
This article explains VIPRE Endpoint Server site properties that you can configure. Be sure to review the options for these settings before deploying agents for the first time.
Site Properties have configurable settings for many areas including remote credentials for agent installation, email server settings, site proxy, advanced database configuration, and adding administrators for console access.
Accessing Site Properties
To open the Site Properties or Site Configuration Wizard:
- From the Site Navigator in the Admin Console, right-click on your desired site and select one of the following
-
Properties: select to open the VIPRE Site Properties
or - Site Configuration Wizard: select to open the Site Configuration Wizard
-
Properties: select to open the VIPRE Site Properties
The remaining sections within this article describe the screens and options within each.
Review the Site Properties menu options
Here is a list of the left-pane menu options presented in the Site Properties view. It is important to configure your site(s) before installing Agents.
- Registration: register your copy of VIPRE, view information about your license, and view your license status. You can also purchase a license or update your existing license.
- Unprotected Computer Discovery: manage settings for discovery unprotected computers and checking saved credentials to see if the agent could be pushed to the found computer.
- Agent Software: select the appropriate agent software for your site.
- Agent Installation: assign one or more credentials for administrative access rights to the machines, which is used for installing agents. At least one credential is required prior to installing an agent. Credentials are not applicable if you are running an installer package.
- Roaming Agent Installation: configure the settings that apply to agents that will reside on machines that are not always connected to your internal network.
- Auto Policy Assignment: settings that control the automatic assignment of a policy to new agent installs.
- Updates: manage the updates for the site.
- Email Server Settings: set up the email server and authentication for all notifications under this site. You can enter recipients to receive alerts that address issues with the VIPRE Site Service. You can set specific email alerts for scanning, Email Protection, and Active Protection from the Policy Properties.
- Proxy Settings: configure the Site's Proxy Settings if your site requires a proxy to reach the Internet.
- Firewall Templates: create templates that contain a set of firewall configurations that you later apply to agents at the Policy level.
- User Administration: optionally, add additional users to access the site and control the access they have to it and its policies.
- Advanced Settings: optionally, change the data repository location, set site service for agent interaction, and set database retention. Also, you can change the database VIPRE uses.
Configure remote credentials for agent installation
A "remote credential" is the administrative access to the machines for installing agents, which consists of a user name, password, and domain. At least one credential is required prior to installing an agent. Credentials are not applicable if you are running an installer package.
To configure a remote credential for agent installation:
- In the Site Properties, open the Agent Installation screen.
- Click Add; the Agent Query and Installation dialog box displays.
- Enter the Administrative access credentials and click OK. The credential displays in the table.
-
Optional:
- Prioritize the credentials in the order that you want them to be used during an Agent installation with the Move up and Move down buttons.
- To not use a credential, unselect the checkbox in the "Use" column for the corresponding credential.
- To modify a credential, select the credential and click Edit.
- To no longer use a credential, select the credential and click Remove.
- Click Apply to accept changes.
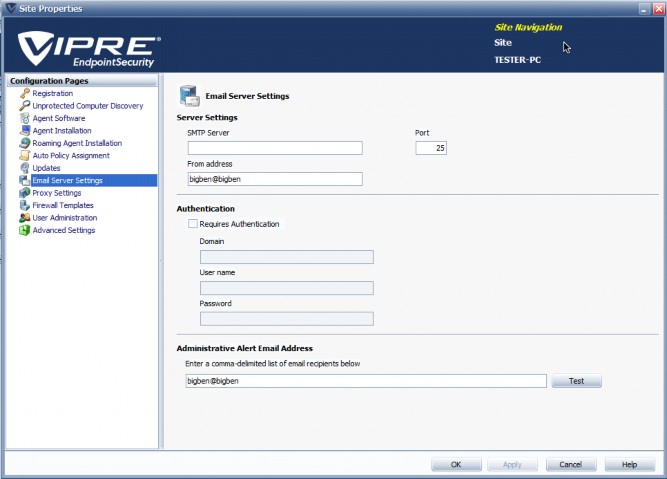
Configure email server settings
Configure Email Server Settings to set up the email server and authentication for all email alerts and emailed reports under this site. Email messages include administrative alerts from VSS, agent-related alerts, which are sent at the policy level, and weekly health reports when enabled.
To configure email server settings:
- From the left pane of Site Properties screen, click Email Server Settings.
- Configure the following Server Settings:
- SMTP Server: key in the Fully Qualified Domain Name (FQDN) or IP Address of the SMTP server. This is typically an Exchange server or an IIS server residing on the network.
- Port: key in the port that is used for email transactions. In most cases, the port is 25.
- From address: enter a “From:” address within your domain to make VIPRE email alerts appear as internal email.
- If required, select the Requires Authentication checkbox and enter the Domain, Username, and Password.
- To receive administrative alerts from VSS, enter one or more recipients separated by a comma.
- Click Test to test the email server settings you just entered.
- Click Apply to save settings.
- To receive agent-related alerts, including alerts for Scanning, Active Protection, and Email Protection, configure the Email Alerts in the Policy Properties.
Configure site proxy
Configure the Site's Proxy Settings if your site requires a proxy to reach the Internet.
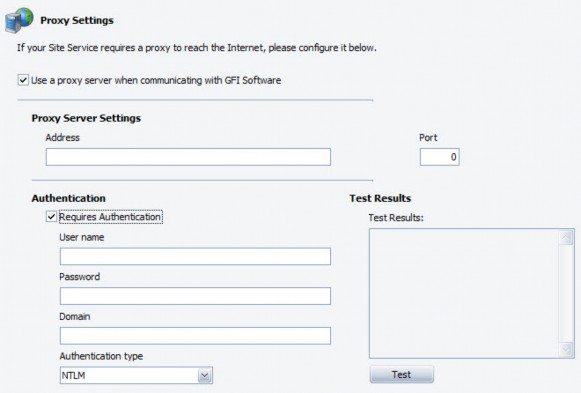
To configure a Site's proxy settings:
- Open the site's Proxy Settings screen (Site Properties > Proxy Settings).
- Select Use a proxy server when communicating with VIPRE Security to enable the Site's proxy settings.
- In the Address box, enter the Fully Qualified Domain Name (FQDN) of the proxy server. The Proxy's IP Address is not recommended.
- Enter the Port, which is typically port 8080.
- If you are using authentication for the proxy, select the Requires authentication checkbox and specify a Username, Password, and Domain, as applicable.
- Set the Authentication type for your proxy by selecting one of the following: NTLM, BASIC, or DIGEST. The common type is NTLM and is used by ISA servers.
- Click Test to test the proxy settings you just entered.
- Click Apply to save changes.
Site Properties: Advanced Settings
The Advanced Settings screen (Site Properties > Advanced Settings) is used to change the data repository location, set site service for agent interaction, and set database retention. VIPRE data include the internal database, threat definitions, agent installation software, diagnostic data, and other data for product operation.
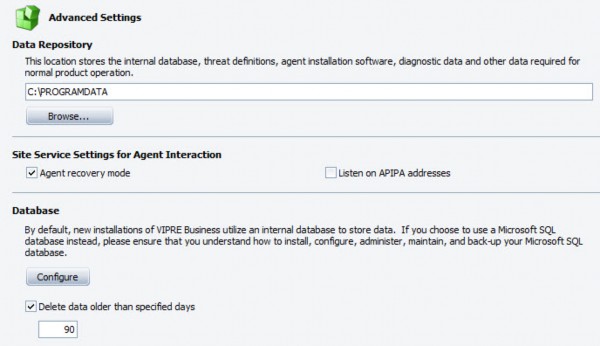
Data Repository
Optionally, select a location on a local drive to automatically backup VIPRE data. VIPRE assigns a default location automatically.
Important! Mapped drives are NOT supported. You MUST save to a local drive only.
Site Service Settings for Agent Interaction
- Agent recovery mode: Select to allow the VIPRE Site Service to accept agents without a secure authentication ID. When the agent calls in, it will be told that it needs to re-establish authentication and get added back into the agent catalog. This is useful if you are migrating agents from one VIPRE Site Service to another. If this option is not selected and the VIPRE Site Service does not have an agent in the catalog, then the call will be rejected.
- Listen on APIPA (Automatic Private IP Addressing) addresses: The VIPRE Site Service uses Dynamic Host Configuration Protocol (DHCP) to get an IP address; if no DHCP is available, an IP address is randomly selected from a range of addresses. Selecting this option will cause the VIPRE Site Service to answer on APIPA assigned IP addresses.
Database
VIPRE uses an internal database to store data. By default, data is automatically purged after 90 days.
- Configure: (Experienced SQL Database Administrators ONLY) Click to configure a Microsoft SQL Database, which will override VIPRE's default built-in database.
- Delete data older than specified days: Select to automatically delete data that is older than the number of days that you specify. Unselect to allow data to be stored until storage space runs out (not recommended). Values for the selection can be set between 1 and 365 days. This setting is selected by default and is set at 90 days. The deleted data does not include quarantined items.
Advanced database configuration
For organizations with over 500 agents, we recommend using Microsoft SQL Express or Microsoft SQL Server.
Important! If you install Agents using VIPRE's built-in database and then later switch to a different database, any configurations made to the Site Properties or Policies are NOT transferable. If you have already installed agents, upon switching databases those agents will be automatically added to the Agent Catalog and will be assigned under the Default Policy with the Default settings. You will need to reconfigure policies.
- In the Admin Console, open Site Properties > Advanced Settings.
- Under the Database area, click Configure.
 The Database Selector dialog box displays.
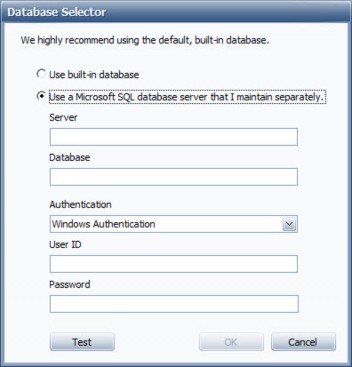
- Select Use a Microsoft SQL database server that I maintain separately and enter the following:
- Enter the Server domain name or IP address of the SQL server.
- Enter the Database or Instance name that will be used as the VIPRE Database. Under Authentication, select one of the following:
- Windows Authentication SQL Server Authentication
- Enter the User ID and Password for the database.
- Click Test to verify the data is entered correctly. If the test fails, please recheck entries.
- Click OK. If a new database is being created, it may take several minutes. If you are assigning an existing VIPRE database, all data will be accessible via the Admin Console.
Add administrators for console access
By default, Admin Console security is set to full access for the domain and local administrators on the respective site. Optionally, you can add additional users to access the site and control the access they have to it and its policies.
To add an administrator to access the console:
- From the Site Properties, open the User Administration screen.
- Click Add User and select a user from the list.

- Click OK. The new user displays in the "Users" area.
- Under the User Access Levels area:
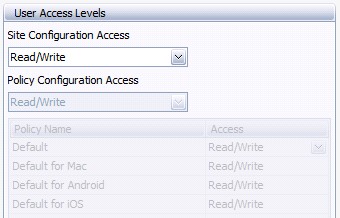
- Assign the Site Configuration Access.
- Assign the Policy Configuration Access for each applicable policy.
- To add additional users, repeat Steps 3-4.
- Click Apply or OK to save changes.