
In this section, you will find information on configuring policies for agents running on Mac operating systems.
Configure User Interaction
The User Interaction screen is used to configure how the end-user interacts with an agent.
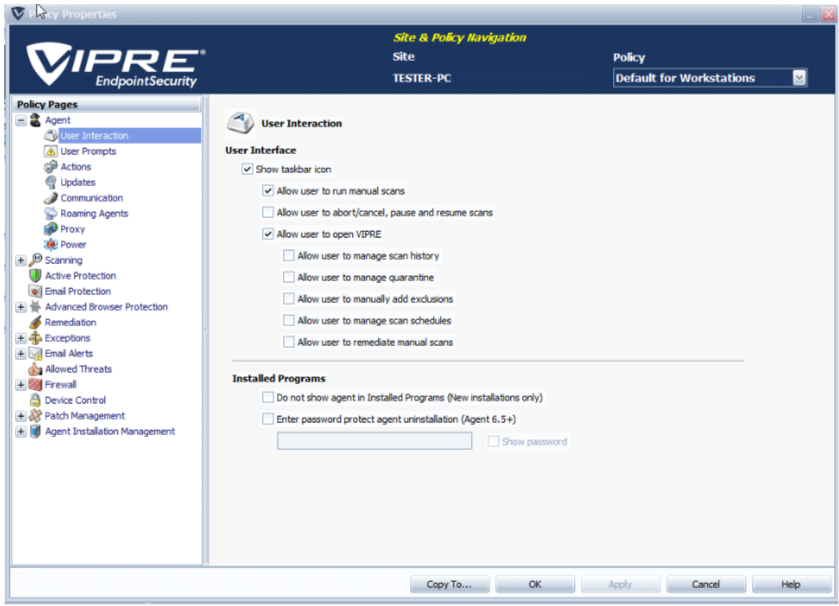
To configure user interaction settings:
- From Site Navigator, double-click the Mac policy you want to configure.
- From the left pane of the Policy Properties screen, expand Agent and click User Interaction.
- From the right pane, select the Show taskbar icon. This displays the agent icon on the end-users' taskbar, through which the user can run agent commands if allowed by the controlling policy.
- Click Apply and OK.
Agent operating system and data retention
The Actions screen is used to configure data retention settings for quarantine and scan history data.

To configure data retention settings:
- From Site Navigator, double-click the Mac policy you want to configure.
- From the left pane of the Policy Properties screen, expand Agent and click Actions.
- To automatically delete quarantined items, based on a schedule, select Delete items from quarantine that are older than in days. Key in the number of days that have to pass before quarantine items are deleted.
- To automatically delete scan history logs, based on a schedule, select Delete items in scan history that are older than in days. Key in the number of days that have to pass before scan history logs are deleted.
- Click Apply and OK.
Agent updates
The Updates screen enables you to configure the time when agents check for definition updates as well as turn on/off pre-scan update checks. This helps you manage network bandwidth utilization as well as system performance for all the agents in your network. If a significant number of agents attempt to check for and download updates at the same time, network performance depreciates.
VIPRE recommends using different time intervals for different policies.

To configure updates settings:
- From Site Navigator, double-click the Mac policy you want to configure.
- From the left pane of the Policy Properties screen, expand Agent and click Updates.
- To enable/disable automatic definition updates, select/unselect Check for definitions updates periodicity in hours. Key in the time interval in hours.
- To disable automatic pre-scan checking for definition updates, select Disable automatic definitions updates before scans.
- Click Apply and OK.
Agent Communication
The Communication screen enables you to control how agents communicate with the VIPRE Site Service (VSS). The default settings are suitable for environments that consist of 100 to 400 agents, including agents running on laptops. Larger environments of around 500+ agents may require adjustments to these defaults.
Modify agent communication intervals only if it becomes necessary.
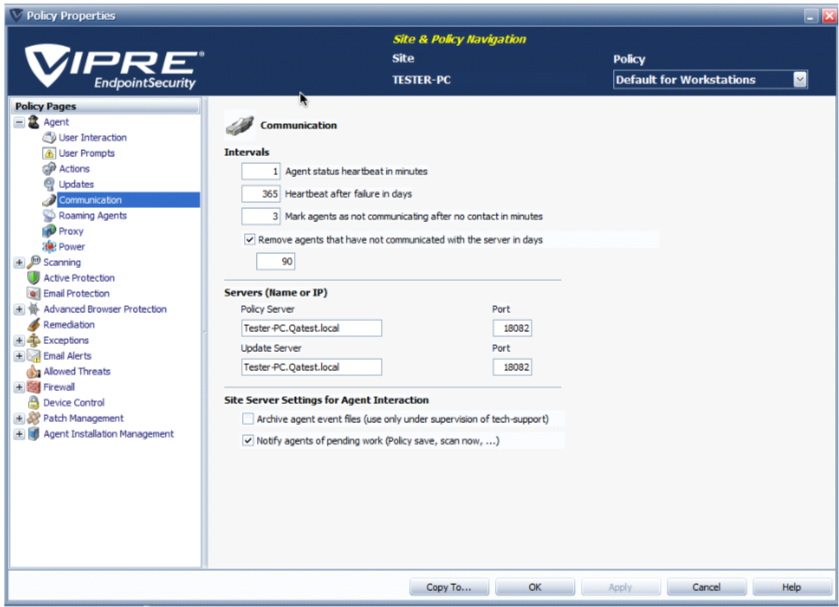
To configure communication settings:
- From Site Navigator, double click the Mac policy you want to configure.
- From the left pane of the Policy Properties screen, expand Agent and click Communication.
- Configure the following agent Intervals:
- Agent status heartbeat in minutes: determines how often the agent calls into VSS, primarily to verify that the agent is working. Particular information passed through the communication includes agent, threat database and Operating System versions, IP address, and agent status. The default is 5 minutes and works well for 100 agents or less. Larger organizations can put a greater load on VSS and may require 15-60 minutes or more. The heartbeat is adjustable between 1 and 10,080 minutes (1 week)
- Heartbeat after failure in days: if the heartbeat fails, the agent will continue attempting communication with VSS for this number of days. After the number of days, communication attempts will cease, resulting in the agent not completing any of its scheduled scans, and disabling Active Protection. If the agent is able to communicate with the server at any time prior to the set period, the Agent will reset its counter. If the agent has gone dormant, every time it's restarted, as, during a reboot, it will try to communicate with the server once. If that heartbeat then fails again, the agent will go dormant again. If communication is successful, the agent will reset its counter and continue its scheduled communications The default setting is 365 days. The setting is adjustable from 1 to 365 days.
- Mark agents inactive after no contact in minutes: set the length of time an agent is quiet prior to being marked inactive by VSS.
- The default value is 30 minutes. The length of time can be set between 0 and 10080 minutes. The recommended length of time is three times the longest heartbeat interval
- Retry authentication in days: only applies if the Agent Recovery Mode in the Advanced Site Settings is turned off. If an agent can successfully say Hello but fails authentication, the agent will be told to reinitialize. The agent will retry to authenticate for the specified period, after which it will go dormant. Every time the agent is restarted, it will try one heartbeat before going dormant again. The default setting is 7 days. This setting is adjustable from 1-7 days.
- (Optional) An agent can be configured to automatically uninstall itself from the host if there is no communication with the VIPRE Site Service (VSS) for a set number of days. To enable this feature, select Remove agents that have not communicated with the server in days, or Remove agents that have been shut down for more than in days, and key in the number of days that have to pass before the agent is automatically uninstalled.
- Configure the following Server settings:
- In the Policy Server field, key in the machine Name or IP address of the VIPRE server that distributes policy updates to the agents managed by this policy.
- In the Port field, key in the TCP port that the VIPRE Site Service uses to receive agent requests and security information.
- Configure Site Server Settings for Agent Interaction:
-
Archive agent event files: (Use this setting only under the direction of VIPRE Technical Support)
scanning and Active Protection reports coming from an agent are stored in the "Incoming XML" folder. The information is then stripped out of the XML and stored in a database, and the XML file deleted. Selecting this option moves the XML file into the "ProcessedXML" folder where the file is stored until deleted manually. Storing this file is useful only for debugging and is best when working with Technical Support. -
Notify agents of pending work:
when you make a change to a policy, VSS stores the information in a deferred work queue. Agents get that information during their next scheduled communication. Selecting this option causes the VIPRE Site Service to contact the agent and tell them to do a heartbeat and get the information prior to the scheduled time.
- Click Apply and OK.
Scan Settings
Configuring General Scan Settings
The Scan Settings screen enables you to randomize scheduled scans start time. This is used to manage the VIPRE host performance. Since scans start at different times, VIPRE's performance is not affected by polling multiple sources simultaneously.

To configure scan settings:
- From Site Navigator, double-click the Mac policy you want to configure.
- From the left pane of the Policy Properties screen, expand Scanning and click Settings.
- Key in the time interval (for example, 60 minutes). This indicates that scheduled scans will start at random intervals of 60 minutes.
- Click Apply and OK.
Full Scan Settings
Use the Full Scan screen to configure thorough scanning options such as scan priorities, locations, and additional scan items.
To configure full scan settings:
- From Site Navigator, double-click the Mac policy you want to configure.
- From the left pane of the Policy Properties screen, expand Scanning and click Full Scan.
To configure full scan scheduling:
- Select Enable to turn on scan scheduling.
- In the Scanning Start Time field, key in the time you want scans to start.
Scan start times are randomized according to General Scan Settings. - In the Re-scan periodicity in hours field, key in the time interval (in hours) between scans.
- In the Repeat Scans Until field, key in the latest possible scan start time.
This does not affect scans in progress. Running scans continue until completed. - Select the days of the week when you want agents to run security scans.
- From the Scan priority drop-down, select one of the following options:
- Lowest: Set the priority to Lowest if you are going to be running the scans in the middle of the day. Windows will run other programs that are requesting to run before the scan. This should reduce the impact of end-user performance when a scan runs during working hours
- Normal: Set the priority to Normal when scanning at night or on multi-core machines where scanning at a higher priority won’t affect user performance
- Highest: Set the priority to Highest when it is important to have the scan run as quickly as possible, even if the end-user is actively using the computer.
- From the Locations section, select the location that VIPREthoroughly checks for security threats. Select from:
- Common threat locations: select for the scan to include the root of the drive, the program files directory, the system directory, etc
- System drive only: select for the scan to include the main drive (C:) only
- Internal drives only: select for the scan to include internal drives only. This selection excludes USB, FireWire, and other external drives
- All local drives: select for the scan to include all internal drives, partitions, plus any attached USB, FireWire, or other external devices
- None: select for the scan to focus on only the selection(s) in the Options area. When selected, no drive or folder will receive scans.
- From the Options section, select any the following optional scan items:
- Processes: select for the scan to include all running processes (applications)
- Archives: select for the scan to include archive files (such as .RAR or .ZIP). If a .RAR file is found to contain an infected file, the .RAR file will be quarantined. If a .ZIP file is found to contain an infected file, the infected file is quarantined and replaced by a .TXT file with text indicating that it was infected and that it has been quarantined.
- Click Apply and OK.
Remediation Settings
Configure how the results of scans are cleaned (remediated). Assign actions according to threat types, such as Adware, Viruses, Worms, and so forth. Actions include allow, report only, quarantine, and delete.

To configure remediation settings:
- From Site Navigator, double-click the Mac policy you want to configure.
- From the left pane of the Policy Properties screen, click Remediation.
- From the threats list, select a treat type or sub-type.
- From the Category Remediation Level section, assign an action to the selected threat. When the selected treat type or sub-type is detected, one of the following actions is performed:
Allow: the threat is allowed to run on the machine. Threats with Allow remediation assigned cannot be tracked in reports
Report Only: the threat is allowed to run and can be tracked in reports
Quarantine: the threat is placed in quarantine, which resides on the agent machine
Delete: the threat is completely removed from the agent machine and unrecoverable.
- Click Apply and OK.
Exceptions Settings
Adding Blocked Items
The Always Blocked screen is used to add Files, Paths, and Folders that you consider as threats to your environment. Blocked items can be any file type you require. For example, File.txt, File.exe, File.bat, File.csv, and more. When an item from the Always Blocked list is detected, it is treated as a known threat and the pre-configured remediation action is performed on it.

To add always blocked items:
- From Site Navigator, double-click the Mac policy you want to configure.
- From the left pane of the Policy Properties screen, expand Exceptions and click Always Blocked.
- To add items to the list, click Add... and select one of the following file or folder types you want to add:
- Add File: key in a file name including the file extension. Click OK and repeat this step to add more files. This ensures that the file is blocked, even if it is found in multiple locations on the computer
- Add File with Path: key in a path and file name including the file extension. Click OK and repeat this step to add more files including the path. If multiple files with the same name exist in different locations on your computer, only the one in the specified path is blocked
- Add Folder: key in a folder path including folder name. Click OK and repeat this step to add more folders. This ensures that the contents of the specified folder are blocked during security scans.
- Note! Wildcards (* and ?) are supported for Exclusions only.
- To remove files or folders from the list, select one or more items using the Ctrl + Shift keys and click Remove.
- Click Apply and OK.
Adding Allowed Items
The Exclusions screen enables you to add Files, Paths, and Folders that you want to allow in your environment. Allowed items can be any file type you require. For example, File.txt, File.exe, File.bat, File.csv, and more. Although threat definitions might consider them as security risks, items in the Always Allowed list are ignored during a scan.

To add allowed items
- From Site Navigator, double-click the Mac policy you want to configure.
- From the left pane of the Policy Properties screen, expand Exceptions and click Exclusion.
- To add items to the list, click Add... and select one of the following file or folder types you want to add:
- Add File: key in a file name including the file extension. Click OK and repeat this step to add more files. This ensures that if the specified file exists in multiple locations on the computer, all the files with the same name are allowed
- Add File with Path: key in a path and file name including the file extension. Click OK and repeat this step to add more files including the path. If multiple files with the same name exist in different locations on your computer, only the one in the specified path is allowed
- Add Folder: key in a folder path including the folder name. Click OK and repeat this step to add more folders. This ensures that the contents of the specified folder are allowed during security scans.
- Note! Wildcards (* and ?) are supported for Exclusions only.
- To remove files or folders from the list, select one or more items using the Ctrl + Shift keys then click Remove.
- Click Apply and OK.
Email Alerts
Email Alerts are email messages sent by VSS to recipients that you enter. Configure Email Alerts for Agent events, including Scanning, Active Protection, Email Protection, and Patch Management (VIPRE Premium or Endpoint Security). Email alerts are configured at the policy level.
Tip! Instead of receiving email alerts in real-time, consider using the Report Viewer to schedule a daily Threat Found Detail report. You can set alerts for the most severe risks after a scan and use reports for the rest.
To configure email alerts for threat detections by Scanning:
- Ensure that the Site's Email Server Settings are configured.
- In the Policy Properties, open Email Alerts>Scanning.
- Click Add. The Scanning Threat Detection Email Alert dialog box displays.

- Enter a recipient's email address.
- From the Severity drop-down box, select a risk level. When the severity or higher that you select is detected during a scan, an email is sent with the details to recipients on the list.
- Click OK. The email address displays in the list.
- To edit an email alert recipient, select an email address and then click Edit to make your desired changes.
- To remove an email alert recipient, select an email address and then click Remove.
To configure email alerts for Active Protection:
- Move an email alert recipient, select an email address and then click Remove.
To configure email alerts for Email Protection:
- Ensure that the Site's Email Server Settings are configured.
- In the Policy Properties, open Email Alerts>Email Protection.
- Click Add. The Email Protection Email Alert dialog box displays.

- Click OK. The email address displays in the list. When Email Protection detects malware in an email, recipients on the list will receive an alert with the details.
- To edit an email alert recipient, select an email address and then click Edit to make your desired changes.
- To remove an email alert recipient, select an email address and then click Remove.
Allowed Threats Settings
VIPRE may detect items that you consider non-threatening in your network and therefore you would want to allow to run. For example, Virtual Network Computing (VNC) and Remote Administrator (Radmin) may both be considered acceptable for use in your organization but may be considered threats in another organization. Allowing a threat enables you to specify these items to be ignored during scans.
To add an allowed threat:
- Navigate to a Site>Quarantine tab or Policy>Quarantine tab.
Or:
Navigate to Protected Computers>Agent Details>Scan History tab. - Right-click on a threat, and select Allow Threat.
The Allow Threat window displays. - Select the policies on which this threat should be allowed.
- Click OK.
The allowed threat now displays in the Allowed Threats list for the policies you selected (Policy Properties>Allowed Threats).