
Information on configuring policies for Patch Management is presented in this article.
With Patch Management enabled, agents automatically detect software applications that are installed on the endpoints on which they reside. These applications are listed under the Manage Patches by Product screen, which enables you to manage patches for individual applications that were detected on the agent machines pertaining to the selected policy.
Manage Patches per Product
By default, patches are managed by the product. This means that missing and installed patches are grouped under one product name and several patches can be managed at once. For in-depth management of software patches, VIPRE also enables you to Manage Patches Individually.
To manage patches per product:
- From Site Navigator, double-click the policy name you want to configure.
- From the left pane of the Policy Properties screen, click Patch Management.
- From the applications list, select the applications you want to patch.
- Click Scan Now to scan the agents for new missing patches and update the software list.
- Click Install Now to start installing the selected missing patches.
- Tip! To check patch installation progress, go to the Protected Computers tab and ensure that the agent Status is Installing Patches.
- (Optional) Select Turn on automatic Windows Updates, to allow VIPRE to manage missing Windows Updates.
- Click Apply to accept changes.
Manage Patches Individually
You can configure Patch Management to allow you to manage patches individually. The Manage Patches Individually view allows you to select individual patches to ensure that only necessary updates are applied to unpatched applications. This view also provides you with the number of computers that have missing, installed, or not required patches as well as the computer names for each.
To switch from managing patches per product to managing patches individually:
- From Site Navigator, double-click the policy name you want to configure.
- From the left pane of the Policy Properties screen, click Patch Management.
- From the bottom of the right pane, click Manage patches individually instead of by product.
- To switch back to Manage by Product view, click Manage patches by product instead of individually.
To manage patches individually:
- Select Approve all patches that are currently missing, to automatically approve patches listed in this view.
Important! Only select this option if you are sure that the listed patches belong to trusted applications and come from genuine sources. If enabled, approve patches may install automatically. - (Optional) To view patches that were previously approved for installation, select Show previously approved patches.
- Click Scan Now to start scanning agents for missing patches.
- Click Install Now to start installing approved patches on agents managed by this policy.
Tip! To check patch installation progress, go to the Protected Computers tab, and ensure that the agent Status is Installing Patches.
- (Optional) Select Turn on automatic Windows Updates, to allow VIPRE to manage missing Windows Updates.
- Click Apply to accept changes.
Schedule Patch Scanning and Installation
Patch Scheduling enables you to set a specific time when VIPRE scans agent machines for missing patches, as well as when missing patches can be installed.
To schedule patch scanning and installation:
- From Site Navigator, double-click the policy name you want to configure.
- From the left pane of the Policy Properties screen, expand Patch Management and click Patch Scheduling.
- Make your Patch Scanning selections.

- Select Enabled to turn on patch scanning for this policy.
- Enter a time for VIPRE to start the patch scanning on the agent machines.
- Select a scanning interval:
- Weekly: select the days of the week when the scanning occurs.

- Monthly: select a day of the month when the scanning occurs.

- Weekly: select the days of the week when the scanning occurs.
- Make your Patch Installation selections.
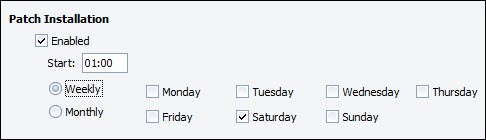
- Select Enabled to turn on patch installation for this policy.
- Enter a time for VIPRE to start the patch scanning on the agent machines.
- Select an interval for installation:
- Weekly: select the days of the week when patch installation occurs.
- Monthly: select a day of the month when patch installation occurs.
- Click Apply to accept changes.