
Configure scan settings for agent endpoints, including both manual and automated scans and specific remediation actions based on the type of threats discovered.
Agent Scanning
Agent scan settings must be configured at the policy level. These settings include on-demand scanning, scanning USB devices, and start-up scanning.
To configure agent scan settings:
- From Site Navigator double-click the policy that you want to configure.
- In Policy Properties, expand Scanning and click Settings.
-
On-Demand Scanning:
- Allow user to scan files and folders via a right-click menu option in Windows Explorer: once selected and applied, this feature is available after the Agent picks up the updated policy.
-
USB Devices:
-
Scan USB drives upon insertion: unselect this to turn off USB drive scanning. When selected and a scan is in progress, the USB drive performs your selected action below:
- Do not perform USB scan if another scan is already in progress: if a scan is in progress, the USB device will not be scanned on insertion. The user will have to scan the device manually.
- Interrupt active scan for USB scan: if a scan is in progress, it will be canceled, and then the USB device will be scanned. The interrupted scan will need to be run again manually by the user or the Administrator or picked up automatically by a scheduled scan.
-
Scan USB drives upon insertion: unselect this to turn off USB drive scanning. When selected and a scan is in progress, the USB drive performs your selected action below:
-
On-Demand Scanning:
-
Scan Start-Up:
-
Randomize scheduled scan start times in minutes: this randomizer setting allows you to manage update server traffic when Agents check for threat definitions updates before running a scan. This setting matters when the "Disable automatic definitions updates before scans" setting is unselected AND you have a large number of Agents.
Enter a number of minutes based on how many agents you have assigned to the policy. Agents will pick a random time to check for updates during the number of minutes entered. The default setting is 5 minutes, which is sufficient for most environments. You can enter between 0-180 minutes.-
Missed scan options at start-up:
- Do not perform the quick scan: select to turn off makeup missed scans on startup.
- Prompt user to perform quick scan: select this option so that if a scheduled scan is missed, the end-user will be prompted to perform a scan at their convenience.
- Perform quick scan after start-up in minutes: select this option so that if a scheduled scan is missed, the machine will perform a quick scan at the entered interval, once it is online. The default setting is 5 minutes. You can enter between 1 and 60 minutes.
-
Missed scan options at start-up:
-
Randomize scheduled scan start times in minutes: this randomizer setting allows you to manage update server traffic when Agents check for threat definitions updates before running a scan. This setting matters when the "Disable automatic definitions updates before scans" setting is unselected AND you have a large number of Agents.
- Click Apply to save settings.
Automatic Scan
A Quick Scan typically focuses on the most vulnerable areas, while a Full Scan is a more thorough scan of the agent workstation. You may also choose to run a Custom Scan which allows you to specify exact scan locations. You configure how comprehensive a scan will be.
Important! Before scheduling a scan, ensure that the setting "Allow user to manage scan schedules", on the Agent User Interaction screen is unselected.
Schedule One Scan per Day
- From Site Navigator, double-click the policy that you want to configure.
- Expand Scanning and select Full Scan, Custom Scan, or Quick Scan.
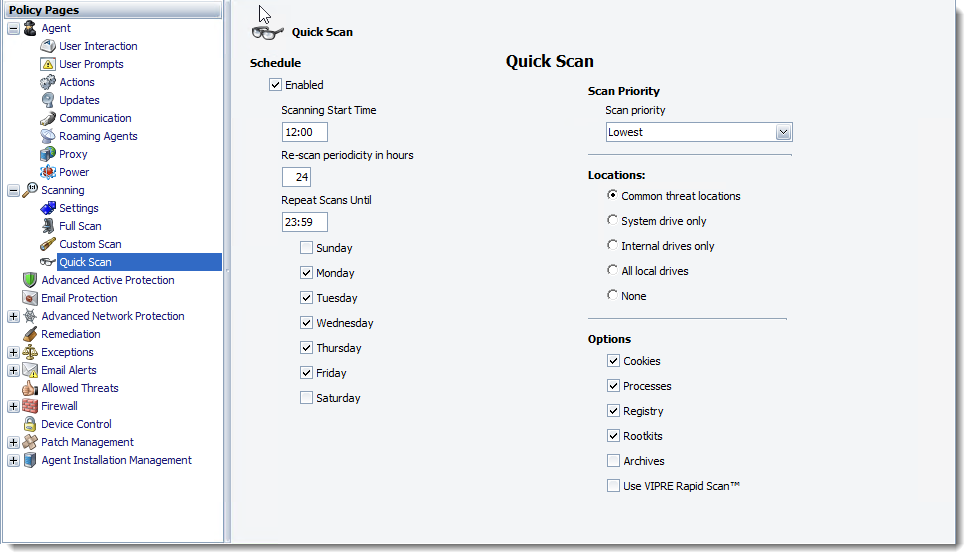
- For Full Scan or Quick Scan, select Enabled under Schedule then skip ahead to Step 5.
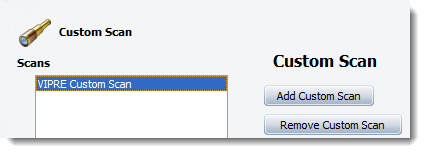
- For Custom Scan, click Add Custom Scan.
- Name your custom scan and click Save.
- In the Scans section, select the custom scan you just created.
- Select Enabled under Schedule and continue to Step 5.
- Enter a Scanning Start Time. For example, "21:00."
- Enter a "zero" (0) for Re-scan periodicity in hours.
- By entering a zero, the "Repeat Scans Until" field is ignored, thereby only one scan will occur for the selected day(s).
- Select one or more days.
- Select the Scan Priority, Locations, and Options as described in the Screen Descriptions area below.
- Click Apply to accept changes.
Schedule Multiple Scans in One Day
Best Practice! It is a best practice to only schedule multiple Quick Scans on the same day. If you intend to run multiple Full Scans on the same day, take into account how long the full scan will run to avoid potential issues, especially a case where scans are running constantly on a machine. Poor system performance could result on the agent machine.
- From Site Navigator, double-click the policy that you want to configure.
- From Policy Properties, expand Scanning and select Full Scan, Quick Scan, or Custom Scan.
- Select Enabled.
- Enter a Scanning Start Time. For example, "21:00."
- Under Re-scan periodicity in hours, enter a number between 1 and 23. The scan will run after this number of hours.
- For example, If you enter 09:00 for the "Scanning Start Time" and 2 for the "Repeat every," your agents will run the requested scan at 9 a.m. and every 2 hours after that until the "Repeat Scans Until" time is reached.
- If a scan is already in progress at the time a scheduled scan is to start, the scheduled scan will begin after the current scan completes.
Recommended Scanning
If agent workstations are always powered on, the scheduled scans should run as indicated below. The "Default" is what is set in the Default Policy, and "Optional" is a best practice under slower network conditions.
-
Quick Scan:
- Default: 7 days per week at noon.
- Optional: 7 days per week during non-business operational hours.
-
Full Scan:
- Default: 7 days per week at 9:00 p.m. (21:00).
- Optional: 7 days per week during non-business hours, when possible, and after nightly backups.
For environments where agent workstations can only be scanned during working hours, the scheduled scans should be run as follows:
- Quick Scan: daily during lunchtime and set the quick scan to run at a low priority during working hours.
- Full Scan: during lunchtime on one or more days that scanning least impacts employee productivity. Set the full scan to run at a low priority during working hours.
Screen Descriptions
Scan Priority:
Select one of the following priority options:
- Lowest: Set the priority to Lowest if you are going to be running the scans in the middle of the day. Windows will run other programs that are requesting to run before the scan. This should reduce the impact of end-user performance when a scan runs during working hours.
- Normal: Set the priority to Normal when scanning at night or on multi-core machines where scanning at a higher priority won’t affect user performance.
- Highest: Set the priority to Highest when it is important to have the scan run as quickly as possible, even if the end-user is actively using the computer.
Locations:
The fields in this area set where on the workstations the scan will take place. You can select specific drives or none at all and instead focus on key areas on the machine which you select in the Options area.
- Common threat locations: select for the scan to include the root of the drive, the program files directory, the system directory, and so forth
- System drive only: select for the scan to include the main drive (C:) only.
- Internal drives only: select for the scan to include internal drives only. This selection excludes USB, FireWire, and other external drives.
- All local drives: select for the scan to include all internal drives, partitions, plus any attached USB, FireWire, or other external devices.
- None: select for the scan to focus on only the selection(s) in the Options area. When selected, no drive or folder will receive scans.
When creating a Custom Scan, use the Add, Edit and Remove buttons to specify exact locations you wish to scan (such as c:\Windows, d:\external\backup, etc.).

Options
You can scan common threat types, the registry, cookies, and/or processes, of which are all separate from full drives and directories that are selected in the Locations area.
- Cookies: deselect for the scan to exclude cookies. This will prevent cookies from appearing in your reports if they may not be of large concern to you.
- Processes: select for the scan to include all running processes (applications).
- Registry: select for the scan to include the workstation's registry. Deselect if you want to scan only files, directories, or some other specific scan type without the registry being included in the scan.
- Rootkits: select for the scan to include rootkits.
- Archives: select for the scan to include archive files (such as .RAR or .ZIP). If a .RAR file is found to contain an infected file, the .RAR file will be quarantined. If a .ZIP file is found to contain an infected file, the infected file is quarantined and replaced by a .TXT file with text indicating that it was infected and that it has been quarantined.
- Use VIPRE RapidScan: select to enable previously scanned files to be checked much faster on subsequent scans. By keeping track of items already scanned, RapidScan quickly scans only files that have changed since the previous RapidScan, allowing for very quick successive scans. When a previously checked file is modified, RapidScan will re-scan it.
Quarantine and Unquarantine on Hyper-V Virtual Machines
In order to quarantine a threat found via a Hyper-V agent scan, the guest computer must be rebooted by the VIPRE Hyper-V agent. When a threat is to be quarantined either automatically or because a user has triggered it, the guest agent status is set to “Needs Reboot”. Clicking on “Needs Reboot” triggers the reboot and the threat is quarantined.
In order to unquarantine a file found during a scan, the guest computer must be rebooted by the Hyper-V agent. When the user selects a file for unquarantine, the guest agent status is set to “Needs Reboot”.
Clicking on “Needs Reboot” results in the Hyper-V agent rebooting the guest computer and restoring the file from quarantine.
Important! The reboot must be performed by the Hyper-V agent. Rebooting the guest computer by other means does not result in the threat being unquarantined.
Scanning Agent Workstations
After agents are installed on workstations, they will be scanned based on the schedule configured in the policy's Scanning settings.
To scan an agent workstation:
- From the policy's agents screen, right-click on the agent and select Scanning>Full Scan or Quick Scan.
- Select either a Quick or Full Scan and click OK.
You can select more than one agent to scan. Manual scans initiated from the Console do not use the RapidScan setting, even if it is enabled in the policy.
Scanning Hyper-V VMs
Reboot to remove malware
When a threat is detected during VIPRE Hyper-V agent scanning, the guest computer must be rebooted by the Hyper-V agent. The guest computer status on the Protected Computers tab is listed as “Needs Reboot”. Clicking “Needs Reboot” causes the guest computer to be rebooted.
Important! The reboot must be initiated by the VIPRE Hyper-V agent in order to remediate the threat. The threat remains on the guest computer until the reboot happens.