
This article covers agent policy settings intended for use with Microsoft Windows operating systems.
Configure User Interaction Settings
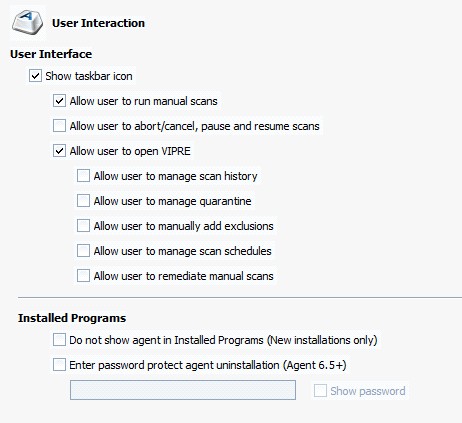
User Interaction refers to how the end-user can interact and control specific functionality in the Agent.
To configure user control of Agent interface:
- Open the User Interaction screen (Policy Properties>Agent>User Interaction)
- Configure the User Interface settings:
- Show taskbar icon: select to place the VIPRE icon in the system tray of end-user machines. With this option enabled, users are able to open the agent UI as well as perform various tasks that can be enabled/disabled by policy settings, as listed below. With this option unselected, end-users will have no access to the agent UI and will be dependent on the settings in the agent's assigned policy
- Allow user to run manual scans: select to enable end-users to manually perform either a quick or a full scan whenever they want. Unselect for agent scans to be dependent on assigned policy
- Allow user to abort/cancel, pause and resume scans: select to enable end-users to abort/cancel, pause, and resume running scans. Unselect to not allow users to have any user-interaction over a scan; as a result, scans may only be stopped from the Admin Console (right-click on the agent and select Scanning>Abort Scan)
- Allow user to manage scan history: select to enable end-users to delete scan, AP, and email histories, and clear system history. Unselect to not allow end-users to delete/clear any history items made by the agent; instead, histories will be cleared based on the settings in the Agent Actions area listed below
- Allow user to manage quarantine: select to enable end-users to restore an item in quarantine and to delete an item from the computer. Unselect to not allow end-users to manage any quarantine items on their computer
- Allow user to manually add exclusions: select to allow end-users to be able to add exclusions to scans that will always be allowed, as well as manage those items. Unselect for the agents to be dependent on Policy level exclusions
- Allow user to manage scan schedules: select to allow end-users to edit their scan schedule. When selected, admin control is locked out of editing this schedule. If the admin turns this on after a user has created their own schedules, then all of those new schedules that the user made will be cleared from the agent. After making this selection and applying the change, "USER MANAGED" will be displayed at the top of the Full Scan, Quick Scan, and Custom Scan screens, as shown below. In addition, the options will be grayed out
- Allow user to remediate manual scans: select to allow end-users to decide the action to take on the results of a scan. Unselect for the agents to be dependent on the Remediation settings
- Optionally, select Do not show agent in Installed Programs for the end-user to be unable to uninstall or modify the program in any way. This MUST be done prior to installing the Agent on the workstation. Otherwise, you'll have to uninstall the agent, select and save this setting, and then reinstall the agent
- Click Apply to save changes
Configure User Prompts and Reboot Options
Configure User Prompts that end-users experience and how Rebooting occurs.

To configure user prompts and rebooting:
- Open the User Prompts screen (Policy Properties>Agent>User Prompts)
- Configure the following:
- Show balloon messages: select to show the balloon popups for the agents under this policy. Unselect to hide the popups
- Reboot Message: use existing or modify the message that the user will see when the machine needs to reboot. The field is limited to 200 characters
- Automatically reboot agent computer if no user reply in seconds: when selected, the machine will reboot automatically after the number of seconds entered if the user
- Click Apply to save changes
Agent Actions
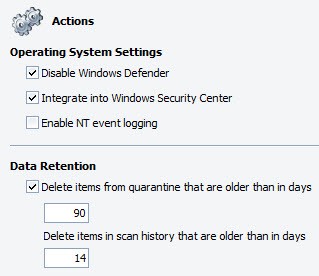
Actions apply to the settings for the agent machine's OS and Data Retention for its Quarantine and Scan History.
To configure agent actions:
- Open the Agent Actions screen (Policy Properties>Agent>Actions).
- Configure the Operating System Settings:
- Disable Windows Defender: if agent machines have Windows Defender installed, it's best to disable it to avoid conflicts.
- Integrate into Windows Security Center: select to integrate into Windows Security Center.
- Configure the Data Retention settings:
- Delete items from quarantine that are older than in days: select to enable the agent to delete items stored in quarantine after a specified number of days ranging from 1 to 365.
- The default setting is 15 days; these items are deleted from quarantine on the agent machine
- Delete items in scan history that are older than in days: enter an interval between 1 and 365 days. The default interval is 14 days
- Delete items from quarantine that are older than in days: select to enable the agent to delete items stored in quarantine after a specified number of days ranging from 1 to 365.
- Click Apply to save changes
Manage updates for policies
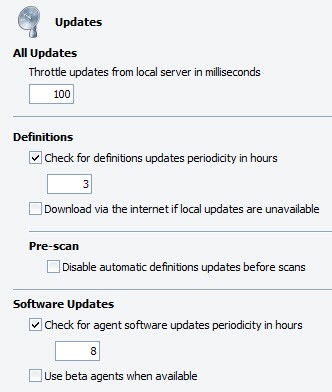
Updates are distributed to machines based on the Agent Updates settings for each Policy. Agent update settings help you manage the impact on network traffic and machine performance when Policies distribute updates to Agents.
To manage the distribution of updates per policy:
- Open the Agent>Updates screen in the Policy Properties for each Policy
- Set Throttle updates from local server in milliseconds to cut down the load on the update server when distributing updates to the machines under the selected policy. The default value for throttling is 100 milliseconds but can be set as high as 60,000 milliseconds (or 1 minute) for networks with extreme bandwidth constraints. The average update chunk size is approximately 67 KB. A general guide:
1 MBPS network: 1000 milliseconds.
10 MBPS network: 200 milliseconds.
100 MBPS network: 50 milliseconds.
1 GBPS network: 20 milliseconds
- Configure automatic Definition Updates for Agents under this policy:
- Select Check for definitions updates periodicity in hours to turn on automatic definition updates and then enter a number in hours for the update interval. The default is to automatically check at 1-hour intervals. The interval values are 1-72 hours. Best set between 1 and 3 hours. The default start time for updates is when the computer first boots up. For example, if the computer boots up at 7:43 a.m. and checks for updates every 3 hours, it will check at 10:43 a.m., 1:43 p.m., 4:43 p.m., and so forth
- The "Disable automatic definitions updates before scans" setting:
- Unselect (recommended) to ensure that the Agent automatically gets the latest definitions before running any type of scan
- Select if Agent machines are older models and run slower, or if the interval for definitions updates is set frequently (1-3 hours)
- Note! This setting should be done in conjunction with the Scan setting "Randomize scheduled scan start times in minutes.
- To have Agents on laptops (or remote users) connect to VIPRE Security over the Internet if the agent fails to contact VSS or the update server, select Download via the Internet if local updates are unavailable. If machines require a Proxy to access the Internet, ensure that you configure Policy proxy settings
You may also specify that all updates come directly from VIPRE Security, instead of an update server
Important! If this option is used for agents over your network, this could put a strain on the WAN.
- Configure Software Updates for Agents under this policy:
- (Recommended) To turn on automatic software updates, select Check for agent software updates periodicity in hours, and then enter a number in hours for the update interval. The default setting is on and at 8 hour intervals. The interval values are 1-72 hours
- To turn off automatic software updates, unselectCheck for agent software updates periodicity in hours
- To participate in Beta releases, select Use beta agents when available. This is best used under policies with a limited number of agents and non-production machines
- Click OK to accept your changes. All changes are applied to the Agents assigned to the Policy the next time the Agent communicates to the Site
Agent communication settings
The Communication screen enables you to control how agents communicate with the VIPRE Site Service (VSS). The default settings are suitable for environments that consist of 100 to 400 agents, including agents running on laptops. Larger environments of around 500+ agents may require adjustments to these defaults.
Note! Modify agent communication intervals only if it becomes necessary.
To manage agent communication intervals with VSS:
- From Site Navigator, double-click the Windows policy you want to configure
- From the left pane of the Policy Properties screen, expand Agent and click Communication
- Configure the following communication Intervals:
-
Agent status heartbeat in minutes
determines how often the agent calls into VSS, primarily to verify that the agent is working. Particular information passed through the communication includes agent, threat database and Operating System versions, IP address, and agent status.
The default is 5 minutes and works well for 100 agents or less. Larger organizations can put a greater load on VSS and may require 15-60 minutes or even more. The heartbeat is adjustable between 1 and 10,080 minutes (1 week). -
Heartbeat after failure in days
if the heartbeat fails, the agent will continue attempting communication with VSS for this number of days. After the number of days, communication attempts will cease, resulting in the agent not completing any of its scheduled scans, and disabling Active Protection. If the agent is able to communicate with the server at any time prior to the set period, the Agent will reset its counter. If the agent has gone dormant, every time it's restarted, as during a reboot, it will try to communicate with the server once. If that heartbeat then fails again, the agent will go dormant again. If communication is successful, the agent will reset its counter and continue its scheduled communications.
The default setting is 365 days. The setting is adjustable from 1 to 365 days. -
Mark agents inactive after no contact in minutes
set the length of time an agent is quiet prior to being marked inactive by VSS.
The default value is 30 minutes. The length of time can be set between 0 and 10080 minutes. The recommended length of time is three times the longest heartbeat interval. -
Retry authentication in days
only applies if the Agent Recovery Mode in the Advanced Site Settings is turned off.
If an agent can successfully say Hello but fails authentication, the agent will be told to reinitialize itself. The agent will retry to authenticate for the specified period, after which it will go dormant. Every time the agent is restarted, it will try one heartbeat before going dormant again. The default setting is 7 days. This setting is adjustable from 1-7 days. -
Remove agents that have not communicated with the server in days
remove agent data from the VIPRE Console if there is no communication between the agent and VSS for a specified number of days. The agent remains installed on the host computer and can be reused if the computer is protected again. -
Remove agents that have been shut down for more than in days
remove agent data from the VIPRE Console if the agent last reported as "shut down" and there is no communication between the agent and VSS for a specified number of days. The agent remains installed on the host computer and can be reused if the computer is protected again.
-
Agent status heartbeat in minutes
- Configure the following Server settings:
- In the Policy Server field, key in the machine Name or IP address of the VIPRE server that distributes policy updates to the agents managed by this policy.
- In the Port field, key in the TCP port that VSS uses to receive agent requests and security information.
- To use VIPRE Security as a (non-local) update server, check Use VIPRE Security as Update Server for definitions and software updates.
Important! Using VIPRE Security as your update server may increase your internet traffic.
- Configure Site Server Settings for Agent Interaction:
Archive agent event files:
Note! This setting is for DEBUGGING WITH TECH SUPPORT ONLY
Scanning and Active Protection reports coming from an agent are stored in the "Incoming XML" folder. The information is then stripped out of the XML and stored in a database, and the XML file deleted. Selecting this option moves the XML file into the "ProcessedXML" folder where the file is stored until deleted manually. Storing this file is useful only for debugging and is best when working with Technical Support.Notify agents of pending work
when you make a change to a policy, VSS stores the information in a deferred work queue. Agents get that information during their next scheduled communication. Selecting this option causes VSS to contact the agent and tell them to do a heartbeat and get the information prior to the scheduled time.
- Click Apply and OK.
Proxy settings for agents
If Agents require a Proxy to reach the Internet for obtaining definitions updates, set the proxy settings at the policy level, which will apply to all agent machines assigned to the policy.

To configure proxy settings for Agents at the Policy level:
- Open the Policy's Proxy Settings screen (Policy Properties>Agent>Proxy Settings).
- Select Use a proxy server when communicating with VIPRE Security to enable the Policy's proxy settings.
- In the Address box, enter the Fully Qualified Domain Name (FQDN) of the proxy server. The Proxy's IP Address is not recommended.
- Enter the Port, which is typically port 8080.
- If you are using authentication for the proxy, select the Requires authentication checkbox and specify a User name, Password, and Domain, as applicable.
- Set the Authentication type for your proxy by selecting one of the following: NTLM, BASIC, or DIGEST. The common type is NTLM and is used by ISA servers.
- Click Apply to save changes.
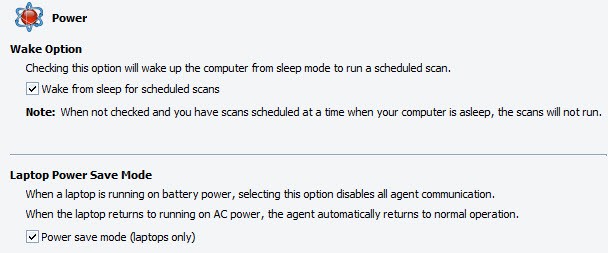
Agent power save settings
The Power settings are used in separate policies to handle laptops in power saver mode. The default settings for laptops running an Agent require that the laptop be powered by AC power (not battery) in order for the Agent to properly receive updates. This feature is incorporated to ensure the agent software can complete the update cycle which could be interrupted due to an unexpected loss of power from a depleted laptop battery.
To configure power save settings:
- In the Policy Properties, open Agent>Communication.
- Modify any of the following default settings accordingly:
- Wake from sleep for scheduled scans: selecting this option will wake up the computer from sleep or hibernate modes to run a scheduled scan. Unselecting this option tells the agent to ignore any scheduled scan while in sleep or hibernate modes. When an agent's computer is using Windows sleep mode and this option is unselected, the computer is at risk of missing important system scans, especially during periods of inactivity. To ensure that the computer is protected, run manual scans or schedule a scan at a likely time that it is not asleep.
- Power save mode (laptops only): when a laptop is running on BATTERY POWER, selecting this option disables the agent from running scheduled scans or checking for updates. However, Active Protection will continue to operate and scans and updates can be run manually. When the laptop returns to running on AC power, the agent automatically returns to normal operation. Unselecting this option will allow an agent to continue checking for updates and running scheduled scans on battery power.
- Click Apply to save changes.
Active Protection settings
Configure the Active Protection (AP) settings for on access protection for all Agents installed under the policy.
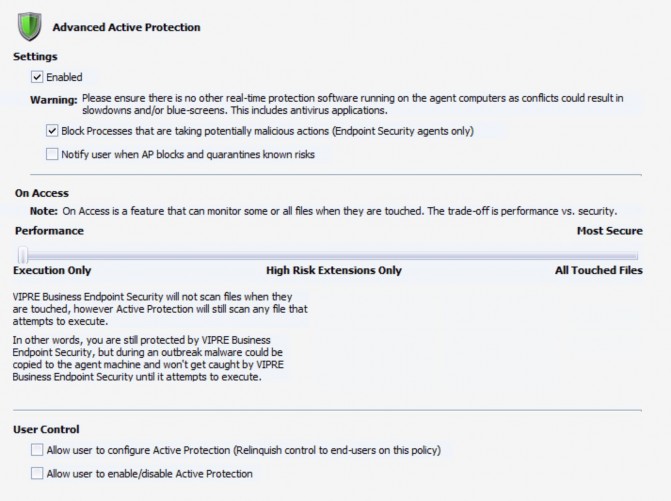
To configure Active Protection settings:
- In the Policy Properties, open Active Protection.
- Select Enabled to turn on AP for agents under this policy.
- Optionally, select Block Processes that are taking potentially malicious actions (VIPRE Endpoint Security only). This actively monitors processes to check for potentially malicious behavior. If a malicious process is found, the process is stopped and blocked from starting again. Any malicious files the process may have created are removed.
- Optionally, select Notify user when AP blocks and quarantines known risks to let end-users know that something has been quarantined on their computer.
- Configure On Access to control how AP will respond to files when accessed. You can set it based on the needs of security for your environment, whether it be more for performance or more for security:
- Execution Only (Performance): select for AP to scan any file that attempts to execute. This setting is optimal during normal conditions.
- High Risk Extensions Only: select for AsP to only scan files with extensions that VIPRE Security and you (Admin Known) consider "high risk." So, when a file with one of the listed extensions is touched, it will be scanned. In addition, any file that attempts to execute will be scanned.
- VIPRE Known: lists the file extensions (such as EXE, INI, HLP, and BAT) that have proven to be "high risk." You can unselect any of these extensions that you may want AP to NOT check on access.
- Admin Known: lists Admin-defined extensions that will be checked on access. You can add to and remove from this list, and then select the extension that you want to be checked on access.
- Add: click to add a new extension to the Admin Known list. Select to enable the new extension.
- Remove: highlight (without checking the box) an extension from the Admin Known list and click Remove. The extension will be removed immediately from the list without confirmation.
- All Touched Files (Security): is for a higher state of protection and should only be enabled in the event that a malware outbreak is suspected or has occurred. When enabled, ALL files are scanned when they are copied or touched.
- Configure User Control:
- Allow user to configure Active Protection: select to turn over complete control of AP to end-users. Unselect for the agents to be dependent on what is set for AP in this console.
- Allow user to enable/disable Active Protection: select to allow users to activate/deactivate AP from their agent.
- Click Apply to save changes.
Email protection settings
Outlook and SMTP and POP3 are supported. Infected email attachments are removed and replaced by a .TXT file indicating that they were infected and thus quarantined.
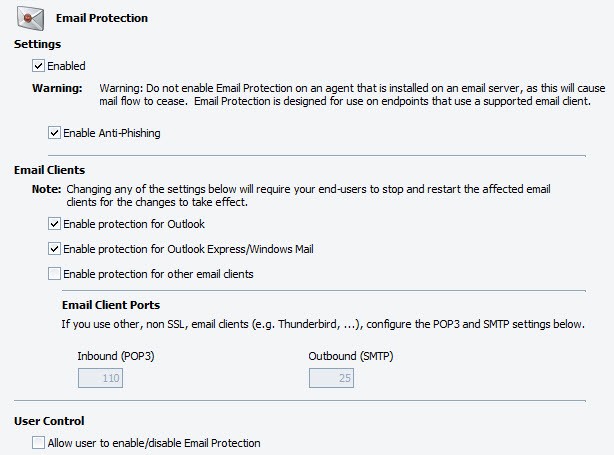
To configure Email Protection settings:
- In the Policy Properties, open Email Protection.
- Enable Email Protection Settings:
- Enabled: select to turn on Email Protection for this policy, which will scan all inbound and outbound email messages, including attachments.
- Enable Anti-Phishing: select to enable anti-phishing. When enabled and when a phishing email is received, the known bad URL link is stripped from the email, protecting the end-user from the phishing scam. (This function applies to VIPRE Premium and VIPRE Endpoint Security).
- Enable one or more Email Clients (SSL is not supported):
- Enable protection for Outlook
- Enable protection for other email clients
- If Email Client Ports are different than the defaults of 110/25, configure accordingly.
- Configure User Control:
- Allow user to enable/disable Email Protection: when selected, the UI controls for email protection are accessible to the agents under this policy. When unselected, enabling/disabling the email protection is inaccessible to the agents.
- Click Apply to save changes.
Email alerts
Email Alerts are email messages sent by VSS to recipients that you enter. Configure Email Alerts for Agent events, including Scanning, Active Protection, Email Protection, and Patch Management (VIPRE Premium or Endpoint Security). Email alerts are configured at the policy level.
Tip! Instead of receiving email alerts in real-time, consider using the Report Viewer to schedule a daily Threat Found Detail report. You can set alerts for the most severe risks after a scan and use reports for the rest.
To configure email alerts for threat detections by Scanning:
- Ensure that the Site's Email Server Settings are configured.
- In the Policy Properties, open Email Alerts>Scanning.
- Click Add. The Scanning Threat Detection Email Alert dialog box displays.
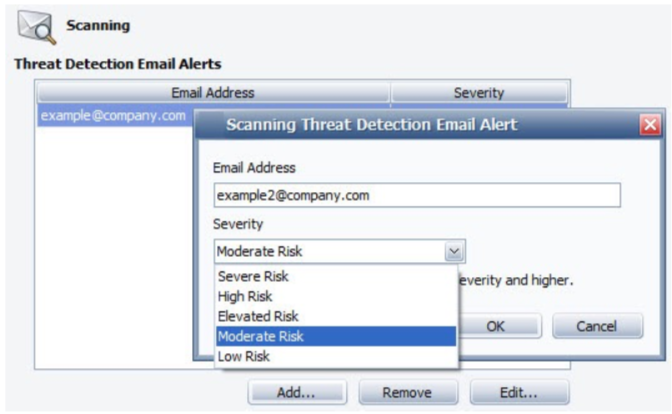
- Enter a recipient's email address.
- From the Severity drop-down box, select a risk level. When the severity or higher that you select is detected during a scan, an email is sent with the details to recipients on the list.
- Click OK. The email address displays in the list.
- To edit an email alert recipient, select an email address and then click Edit to make your desired changes.
- To remove an email alert recipient, select an email address and then click Remove.
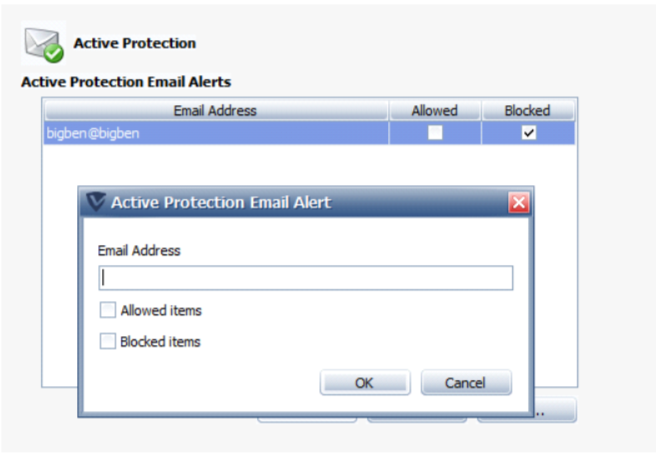
To configure email alerts for Active Protection:
- Move an email alert recipient, select an email address and then click Remove.
To configure email alerts for Email Protection:
- Ensure that the Site's Email Server Settings are configured.
- In the Policy Properties, open Email Alerts>Email Protection.
- Click Add. The Email Protection Email Alert dialog box displays.
- Click OK. The email address displays in the list. When Email Protection detects malware in an email, recipients on the list will receive an alert with the details.
- To edit an email alert recipient, select an email address and then click Edit to make your desired changes.
- To remove an email alert recipient, select an email address and then click Remove.
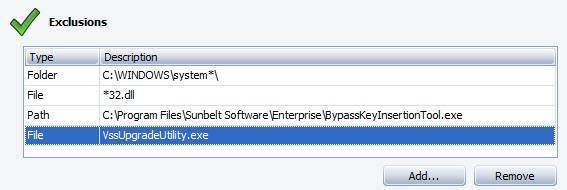
Policy exceptions
The Exceptions screens are used to assign files, files with path, and/or folders that you, as the administrator, want allowed or blocked for all Agents assigned to a policy. This applies to all of the methods that VIPRE uses to detect threats, including Active Protection, Email Protection, and Scans.
Add Always Blocked items to be treated as a known threat. For example, if you were to add ABCX as a bad application, then if ABCX is executed on a machine under this policy, ABCX will be automatically blocked from running.

Add Exclusions that will always be allowed to run, overriding the threat definitions.
To add an item:
- In the Policy Properties, open the Exceptions>Always Blocked or Exclusions screen, as applicable.
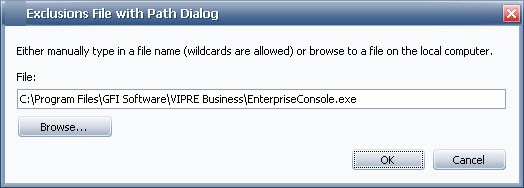
- Click Add and choose from the following options:

- Add File: select a file for VIPRE to block/ignore all files named “example.exe” regardless of where the file is located (such as email attachment, network, user's machine, portable drive, and so forth).
- Add File with Path: select a file with the path for VIPRE to block/ignore all files named “example.exe” with that exact path. If the file is ever moved or another file with this name is somewhere else, VIPRE will once again interrogate that file as potential malware.
- Add Folder: select a folder for VIPRE to block/ignore all contents in it. If a particular folder is ever moved or another folder with this name is somewhere else, VIPRE will once again interrogate programs in that folder as potential malware.
- Enter the name of the File, Path, of Folder.
-or-
Click Browse and locate the File, Path, or Folder to add.
Note!Wildcards (* and ?) are supported for Exclusions only!
- Click OK.
- Click Apply to save changes.
To remove an item
- Select a row and click Remove.
- Click Apply to save changes.
Using wildcards in exclusions
VIPRE supports wildcards for Exclusions (always allowed items) only. This does NOT include environment variables. Supported wildcards are:
- '?' - matches exactly ONE character, EXCEPT the directory separator.
- '*' - matches ZERO or MORE characters, EXCEPT the directory separator.
Supported entity types:
Full Path
Fully specified path to a file, wildcards NOT permitted.
Example: "C:\WINDOWS\system32\kernel32.dll"
Full Path Pattern
Fully specified path to a file, wildcards permitted.
Example: "C:\WINDOWS\system32\*32.dll"
File Name
Just the name of a file, wildcards NOT permitted.
Example: "kernel32.dll"
File Name Pattern
Just the name of a file, wildcards permitted.
Example: "*32.dll"
Folder
Fully specified path to a folder, wildcards NOT permitted (must be terminated with directory separator).
Example: "C:\WINDOWS\system32\"
Note! Folder patterns are implemented as Full Path Patterns terminated with a directory separator.
Example: "C:\WINDOWS\system*\"
Note! Folder entities are recursive and thus will match the folder itself and any descendant files and folders.
Examples:"C:\WINDOWS\" matches "C:\WINDOWS\", "C:\WINDOWS\SYSTEM32\", "C:\WINDOWS\notepad.exe", "C:\WINDOWS\SYSTEM32\regedit.exe", and so forth
Multiple Path Levels
Wildcards should behave exactly as they do in a Windows Command Prompt, with the added feature of supporting wildcards at multiple path levels including the drive.
Examples:
"*.dll" - matches "kernel32.dll", "advapi32.dll",
etc "C:\WINDOWS\system32\*.dll" - matches "C:\WINDOWS\system32\kernel32.dll",
"C:\WINDOWS\system32\advapi32.dll", etc
"?:\WIN*\system*\*.dll" - matches "C:\WINDOWS\system32\kernel32.dll", "D:\WINNT\system\advapi32.dll", etc
Adding allowed threats
VIPRE may detect items that you may consider non-threatening in your network, for which you would want to allow to run. For example, Virtual Network Computing (VNC) and Remote Administrator (Radmin) may both be considered acceptable for use in your organization but may be considered threats in another organization.
To add an allowed threat:
- Navigate to a Site>Quarantine tab or Policy>Quarantine tab.
Or:
Navigate to Protected Computers>Agent Details>Scan History tab. - Right-click on a threat, and select Allow Threat. The Allow Threat window displays.
- Select the policies on which this threat should be allowed.
- Click OK.
- The allowed threat now displays in the Allowed Threats list for the policies you selected (Policy Properties>Allowed Threats).
Agent Installation Management - Configuration
The Configuration screen allows you to configure Site Service settings for agent interaction and enable/disable Automatic Agent Installations for the policy.
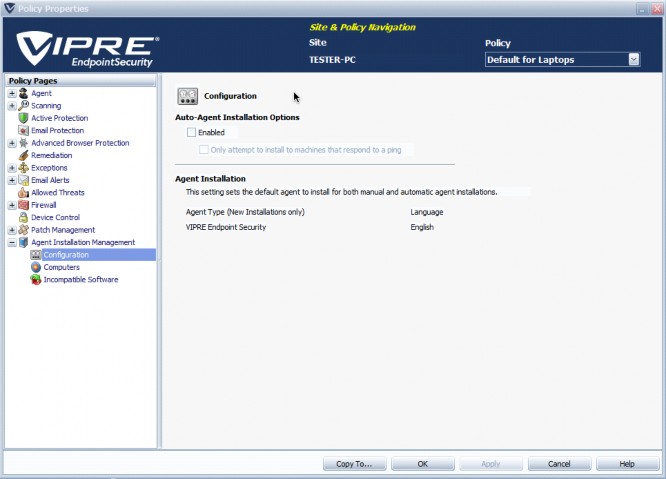
Auto-Agent Installation Options:
-
Enabled: select to enable Automatic Agent Installation at the policy level. The checkboxes below "Enabled" are grayed out until "Enabled" is selected.
Note! You MUST enable scheduled Agent installation at both the policy and site level for a scheduled Agent installation to occur. To enable scheduled Agent installation at the site level, go to Site Properties>Automatic Agent Installation Settings. -
Only attempt to install to machines that r.espond to a ping: when selected, VSS tries to ping each machine first, then only installs to those that respond, reducing Agent Installation time considerably.
Note! If you are blocking ICMP (Internet Control Message Protocol) traffic between VIPRE and the workstations, do NOT select this option. This will result in the pings failing and creating a large ping timeout value, thus increasing the deployment time considerably.
Agent Installation:
- Agent Type: choose an agent from the drop-down box to be used for the selected policy.
Configure incompatible software removal
When an agent is deployed on a computer, it automatically scans the system for incompatible software. Incompatible Software is applications that may interfere with VIPRE's performance if they are running at the same time and on the same machine as a VIPRE agent.
Incompatible Software settings enable you to specify the actions that are performed by VIPRE when an incompatible application is detected.

To configure the incompatible software removal settings:
- From Site Navigator, double-click the Windows policy you want to configure.
- From the left pane of the Policy Properties screen, expand Agent Installation Management and click Incompatible Software.
- Click Show List... for a full list of incompatible software.
- Open Policy Properties > Installation Management > Incompatible Software.
- Enable/disable the removal of incompatible software.
- Enable/disable auto-reboot of agent machine after removal of the software.
- Click Apply to accept changes.