
Congratulations on your purchase of VIPRE Android Security! From installation to initial setup, we're here to walk you through it every step of the way.
Decision Tree
Device Requirements
- A device running Android 5.0 (Lollipop) or higher
- An active internet connection or mobile data subscription
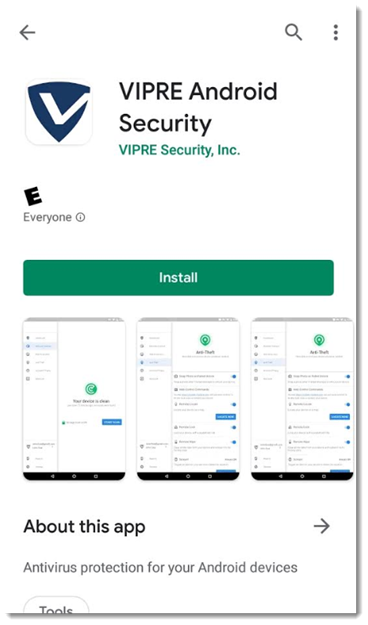
Installation
- Open the Google Play Store on your Android mobile device
- Search for VIPRE Android Security to locate and install the app
- Select Install
- This allows the app to be downloaded and installed on your device
- This allows the app to be downloaded and installed on your device
- Once the installation is complete, the Install button becomes the Open button
- Select Open to launch the app
- Once you have reviewed the Subscription Agreement, check I agree with the Subscription agreement then select CONTINUE
-
Next Step
- Add Button
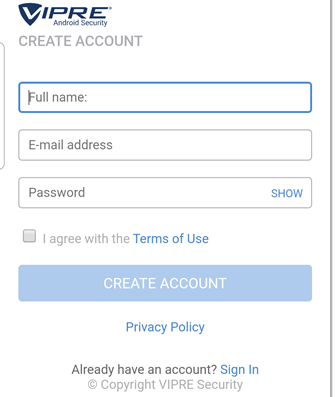
Creating A VIPRE Security Central Account
The first time you open the app, you will be prompted to sign in or create a new account.
- On the VIPRE Security Central account sign-in page, click Create one
- Type in your Full Name, E-mail Address, and Password
- Check I agree with the Terms of Use
- Select CREATE ACCOUNT
-
Next Step
- Add Button
Configuring VIPRE Android Security
Once you successfully signed in to the app, you will begin configuring the features of VIPRE Android Security.
The Let's secure your device quick configuration screen will appear.
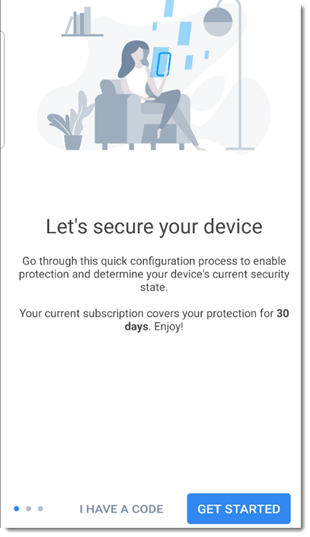
- If you do not have a code yet and will be using the 30-day trial, tap GET STARTED
- If you have an activation code:
- Tap I HAVE A CODE
- In the Enter activation code screen, enter your activation code then select ACTIVATE
- You will be returned to the Let's secure your device screen; select GET STARTED
-
Next Step
- Add Button
Activate Web Protection
.png)
- The Activate Web Protection for safe browsing screen will appear; select ACTIVATE
- Android's Accessibility Settings screen will open. You need to allow accessibility permission to have Web Protection secure your browsing experience on any of the supported browsers
- In the Accessibility screen, scroll to locate VIPRE Android Security and slide to On
-
VIPRE Android Security will request the permissions below. Once you review them, select OK
- Monitor your actions: Receive notifications when you're interacting with an app
- Retrieve window content: Inspect the content of a window you're interacting with
- You will return to Android's Accessibility Settings. Press the device's back button to return to the VIPRE Android Security installation
-
Next Step
- Add Button
Malware Scanner
- Is your device clean? Let's find out. Select SCAN NOW
- VIPRE Android Security will request permission to make and manage phone calls. Select ALLOW
- VIPRE Android Security will request permission to access photos, media, and files on your device; select ALLOW

Congratulations! Malware Scanner is now in progress and you have successfully installed, and completed the initial setup of, VIPRE Android Security.
What's Next
To complete configuration of VIPRE Android Security via Auto-Pilot, visit our Auto-Pilot Guide.