
Welcome to the guided setup for VIPRE Core Defense. Included in this solution is VIPRE Endpoint Security Cloud with Web Access Control add-on, Encrypt.team, and Security Awareness Training for Core.
Select a topic below for step-by-step instructions.
Endpoint Security Cloud with Web Access Control Add-on
Before you get started, you should have received a Welcome email that contains important information you'll need to proceed with this guide. If you haven't received this email, please check your spam folder or contact Support.
Welcome
If you're starting out with a trial of VIPRE Endpoint Security Cloud, visit our 30-day trial guide first.
If you've already purchased VIPRE Cloud, whether as part of a bundled solution or a standalone product, click the next step below.
Protect your Devices
When you first use VIPRE Cloud you can choose to first deploy agents using default policies, or you can set up customized policies for use by your agents.
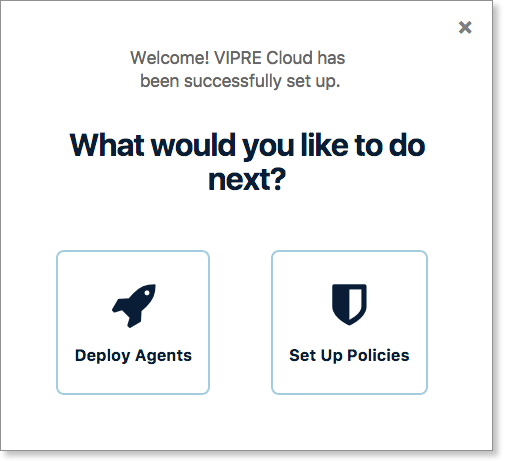
First things first: You are not yet protected!
The first time you log in to VIPRE Cloud, you are asked if you'd like to Deploy Agents or Set Up Policies. Select Deploy Agents.
Deploying Agents
An agent is the VIPRE software that runs on your endpoint devices. You must deploy an agent to a device to protect it. At this point, VIPRE is waiting on your decision, and you need to take further action before your devices are protected and managed by VIPRE.
In order to protect your endpoint devices, the VIPRE agent software must be installed on, or deployed to, each device. This article explains the various ways to get agents to your devices.
Deployment is the process of installing the VIPRE agent onto the endpoint device. When you deploy an agent, you choose your method of deployment (downloading a file, or inviting users through email) and which policy the deployed agent will belong to when it installs.
Deployment Methods
When deploying agents, you have two simple ways to get agents into your environment.
| Install an Agent on your Local Device | Invite Users through Email |
|
This method is best for
This downloads a simple installer package. You can download this installer file directly to your endpoint device and run it to install the VIPRE agent. You can also manually send this installer file to other users, or use a third-party application to distribute it. |
This method is best for
This enables you to invite multiple users to install the VIPRE agent onto their devices. For sites with many devices, this is the easiest option. Simply select Invite Users and enter your user email addresses. Each user receives an email that welcomes them to VIPRE and gives them an install link. This link downloads the same installer package, which the user then runs to install the VIPRE agent on their device. |
Regardless of the option you choose, the user performing the install will need to have administrator privileges on the device.
Option 1: Install an agent on your current device
When downloading an agent installer, you can choose to use VIPRE's default Agent Installer, or create a custom installer that uses a specific policy.
For newer users, the simplest option is to use the default installer for the needed OS to get the agent up and running, and decide which policy the agents belong to at a later time.
To install an agent on your current device
- From the Deploy Agents screen, select the Download Installer option for the appropriate OS
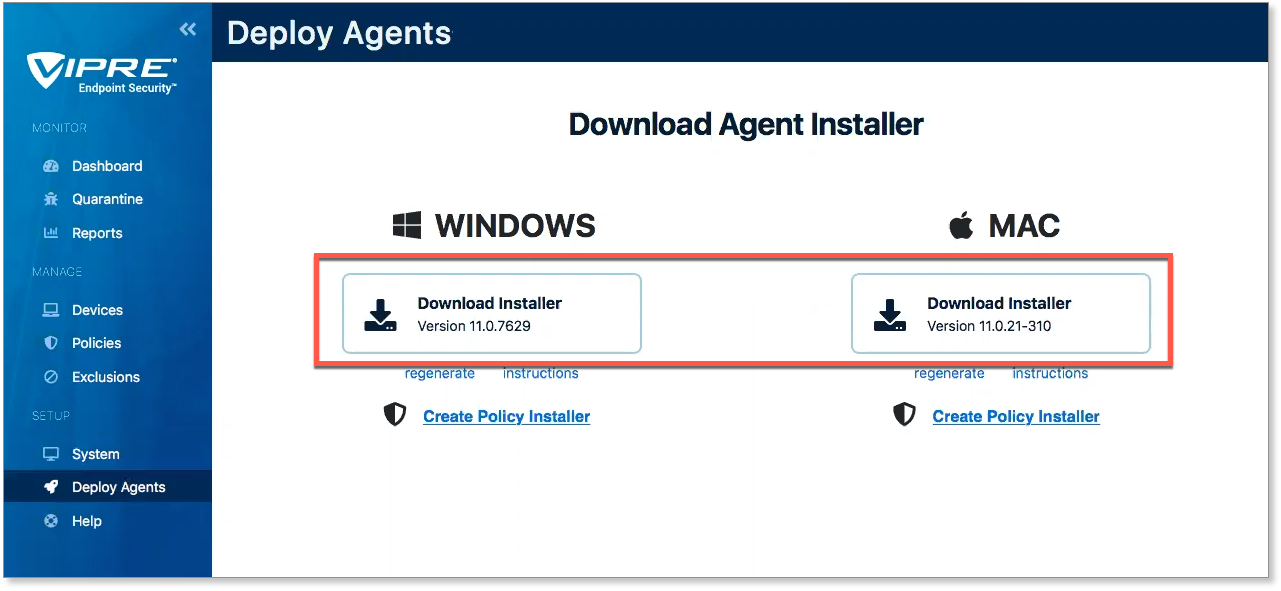
- Your browser will prompt you to save the installer file (the actual file type differs depending on the OS)
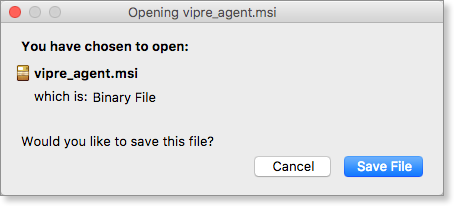
- Run the downloaded installer file to start a VIPRE agent install on your current device
When the installation is complete, the agent on your device will automatically register with VIPRE Cloud.
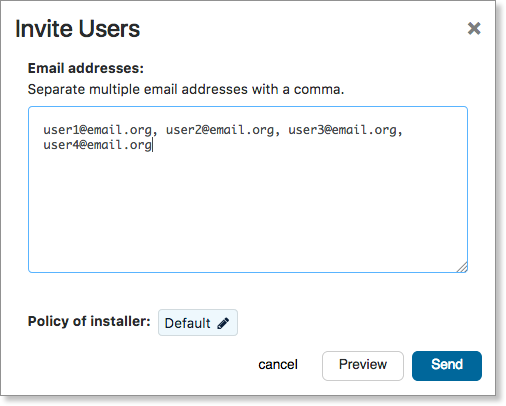
Option 2: Invite users to install agents
Use the Invite Users option to distribute invitations across a large group of users. When inviting users to install an agent, you can also select which policy those devices will belong to.
To invite users to install an agent on their devices
- From the What would you like to do next? screen, select Deploy Agents
or
Navigate to Deploy Agents - Select the Invite Users button
- Under Email addresses, enter a comma-separated list of email addresses
- Next to Policy of installer, select which policy the agent will use
- Select Send
Each user will receive an email with a link to the agent installer file. When the user downloads the install package and runs it, the VIPRE agent will install on their device and self-register with VIPRE Cloud.
For a complete step-by-step walkthrough of all settings and options that are part of VIPRE Endpoint Security Cloud, visit the Guided Tour of VIPRE Endpoint Security Cloud.
Encrypt.team
Before you get started, you should have received a Welcome email that contains important information you'll need to proceed with this guide. If you haven't received this email, please check your spam folder or contact Support.
Guided Setup of Encrypt.team
Guided Setup of Encrypt.team
There are several things to consider when setting up your Encrypt.team business V...
There are several things to consider when setting up Encrypt.team. Here, we'll walk you through all the steps and considerations to deploy Encrypt.team in your organization.
Click the steps below to follow the guided path and set up your VPN team.
Step 1 - Set Password Policy
Before you do anything else, it's recommended that you set a strong password policy to ensure your team's VPN accounts are secure.
- Click Set Password Policy on the left-side of the Team Management options screen
- A window will pop up asking you to set the following:
- Minimum Password Length
- Minimum Uppercase Letters
- Minimum Non-Alphabet/Special Characters
- Click Save Policy
Step 2 - Trusted Domains
The next step should lead you to start thinking about inviting users to your team and whether or not you want to limit your users based on the domain of their email address. Using trusted domains is an additional way to secure your team
If you will not be using a trusted domain, skip to the bottom and select Next Step
If you will be using trusted domains to secure your team, follow the instructions below.
- In the Trusted domains row, click Manage
- Check Enable trusted domains
- In the form box that opens, add any domains you want to be added to the trusted domains list
- Click the Save button
Step 3 - Invite Users
It's now time to add users to your team and there are two ways to accomplish this. Please note, these options are not mutually exclusive and you can use both options simultaneously.
Option 1 - Signup URL
If you want to simply provide a URL to everyone and allow them to create their own accounts, creating a signup URL is the option for you. If you haven't set up trusted domains and don't want anyone outside of your organization's email domain joining your team, you may want to reconsider setting up a trusted domain when using the signup URL option.
- In the Signup URL row, click Create
- A Create Signup URL window will pop up; click the Create button
You will now see a URL in the same row. Anyone you send the URL to will see be able to create an account and join your team.
Option 2 - Send Email Invitation
If you want to have more control over who receives an invitation to join your team, you can send email invitations to specific people.
- In the Invitations row, click Manage
- Click Invite More
- An Invite Users window will pop up asking you to enter the email addresses for the users you'd like to invite to your team.
- Once you're finished adding the email addresses, you have the option to click Create accounts automatically
- This option creates the user's account using the email address you sent the invitation to, otherwise, the user can create an account with any email address they want
- Click the Invite button

Step 4 - Set Team Admins
Now that you've added users to your team, let's set up your team admins. There are two admin roles available - team admin and team owner.
Team Owners can manage all admins.
Team Admins can:
- Invite new users
- Manage trusted domains
- Add or remove Signup URL
- Manage team networks
- Modify notifications for other team admins
- In the Admins row, click Manage
- On the Admin Management screen, select Add Team Admin
- A window will pop up asking you to Add a Team Admin; enter their email address and click Add
- In the Admins row, click Manage
- Locate the desired admin and select Promote
- Choose the desired options and click the Promote button
- Please note, each team has only one owner (which is you by default); by promoting another admin to Owner, you will no longer have any control in the team manager portal space

Step 5 - End-User Education
Congratulations! Your team set up is now complete. Make sure you visit our End-User Guide that includes information to help your team users download, install, and configure Encrypt.team.
- Our Quick Start User Guide will tell your end-users where to download the application, based on OS as well as basic setup steps
- We've created an FAQ to give your end-users some information on what Encrypt.team is and how it works
- Learn how to manage the app based on OS
- And more!
Advanced Setup and Configuration
For more details on Private Endpoints, Content-Filtering, and using Team Networks to set this up, refer to Related Articles for the following important information:
- Private Endpoints
- Content-Filtering with Private Endpoints
- Set Up Team Networks for use with PEPs
Security Awareness Training for Core
Before you get started, you should have received a Welcome email that contains important information you'll need to proceed with this guide. If you haven't received this email, please check your spam folder or contact Support.
Guided Setup of VIPRE SAT
Guided Setup for VIPRE SAT
There are several things that will need to be completed before you are able to de...
There are several things that will need to be completed before you are able to deploy VIPRE Security Awareness Training.
What we need from you
Sometimes it can be confusing to try to figure out what you need to do to get started. Here we eliminate that confusion and lay it all out as simply as possible.
- Company Name
- Customer Contact Name
- Customer Email Address (both primary and admin)
- Product Selection
- Number of users/learners
- List of end-users in a CSV file
- Confirmation that all prerequisite action items have been completed
The majority of these items are obtained when you respond to the Onboarding/Account Setup email.
Action Items Checklist
On top of the required items above, we've put together a check-list of things you'll need to complete on your end to ensure VIPRE SAT and PhishProof works properly.
Info
The following information discusses white-listing via domain. If your organization prefers to white-list via IP address, please contact us for that information.
- Notify your IT department that we will be sending simulated phishing emails from outside of your network
- The following white-listing tasks must be completed in Intrusion Detection System/Firewall, Client-side Email Filters, and Server-side Email Filters to ensure emails are delivered successfully to the end-user:
- Domain name of the SMTP Relay used by the application: smtp.mailgun.org
- Location that hosts the landing pages in your web filtering software (if applicable): *phishproof.com
- Domains used when sending Phishproof email templates:
- accountsecurity.online
- amznbks.com
- bankameriica.com
- certifyjob.com
- clickweb.solutions
- faceboookfriendster.com
- filescanners.org
- formsmail.com
- funitgames.org
- googllesecurity.net
- ibsbanks.com
- mailsystems.online
- phishproof.com
- securityadmin.net
- securityalert.org
- securityawarenesstraining.com
- starrwood.net
- systemadsmin.org
- twitttersocialpage.com
- upssite.com
- uspostallservice.com
- wallgreenspharm.com
- web-access-alerting.com
- boxfilesshare.com
- docutransfers.com
- employee-rewards.net
- hr-rewardscenter.com
- hq-administrators.com
- itpatching-installs.com
- corp-addmin.com
- admin-tokenalert.com
- sso-server.com
- login-microsoft.com
- Adjust any other settings as needed to ensure the simulated phishing emails flow properly to your end-users
What VIPRE takes care of
Once we've received all of the above information from you, we'll get to work on the following:
- Configuration of VIPRE SAT (Security Awareness Training) with the provided company name and domain
- Sending a registration email
- Registration of users with the selected learning path
- Configuration of automatic reminders for all courses bi-weekly on predefined cadence
- e.g. Every two weeks, learners will receive automated reminders to complete their courses
System Requirements
Browsers
- Google Chrome 75+
- Mozilla Firefox 66+
- Microsoft Edge 89+
- Apple Safari 13.0.2+
Additional Requirements
- Required bandwidth per host machine of 4 Mbps download and .5 Mbps upload
- iPad access is supported only for HTML5-based courses in the latest version of iPadOS with Safari
- Operating System and browser zoom levels at 100%
- Screen resolution of 1024x768 or 1920x1080
- Ability to play .mp4 videos
Not Supported
VIPRE User Protection does not officially support training using the following:
- Thin Clients (Citrix / Virtual Desktops)
- VPN Connections
- Proxy Connections
- Internet Explorer Compatibility mode
PhishProof
Ensure your computers meet the following requirements:
Email Clients
- MS Outlook 2003+
- Hotmail
- Gmail
- Yahoo Mail
Browsers
- Chrome 71+
- Firefox 65+
- Internet Explorer 9+
- Safari 11.1.2+