
Product release information for VIPRE Site Manager on July 6, 2020.
What's New
A couple of months ago, we released a significant update to VIPRE Site Manager's client sites and agents that brought more advanced network protection, including DNS protection, to the VIPRE portfolio. But until now, those new capabilities were mostly visible and manageable only from within client sites. With today's release of Site Manager, this has now changed.
The first significant new capability is the advent of Web Access Control within the Site Manager ecosystem. Built on top of our DNS Protection, this new paid add-on gives you the ability to deliver category-based access control of websites to your clients. If your clients have a duty-of-care requirement to protect employees from offensive content, or just want to keep them from wasting time online, you can instantly add Web Access Control to any existing or new site. Choose from our policy templates or craft your own, and your clients will immediately be protected. Trials are also fully supported, as are advanced features. VIPRE's Web Access Control add-on is priced competitively for the market and gives you additional value to deliver to your customer to increase your revenue.
Refer to Related Articles for an overview of Web Access Control and how to enable it.
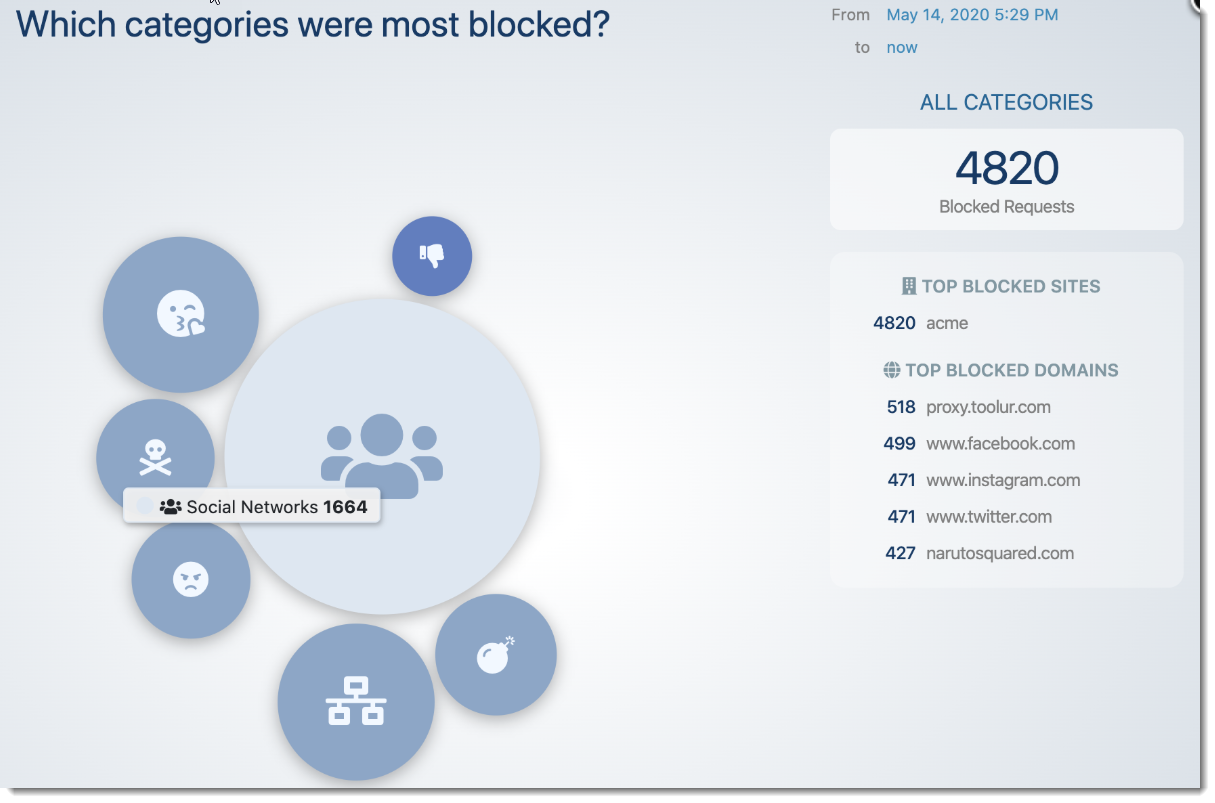
Aside from a single dashboard widget and a new report, cross-tenant visibility into network protection was previously limited. In this new release, we now provide new summary dashboard elements linked to comprehensive reporting and analytics around DNS Protection and Web Access Control. Leverage these analytics to understand what kinds of risky behavior your clients are engaging in, and consider whether they might benefit from Security Awareness Training.
One of our most commonly asked-for features for Site Manager is to add a concept of global policies to make managing many clients easier. A while back, we added global Exclusions; now, we've added a global Policy capability as well. You can now define VSM-level policies, and your client sites can reference those policies. Local policies will still be supported and can override the global policy, but for most clients, you should be able to define things once and then re-use them.
Refer to Related Articles for more information on Global Policies and how to use them.
Last but not least, we're improving the notification mechanisms within the product to make sure we keep you informed about new features, new agents, service outages, and any other information you need to know. You'll see new notification emails and banners showing up as we have things to tell you.
Special Instructions
For existing Site Manager users who want to use global policies, refer to Related Articles for details on how to use them.
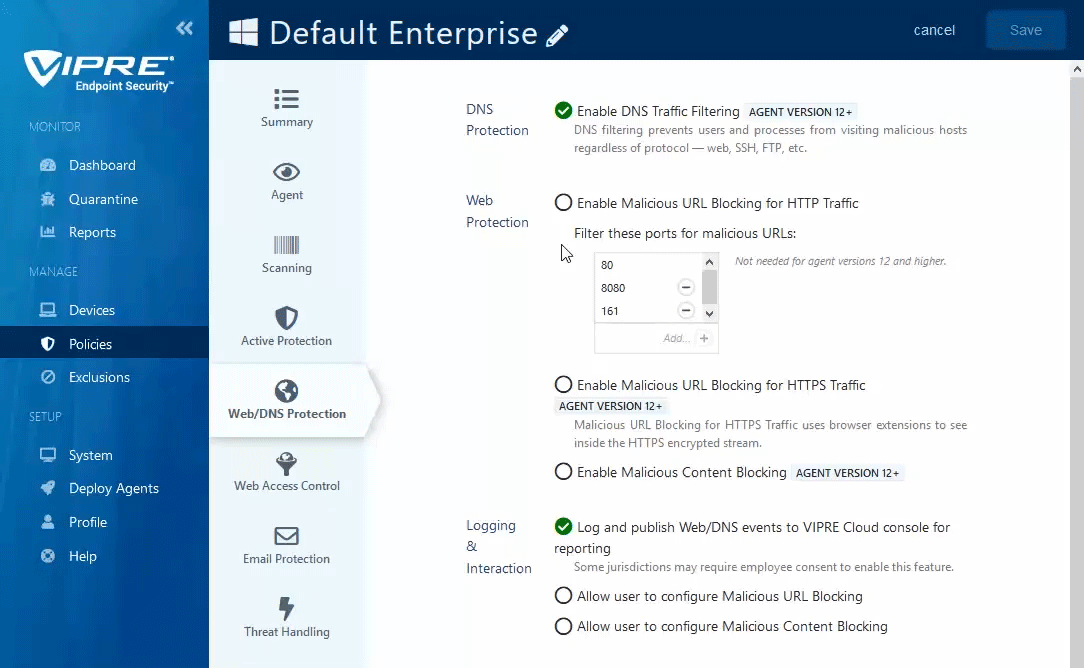
Web/DNS Protection
Web/DNS Protection is a single tab within VIPRE Endpoint Security Cloud that allows you to have even more control by filtering DNS traffic and automatically blocking known malicious content. Here we'll walk you through how to work within each section.
The Web/DNS tab within VIPRE Endpoint Cloud includes DNS Protection, Web Protection, Logging & Interaction.
Enable DNS Protection
With DNS Protection, whenever any program on your computer needs to look up a hostname, VIPRE intercepts the request to make sure it's safe. Here we walk you through enabling this feature.
In VIPRE Endpoint Security Cloud:
- From the Endpoint Security Cloud console, click on Policies and select the appropriate policy from the main window
- Choose Web/DNS Protection from the second left-side menu
- In the main window, click the checkbox next to Enable DNS Traffic Filtering
- This feature only works on endpoints that have been updated to use VIPRE Agent v12.
- Click Save at the top right of the screen
DNS Protection has been enabled! Refer to Related Articles to learn more about DNS and how VIPRE DNS Protection works to keep you safe.
Enable Malicious URL & Content Blocking
VIPRE Endpoint Security Cloud can block access to specific URLs by checking all visited URLs against a cloud-based global threat intelligence network that is updated to the minute with the latest list of known bad URLs.
- From the Endpoint Security Cloud Console, click on Policies and select the appropriate policy from the main window
- Choose Web/DNS Protection from the second left-side menu
- In the main window, click the checkbox next to Enable Malicious URL Blocking for HTTP Traffic
- Ports 80 and 8080 are added by default; Port 80 cannot be removed to ensure HTTP requests are filtered for bad URLs
- Endpoints running VIPRE Agent v11 or older: Specify destination ports for which network traffic will be examined
- Endpoints running VIPRE Agent v12 or later: All HTTP traffic is automatically detected and inspected
- Click the checkbox next to Enable Malicious URL Blocking for HTTPS Traffic to use browser extensions to analyze decrypted traffic
- This feature only works on endpoints that have been updated to use VIPRE Agent v12.
- Select your desired browser to automatically deploy the appropriate browser extension to any endpoint where that browser is installed
- Currently, browser extensions for Google Chrome, Mozilla Firefox, and Microsoft Edge are supported (see latest release notes for the latest versions supported)
- Click the checkbox next to Enable Content Blocking to analyze web traffic and block any malicious code within the webpage
- This feature only works on endpoints that have been updated to use VIPRE Agent v12.
- Click Save at the top right of the screen
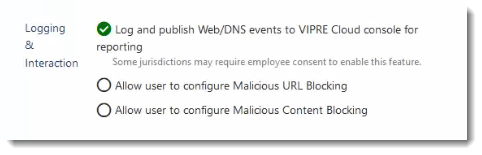
Logging & Interaction
The Web/DNS Protection tab in VIPRE Endpoint Security Cloud allows you to configure whether Web and DNS activity is logged and whether or not you want to allow your end-users access to self-configure protection features.
- From the Endpoint Security Cloud console, click on Policies and select the appropriate policy from the main window
- Choose Web/DNS Protection from the second left-side menu
- In the main window, scroll down to Logging & Interaction
- Select from the following options:
-
Log and Publish Web/DNS events to VIPRE Cloud console for reporting
- If this is enabled, all blocked attempts to visit domains or URLs will be sent to the VIPRE Console and reported allowing examination of patterns to determine accidental or intentional misuse/abuse of the system
- Please note, this setting could record potentially sensitive user actions on the endpoint so end-user notification or consent may be needed; check your organization's policies and any applicable regulations for details
-
Allow user to configure Malicious URL Blocking
- This allows the Malicious URL Blocking feature to be enabled/disabled at the agent level
-
Allow user to configure Malicious Content Blocking
- This allows the Malicious URL Blocking feature to be enabled/disabled at the agent level
-
Log and Publish Web/DNS events to VIPRE Cloud console for reporting
- Click Save at the top right of the screen
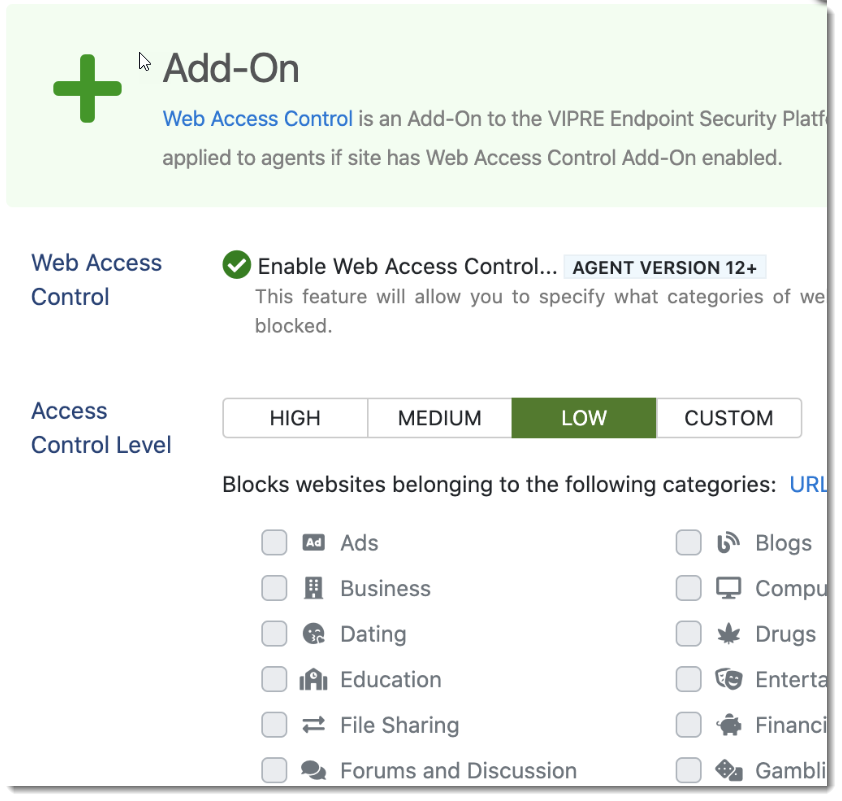
Web Access Control
Here we walk you through enabling the Web Access Control add-on for VIPRE Endpoint Security Cloud.
Configure Web Access Control
- From the Endpoint Security Cloud console, click on Policies and select the appropriate policy from the main window
- Choose Web Access Control on the second left-side menu
- In the main window, select the radio button next to Enable Web Access Control
- This feature is for Agent version 12 or higher
- Select the level of access control you want to configure:
- Low: Examples include pornography, violent cartoons, suicide
- Medium: Examples include everything in Low as well as things like advertisements, dating, gambling, illegal software
- High: Examples include everything in Low and Medium as well as things like discussion boards, games, hacking, weapons, and more
- Custom: Selecting Low, Medium, or High before selecting Custom allows you to start with that level as a template
- Next to Scheduling, select one of the following:
-
Apply Web Access Control 24x7
- The access level configured within Web Access Control is in effect 24 hours a day, seven days a week
-
Apply Web Access Control only during these hours
- The access level configured within Web Access Control is in effect only during the hours and days of the week of your choosing
- You can also add an exception if desired
- e.g., Monday - Friday 8 am - 6 pm except during the hours of 12 pm - 1:30 pm
-
Apply Web Access Control 24x7
- Click Save at the top right of the screen
Congratulations! You have configured Web Access Control.
Global Policies
VIPRE Site Manager has the ability to create policies at the global level to make managing multiple clients easier. Local policies are still supported and can be used to override global policy, however, for most clients you should be able to define things once and then reuse those policies.
Create a Global Policy
There are several options for creating global policies.
Option 1: Add a new global policy
- Log in to VIPRE Site Manager
- Select Policies on the left side blue menu
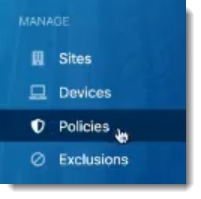
- Click on Add Policy in the top right corner

- Name your policy and click Next
- If the name is valid, a green checkmark will appear
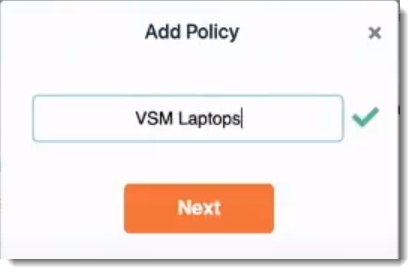
- If the name is valid, a green checkmark will appear
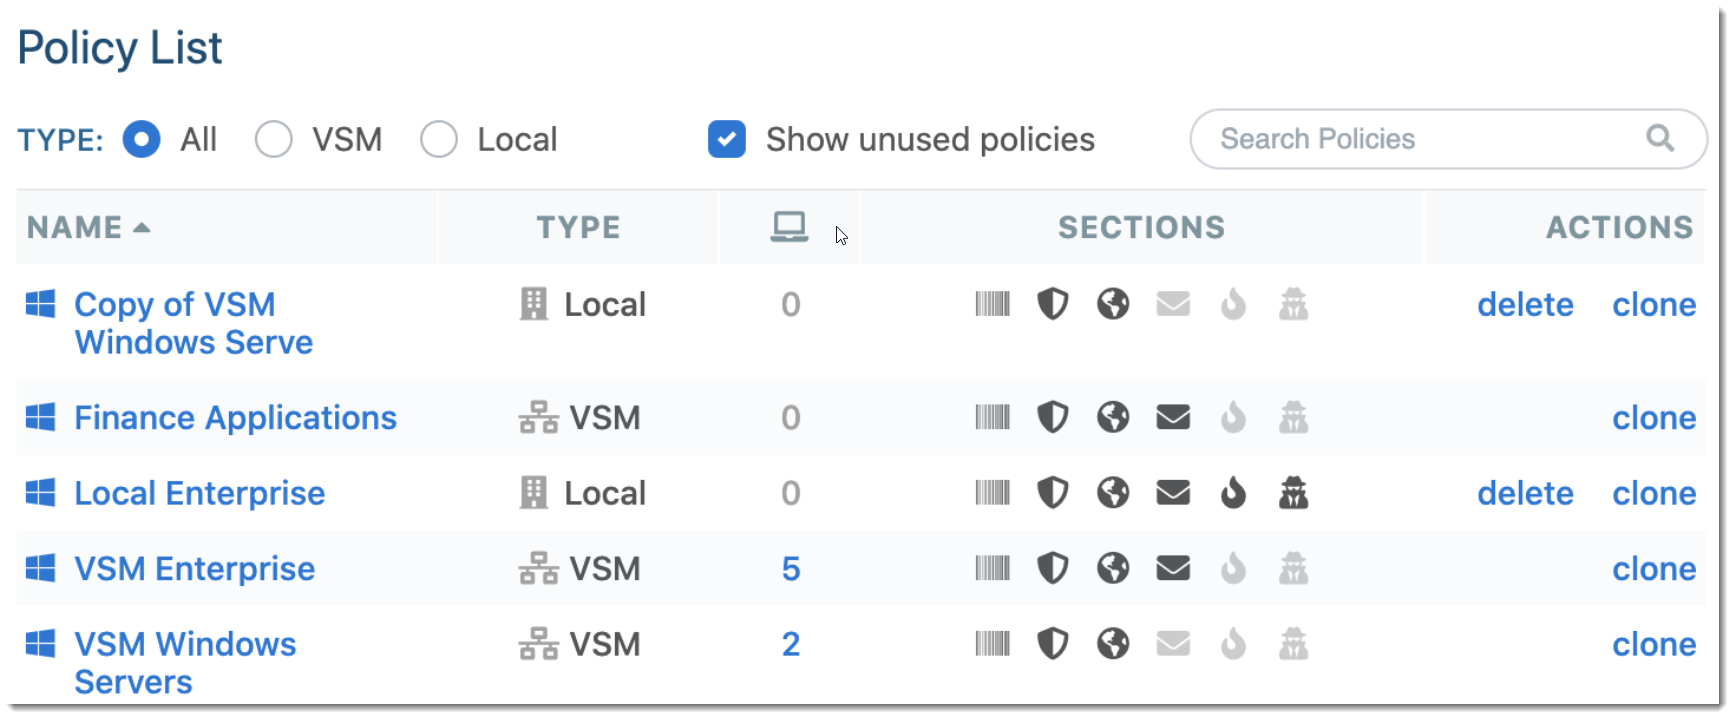
Option 2: Clone an existing global policy
- Select Policies on the left side blue menu
- Find the policy you want to clone under Policy List
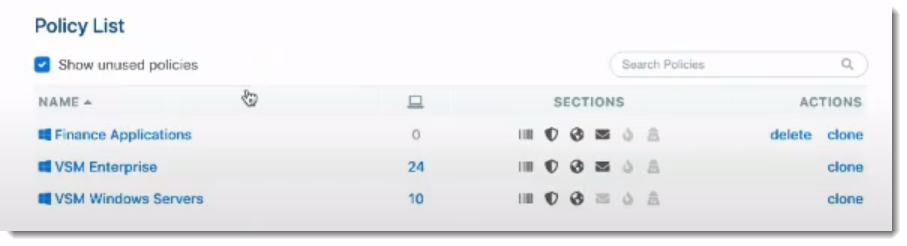
- Under Actions, select clone
Assign Devices to Policy
There are several ways to assign devices to policies:
- Specify the default policy that new devices of a given type will receive, and then deploy new agents to those devices
- Create a custom agent installer that is tied to a specific policy, and then deploy that installer to specific endpoints
- Choose an existing policy, and then select a set of devices to add to that policy
- Select a set of existing devices, and then move them to a new policy
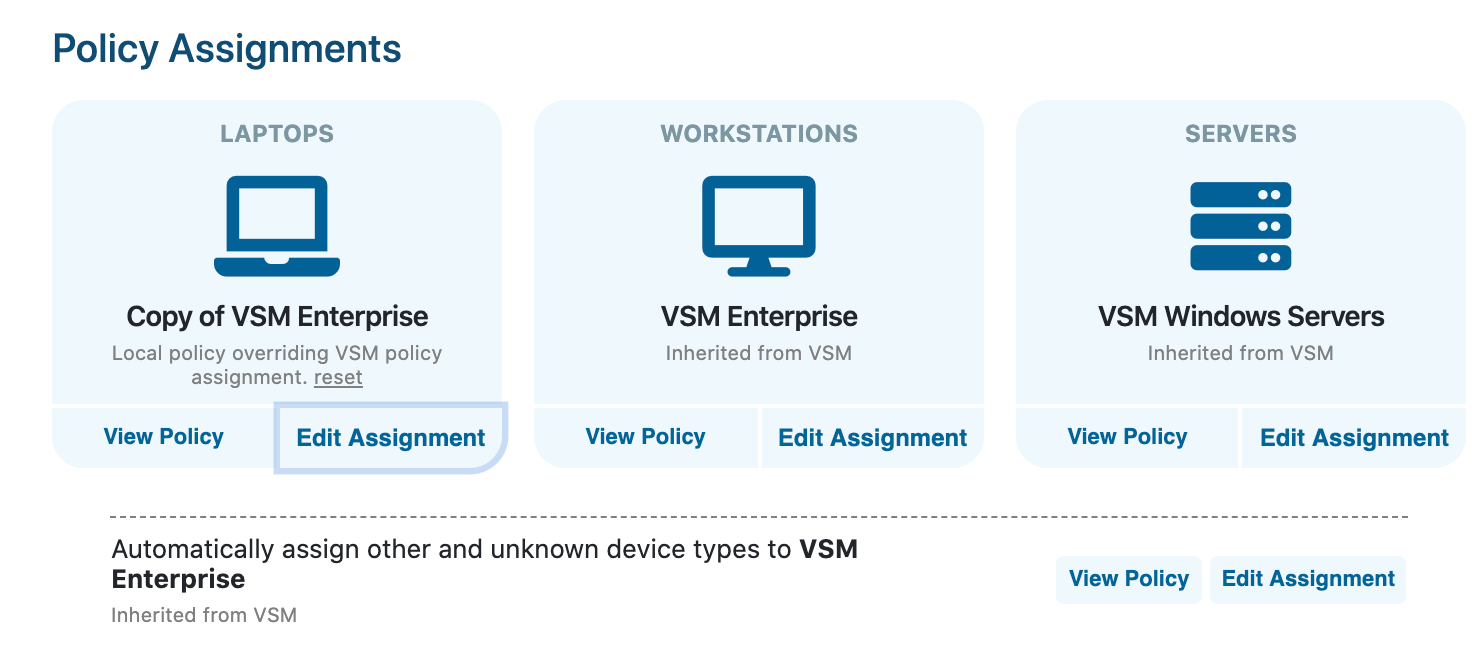
Option 1: Select Default Policy Assignments
With default policy assignments, you can choose in advance which policy a new device of a given type will receive when its agent is installed. If these assignments are made at the Site Manager level, tenant sites will adopt these defaults. If changes are made local to a tenant site, however, those default assignments will override the Site Manager global assignments. You can however revert to the global assignments at any time.
- Select Policies from the left-hand blue menu
- At the top of the Policies screen are listed three device types: Laptops, Workstations, and Servers - select the device type for which you wish to Edit Assignment of the default policy
- Assign a different policy for that device type
The net effect of the above procedure is that when a normal agent installer (i.e. not a Custom Policy installer) for the tenant site is deployed to an endpoint, the endpoint will adopt the policy specified as the default for that device type. Subsequently changing the assignment will not change policy for existing devices.
Tenant site assignments - note that the Laptops default policy overrides the global assignment
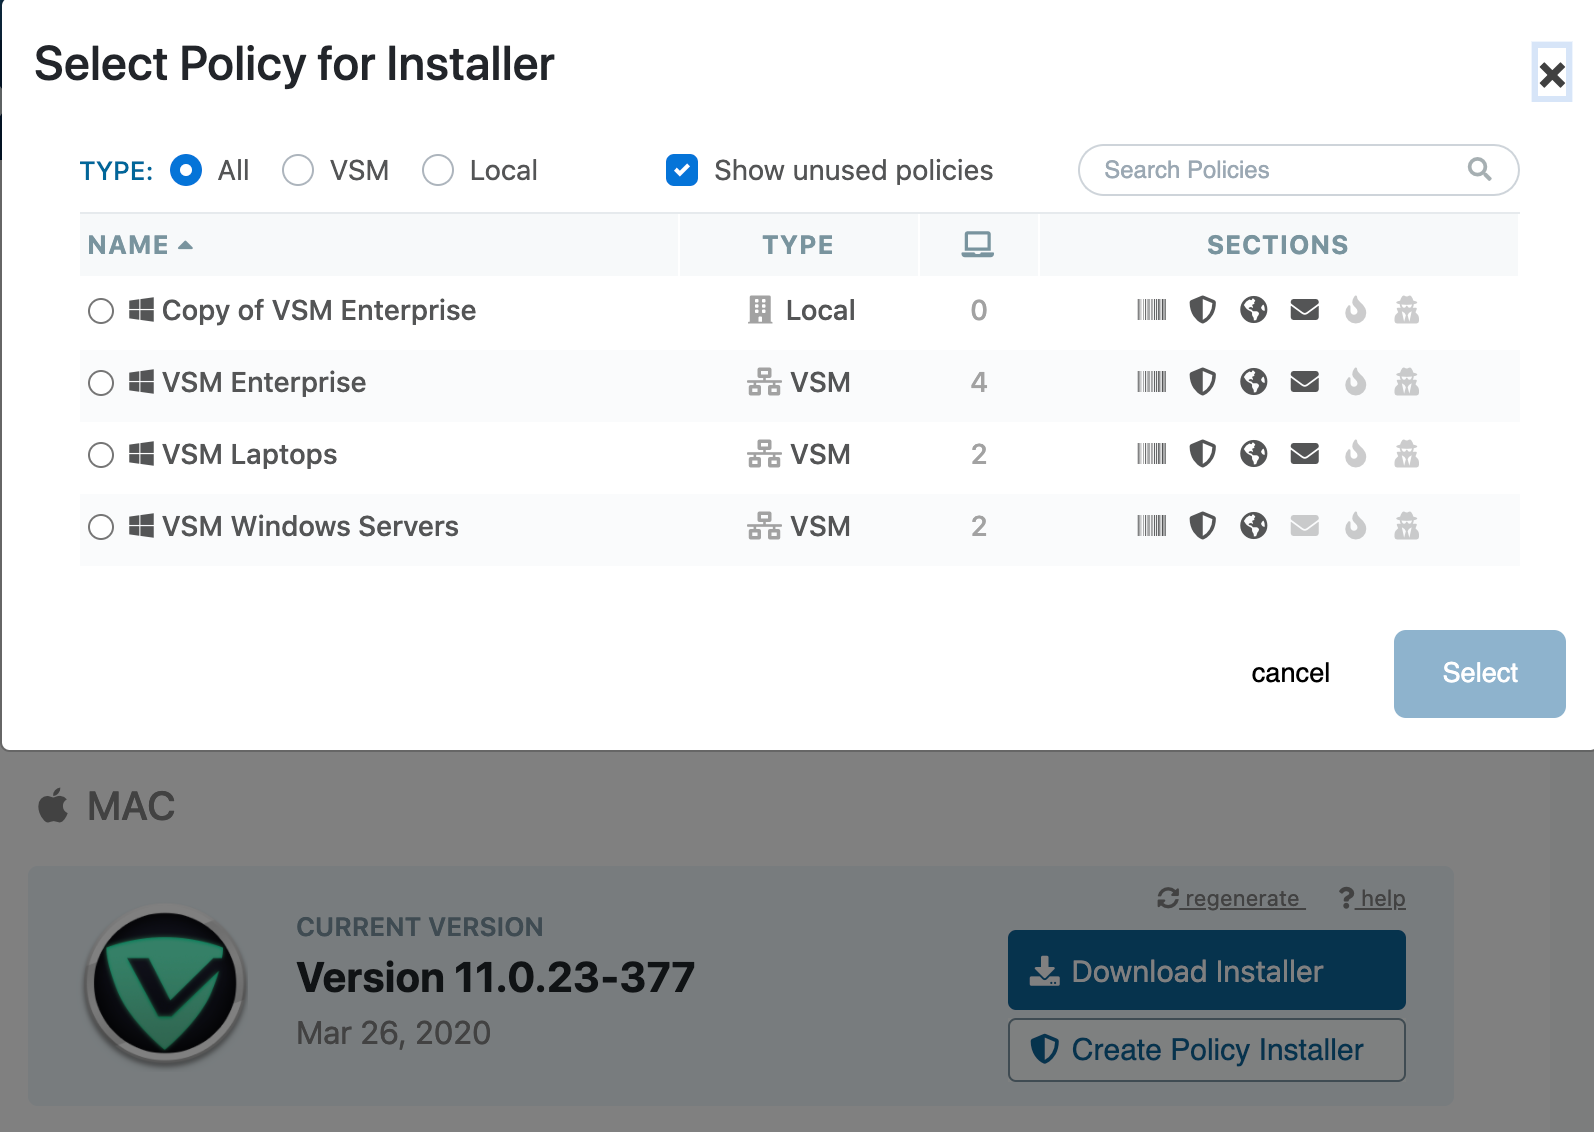
Option 2: Create a Policy-based Agent Installer
This procedure works only within an individual tenant site, and endpoints to which this installer is deployed will be associated with the specific site, and with the selected policy.
- Select Sites from the left hand blue menu
- Select the desired tenant site and click on its listing
- Select Go to Site within the listing to log in to the tenant site in a new tab
- Within the tenant site, select Deploy Agents from the left hand blue menu
- For the applicable OS agent, select the Create Policy Installer button
- Select the policy which should be bound to this installer (can be either a VSM global policy, or a local policy)
- Wait for the policy installer to generate
- Once the Download Installer button appears, you can download the installer and deploy it to new endpoints
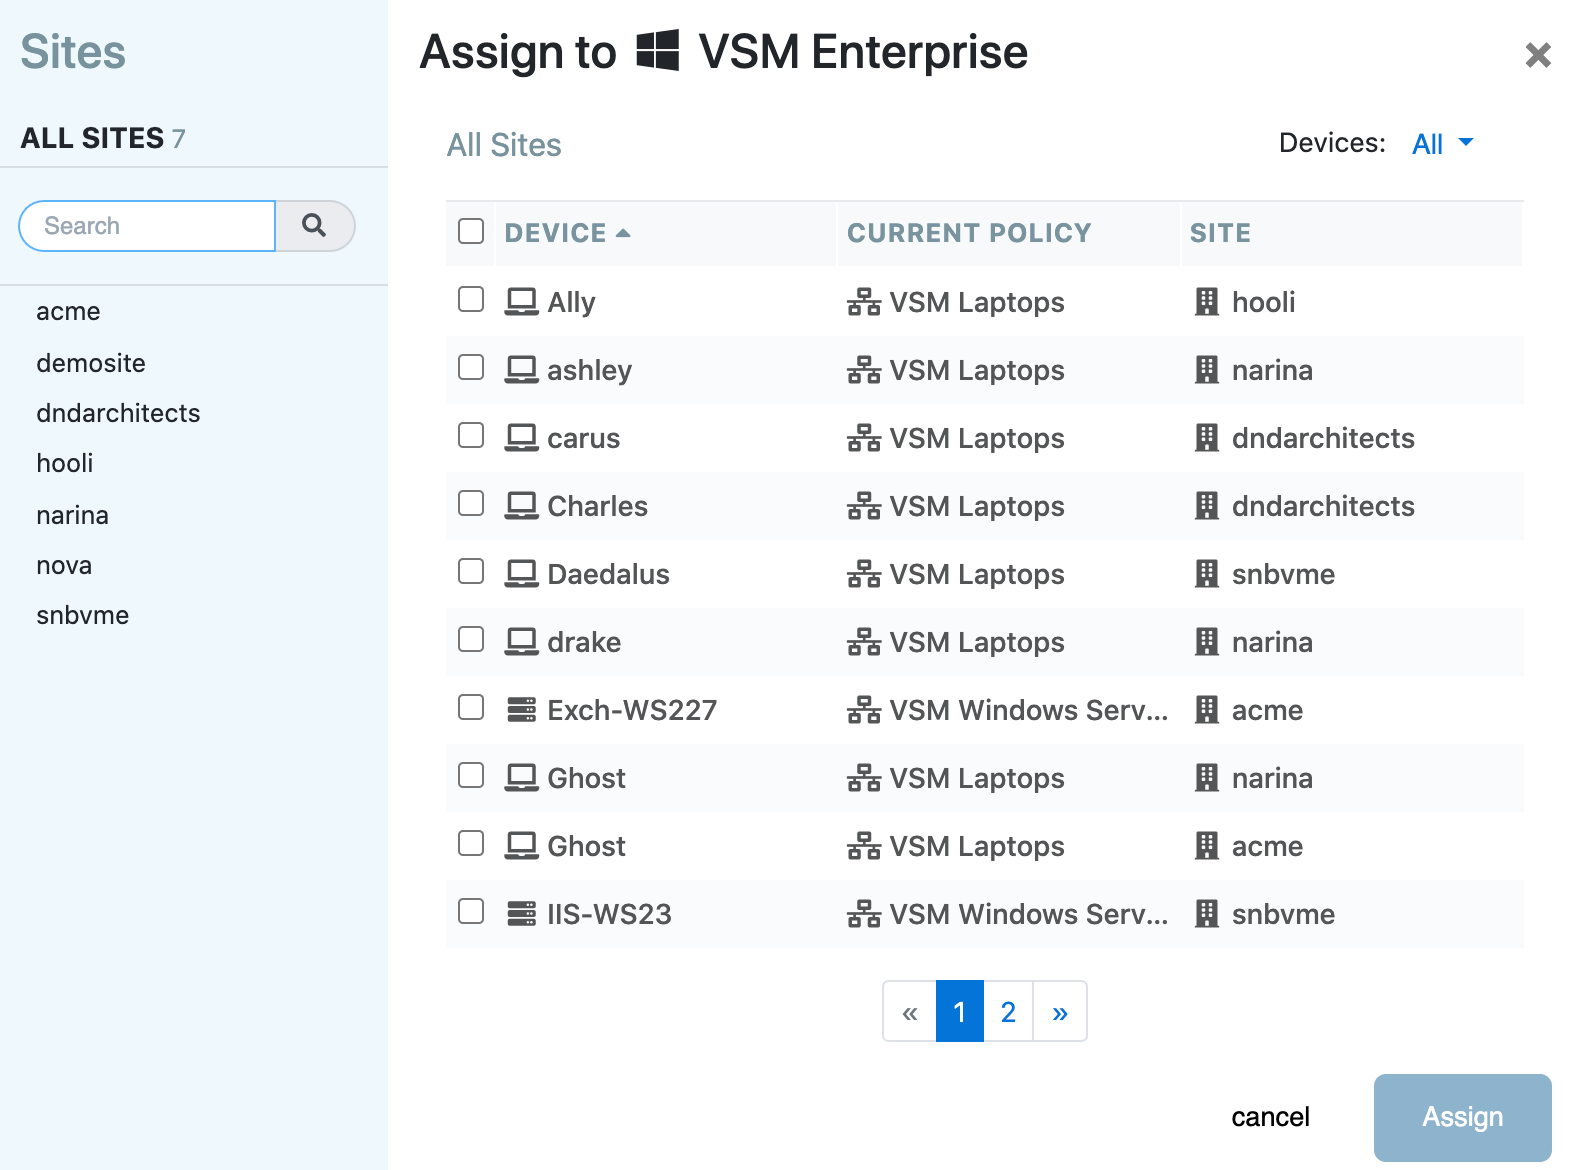
Option 3: Add Devices to a Given Policy
This feature works at both Site Manager level and within an individual tenant site.
- Select Policies on the left side blue menu
- Under Policy List, select the policy you want to assign devices to
- On the Policy Summary page, click Assign Devices (if none are yet assigned) or assign this policy (if some devices have already been assigned)
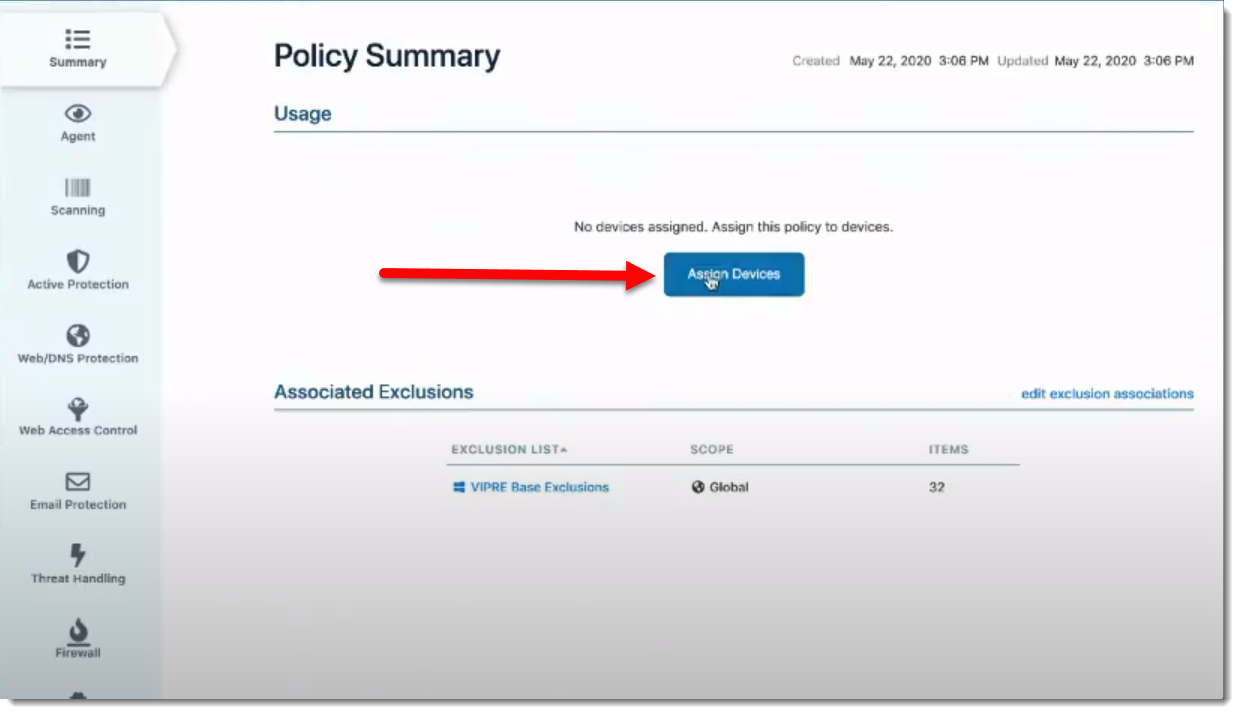
- A window will pop up to Assign Devices to Policy; place a checkmark next to the desired devices and click Assign
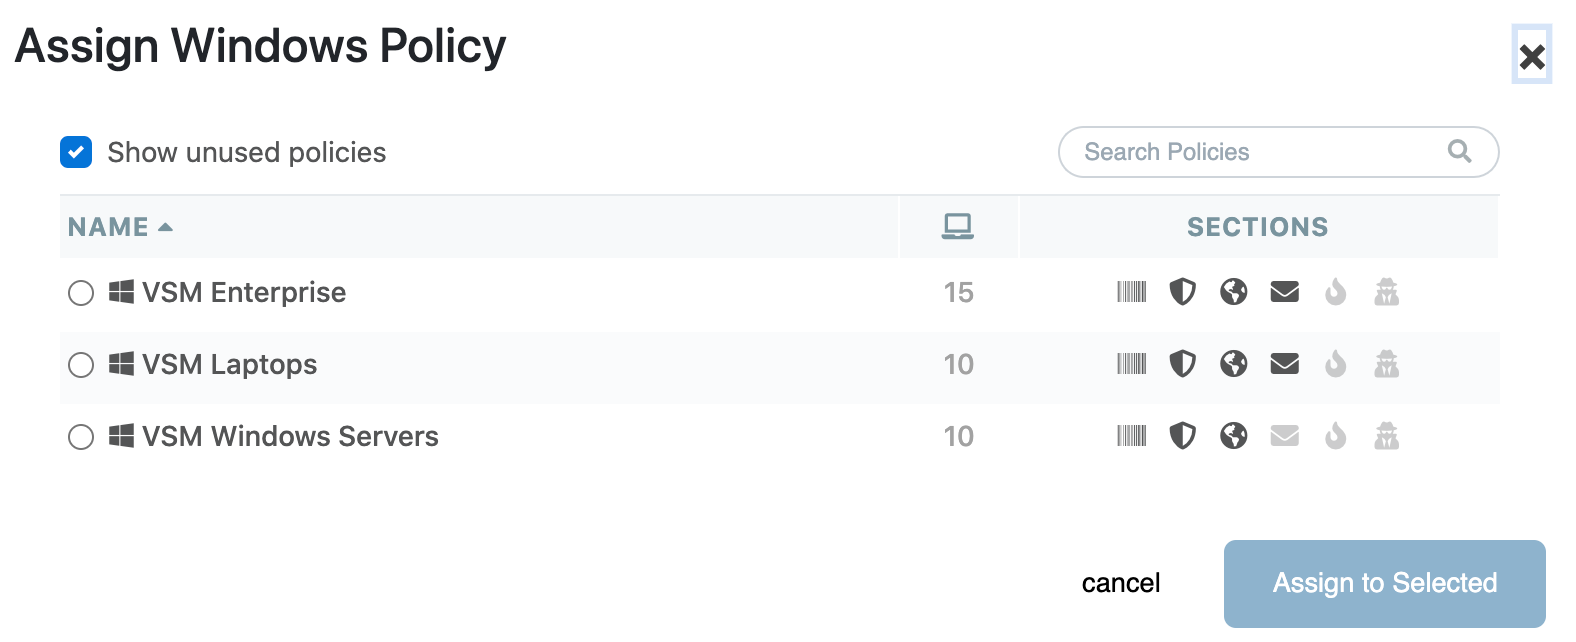
Option 4: Move Devices Into a Policy
This process works at both the VIPRE Site Manager level and within an individual tenant site.
- Select Devices in the left side blue menu
- Review the list of devices and select those you wish to move into a new policy
- Note: if you do not see the Policy column which lists the current policy to which the device is assigned, select the gear icon at the top right to enable that column
- Select the Actions menu at top right, then select Assign Windows Policy or Assign Mac Policy as appropriate
- Choose a policy from the list to which the selected devices will be assigned, then select Assign to Selected
- Note: When performing this action from Site Manager, only global policies will be visible. Within a tenant site, both global and local policies will be visible.
Exclusions for Global Policies
Exclusions now have multiple scopes:
- Global: Global exclusions will automatically apply to all devices across all sites. You will not need to descend into tenant sites or modify tenant policy assignments to get these exclusions to apply.
- Policies: Policy exclusions can be associated with one or more Site Manager-level global policies, which can in turn be assigned to devices resident in tenant sites. Changes made to Policy exclusions will apply to all local tenant devices which are assigned to associated global policies. If you select this option, you should select which global policies will reference this exclusion set.
- Site: Site exclusions apply to all devices within a specific set of tenant sites. If you select this option, you should choose a set of sites to which this exclusion set will apply.
- Site-Specific Local Policies: These exclusions apply to local policies defined at the tenant site level. If you select this option, you should choose a set of sites and local policies for which the exclusions will apply.
Note that you may also edit exclusions associated with a given policy from the Policy section, but at the tenant site level you may not edit global policies to modify exclusions.
- On the blue left-side menu, select Exclusions
- On the top right, click Add Exclusion List
- Name your exclusion list and click Next
- Set File, Domain, and Process exclusions as usual
- Click on Scope on the light blue left-side menu
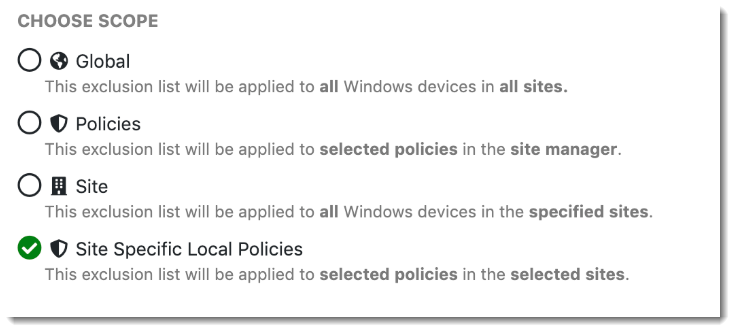 Select the appropriate scope for how you wish to use this exclusion set
 - If you have chosen one of the Scopes that requires explicit selection of sites and/or policies, make those selections
Important
When Endpoint Detection & Response (EDR) is enabled for a child site, you are essentially turning on an entitlement to use the new EDR features + Patch Management + Web Access Control.
When that child site adopts the Site Manager (VSM) level controlling policy for its agents, the features that are enabled by entitlement will function. A different site, without EDR or Patch Management enabled (for example), can still use the global policy, but the unentitled features will not work.
System Requirements
Refer to the most recent Endpoint Cloud Console and Agent release notes for a list of the system requirements.
Known Issues and Workarounds
This section lists issues that are known at the time of release. In some cases, these are bugs that we are working to resolve with a subsequent release. Other items may be due to causes outside of our control, such as bugs with other vendors' software. In all cases, we have tried to provide a workaround for you to consider, should you experience an issue.
If you have questions about a specific issue, please provide the issue ID (if applicable) when contacting our Technical Support team.
Bugs Fixed in this Release
- [VC-5909] - Update Devices modal lists all devices, even if the device was already updated or has a higher version
- [VC-5892] - '?' wildcard not supported in Cloud exclusion (filename, folder, and file path)
- [VC-5470] - Site scope exclusion does not have remove option
- [VC-4593] - Deleted policies are not displayed in some reports
Known Issues
| Ticket Number | Description | Workaround |
|---|---|---|
| VC-6530 | "Disable-Auto-delete quarantine and scan history data" on Mac policy should not be allowed as Mac Agent does not support disabling the option, it defaults to a maximum value of 365 days. |
None |
| VC-6494 | Web/DNS displayed NOT ENABLE when only DNS is enabled | None |
| VC-6308 | [CASESENSITIVE] All exclusion in Cloud contains CaseInsensitive=True while Agent contains CaseInsensitive=False | None |
| VC-6299 | User Interface: SM Dashboard is not updated | Manually refresh the page |