
Information on manual and automatic agent installs for Windows devices is covered in this topic. Roaming agents, for those devices that are not always connected to your network, are also explained.
Agent installs for Windows devices
An Agent is the client software that is installed on workstations or other machines, running periodic scans for threats based on its assigned policy. The following Console tabs enable you to install, manage and configure your agents, network-wide:
- Unprotected Computers
- Protected Computers
- Patch Management
- Quarantine
- Pending Agent Installs
- Agent Install History
Manual install of an agent
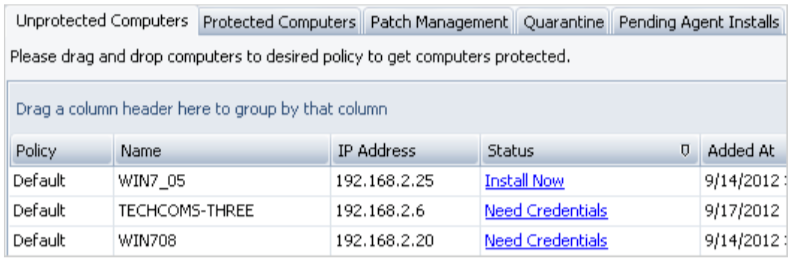
When VIPRE is installed, it automatically scans your network to detect online computers and lists them under the Unprotected Computers tab of your Default Policy. This tab shows the computers that do not have an agent installed on them. Through the Unprotected Computers tab, you are able to deploy agents on specific computers as well as assign security policies on an agent by agent basis.
In evaluation mode, you can have up to 5 agents installed.
To deploy agents in large environments, it is recommended to use an automatic installation method, especially if the agents will share the same settings. This reduces configuration time and prevents manual configuration errors.
To manually install agents:
- From the main menu, click Install Agent. This displays the Unprotected Computers tab of your default policy.
- From the Unprotected Computers tab, you may install an agent in one of three ways, all with the same end result:
- From the Status column, click Install Now for each agent you want to install.
- Alternatively, use Ctrl or Shift to select multiple computers, right-click and select Install Agent(s)...
- You may also click the Install Now button in the Install Column on the left side of the display for each agent you wish to install.
Note that when VIPRE cannot connect to the selected computers using the pre-configured remote credentials, it displays Need Credentials instead of Install Now. in this scenario, click Need Credentials and key in the required username and password.
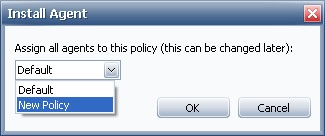
- Select the policy that you want to assign to the new agent(s) and click OK.
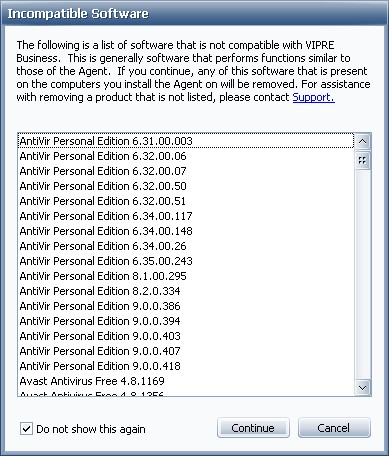
- From the Incompatible Software dialog, review the software that can interfere or interrupt VIPRE's activity. Click Continue to begin installing the agent(s).
After an agent is installed, the computer is automatically listed under the Protected Computers tab.
Automatic install of an agent
Automatic Agent Installation is a pre-configured process for each policy, whereby agents are automatically installed on newly discovered machines. You can select the locations where VIPRE scans for new machines, using any of the following methods (or in combination):
- Active Directory Queries
- Machine Lists
- IP Ranges and/or Subnets.
Active Directory is the recommended method because it will detect new machines as soon as they are joined to the domain.
Installing agents automatically consists of the following steps:
- Step 1: Configure a security policy
- Step 2: Configure the new policy Installation Management settings
- Step 3: Assign computers to the policy
- Step 4: Enable automatic agent installation at site level
Step 1: Configure a security policy
Agents are installed at policy-level, NOT at site-level. If you haven't configured a policy already, add and configure a policy now.
Step 2: Configure the new policy Agent Installation Management settings
- From the Admin Console > Site Navigator, right-click on the policy to which you want to install agents and select Properties.
- From the Policy Properties dialog, click Agent Installation Management > Configuration and configure the following:
Auto-Agent Installation Options:
-
Enabled: select to enable Automatic Agent Installation at the policy level. The checkboxes below "Enabled" are grayed out until "Enabled" is selected.
- You MUST enable scheduled automatic agent installation at both the policy and site level for a scheduled installation to occur.
-
Only attempt to install to machines that respond to a ping:when selected, VSS tries to ping each device first, then only installs to those that respond, reducing Agent Installation time considerably.
- If you are blocking ICMP (Internet Control Message Protocol) traffic between VIPRE and the workstations, do NOT select this option. This will result in the pings failing and creating a large ping timeout value, thus increasing the deployment time considerably.
Step 3: Assign computers to the policy
- From the Policy Properties dialog, select Agent Installation Management > Computers. You can select groups of machines using any of the methods below (or in combination):
-
AD Queries: (recommended) Active Directory queries run on the same directory as VSS. You can run queries at the root level or by group level. If you select a group, then any new machine added to that group will have an agent installed the next time Automatic Agent Installation runs:
- Click Add to display the Add AD Query Path(s) dialog box.
- Enter specific machine names or IP addresses to add to the query, or browse the appropriate domain, then select the sub-folder that you wish to query. Click OK.
-
Machine List:add one or more machines:
- Click Add to display the Add Machines dialog box.
- Enter specific machine names or IP addresses to add to the list, or browse the appropriate domain, then select the machine or group of machines where you wish to install agents. Click OK.
-
IP Ranges and Subnets:in the IP Range section, enter a range of addresses and let VSS resolve that list and find existing machines. The Subnet section allows you to get more specific, supporting up to a Class B address (such as 255.255.0.0):
- Click Add in either of these sections to display the IP Range or Subnet dialog box respectively.
- Enter a range of IP addresses or a subnet Host Address and a Subnet Mask in the appropriate text boxes and click OK.
-
Exclusion List:after you have selected a group of machines you may find there are machines you wish to exclude from the Automatic Agent Installation. The Exclusion List takes precedence over all other lists. You can list the same machine in the Machine List area and the Exclusion List area. The final list will be resolved and that machine will be excluded. When Automatic Agent Installation runs, agents will not be installed on these listed machines:
- Click Add to display the Add Exclusions dialog box.
- Enter specific machine names or IP addresses or browse to the appropriate domain, then select the machine or group of machines to which you wish to install agents. Click OK.
-
Verify the lists to combine the results of all queries into one list, thus removing any duplicates, as well as removing the machines listed in the Exclusion List:
Once you have selected machines for Automatic Agent Installation, as well as any to be excluded, click Verify.
After the computers are verified, a list of them displays. Select machines for further exclusion, if needed.
Click OK to accept this list. Your Automatic Agent Installation list for this policy is now created and verified.
-
AD Queries: (recommended) Active Directory queries run on the same directory as VSS. You can run queries at the root level or by group level. If you select a group, then any new machine added to that group will have an agent installed the next time Automatic Agent Installation runs:
Step 4: Enable automatic agent installation at site level
- From Admin Console > Site Navigator, right-click the site you want to configure and select Properties.
- From the left pane, click Agent Installation.
- Select Enable automatic agents installation, from under Automatic Agent Installation. This enables auto agent install for all the policies under the site.
- In the space provided next to Schedule Auto Installation start time, specify the time when VIPRE scans your network for new machines and deploys agents on them.
- Time must be specified in 24-hour format
- Click OK.
Each time Automatic Agent Installation runs, a "verify" automatically occurs; therefore, any devices added to the network will automatically be found if you are using an AD or IP range scope.
Create an installer package
An Installer Package can consist of an MSI or EXE file. Once the package is created, you can distribute it on to machines manually or using a third-party application, such as Microsoft SMS. Using an Installer Package is suitable for users who cannot use the "Push" manual installation method. Installation credentials are not relevant for Installer packages; they are only necessary for manual push and automatic installations.
To create an installer package:
- From the Admin Console, click Agent Installation and select one of the following installer package options:
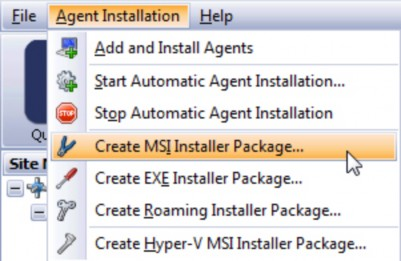
- Create MSI Installer Package - creates an MSI installer that can be deployed across your network using Group Policy Objects (GPO)
-
Create EXE Installer Package - creates an executable file that can be used to install agents manually or automatically, using third-party tools.
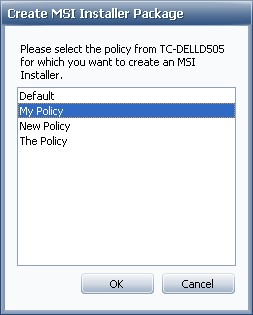
- Select the policy that is assigned to the agent when it is installed and click OK.

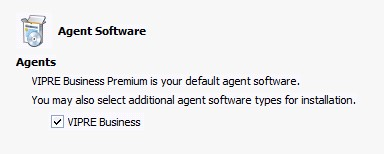
- (Optional) Select the agent software that is installed when the installer package is executed. This applies for users who have a combination of VIPRE and VIPRE Premium or VIPRE Endpoint Security license keys.
- Click OK.
- Select a location where the package is saved and click Save.
Once the package is created, run the package on the workstation(s) manually or use a third-party application.
Agent installation in a Windows Workgroup environment
Push vs. Installer Package
You can install agents in a Workgroup environment by either a "Push" method (see Manually Installing Agents) or by Creating an Installer Package. Companies unable to use the Push method may find creating an MSI Installer Package is a good alternative.
Static IP Addresses
It's important to use a Static IP Address and NOT a Dynamic IP, because a Dynamic IP will change and then be unable to communicate to the server. Enter the Static IP Address for each Policy, under Policy Properties > Agent > Communication > Servers (Name or IP) area.
Connecting agents over the WAN
VIPRE allows you to install and communicate with agents across the Internet, even if they do not access the network via a VPN connection. This is done using Network Address Translation (NAT).
A policy for the remote agents has to be created; agents are deployed to that policy using an installer package.
Installing agents over WAN consists of the following steps:
- Step 1: Configure firewall settings
- Step 2: Create a policy for remote Agents
- Step 3: Create an installer package
- Step 4: Distribute the package
- Step 5: Install the package
Step 1: Configure firewall settings
- If you are using a 3rd party (non-Microsoft) Business Router/Firewall:
If you are using the Microsoft Windows firewall, configuration is automatic. You will not need to do any further configuratio
- Allow Inbound external traffic on port TCP and UDP port 18082 to the VIPRE Server.
- Allow SOAP traffic (if your firewall blocks at the protocol level).
- On your Remote Agents Router/Firewall:
- If the agent computer has a third-party firewall installed, you may need to allow Outbound traffic on TCP and UDP port 18082 so that it can communicate with the VIPRE Server.
- Allow SOAP traffic (if your firewall blocks at the protocol level).
Some firewalls may block SOAP over HTTP. You will need to configure your firewall to allow this communication type.
Step 2: Create a policy for remote agents
- From Site Navigator, right-click on the site to which you want to add a policy and select Add Policy.
- Enter a name for the remote agents policy, for example, "Remote Agents".
- Double-click the policy to open the Policy Properties screen.
- From the left pane, click Agent > Communication.
- Under Servers (Name or IP), key in the public IP and communication port for:
- Policy Server - server that distributes security policy updates to machines running an agent
- Update Server - server that distributes threat definitions updates to machines running an agent
- Usually, this is the address issued to you by your ISP and will not begin with 10, 172, or 192
- The Policy Server and Update Server can be two separate machines, situated in different geographical locations
- To use VIPRE Security as a (non-local) update server, check Use VIPRE Security as Update Server for definitions and software updates.
- Click OK.
Step 3: Create an installer package
The recommended method of deploying agents over WAN, is using an Installer Package.
To create an installer package:
- From the Admin Console, click Agent Installation and select one of the following installer package options:
- Create MSI Installer Package - creates an MSI installer that can be deployed across your network using Group Policy Objects (GPO)
- Create EXE Installer Package - creates an executable file that can be used to install agents manually or automatically, using third-party tools.
- Select the "Remote Agents" policy (configured in Step 2: Create a policy for remote Agents). The selected policy is assigned to agents that are installed from this package. Click OK.
- Save the installer package in a convenient location.
Step 4: Distribute the package
The package must be distributed to all the client machines that require an agent. This can be done using any of the following methods:
- Group Policy
- Network Shares
- Jump Drive
- CD / DVD
- Flash Drives
Step 5: Install the package
Run the installer package while connected to the Internet. During installation, the agent needs to communicate with VSS in order to receive threat definitions.
Roaming agents
When an agent can no longer talk directly with the Console, it becomes a roaming agent. Roaming agents communicate to the Console through the VIPRE Roaming Service (VRS).
Roaming allows for easier management of remote agents, as you no longer need to use firewall port forwarding to retain a remote agent connection.
The roaming service acts as a holding queue for messages between the Console and roaming agents. The Console checks the VIPRE Roaming Service every 5 minutes for incoming roaming agent messages.
When an agent is connected directly to the Console, it has a call in period of once every 5 minutes. If an agent is unable to connect directly to the Console, it is considered a roaming agent. When roaming, the call in period changes (by default) to once per hour. AP (Active Protection) events will still be handled immediately.
Types of roaming agents
There are two distinct types of roaming agents:
- You may configure a previously installed “regular” agent as a roaming agent. This means any existing agent can be configured to roam, once it is installed locally on the network.
- You may install a new agent on a remote machine that has no direct VIPRE Console contact. This uses the Roaming Agent installation package, and allows for a full installation without direct contact with the VIPRE server.
Turn roaming agents on for site and policies
Roaming is controlled on both the site level and policy level. You must enable both for roaming to function correctly.
To enable roaming agent installation at the site level
- Select Admin Console > Site Properties.
- From the left pane, click Roaming Agent Installation.
- Select Allow, from under Roaming Agent Installation. This enables roaming agent installations to contact VIPRE Site Service for all the policies under the site.
- Click OK.
To enable roaming agent installation at the policy level
- Select Admin Console > Site Navigator.
- From the left pane, click the policy you wish change.
- Click the Enable roaming for this policy link.
Approve a roaming agent
When a roaming agent calls in for the first time, the admin must manually approve or reject the pending roaming installation. Alternatively, a policy can be set to auto-approve pending roaming installations.
To approve or reject a pending roaming installation
- Select Admin Console > Site Navigator.
- From the left pane, click the policy you wish change.
- For the agent in question, in the Install column, click Approve or Reject.
Some pending roaming installs may not immediately show as pending. To resolve this, select a different policy, and then click back to the policy in question.
To set a policy to auto-approve roaming installations
- Select Admin Console > Site Navigator.
- From the left pane, click the policy you wish change.
- Click the Settings tab, then Properties. The Policy Properties window will display.
- Select Agent > Roaming Agents from the left pane.
- Click the Automatically approve roaming installations for this policy check box.
- Click OK.
Create a roaming agent installer
You may create roaming agent installation packages to enable a remote machine to roam. This can be used to install the agent on laptops or in remote offices. Note that roaming agents receive their definitions updates directly from VIPRE Security, not through the Console
To create a roaming installation package
- Select Admin Console > Install Agent. The Install Agent Wizard will launch.
- From the drop down, choose the type of device you are installing to, and click Continue.
- From the drop down, choose the policy this device will adhere to, and click Continue.
- Select Roaming Installation.
-
Optionally, select the Make the installer expire after ten days check box to limit the amount of time the installer may be used,
Or
Optionally, select the Allow only “x” installations with this package check box to limit the number of installations to a number of your choosing (10 by default). - Click Continue.
- Enter or browse to the location where you would like the installation file to be saved, and then click Continue.
- You should see a message confirming successful creation of the EXE package. Click Finish.
- Distribute this file to your end-user.
Automatic policy assignment
VIPRE Premium and VIPRE Endpoint Security can automatically assign computers to a policy during installation. This only affects computers on the "Default" policy, or not in the catalog. Auto Policy Assignment is divided by the three computer types: Workstations, Laptops, and Servers. It's a good practice to ensure you have created specific policies for each type of machine, such as "Default for Workstations", "Default for Laptops", and so forth.
To enable Auto Policy Assignment
- Under Site Properties, select Auto Policy Assignment.
- Check the Automatically assign my computers to a policy check box.
- For each type of computer, select a policy from the drop-down list.
- Click Apply or OK.
Choose default agent type for installs
You have the option to distribute Endpoint, Premium and non-Premium agents when you create an agent installation.
To enable agent type selection:
- Open the Site Properties > Agent Software.
-
Select the check box next to an agent type to add it as an option for agent installation. This enables selecting a default agent type for each policy (see below).
To select the default agent type for each policy:
- Double-click on a policy, then select Agent Installation Management > Configuration.
- Under Agent Installation, select the Agent Type you wish to use by default.
- The Install Agent will now use your default agent for any new installations.
