
Product release information for VIPRE SafeSend v5.2, released on September 27, 2022.
What's New
We're excited for the latest version of VIPRE SafeSend as we add new features, update existing features and settings, and do everything we can to stay ahead of the curve.
>> Click here to download SafeSend v5.2. <<
For specific details, click on the tab for your desired SafeSend add-in below.
PC Add-in
Enable Force Open Attachment
In SafeSend v5.2, the PC add-in sees the addition of a new feature called Enable Force Open Attachment. When sending an email, on the Confirm External Recipients screen, under Files, this feature will force the user to click OPEN to verify the attachments before they can select the files for confirmation and send the email.

To enable:
- In Outlook, on the top left, click File
- Go down to Outlook Options and select Add-ins
- Select Add-in Options, then click Edit Settings
- On the Advanced tab, look for EnableForceOpenAttachment
- Disabled by default;
- To enable, set to True
- Click Close Window
MIP Sensitivity Label Detection
MIP (Microsoft Information Protection) Sensitivity Labels must be configured on the domain by your organization's system administrator. They can be applied to files and emails to help keep them compliant with your organization's information protection policies. SafeSend DLP now searches attachments for these sensitivity labels to require additional verification.
SafeSend Data Loss Prevention add-on is required for this feature.

Client Keyword Disable Confirm
This new setting allows admins to remove the need to type CONFIRM on the confirmation dialog box in order to send an email.

To enable:
- In Outlook, on the top left, click File
- Go down to Outlook Options and select Add-ins
- Select Add-in Options, then click Edit Settings
- On the Advanced tab, look for ClientKeywordDisableConfirm
- This setting is disabled by default; set to true to enable
- Click Close Window
Expand Lists by Default
Another new setting, ExpandListsbyDefault, actually works with the GroupbyDomain setting. When GroupbyDomain is enabled, the confirmation dialog box has email addresses with the same domains grouped together with the list closed, with the option to manually expand the lists. ExpandListsbyDefault allows lists of email addresses affected by the GroupbyDomain setting to be expanded by default.

To enable:
- In Outlook, on the top left, click File
- Go down to Outlook Options and select Add-ins
- Select Add-in Options, then click Edit Settings
- On the Advanced tab, look for ExpandListsByDefault and enable it
- This setting is disabled by default
- Click Close Window
DLP Client Keywords
The Client Keywords setting as part of the Data Loss Prevention add-on has gotten a makeover, allowing for additional ways to configure this setting.
-
ClientKeyword1, ClientKeyword2:domain1
- Nothing after domain1; Current configuration; shows Allowed Domains in the confirmation dialog box
-
ClientKeyword1, ClientKeyword2:domain1:
- Add a colon after domain1; updated configuration; shows blank/nothing under Allowed Domains in the confirmation dialog box
-
ClientKeyword1, ClientKeyword2:domain1:REDACTED
- Add any custom text you want after domain1: (this example uses REDACTED); updated configuration; shows whatever custom text you choose under Allowed Domains in the confirmation dialog box
For more details on configuring DLP, navigate to PC Add-in Data Loss Prevention.
>> Click here to download SafeSend v5.2. <<
DeleteWeb Add-in
It is recommended to use Microsoft Azure App Service for installation and to enable the following new settings.
Configuring Settings in Azure:
- On the left-side menu under Settings, click New application setting
- Take the name of the setting below (which can also be found in the settings.json file) and add to Name field
- Use the info below (or from settings.json file) to determine the setting value
- Click OK
- Repeat steps 1 -4 for each setting you wish to configure
- Click Save
- Once you've finished configuring your settings, on the left-side menu, select Overview then select Restart at the top
- Azure will confirm you are sure you want to restart SafeSend - click Yes
MIP Sensitivity Label Detection
MIP (Microsoft Information Protection) Sensitivity Labels must be configured on the domain by your organization's system administrator. They can be applied to files and emails to help keep them compliant with your organization's information protection policies. SafeSend DLP now searches attachments for these sensitivity labels to require additional verification.
SafeSend Data Loss Prevention add-on is required for this feature.

Client Keyword Disable Confirm
This new setting allows admins to remove the need to type CONFIRM on the confirmation dialog box in order to send an email.
-
ClientKeywordDisableConfirm
- Set to true to enable
- This setting is disabled by default
Expand Lists by Default
Another new setting, ExpandListsbyDefault, actually works with the GroupbyDomain setting. When GroupbyDomain is enabled, the confirmation dialog box has email addresses with the same domains grouped together with the list closed, with the option to manually expand the lists. ExpandListsbyDefault allows lists of email addresses affected by the GroupbyDomain setting to be expanded by default.
-
ExpandListsByDefault
- Set to true to enable
- This setting is disabled by default
Retry on Server Connection Reset
Another new setting, RetryOnServerConnectionReset, allows the email message to be resent without displaying another confirmation dialog box if the server connection has been lost and restored. RetryOnServerConnectionReset works only with Microsoft Azure sites.
- RetryOnServerConnectionReset
- Options are: 0 - Send without retry, 1 - Retry if no dialog, or 2 - Retry always
- The default value is: 0
 |
 |
DLP Client Keywords
The Client Keywords setting as part of the Data Loss Prevention add-on has gotten a makeover, allowing for additional ways to configure this setting.
-
ClientKeyword1, ClientKeyword2:domain1
- Nothing after domain1; Current configuration; shows Allowed Domains in the confirmation dialog box
-
ClientKeyword1, ClientKeyword2:domain1:
- Add a colon after domain1; updated configuration; shows blank/nothing under Allowed Domains in the confirmation dialog box
-
ClientKeyword1, ClientKeyword2:domain1:REDACTED
- Add any custom text you want after domain1: (this example uses REDACTED); updated configuration; shows whatever custom text you choose under Allowed Domains in the confirmation dialog box
For more details on configuring DLP, navigate to Web Add-in Data Loss Prevention.
Additional Updates in VIPRE SafeSend v5.2 BETA
- SafeSend Web Add-in now supports Microsoft Graph API when using Microsoft 365
- As a result of Microsoft's announcement that its support of .NET Core 3.1 will expire in December 2022, VIPRE SafeSend now works with any .NET Core 6.0 capable web server
Click here for Microsoft Azure-specific installation instructions
- Navigate to https://portal.azure.com/ and log in with your Microsoft Azure account credentials
- On the top menu, hover your mouse over App Services and select Create
- A new page called Create Web App will load
- Select the desired Resource Group from the drop-down menu
- Under Instance Details:
- Choose a web app name that reflects your use; e.g., for our purposes, we'll use SafeSend8
- Publish - defaults to Code; this can stay as-is
- Runtime stack - .NET Core 6.0 (LTS)
- Operating System - choose your preferred operating system to host SafeSend
- Region - select your region
- Skip the section called App Service Plan and click Next : Deployment >
- On the next page, click Review + Create
Step 2 - The following steps are performed while Azure is deploying the App Service
- After you have downloaded and extracted the SafeSend .zip file, open the SafeSendWebAddInWeb folder and open settings.json with a text editor like Notepad or Notepad++
- Verify the following settings:
- EmailProviderURL
- LicenseKey
- SafeDomains
- Any other settings necessary/desired
- Important note: Settings can also be configured after deployment. Anything configured via Azure portal will override the settings.json file
- Take all files in the extracted SafeSendWebAddInWeb folder, select all (CTRL+A)
- Right-click and select Send to > Compressed (zipped) folder

- Name this anything you want but for this example, we'll name it SafeSendDeploy.zip
- Right-click and select Send to > Compressed (zipped) folder
- Move the newly created .zip file to a different location on your computer
- In the same place you moved the newly created .zip file. right-click on the folder
- Select New > Text Document

- Select New > Text Document
- Name the text file packagename.txt
- Open the txt file and add the name of the .zip file (in our case SafeSendDeploy.zip), save then close the .txt file
Step 3 - For the next part, go back to the Azure screen - you should see confirmation that deployment is complete
- Click Go to resource
- On the left-side menu, under Settings, select Configuration
- Under Application Settings, select +New application setting

- Under Add/Edit application setting:
- Name = WEBSITE_RUN_FROM_PACKAGE
- Value = 1
- Click OK
- Click Save at the top
Step 4 - You'll need an FTP Client (like Filezilla) for the next part
- On the left-side menu, under Deployment, select Deployment Center
- Select FTPS Credentials at the top
- Copy the value in the FTPS endpoint field and paste it into the Host address field of your FTP Client
- Under Application scope, copy the value in the Username field to the Username field of your FTP Client
- Copy the value of the Password field to the Password field of your FTP Client
- On your FTP Client, click Connect

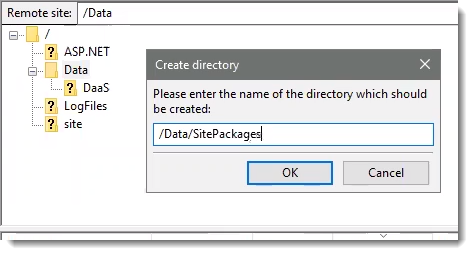
- After you're connected, under Remote site, create a new folder called Data
- Right-click on the new folder Data and select Create a Directory
- A box called Create Directory will open
-
Name your directory based on the Operating System you chose in Step 1.5.d above
- Examples: Windows based App Service = C:\home\Data\sitepackages or Linux based App Service = /data/sitepackages
- Click OK
-
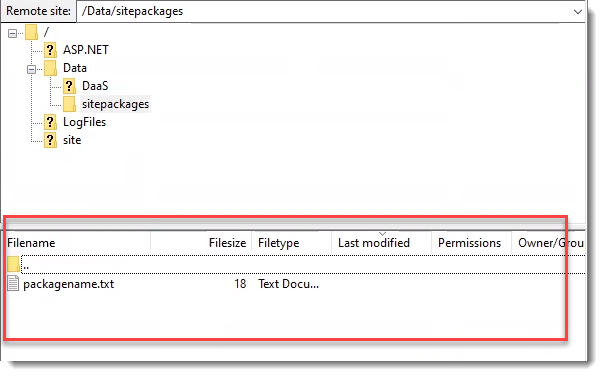
- Going back to the location where you saved SafeSendDeploy.zip and packagename.txt, select those two files and drag them to your FTP Client to copy them to /Data/sitepackages
Step 5 - Go back to the browser screen that has Azure open
- Configure additional settings as desired
- On the left-side menu under Settings, click New application setting
- Take the name of the setting from the settings.json file and add to Name field
- Use the settings.json file to determine the setting value
- Click OK
- Click Save at the top
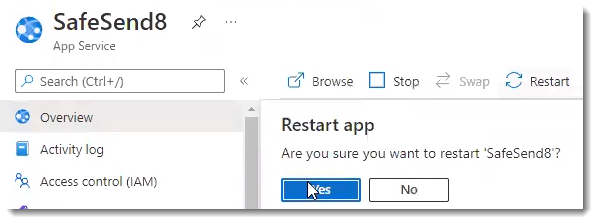
- On the left-side menu, select Overview then select Restart at the top
- Azure will confirm you are sure you want to restart SafeSend - click Yes
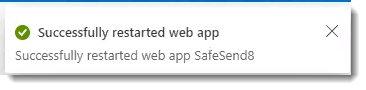
- In the top-right corner, you should see a notification showing the web app has been successfully restarted
- You'll see a URL somewhat close to the top-right portion of the screen; clicking that URL should open a browser window and take you immediately to the SafeSend website to verify your installation and license status
- Copy that URL and open the safesend-manifest.xml file with a text editor like Notepad or Notepad++

- In safesend-manifest.xml, next to AppDomains, perform a Replace All to replace localhost:44355 with the URL you copied from Azure

- Save and close safesend-manifest.xml
Congrats! SafeSend has now been installed.
DeleteClick here for Microsoft Graph API setup instructions
If you use Microsoft 365 with a Microsoft Azure deployment, the following instructions are required.
- Sign in to Microsoft Azure Active Directory Admin Center with your administrator credentials
- Select New Registration
- On the Register an Application page, set the following values:
- Name: SafeSend
- Supported account types: Accounts in any organizational directory (any Entra ID directory - Multitenant) and personal Microsoft accounts (e.g., Skype, Xbox, etc)
- In the Redirect URI section, select Web from the drop-down menu, then set URI to 'https://<yoursafesendhost>'
- Choose Register
- On the SafeSend page, copy and save the Application (client) ID; you'll need this later
- Under the Manage section, select Authentication
- Under Implicit Grant and Hybrid Flows, check the box next to Access Tokens (used for implicit flows) and ID Tokens, and click Save
- Still, under the Manage section, select Certificates & Secrets, then New Client Secret
- Enter a value for Description, select an appropriate option for Expires, then click Add
- Copy and save the Client Secret value; you'll need this later
Please note that this is the only opportunity you will have to save the Client Secret value; please ensure you save it in a secure location
- Still, under Manage, select Expose an API
- Choose the Set link that appears after Application ID URI
- In the Set App URI panel, change the default value by adding your host before the GUID listed
- Example: If the default value is api://05adb30e-50fa-4ae2-9cec-eab2cd6095b0, and your app is running on <yoursafesendhost>, the value should be api://<yoursafesendhost>/05adb30e-50fa-4ae2-9cec-eab2cd6095b0
- Click Save
- Select Add a Scope
- A panel will open; enter access_as_user as the Scope name
- Who can consent? should be set to Admins only
- Fill in the fields for configuring the admin consent prompt with values that are appropriate for the `access_as_user` scope
- This enables the Office client application to use your SafeSend add-in's web APIs with the same rights as the current user
- Examples:
- Admin consent display name**: Office can act as the user
- Admin consent description**: Enable Office to call the add-in's web APIs with the same rights as the current user
- Set State to Enabled
- Select Add Scope
- In the Authorized client applications section, identify the applications that you want to authorize to your SafeSend add-in's web application
- Each of the following IDs needs to be pre-authorized:
- d3590ed6-52b3-4102-aeff-aad2292ab01c (Microsoft Office)
- ea5a67f6-b6f3-4338-b240-c655ddc3cc8e (Microsoft Office)
- 57fb890c-0dab-4253-a5e0-7188c88b2bb4 (Office on the web)
- 08e18876-6177-487e-b8b5-cf950c1e598c (Office on the web)
- bc59ab01-8403-45c6-8796-ac3ef710b3e3 (Outlook on the web)
- Each of the following IDs needs to be pre-authorized:
- For each of the IDs above, take the following steps:
- Select Add a client application button
- In the panel that opens, set the Client ID to the respective GUID
- Check the box for api://<yoursafesendhost>/$App ID GUID$/access_as_user
- Select Add application
- Under Manage, select API Permissions, then Add a Permission
- On the panel that opens, choose Microsoft Graph then Delegated Permissions
- Using the Select Permissions search box, search for the following permissions
- Calendars.ReadWrite.Shared
- Files.ReadWrite
- Mail.ReadWrite.Shared
- offline_access
- openid
- profile
- User.Read
- Select the checkbox for each permission as it appears; after selecting the permissions, click Add Permissions at the bottom of the panel
- On the same page, choose Grant Admin Consent for [tenant name] button
- Select Yes to confirm
- Update the following settings via Azure portal configuration:
- Update AppID using the AppID from Step 5 above
- Update AppSecret using ClientSecret from Step 10 above
- Ensure EmailProviderUrl is set to https://graph.microsoft.com
- Navigate to https://<yoursafesendhost>/safesend-manifest.xml,to download the safesend-manifest.xml file
Using SafeSend Web Add-in with a Different Tenant than the one you Registered the Application with
In order to use the SafeSend Web Add-in with a different tenant than the one you registered with, you will need access to a tenant administrator account to perform consent for all of your Microsoft 365 users
- Browse to `https://login.microsoftonline.com/common/adminconsent?client_id={AppId}&state=12345`, where `{AppId}` is the application ID shown in your app registration
- Sign in with your administrator account then review the permissions and click Accept
- The browser will attempt to redirect back to your app, which may not be running
- You might see a This Site cannot be Reached error after clicking Accept; this is okay as the consent was still recorded
>> Click here to download SafeSend v5.2. <<
DeleteSystem Requirements
| Product or Component | Minimum Requirement |
|---|---|
| SafeSend PC Add-in |
Operating Systems
Email Clients
|
| SafeSend Web Add-in |
.NET Core 6.0 Capable Web Server
Microsoft 365
Exchange 2019
|
Bugs Fixed in this Release
- SAFE-1179: Editing Assigned Tasks within emails was leading to internal error prompts
- SAFE-1167: The following settings (SS_OnlyPopupForAttachments and SS_OnlyPopupForAttachmentsOrDLPMatch) will no longer produce a confirmation dialog when an email with only internal recipients and attachments is sent
- SAFE-1163: PC Add-in showed an error dialog if configured with the following settings
- SS_DisableSelectAll=true
- SS_ShowAttachmentsSeparator=true
- SS_ConfirmReplyToRecipients=true
- Sending an internal message with replyto set
- SAFE-1067: Added SS_StringContentScanningScanningWaiting with default value "Please wait"
Known Issues and Workarounds
This section lists issues that are known at the time of release. In some cases, these are bugs that we are working to resolve with a subsequent release. Other items may be due to causes outside of our control, such as bugs with other vendors' software. In all cases, we have tried to provide a workaround for you to consider, should you experience an issue.
If you have questions about a specific issue, please provide the issue ID (if applicable) when contacting our Technical Support team.
Known Issues from Current Versions
| Ticket Number | Description |
|---|---|
| SAFE-1287 (Web Add-in) | When replying to an email from the side reading pane in Outlook, the text of a nested message will not be scanned by the DLP add-on Workaround: Open the email and reply in a maximized/expanded window; this will allow it to be scanned |
| SAFE-1147 (PC and Web Add-in) | Confirmation window positioned incorrectly Workaround: Ensure all of your monitors are set to the same scale |
Known Issues from Previous Versions
| Ticket Number | Description |
|---|---|
| SAFE-808 (Web Add-in) | When StringMainMessage in Exchange/OWA is too long, it can take up the whole SafeSend confirmation dialog box and sometimes cause the page to be unresponsive Workaround: Keep your string as short as possible; it’s recommended to not use more than 140 characters (including spaces); it’s also important to ensure your browser window is maximized. |
| SAFE-757 (Web Add-in) | An event is created on the organizer's calendar when clicking Send on the Outlook event in Microsoft365, then clicking Cancel from the SafeSend confirmation dialog box. Workaround: Manually cancel the Outlook event. |
| SAFE-929 |
Adding a new embedded image when using Reply, Reply All, or Forward causes any previously embedded image to disappear from the confirmation dialog box Workaround: Confirm that your Drafted email is what you want to send and ignore the list in the confirmation dialog box |