
VIPRE Email Security Cloud supports the use of SAML, allowing for integration with SSO identity providers.
What is SAML?
SAML (Security Assertion Markup Language) is an open standard that allows for authentication and authorization between an identity provider (IDP) and a service provider (SP).
Configuration
SAML configuration takes place in both the IDP admin portal and the VIPRE Email Security Cloud admin portal.
Choose your IDP below for specific instructions on configuring SAML with VIPRE Email Cloud for single sign-on. Please know that while we are working to provide instructions for as many of the most common IDPs as we are able, we have not provided instructions for all of them. If your IDP is not represented below, you can use the instructions below as a general guide. If you require further assistance, contact Technical Support.
Okta
- Log in to the Email Cloud portal
- On the left-side menu, find Service Settings, then select SAML
- Click Configure SAML

- Open a separate browser tab and navigate to your Okta admin portal
- In your Okta portal, select Applications > Applications on the left-side menu
- In the main part of the screen, select Add Application
- Click Create a New App in the top-right
- Select SAML 2.0 as the Sign on Method and click Create
- On the General tab, under SAML Settings, click Edit
- App name can be any name you want to use to identify the Email Security Cloud application within Okta
- All other options are based on your organization's desired decisions
- Click Next to get to the Configure SAML screen within Okta
- Go back to the browser tab that has your Email Cloud portal open and copy the Entity ID from the Service Provider Metadata screen
- In the browser tab that you're using for Okta, paste the Entity ID into the Audience URI (SP Entity ID) field
- Go back to the browser tab that has your Email Cloud portal open and copy the Single Sign On URL from the Service Provider Metadata
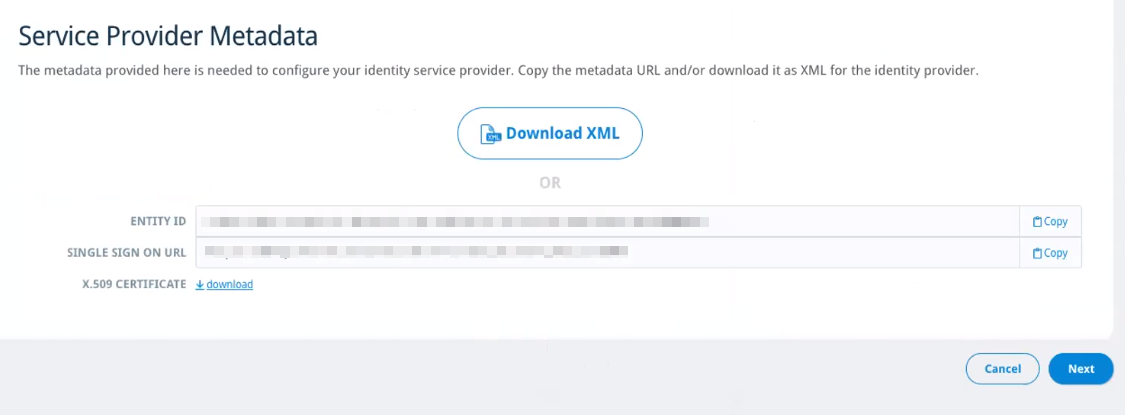
- In the browser tab that you're using for Okta, paste the Single Sign On URL into the Single sign on URL field
- Under Single sign on URL, Use this for Recipient URL and Destination URL should already be checked by default
- Ensure the following configurations are set in your Okta portal:
- Name ID format should be set to EmailAddress
- Application username should be set to Email
- Click Show Advanced Settings at the bottom of the page to continue
- Response should be set to Signed
- Assertion Signature should be set to Signed
- Assertion Encryption should be set to Unencrypted
- All other settings can remain in their default state
- Scroll to the bottom of the page and click Next
- Click Finish
- In the middle of the page, you'll see a message that SAML has not yet been configured; click View Setup Instructions
- You'll come to a page explaining how to configure SAML 2.0 for your application
- Go back to the Email Cloud portal and click Next to get to the Identity Provider Metadata page
- Select Enter Manually
- Go back to the Okta portal and copy the Identity Provider Issuer
- In the Email Cloud portal, paste the Identity Provider Issuer from Okta into the Entity ID field
- Go back to the Okta portal and copy the Identity Provider Single Sign-On URL
- In the Email Cloud portal, paste the Identity Provider Single Sign-On URL from Okta into the Single Sign On URL field
- Go back to the Okta portal and click Download certificate
- In the Email Cloud portal, next to X.509 Certificate, click Upload, then select the certificate you downloaded from Okta
- Next to Mailbox Attribute, select the radio button for Name ID; this is an email address
- Click Next
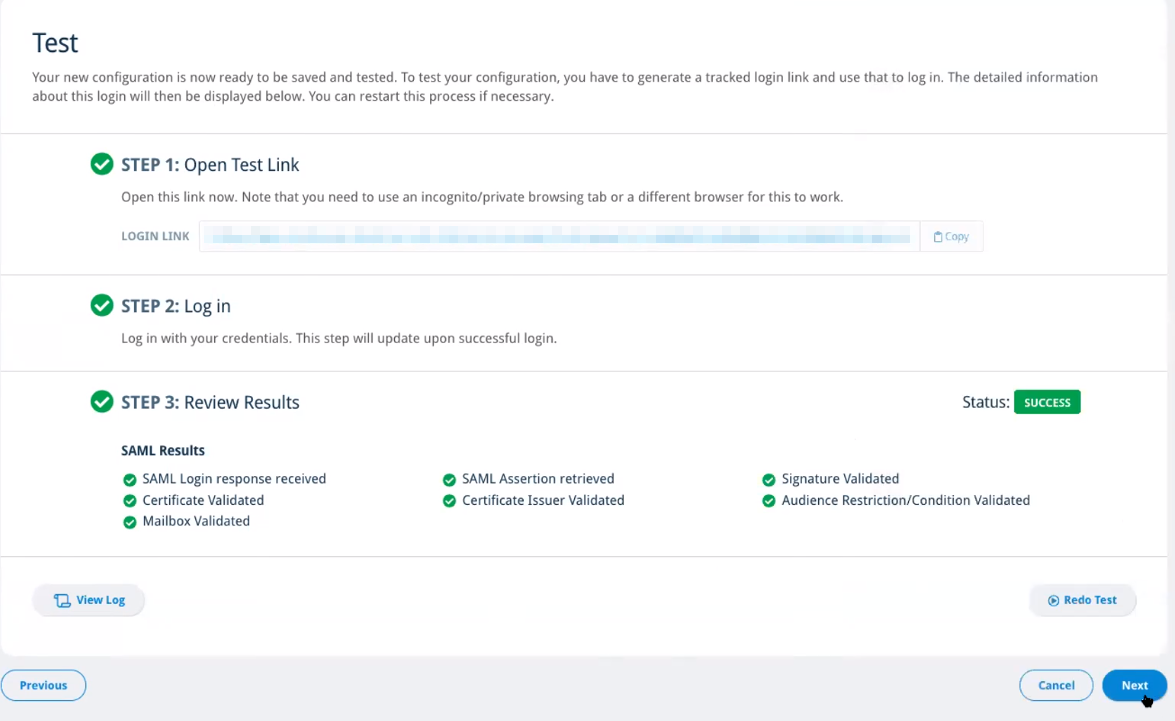
- On the Test screen, there are multiple steps:
- Copy the login link provided in Step 1
- Open an Incognito browser tab and navigate to the login link
- It will simulate a login screen that should look similar to your Okta admin portal
- You will need to have manually created identical users in both Okta and Email Cloud
- In the navigation pane, expand the Users menu, then select Users.
- On the right side of the Users panel, select the green + plus sign.
- In the Add:User panel, fill out the information in all required fields.
- (Optional) You can add additional information (phone numbers, notes, etc.) by selecting the Additional checkbox.
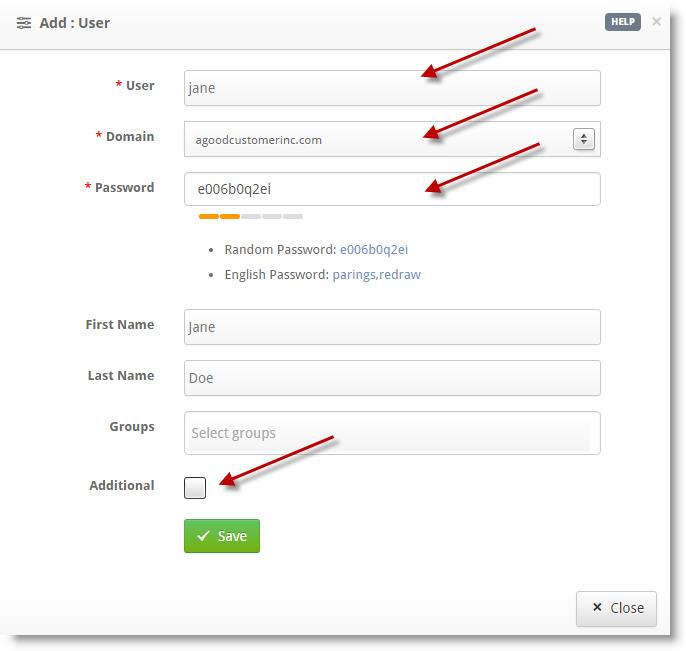
- Once completed, select Save
- (Optional) You can edit Settings, Quarantine, Filtering, and Routing information on a per-user basis.
- Confirm the user information is correct, then select Close
- Log in with your Okta account as directed in Step 2
- Once you log in successfully, go back to your Email Cloud admin portal browser tab and you should see the following test results:
- If you have any errors in Step 3, refer to SAML SSO Error Codes and select Redo Test, noting that you will need to copy the new login link provided in Step 1
- Once all SAML Results pass validation in Step 3, click Next
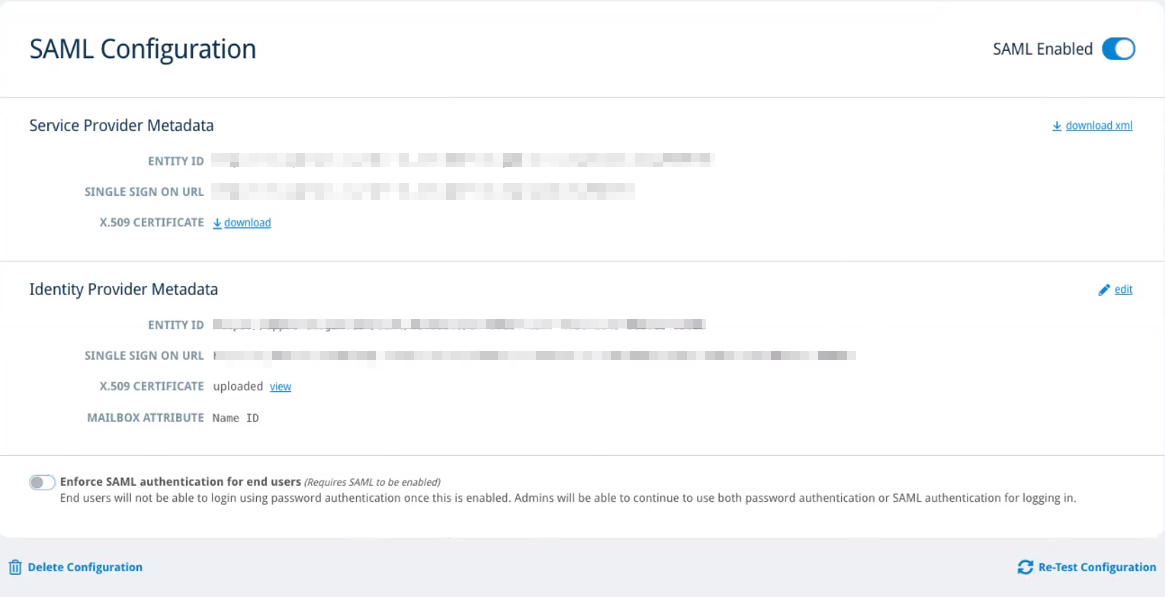
- On the SAML Configuration Summary page, you'll have the option to require all of your users to login via SAML only by selecting Enforce SAML Authentication for End Users
- If you opt to enforce SAML for all of your end-users, a window will pop up asking you to confirm your choice; select OK
- Click Save & Enable to save your configuration and enable SAML
- You can also select Save to save your configuration and enable SAML at a later time
SAML SSO with Okta has now been configured with Email Cloud. Whenever you click SAML on the left-side menu, you'll see a page that looks similar to this:
Access Email Cloud with SSO
Once a user is signed in to Okta, they will only need to enter their email address to access their email.
- Navigate to your Email Cloud login portal
- Click Single Sign On (SSO)

- Enter your email address and click Continue
That's it!
OneLogin
- Log in to the Email Cloud portal
- On the left-side menu, find Service Settings, then select SAML
- Click Configure SAML
- Open a separate browser tab and navigate to your OneLogin admin portal
- In your OneLogin portal, find the application details under Configuration in the left-side menu
- Go back to the browser tab that has your Email Cloud portal open and copy the Entity ID from the Service Provider Metadata
- In the browser tab that you're using for OneLogin, paste the Entity ID into the Audience (EntityID) field
- Go back to the browser tab that has your Email Cloud portal open and copy the Single Sign On URL from the Service Provider Metadata
- In the browser tab that you're using for OneLogin, paste the Single Sign On URL into the ACS (Consumer) URL field
- Paste the same Single Sign On URL into the Recipient field in your OneLogin portal
- Ensure the following configurations are set in your OneLogin portal:
- SAML nameID format = Email
- SAML signature element should be either Assertion or Both from the drop-down menu
- Go back to the Email Cloud portal and click Next to get to the Identity Provider Metadata page
- In the OneLogin portal, in the top-right, choose SAML Metadata from the More Actions drop-down menu to download an XML file

- Go back to the Email Cloud portal and upload the XML file you just created from OneLogin; this will auto-populate the IDP metadata

- Next to Mailbox Attribute, select the radio button for Name ID; this is an email address
- Click Next
- On the Test screen, there are multiple steps:
- Copy the login link provided in Step 1
- Open an Incognito browser tab and navigate to the login link
- It will simulate a login screen that should look similar to your OneLogin admin portal

- Log in with your OneLogin account as directed in Step 2
- Once you log in successfully, go back to your Email Cloud admin portal browser tab and you should see the following test results:
- If you have any errors in Step 3, refer to SAML SSO Error Codes and select Redo Test, noting that you will need to copy the new login link provided in Step 1
- Once all SAML Results pass validation in Step 3, click Next
- On the SAML Configuration Summary page, you'll have the option to require all of your users to login via SAML only by selecting Enforce SAML Authentication for End Users
- If you opt to enforce SAML for all of your end-users, a window will pop up asking you to confirm your choice; select OK
- Click Save & Enable to save your configuration and enable SAML
- You can also select Save to save your configuration and enable SAML at a later time
SAML SSO with OneLogin has now been configured with Email Cloud. Whenever you click SAML on the left-side menu, you'll see a page that looks similar to this:
Access Email Cloud with SSO
Once a user is signed in to OneLogin, they will only need to enter their email address to access their email.
- Navigate to your Email Cloud login portal
- Click Single Sign On (SSO)
- Enter your email address and click Continue
That's it!
Entra ID
If you subscribe to Entra ID for User Management as well and haven't already set up Email Cloud to sync user and group accounts that belong to your managed domain, refer to Related Articles for full details. The following instructions assume that Entra ID and Email Cloud are already syncing users.
- Log in to the Email Cloud portal
- On the left-side menu, find Service Settings, then select SAML
- Click Configure SAML
- Open a separate browser tab and navigate to your Azure admin portal
- In your Azure portal, under Azure Services, select Enterprise Applications
- Click New Application at the top
- On the Browse Entra ID Gallery page, click Create your own application
- Azure will ask you to name your app and how you will be using your new application; add your desired app name in the appropriate field, select Integrate any other application you don't find in the gallery, then click Create at the bottom
- In the left-side menu, under Manage, click Single sign-on
- Select Upload metadata file
- Go back to the browser tab that has your Email Cloud portal open and click download XML from the Service Provider Metadata page
- In the browser tab that you're using for Azure, click Select a file and navigate to the XML file you downloaded from Email Cloud
- Click Add and it will automatically populate the Basic SAML Configuration (Entity ID and Assertion URL)
- Under User Attributes & Claims, click Edit
- Name identifier format should be Email address
- Source should be Attribute
- Source attribute has two possible options:
- user.userprincipalname should only be used if you know for sure the domain in the userprincipalname is a managed domain in Email Cloud
-
user.mail should be used if the domain in the userprincipalnameis not a managed domain in Email Cloud
- Visit Microsoft Docs for full details on Entra ID UserPrincipalName Population
- Click Save
- Scroll down, under SAML Signing Certificate, and click Download next to Federation Metadata XML
- Go back to the Email Cloud portal and click Next to get to the Identity Provider Metadata page
- Upload the XML file you just created from Azure by dragging and dropping the XML file or navigating to where you downloaded the file; this will auto-populate the IDP metadata
- Next to Mailbox Attribute, select the radio button for Name ID; this is an email address
- Click Next
- On the Test screen, there are multiple steps:
- Copy the login link provided in Step 1
- Open an Incognito browser tab and navigate to the login link
- It will simulate a login screen that should look similar to your Azure admin portal
- Log in with your Azure account as directed in Step 2
- Once you log in successfully, go back to your Email Cloud admin portal browser tab and you should see the following test results:
- If you have any errors in Step 3, refer to SAML SSO Error Codes and select Redo Test, noting that you will need to copy the new login link provided in Step 1
- Once all SAML Results pass validation in Step 3, click Next
- On the SAML Configuration Summary page, you'll have the option to require all of your users to login via SAML only by selecting Enforce SAML Authentication for End Users
- If you opt to enforce SAML for all of your end-users, a window will pop up asking you to confirm your choice; select OK
- Click Save & Enable to save your configuration and enable SAML
- You can also select Save to save your configuration and enable SAML at a later time
SAML SSO with Azure has now been configured with Email Cloud. Whenever you click SAML on the left-side menu, you'll see a page that looks similar to this:
Access Email Cloud with SSO
Once a user is signed in to Azure, they will only need to enter their email address to access their email.
- Navigate to your Email Cloud login portal
- Click Single Sign On (SSO)
- Enter your email address and click Continue
That's it!