
What is a Private Endpoint?
A Private Endpoint is a solution to support zero-trust network access to critical business services within your organization. Unlike traditional VPNs, which simply serve to connect remote devices into your internal network as if they were present on—and therefore granted broad access to—your LAN, zero-trust network access requires that individual users be properly authenticated and then granted access only to those network resources that you assign to them. Private Endpoints work by creating a secure tunnel between an individual user's device and the Private Endpoint and then leveraging the Private Endpoint as a client resource that can be granted granular access to internal or cloud-hosted network resources. In this way, a Private Endpoint acts as a proxy for a group of users in a specific role that needs to access that specific resource.
Deploying Private Endpoints
There are a number of options for deploying Private Endpoints, but generally speaking, they are configured as small virtual machines (VM) running in a public cloud platform, such as AWS. Special software is placed on that VM that can create the secure connection between the client device and the Private Endpoint, and then the Private Endpoint is configured within the Encrypt.team system. Organizations can then tightly control corporate internal or cloud-hosted resources that the Private Endpoint, and hence the group of users who have been granted access to that Private Endpoint, can access.
 Diagram: how private endpoints are deployed
Along the top, you see the normal kind of encrypted network access that is provided out of the box by Encrypt.team: secure encrypted access to "public" endpoints that can then access other public cloud and internet resources. The bottom path, however, indicates the Private Endpoint(s) set up by an organization solely for use by specific groups of individuals and then granted granular access to an internal database or server (although this could equally be a resource hosted in the organization's private cloud).
You can also deploy Private Endpoints within your internal network, or you can host your organizational resources within the same cloud hosting provider as your Private Endpoint. These options can still leverage the zero-trust approach used by Private Endpoints to secure access to the resource, but do require different setup instructions.
What are the Deployment Steps?
Since Private Endpoints are delivered as a simple Linux service, VIPRE is relatively agnostic about what specific VM types you use and how you host them, and correspondingly how you control access to your internal resources. What we will document here are prototypical setups using very common tooling; if you would prefer to use something else that you are already familiar with, you should be able to translate these instructions appropriately.
Step 1: Set up a VM (Virtual Machine)
The VM you use for your Private Endpoint can be set up almost anywhere, as long as any Encrypt.team client device can reach that VM over the network from the locations you anticipate those devices being located. One very common setup is to simply host a VM in a "cloud compute" platform such as Amazon EC2 or Google Cloud Platform. The other decision you will need to make is which operating system to place on your Private Endpoint, which must be a distribution of Linux.
A full list of supported OS platforms for Private Endpoints is available in the most recent Encrypt.team release notes.
In this phase you will:
- Create a VM within your preferred hosting environment
- Select an operating system to place on the VM
- Configure the VM with internet access
- Configure remote shell access to the VM
- Start the VM
General VM requirements:
- 2 CPUs (more recommended if you have a lot of MacOS or Android clients)
- 0.5GB RAM
- 16GiB storage
- Linux-based OS (CentOS 7+ recommended)
- Open ports
- Port 53 for TCP/UDP (DNS lookups)
- Port 80 for TCP (used by Let's Encrypt to get dynamic certificates)
- Port 443 for TCP/UDP (OpenVPN)
- Ports 500 and 4500 for UDP (IPSEC VPN)
- Port 22 for TCP (SSH access to the console)
Click here for a step-by-step guide of the Amazon AWS Setup
The process of setting up a Private Endpoint within Amazon AWS will depend to a certain extent on your current AWS configuration if any. A Private Endpoint runs as a service on a virtual machine instance, which in AWS must be placed within a Virtual Private Cloud (VPC). The VPC is essentially an isolated container that can host VMs, but you can create VPCs in various regions and apply security policies to them.
There are various reasons you might want to use a new or non-default VPC. Some examples include:
- If you want to host private endpoints in a different region or country
- If you already have a VPCin which you host organizational resources
- You can create a Private Endpoint inside the VPC to provide a secure tunnel into that VPC and block off nearly all other network access
- If you have specific security configurations you want to apply to the VPN for Private Endpoints
If you are new to Amazon AWS, or don't have a specific reason to create a new VPC, using the default VPC is appropriate.
Step 1 - Create a Key Pair
The following steps assume you will be using the default VPC and that you have already set up a local SSH client.
- Log in to your Amazon AWS console as a root user
- Under Services, navigate to the EC2 service
- Generate a key pair so that you can use SSH to log in to the console of the VM you will be creating
- On the EC2 dashboard, select Network Security, then Key Pairs at left
- If you don't already have a key pair you want to use, select Create Key Pair in the top left
- Give the key pair a name, leaving the default pem format selected
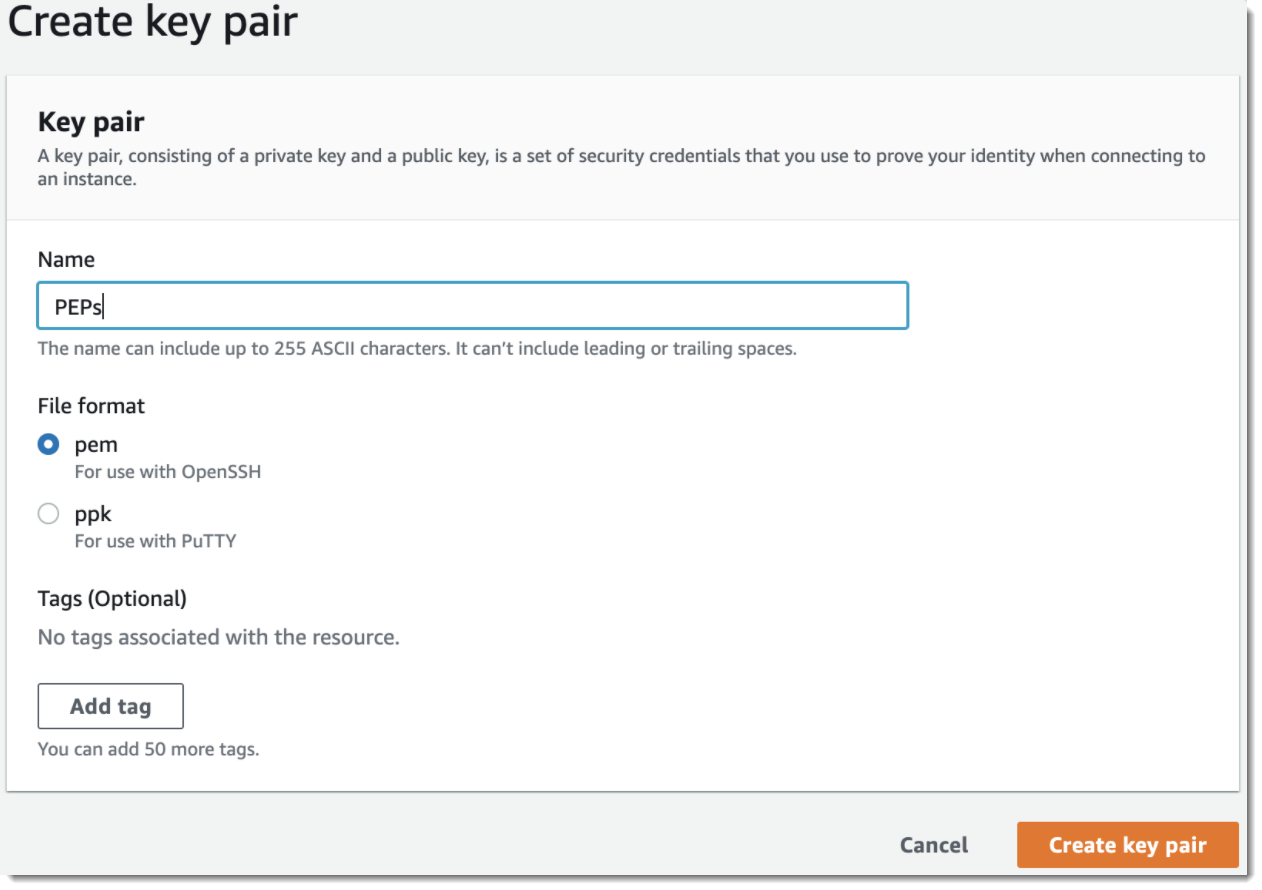 Creating key pairs
- Select Create key pair
- A PEM file should download automatically; this can be imported into your SSH client so that you can transparently log in to your VMs
Step 2 - Virtual Machine Setup
- On the EC2 dashboard, click the Region drop-down at the top
- Select the region in which you want to deploy your VM
VIPRE Recommends
As of the time of this writing, we recommend deploying a CentOS 7 image. The steps below reflect that recommendation.
- Open a new browser tab and visit https://centos.org/download/aws-images/
- Find an image for your selected region and click on Deploy Link to the right
- This should bring you back to your EC2 console, with the appropriate region and image selected
- If this doesn't work as expected, you may need to switch regions (at top)
- You can also back out to the EC2 dashboard, select Create Instance, select your region, then search for the AMI ID listed on the CentOS images page
- Select the appropriate VMType (size)
- As this is a network service, you'll probably want something in the t3* range, but there aren't many other requirements—even the t3a.nano instance type will work in most circumstances
- If you have a lot of MacOS or Android clients (which use OpenVPN), or just an extremely large number of clients in general, you may need to increase the CPU/RAM
- Select Next: Configure Instance Details
- Under Instance Details, most settings can be left at their default, but here is where you might select (or create) a different VPC to put the VM in
- Select Next: Add Storage
- Under Add Storage, configure a size of 16GB to allow for the additional software you will be installing and possibly advanced features
- Select Next: Add Tags
- Under Add Tags, add descriptive tags to the VM such as the resource it will be protecting, or any other descriptive information that will help people figure out later why this instance was created
- Select Next: Configure Security Group
- Under Configure Security Group, select Create a new security group
- Give the new profile a name and description
- Add the following ports; you will see warnings about your ports being accessible to anyone but this is the purpose of the service and one reason it might make sense to create a separate VPCspecifically for these PEPs:
- If you can restrict the set of IPs from which administrators can access this VM for maintenance, we recommend you do so (SSH is availably by default, so a new Security Group is pre-populated with that entry—modify the Source column to restrict the source IPs allowed).
- Add Rule, select HTTP as the Type, TCP as the Protocol, 80 as the Port Range, and leave the Source as-is. Put 'Let's Encrypt certificates' in the Description.
- Let's Encrypt is a service that allows services to dynamically create encryption certificates on the fly. The service requires that port 80 be available on the server for which the certificates will be created.
- Add Rule, select 'Custom UDP Rule' as Type, UDP as Protocol, 443 as the Port Range, and set the Source to '0.0.0.0/0, ::/0'. Put 'OpenVPN' in the Description.
- OpenVPN, one of the protocols used by the Encrypt.team clients, uses UDP port 443 for its encrypted connection.
- Add Rule, select 'Custom UDP Rule' as Type, TCP as Protocol, 443 as the Port Range, and set the Source to '0.0.0.0/0, ::/0'. Put 'OpenVPN' in the Description.
- OpenVPN, one of the protocols used by the Encrypt.team clients, uses TCP port 443 for its encrypted connection.
- Add Rule, select 'Custom UDP Rule' as Type, UDP as Protocol, 500 as the Port Range, and set the Source to '0.0.0.0/0, ::/0'. Put 'IPSec' in the Description.
- IPSec, one of the protocols used by the Encrypt.team clients, uses UDP port 500 for its encrypted connection.
- Add Rule, select 'Custom UDP Rule' as Type, UDP as Protocol, 4500 as the Port Range, and set the Source to '0.0.0.0/0, ::/0'. Put 'IPSec' in the Description.
- IPSec, one of the protocols used by the Encrypt.team clients, uses UDP port 4500 for its encrypted connection.
- Select Review and Launch
Step 3 - Start your VM
- Select Launch to start your VM.
- On Launch, you'll be asked to create or select a Key Pair; select the Key Pair you created above
- You will need to have the corresponding PEM file downloaded for OpenSSH to access the Instance
- After a few minutes, go back into EC2 > Instances > Instances screen and you should see your new VM listed as Running in the list
- In your list, find your PEP VMs and scroll to the right to find the public IP of your new VM
- Switch to a terminal window, and SSH in to the new VM
- The precise steps may vary slightly depending on the VMand how you have SSH configured, but here's an example:
- mv Downloads/PEPs.pem .ssh
- PEPs.pem is the Key Pair file downloaded earlier.
- chmod og-rw .ssh/PEPs.pem
- Most SSH clients will not allow you to use a PEM file that has permissions that are too lax
- ssh -i .ssh/PEPs.pem centos@34.201.129.59
- The PEM file is specified for use in this connection
- 'centos' is the user you will log in as; if this fails you can try user 'root' and the login may give you a hint as to the correct username
- The IP address here is the one associated with the Instance, as in step 5a.
- mv Downloads/PEPs.pem .ssh
- The precise steps may vary slightly depending on the VMand how you have SSH configured, but here's an example:
- If you have logged in successfully, you are done with this phase!
Step 2: Configure Encrypt.team to Use the New Private Endpoint
Once the Private Endpoint service is installed on a VM, you must configure Encrypt.team to enable the Private Endpoint and make it available to a select set of team users.
The logical entities involved are:
- Network: a construct within Encrypt.team that represents a sub-group of users, and that can be treated as an access role.
- Target: the Target is the entity that appears within the Encrypt.team client application, and is the thing the end user knows to connect to

- Server: the Server represents the VM that actually hosts the Private Endpoint service. There is a one-to-one relationship between a Target and a Server, but the Server is separated from the Target in case you later want to upgrade the Server.
This is an overview of the process:
- Configure a Network in Encrypt.team, which creates a group of users that you can treat as a role.
- Add users to this Network.
- Configure a Target in Encrypt.team, that defines the thing that end users will connect to when accessing organization resources.
- Configure a Server in Encrypt.team, associated with the Target, that will represent the Private Endpoint service VM that you are setting up.
At the end of this process, Encrypt.team will generate a unique server registration key that you will plug into the Private Endpoint VM, to connect that VM with the Server instance in Encrypt.team.
Click here for a step-by-step guide to setting up Private Endpoints
Team networks group private endpoints into a shared security group or common locality. You can either allow all users to automatically access endpoints within a network or restrict access to networks for specific users.
To create a team network:
- Log in to the Encrypt.team Team Manager web console
- In the Team networks row, click Manage
- On the Networks screen, click Create Network
- A window will pop up to name your network
- VIPRE recommends thinking of this as naming the access role
- If you want to add all of your team users into this network, add a check next to Add all users to this network
- If you only want to add some users, leave this unchecked; you'll be able to add individual users in the next step
- Click the Create button
To add individual users:
- From the Networks screen, click the name of your network
- In the Users row, click Manage
- Click View all users
- Add a check next to the desired users then click the Bulk Actions drop-down menu in the header row
- Click Set Permissions
- Add a check next to your network and click the Save button
To add target to your network:
- In the Team networks row, click Manage
- On the Networks screen, click the name of your network
- Click Add Target (Self-Hosted)
- A window will pop up to create a new target
- Name your target
- - This is the name the end user will see; VIPRE recommends using the name of the resources the end users will be accessing when connected to this target
- Add a check next to Is Enabled
- Add the domain name that points to the Private Endpoint VM
- e.g. If you are using Amazon AWS, this could be the Instance "Public IPv4 DNS"; you could also use your own DNS name here that points to the public IP address of the VM - this name will be used by Let's Encrypt for certificate verification
- Click the Create button
- Name your target
- Click Create Server
- A window will pop up to create a new server
- Add a nickname for your server
- This can be the same as your target name, if desired
- Click the Create button
- Add a nickname for your server

Step 3: Deploy the Private Endpoint Service to the Virtual Machine
Once the VM is set up and running, you will use SSH to log in to the VM, install the Private Endpoint service, and get it up and running. Since the service does have a number of dependencies, this can involve installing and updating several other packages.
The basic steps are:
- Update the base operating system to the absolute latest patches
- Install python
- Add the 'docker' repository and install/run docker-ce
- Add the Private Endpoints repository and install/run the Private Endpoints service.
- Type in the server registration key from the previous phase to connect the VM with the Server object in Encrypt.team.
Click here for a step-by-step example of a CentOS Setup
For this example, we will be assuming that you have a vanilla VM set up with CentOS 7.8, a Red Hat-based Linux distribution. Other Linux distributions, like Ubuntu which are Debian-based, may have slightly different setup instructions and commands. We also assume that you can connect to the console (SSH or similar) of the VM.
We'll be installing various pre-requisites and then the Private Endpoint service itself.
Updating CentOS
- Connect to the VMconsole and log in as a user with access to root-level privileges
- If you are running as root, you can leave sudo off the beginning of each command below
- Ensure that you are running the most recent OS version by typing the following into the command line:
% sudo yum update
This may take a long time—possibly hours—as there are hundreds of packages on the system that may need to be updated. If you see any errors, try again until all installations succeed.
Installing Pre-requisites
Next, we will install a couple standard optional packages that are required. Again, we'll use sudo to execute the commands as root, and yum to manage the installation.
- At the command line, type:
% sudo yum install -y python git yum-utils device-mapper-persistent-data lvm2- This installs each of the packages listed:
- python: a scripting language used by Private Endpoints
- git: a remote repository utility that we will use to bring in additional non-standard packages
- yum-utils: a set of additional package management utilities
- device-mapper-persistent-data: provides thin-provisioning tools for the filesystem
- lvm2: a filesystem volume management tool
This may take a while as each package is downloaded and installed. If you see any errors, try again until all installations succeed.
Install and Run Docker (Container Management)
- At the command line, type:
% sudo yum-config-manager --add-repo https://download.docker.com/linux/centos/docker-ce.repo
- When the command line prompt returns, type:
% sudo yum install -y docker-cethen
% sudo systemctl enable dockerthen
% sudo systemctl enable dockerthen
% sudo systemctl start docker
Install and Start Private Endpoint Service
- At the command line, type:
% sudo git clone https://github.com/encryptme/private-end-points-docker /opt/pepthen
% sudo chown -R centos:centos /opt/pep
% sudo usermod -a -G docker centos
- And then start it by typing the following at the command prompt:
% cd /opt/pepthen
% ./go.sh init --pull-imagethen
./go.sh run- Once the images have been downloaded, you will be prompted to enter an email address. This will be used for notifications in case the Let's Encrypt certificate process doesn't work automatically (as it should). You should use your email address or whoever should be notified if things go wrong.
- Next, you will be prompted for your server registration key. This is the unique key that was created when you set up the Server within the Encrypt.team management console, that you copied somewhere safe. Grab that key and paste it into this dialog.
Step 4: Configure Organization Resources for Private Endpoint Access
In this step, you configure your firewalls and related network-path devices, plus the organizational resource itself to allow access only to the Private Endpoint. Since this configuration depends entirely on the type of firewall devices you have and what the resource is, we can only provide general guidance:
- You must create a network path between the Private Endpoint's public IP address and the resource to which you are granting access. This can, however, be locked down to the specific Private Endpoint IP and port(s) that need access. Since only designated users may access the Private Endpoint, this is equivalent to restricting resource access to only designated individuals.
- Note that if your resource happens to be located in the same cloud hosting environment as the Private Endpoint, you do not need to provide ANY public IP access.
- On the resource itself, if you can restrict access to specific IPs, we recommend locking access down to internal IPs and any Private Endpoints only.
Step 5 - Testing your Configuration
Check to make sure the Private Endpoint is set up correctly:
- Log in to your Encrypt.team console
- On the main screen, select Manage next to the 'Team networks' line
- Select the new Network you created. You should see your Target.
- Select the new Target you created. You should now see your new Server, associated with the VM instance you created.
- Check to make sure that your Encrypt.team clients can see the Private Endpoint and connect to it.
- Open the Encrypt.team client app of your choice, and check the list of available public and private Endpoints. Make sure your new Private Endpoint appears in the list (it may take a few minutes after creation for this to show up).
- Select the Private Endpoint and authenticate as one of the users who has been granted access to the associated Network. Make sure the connection comes up correctly.
- Verify that you can access the organizational resource
- Once connected to the Private Endpoint, use whatever client or method you normally use to connect to the organizational resource. Your network traffic should be routed through the Private Endpoint and then across the network to the organizational resource.
Done!
Your configuration is done. Consider setting up additional Private Endpoints for each resource and role that needs access to those resources.