
If this is your first time here, we recommend following the guided path below.
Using the VIPRE Plugin for ConnectWise Automate, administrators can directly manage any number of VIPRE Endpoint Cloud or VIPRE Endpoint Server sites. Basic VIPRE functionality is controlled through the plugin GUI, while custom scripting and automation can be used to handle large numbers of network-wide processes.
The VIPRE Plugin creates a framework, connection, and database that can be used by Managed Service Providers (MSPs) and IT departments to provide a wider, more holistic approach to their network and computer maintenance and security. By using the VIPRE Plugin, you can manage multiple VIPRE sites simultaneously, whether they are VIPRE Endpoint Server (on-premise) or VIPRE Endpoint Cloud (cloud-based) and take action across any of them simultaneously.
Install the VIPRE Plugin
Install instructions for both beta versions and release candidate versions of the VIPRE Plugin.
To add the VIPRE Plugin to ConnectWise Automate, you must first install the VIPRE Plugin from the ConnectWise Solution Center, which is launched from the Control Center.
Note: The Control Center must be started as an Administrator in order to open the Solution Center.
Install the VIPRE Plugin from the Solution Center
First, we install the VIPRE Plugin from the cloud-based Solution Center, which copies the content of the plugin to your system.
- Right-click on the ConnectWise Control Center / LabTech Control Center shortcut and choose Run as administrator. Login with your credentials

- From the Control Center, click Tools > Solution Center. The Solution Center will launch
- In the Solution Center search box, search for VIPRE
- Hover over the VIPRE 3.0 item and click Queue. This adds the plugin to the Solution Center download queue
- In the top left of the Solution Center, click on the Solutions in Queue list to view your queued installs. Then, click Install/Update. The Solution Center displays a notice that "Local Changes" will be overwritten
- (Optional) Select Backup local database before update
- Click Yes to continue the install.
Enable the VIPRE Plugin in the Control Center
Now that the VIPRE Plugin is installed and copied to your system, you must enable it.
- From the ConnectWise Control Center, open the Plugin Manager
- Version 12: select System > Solutions > Plugin Manager
- Version 11: select Help > Plugin Manager
- Right-click the VIPRE for LabTech plugin and choose Enable
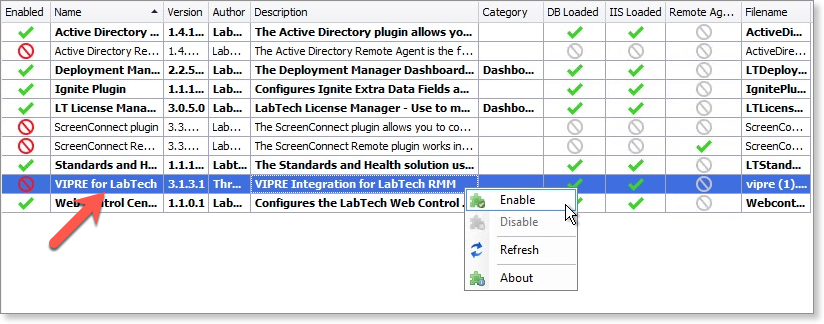
- The system asks "Would you like to restart the database agent now?". Select Yes to allow the new plugin to load

Once the database agent is restarted, the VIPRE Plugin shows as enabled in the Plugin Manager.
-
Next Step
- Add Button
Add Connections to Server or Cloud Sites
This article walks you through adding connections to both Endpoint Server (on-prem) and Endpoint Cloud (both managed and individual) sites.
Connection types
There are three types of VIPRE sites to which you can add connections through the Plugin
- VIPRE Endpoint Security - Server Edition (Endpoint Server)
- VIPRE Endpoint Security - Cloud Edition - (Endpoint Cloud)
- VIPRE Site Manager - (Site Manager)
Connections are added from the ConnectWise System Dashboard.
The ConnectWise System Dashboard shows all VIPRE connections that have been added to the Plugin. The dashboard displays the name of the connection, type of connection, and the current status (such as testing the connection). You can manually refresh the dashboard at any time to review current connections and identify issues.
The System Dashboard only displays basic information about active connections. Your actual sites are modified, monitored, and maintained through the VIPRE Plugin for ConnectWise interface.
Add an Endpoint Server (VSS) connection
This creates a connection between your ConnectWise instance and an on-prem VIPRE site connected to endpoints through the VSS console.
To add a connection to an Endpoint Server (VSS) site
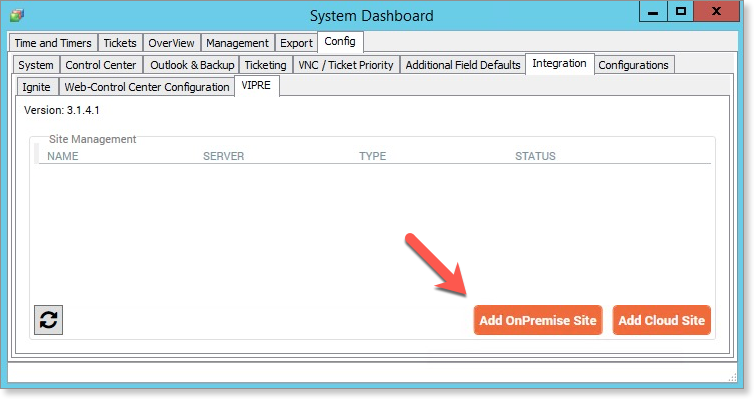
- From the Control Center, click Dashboard to display the System Dashboard
- Select Config tab > Integrationtab > VIPRE tab
- Click Add OnPremise Site
- Enter the site details
a. Domain - The domain name of your VIPRE Server site
b. Username - The administrator username used to log in to your VIPRE Server console
c. Password - The administrator password used to log in to your VIPRE Server console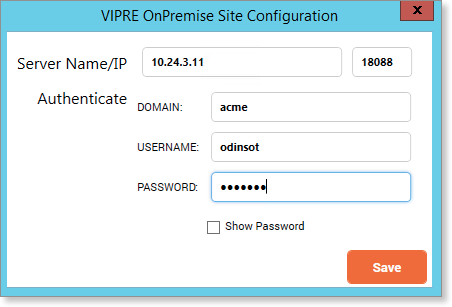
-
Click Save. The plugin will establish a connection and display Connected when done
⚠️ Important: Remember that you're connecting from the main Automate server, not any remote consoles. Also, ensure you're connecting to the actual VIPRE server, not to any remote admin consoles.
What Happens Next?
The ConnectWise Automate server uses the name/address in your site details (above) to connect to your VIPRE server. Then, the Plugin requisitions the appropriate resources and copies local data and permissions into the ConnectWise database. The site connection information is automatically saved within the System Dashboard.
Add an Endpoint Cloud connection
The steps to add an Endpoint Cloud or Site Manager connection are the same.
- Endpoint Cloud - An individual VIPRE Cloud site. These Cloud sites are independent of each other
- Site Manager - A VIPRE Cloud site which is managed by a "parent" VIPRE Site Manager console
To add a connection to a Cloud site
- From the Control Center, click Dashboard to display the System Dashboard
- Select Config tab > Integrationtab > VIPRE tab
- Click Add Cloud Site

- Enter the site details
a. Site Name - The first part of your VIPRE Cloud domain name (e.g. If your site is acme.myvipre.com, you would enter 'acme' here)
Note: When connecting to a Site Manager site, use the Site Manager site name. All existing and future sites will automatically be connected.
b. Email - The administrator email used to log in to your VIPRE Cloud site
c. Password - The administrator password used to log in to your VIPRE Cloud site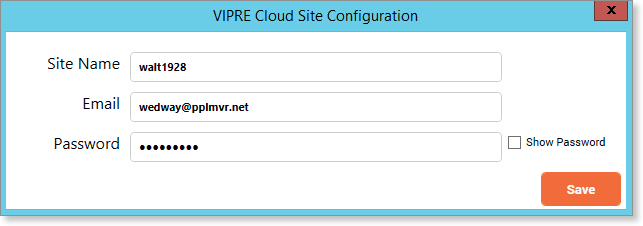
- Click Save. The VIPRE Plugin will establish a connection.
A connection will be established within a minute or two. After allowing enough time for the plugin to connect, you can click refresh to confirm the status as Connected. Site Manager sites can be viewed after the connection is made by clicking on the Site Manager row.
What Happens Next?
The Connectwise Automate server uses the site name (above) to connect to your VIPRE Cloud server. Then, the VIPRE Plugin requisitions the appropriate resources and copies local data and permissions into the ConnectWise database. The site information is automatically saved within the System Dashboard.
Convert sites from Server to Cloud
The VIPRE Plugin supports both Endpoint Server and Endpoint Cloud sites. In addition to this, VIPRE Server sites can be migrated to VIPRE Cloud.
While the migration process from VIPRE Server to VIPRE Cloud is relatively simple, migrating a site from Server to Cloud is handled outside of the VIPRE Plugin.
See our VIPRE Cloud Migration Guide for more information on how to migrate Endpoint Server sites to Endpoint Cloud.
Site count limitations
The Plugin can manage as many Endpoint Server, Endpoint Cloud, and Site Manager sites as needed.
-
Next Step
- Add Button
Create New Site Manager Sites
This article shows how quick and easy it is to create Site Manager sites directly from the Plugin itself.
The VIPRE Site Manager product enables management of multiple VIPRE Cloud sites (which in turn manage their own endpoints) under a single master console.
By creating a new Site Manager site within the VIPRE Plugin, you can easily assign existing and future Cloud sites to this new Site Manager site.
To create a Site Manager site
- From the ConnectWise Dashboard, navigate to Browse > Clients > Client Name > VIPRE
- Click Settings
- In the Site Assignment area, select Create new Site from the site drop-down
- Fill out or select the following items
- Site Name - Usually a "short" variation of the company name; this also becomes part of the direct URL to the site if accessing the site outside of ConnectWise. e.g. "acme" could be the site name for "ACME Industries, Inc."
- Company Name - This is internal, referential information that is designed to make it easier for your organization to manage the customer
- Billing Email - This is the email address for this customer's billing contact
- Billing Name - The name of this customer's billing contact
-
Type - Select Billed or Trial:
- Billed creates a standard, billable client site
- Trial creates a 30-day trial site that customers can use when they are evaluating your service and determining whether they want to commit.
- Estimated seats - This is the number of devices that you believe the customer will use. This is just a reminder for your business; the system will not automatically respond to overages. Instead, the estimated seats number can be used for quick reference, and to identify customers who may be utilizing their service more than first anticipated
- Contract End Date - As above, the Contract End Date is only a reminder — you can later sort by expiration date to find the customers whose contracts you need to start negotiating. By default, this is set to a year in the future for Billed sites and a month out for Trial sites
- Select Save to create the Site Manager site and automatically assign it to this client. This usually takes less than a minute.
Note: If the site creation fails, you may have exceeded the allowed number of trials available.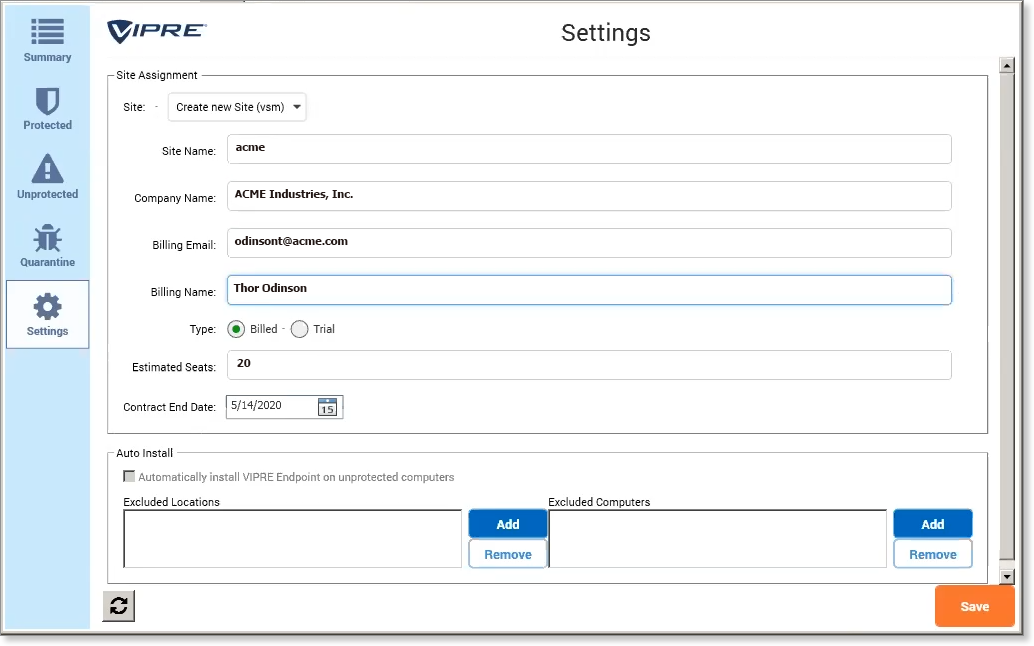
-
Next Step
- Add Button
Navigate the ConnectWise and Plugin Interface
Access VIPRE Plugin
The VIPRE Plugin can be accessed either through ConnectWise VIPRE tabs or the separate VIPRE Dashboard.
To access using VIPRE tabs through ConnectWise Automate Control Center
- Launch the ConnectWise Control Center
- Open a Client, Location, Group, or Computer window
- Click on the VIPRE tab
To access through the VIPRE Dashboard
The Dashboard enables a global view of VIPRE, which can be filtered by clients or locations.
By default, the Dashboard shows All Clients in the list. You can select a specific client or location to restrict the information displayed.
- Launch the ConnectWise Control Center
- On the left, click Tools > VIPRE

Groups of devices
Within ConnectWise Automate, network objects are segregated into groups. Depending on how you have set up your network, you can have Clients > Locations > Computers, or a variety of hierarchies. Network items are generally grouped by physical location.
There is a secondary hierarchy, which is arbitrary collections of items (groups). Groups can be controlled by the administrator, such as by creating a collection of computers with Windows 7 and Service Pack 3. Custom groups provide granular control for reporting services, monitoring, and automation.
The VIPRE Plugin is designed to automatically pull data from whichever groups are selected. A single device can be selected, twelve specific devices, or a group that contains three locations, each of which contains its own devices. Thus, creating the right groups is essential to creating valuable reporting.

Automate's built-in network tools allow for easy grouping and categorization of customer sites with VIPRE.
Single or multiple items
The VIPRE Plugin makes it easy to review both protected and unprotected agents across the network.
On the VIPRE Plugin screen, you will be reviewing data from the devices selected. The VIPRE Plugin screen shows
- Agents - This is the number of agents that you are currently reviewing and have selected
- Protected devices - The protected tab will show you which of these agents are protected
- Unprotected devices - The unprotected tab will show agents that have not yet had VIPRE installed
Agent information includes the site which it belongs to, the endpoint device it is protecting, and the status of this device. To install an agent, administrators use the Unprotected Agents tab.
-
Next Step
- Add Button
Install Agents on Unprotected Devices
As ConnectWise Automate is a network-based device management system, it's a snap to identify unprotected endpoints and deploy VIPRE agents to them as needed.
Unprotected devices on Server and Cloud
ConnectWise Automate makes it easy to view unprotected devices across your entire network and deploy VIPRE to them as needed. The clear benefit is that while VIPRE Endpoint for Server identifies unprotected agents on a contained network, VIPRE Cloud does not yet have that possibility; Cloud endpoints can theoretically be anywhere in the world and not necessarily on the same network.
However, since all your endpoints are linked to ConnectWise itself, you have visibility to them and can deploy agents as you like. These unprotected devices can be monitored from the dashboard. This is one of the useful cross-application utilities that the VIPRE Plugin provides, as administrators are able to work with the data in both the ConnectWise solution and your VIPRE sites.
Installation and Deployment
To install VIPRE on unprotected devices
The VIPRE agent is the piece of software that is deployed to (installed on) the endpoint device.
- Select a device group or a single device
- Select the VIPRE tab
- Click on Unprotected. This will display all machines on which the VIPRE agent has not been installed
- Select the site name and the policy under which you want the selected device(s) to be managed
- Click Install

The installation process begins. During the agent install process, the status will be updated accordingly to tell you when the installation has been started or completed.
The actual agent type that is installed depends on whether you are deploying to a VIPRE Server site or a VIPRE Cloud site. The agent software for Server vs. Cloud is functionally identical (and in fact, both are always updated simultaneously).
Installing the agent may take a few minutes, as it includes the deployment of the file, the actual Windows install, and potentially a reboot.
Refer to Related Articles for more information on automating the installation process through the use of custom scripting.
Monitoring the installation process
Though the process is automated, administrators may want to check to see what the status of the install is. If desired, the ConnectWise Control Center can be used to look at each device and identify processes that have been started and completed, in addition to seeing the queue of current actions. The ConnectWise server shows which commands have been executed in order, what the status of the command is, and when it was last updated. Command details give more information on the tasks that need to be completed.
Updating VIPRE agents is handled at the policy level. If you want to adjust whether agents automatically update to the latest released agent software, this change is made at the policy level. Log in directly to your VIPRE Server Console or VIPRE Cloud Console in order to check a specific policy’s settings.
VIPRE sites run periodic version checks, and auto-updating agents will be notified that a new agent version is ready to be downloaded and updated to. If auto-update is enabled in a policy, agents on that policy will then proceed to update their own software based on the update settings.
-
Next Step
- Add Button
Manage Protected and Unprotected Devices
Once agents are deployed to your endpoints devices, you can manage scans, quarantine, and basic actions from the VIPRE Plugin.
Manage protected devices
While the ConnectWise UI allows for multiple device and site maintenance, the real strength in the VIPRE Plugin ties into leveraging the ConnectWise monitoring and automation functionality. However, not all of the plugin functions need to be scripted.
For the most part, initial and subsequent configuration should be done directly through the VIPRE Console; the plugin is not intended to replace the VIPRE Server or VIPRE Cloud interface (see Additional Commands, below). In addition to the actions that can be done through automation, administrators can modify and maintain devices on-the-fly with the built in ConnectWise toolset.
When viewing VIPRE endpoint devices, you can click on "Protected Computers" and select one of the following options:
- Start a deep scan. This will perform a thorough but resource-intensive scan of the protected computers.
- Start a quick scan. This will perform a shallow, but faster, scan of the protected computer.
- Update definitions. This will download and update the latest security definitions on the agent.
- Update agent software. This will install the newest version of VIPRE agent.
- Uninstall. This will uninstall the VIPRE agent from the endpoint device.
NOTE: When a VIPRE agent is successfully uninstalled, it will report as being “shut down”. This is because the uninstallation process is queued up through ConnectWise. The VIPRE agent's last status update is to tell the VIPRE system that it is shutting down. The agent will continue to show "shut down" unless it is removed from the list of devices (either manually or through scripting).
Take action on items in quarantine
The Quarantine tab displays all quarantined items on selected devices. This enables you to unquarantine files or delete them from the quarantine across all currently selected devices. This can be done to resolve quarantined items across the network efficiently. When you select “Unquarantine” or “Delete”, the ConnectWise Control Center transfers a quarantine command to the VIPRE Console.
Administrators can quickly review quarantined files across different areas of the network in order to swiftly mitigate threats. Automated processes can be designed to alert administrators to quarantined items, delete quarantined items automatically, or take other actions on devices that appear to be vulnerable to potentially malicious items.
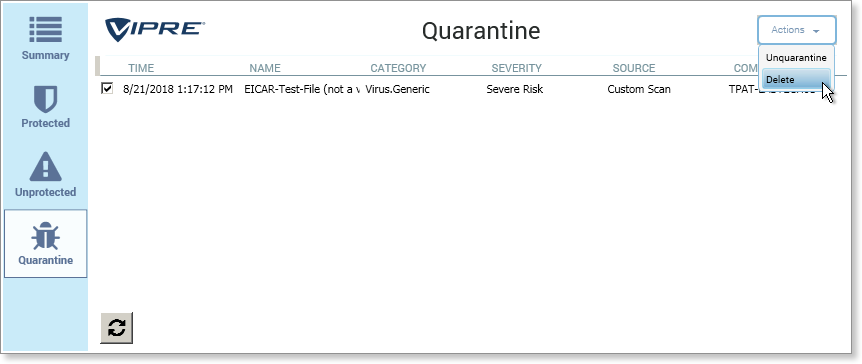
Quarantined items can easily be acted upon individually or in groups.
Investigating a group of devices
You can manage a group of devices by navigating to the group in the ConnectWise Control Center.
To navigate to a device group
- In the ConnectWise Control Center, double-click on a device group (such as Clients > Your Company)
- On the Client ID screen, select the VIPRE tab
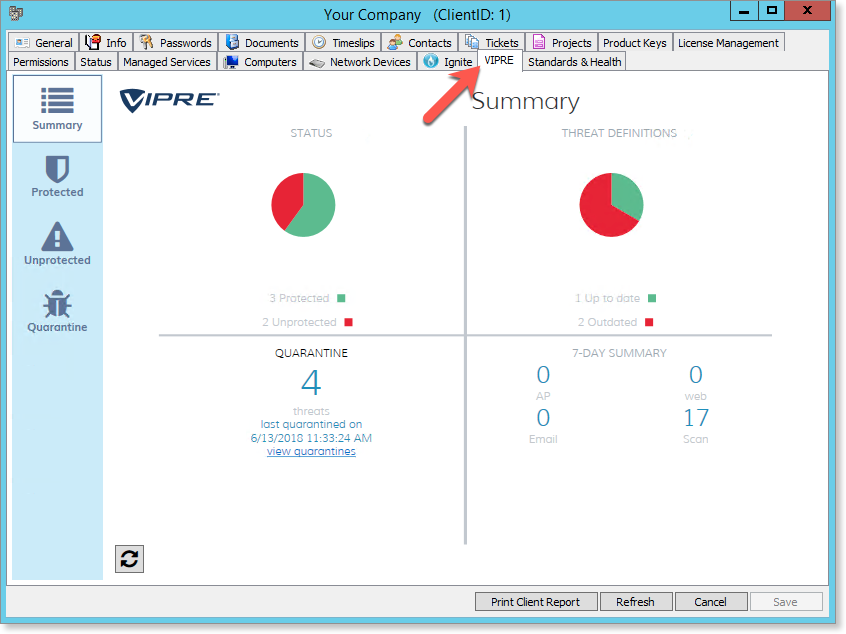
View the status of a group of devices from the Control Center.
Investigating a single endpoint device
If you would like to manage the quarantine of an individual device one at a time, you can do so by selecting the computer directly.
There are multiple ways to access your VIPRE sites and take advantage of VIPRE's functionality. Although the primary use of the VIPRE Plugin is at a macro level, you may also drill down directly into an individual device.
To navigate to a single device
- In the ConnectWise Control Center, select a single device
- On the computer management screen, select the PlugIns tab
- Select VIPRE
If an agent is installed on this device, the VIPRE agent will report the status of the device, any threats detected, quarantine information, and information on the agent itself. The quarantine tab reveals any quarantined files on the machine and allows the administrator to take action on them.
Additional commands
To manage policies, visualize threat data, or perform forensic threat analysis, visit the VIPRE console directly.
- VIPRE Endpoint Security - Cloud Edition - Login directly to your VIPRE Cloud console through a web login interface
- VIPRE Endpoint Security - Server Edition - Login directly to your VIPRE Site Service (VSS) or through a VIPRE admin console
Manage unprotected devices
You may now select multiple (or all) computers on the grid before performing an action.
To select multiple computers
- Perform one of the following
- Shift-click or Control-click your selected computers
- Using the mouse, drag-select the corresponding rows in the grid
- (Optional) Select all computers by clicking the top of the gray bar on the left of the selection boxes
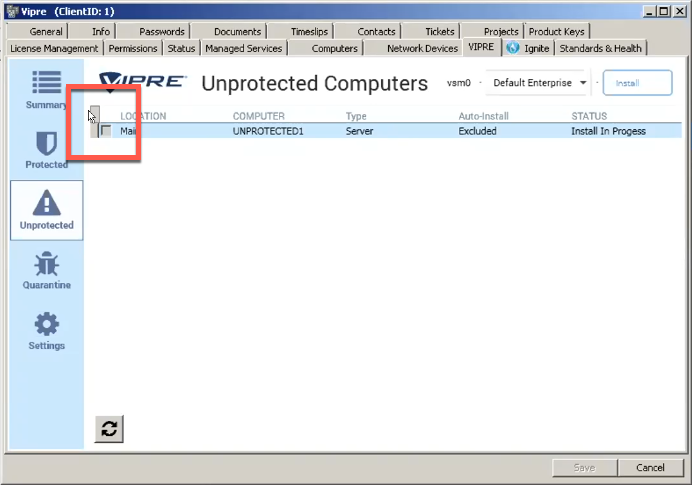
- Press Space Bar to toggle the selection
- Choose an action from the drop-down action menu
- Click Save
Depending on the action you choose, the Plugin will queue up deferred work to make the change.
If you elect to change policies from the action menu, the Policy column will show the new policy name with (change pending) next to it to indicate the pending change.
Changes applied like this can take some time to process—potentially up to 30 minutes. The Plugin has to
- wait for the agent to perform the action and report the result to the VIPRE site
- sync the result from that VIPRE site
Because these types of changes can take awhile, we recommend kicking off bulk changes and checking back on the process later.