
VIPRE SafeSend can prevent sensitive information from being sent out to the wrong client.
Important Information
This article is part of the SafeSend PC Add-in Deployment Guide, which includes all successive steps needed for a successful deployment. Please refer to Related Articles for direct links to the deployment guide and other processes pertinent to the one detailed in this article.
Within VIPRE SafeSend, DLP (Data Loss Prevention) has three important features:
- Client Keyword/Domain Scanning allows you to identify a set of client keywords or regular expressions and associate those with a set of client domains or individual email addresses
- DLP Content Scanning presents sensitive content to the user, allowing the user to determine if the email should be blocked or sent with additional confirmation
- DLP Scan Password-Protected Attachments allows SafeSend to detect password-protected .zip files and prompt the user to add the password and decrypt the file so it can scan the attachment
It can scan emails and attachments for specific client keywords or regular expressions and require agent confirmation.
Client Keyword and Domain Scanning
Define Client Data
The client keyword/domain data is configured in Edit Settings, under the Data Loss Prevention (DLP) tab, and stored in the setting SS_ClientKeywordDomainList; it can contain thousands of lines of client/customer data. The principle is that you can identify a set of client keywords or regular expressions and associate those with a set of client domains. Instead of domains, it is also possible to specify individual email addresses as approved recipients.
Syntax: Client1Keyword1,Client1Keyword2,…:Client1Domain1,Client1Domain2,… Client2Keyword1,Client2Keyword2,…:Client2Domain1,Client2Domain2,…
Example: Apple,AAPL:apple.com Microsoft,MSFT:microsoft.com
Display Popup only when Client Data is Found
It is possible to use the setting OnlyPopupForDLPMatch to configure SafeSend to display its confirmation window only when client data has been found in the email.
Supported Attachment File Types
- Text: csv, txt
- PDF: pdf
- HTML: html, xhtml
- Word: doc, docx
- PowerPoint: pptx, ppsx, pptm, ppt, pot, pps
- Excel: xls, xlsx, xlsm, xlt, xltx, xltm
- RTF: rtf
- ZIP: zip (recursively)
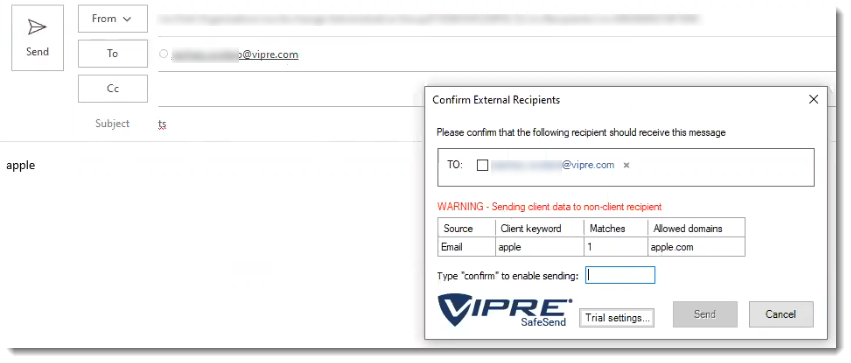
Sending to Non-client Recipients
The user is required to type “CONFIRM” in order to send client data to a non-client external domain.
Sending to Approved Recipients
No additional confirmation is required except confirming the external recipient.
Sending Non-client Data Externally
What happens, in this case, depends on the OnlyPopupForDLPMatch setting. If it is enabled then the SafeSend confirmation window will not be displayed. If it is disabled, which is the default behavior, then SafeSend will still show its normal confirmation window. The below screenshot is thus displayed only if OnlyPopupForDLPMatch = 0.
Password Protected Files or Invalid Files
SafeSend displays password-protected files or invalid files in the DLP output table. Password protection is detected on Word, Excel, PowerPoint, PDF, and ZIP files.
Scanning Email Notification
The Scanning Email notification is displayed when OnlyPopupForDLPMatch is enabled, and SafeSend is busy scanning large files. The default time-out for large files is 10 seconds (see ContentScanningTimeoutMS), whereby SafeSend will post an error message in the dialog, saying that the content scan timed out.

DLP Content Scanning
Sensitive content is presented to the user, and you can define if the email should be blocked, or if the user can send the email after an additional confirmation.
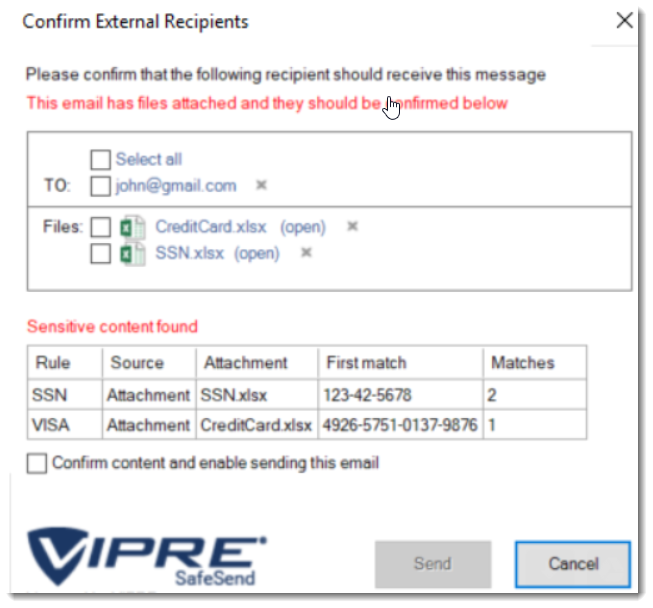
Here you can see that SafeSend scanned an email's content and attachments finding potential Social Security and Credit Card numbers.
Sensitive Content
When you use DLP with VIPRE SafeSend, this is the type of content it looks for within your emails:
- Strings such as ‘Confidential’, ‘Internal’, ‘Restricted’ and ‘Sensitive’.
- US Social Security Number (SSN)
- Credit Card number (VISA, MasterCard, American Express, Diners Club, …)
- Standard health identification card number (NPI)
- Vehicle Identification Number (VIN)
- UK health identification number (NHS, CHI)
- UK national insurance number (NINO)
SafeSend Actions
Once VIPRE SafeSend finds what it's looking for, it performs the following actions:
- Inform the user
- Require confirmation from the user in the form of a checkbox
- Require confirmation from the user by the text “CONFIRM”
- Deny sending the email
Supported Content Types
VIPRE SafeSend supports the following types of documents and attachments:
- Email content (body)
- Email subject
- Attachment filename
- Attachment file types (scans inside attachments)
- Text: csv, txt
- PDF: pdf
- HTML: html, hxtml
- Word: doc, docx
- PowerPoint: pptx, ppsx, pptm, ppt, pot, pps
- Excel: xls, xlsx, xlsm, xlt, xltx, xltm
- RTF: rtf
- ZIP: zip (fully recursive)
- MSG: msg (fully recursive)
DLP Policy
Policy Syntax
The DLP policies are defined using the following syntax:
[policy_name]:[file_types_to_scan]:[action_upon_match]:[regular_expression]
Options for ‘file_types_to_scan’:
- “all”
- “all_excl_pdf”
- “email_content”
- “email_subject”
- “file_name”
- “csv”, “txt”, “pdf”, “html”, “hxtml”, “doc”, “docx”, “rtf”, “xls”, “xlsx”, “xlsm”, “xlt”, “xltx”, “xltm”, “pptx”, “ppsx”, “pptm”, “ppt”, “pot”, “pps”
Options for ‘action_upon_match’:
- “inform”
- “confirm”
- “confirm_text”
- “deny”
If you'd like to skip the policy examples and get straight to the configuration of DLP, we can skip past it and come back if necessary.
Policy Examples
Case-insensitive detection of the string “confidential” in all content types that require user confirmation. The policy is named “Confidential”.
Confidential:all:confirm:(?i)confidentialCase-insensitive detection of the string “confidential” in specific content types. The results are displayed to the user and require no confirmation. The policy is named “Confidential”.
Confidential:email_subject,email_content,doc,docx:inform:(?i)confidentialVISA credit card rule that requires a user confirmation for all content types. The policy is named “VISA”.
VISA:all:confirm:4(?<=\b(?<!\.)4)\d{3}[\W\s]?\d{4}[\W\s]?\d{4}[\W\s]?\d{4}\b
Regular Expressions (regex)
Generic:
Confidential:all:confirm:(?i)confidential
Internal:all:confirm:(?i)internal
Restricted:all:confirm:(?i)restricted
Sensitive:all:confirm:(?i)sensitive
Credit cards:
Visa: 4(?<=\b(?<!\.)4)\d{3}[\W\s]?\d{4}[\W\s]?\d{4}[\W\s]?\d{4}\b
Mastercard 1: 5(?<=\b(?<!\.)5)[1-5]\d{2}[\W\s]?\d{4}[\W\s]?\d{4}[\W\s]?\d{4}\b
Mastercard 2: 5(?<=\b(?<!\.)5)([\W\s][1-5])([\W\s]\d){14}\b
American Express 1: 3(?<=\b(?<!\.)3)(4|7)\d{2}[\W\s]?\d{2}[\W\s]?\d{4}[\W\s]?\d{5}\b
American Express 2: 3(?<=\b(?<!\.)3)([\W\s](4|7))([\W\s]\d){13}\b
Diners Club 1: 3(?<=\b(?<!\.)3)(0[0-5]|[68]\d{1})\d{1}[\W\s]?\d{4}[\W\s]?\d{4}[\W\s]?\d{2}\b
Diners Club 2: 3(?<=\b(?<!\.)3)[\W\s](0[\W\s][0-5]|[68][\W\s]\d{1})([\W\s]\d){11}\b
Discover card 1: 6(?<=\b(?<!\.)6)(011|5[0-9]{2})[\W\s]?\d{4}[\W\s]?\d{4}[\W\s]?\d{4}[\W\s]?\b
Discover card 2: 6(?<=\b(?<!\.)6)[\W\s](0[\W\s](1[\W\s]){2}|5[\W\s](\d[\W\s]){2})(\d[\W\s]){11}\d\b
JCB cards 1: (?=[21|18])(2131|1800)[\W\s]?(\d{4}[\W\s]?){2}\d{3}\b
JCB cards 2: (?=[2|1])(2[\W\s]?1[\W\s]?3[\W\s]?1|1[\W\s]?8[\W\s]?0[\W\s]?0)([\W\s]?\d){10}\b
JCB cards 3: 35(?<=\b(?<!\.)35)\d{2}[\W\s]?(\d{4}[\W\s]?){3}\b
JCB cards 4: 3(?<=\b(?<!\.)3)[\W\s]?5[\W\s]?(\d[\W\s]?){13}\d\b
Standard health identification card number (NPI):
(?<!\\d)\\d{10}(?!\\d)|80840\\d{10}(?!\\d)
Vehicle Identification Number (VIN):
[0-9A-HJ-NPR-Z]{17}
US Social Security Number (SSN):
([^0-9-]|^)([0-9]{3}-[0-9]{2}-[0-9]{4})([^0-9-]|$)
UK health identification number (NHS, CHI):
b([1-9]{1}[0-9]{2}s?-?[0-9]{3}s?-?[0-9]{4})b
(([^wt]?s)?(-)?d){10}
(([^wt]?s)?(_)?d){10}
(([^wt]?s)?d){10}
UK national insurance number (NINO):
[A-CEGHJ-NOPR-TW-Z]{2}[0-9]{6}[ABCDs]{1}
Irish PPS number:
W?d{7}[a-zA-Z]{1,2}W
Other
SSNorHSA:all:confirm:([^0-9-]|^)([0-9]{3}[0-9]{2}[0-9]{4})([^0-9-]|$)
DDAorSAV7:all:confirm:([^0-9-]|^)([0-9]{7})([^0-9-]|$)
DDAorSAV8:all:confirm:([^0-9-]|^)([0-9]{8})([^0-9-]|$)
HSA:all:confirm:([^0-9-]|^)([0-9]{10})([^0-9-]|$)
Health
Birthday:all:confirm:((?i)Birth Date|DOB|Patient Date of Birth|Patient DOB|Patient_DOB)
RX:all:confirm:((?i)rx_number|RxNumber)
Patient Name:all:confirm:((?i)pa_first_name|pa_last_name|patient_first|patient_last|Patient First|Patient First Name|Patient Last|Patient Last Name|first_name|last_name|Patient Address|Patient Full Name|Patient Middle Name|Patient Middle Initial)
Patient Identifier:all:confirm:((?i)Patient Email|Patient experience on drug|patient experience on drug(DELETE)|Patient Gender|Patient height|Patient ID (Internal Reporting)|Patient interest|patient phone #|patient state|patient weight|patient work phone #|patient zip)
PHI:all:confirm:((?i)PHI Consent Date|PHI Consent signed|Prescription Sub-Status Code)
HUB ID:all:confirm:((?i)HUB Identifier|HUB Patient ID)
Identifiers:all:confirm:((?i)Patient_Genotype|Fibrosis Score|Patient Weight|Prescription Transfer|Product Form|Quality of Life Scale|Record Date/Timestamp|SPP Patient Identifier)
ICD:all:confirm((?i)ICD9|ICD-9|ICD10|ICD-10|ICD)
Configuring DLP Content Scanning
VIPRE recommends that you test your DLP rules before deployment using the live testing window. To do this, follow the steps below.
- Access the live testing window at File > Options > Add-ins > Add-In Options > SafeSend > Edit Settings
- Use the setting ContentScanningRules in the ADMX/ADML files for configuration via Group Policy; This setting can be used to push out new rules to all client machines. This setting is named SS_ContentScanningRules in the registry which can also be used for testing settings locally:
HKEY_LOCAL_MACHINE/SOFTWARE/{WOW6432Node}/SafeSend/SS_ContentScanningRules
The ContentScanningLicenseKey needs to be set to a valid license key in a production deployment (not in a trial or POC).
Important
Encrypted MS Office documents go through Office to decrypt - not SafeSend. Depending on your computer and network connection, this could potentially take longer than the default scan timeout. You’ll need to increase the content scanning timeout to allow enough time for the document to be opened, the password to be entered, and the scan to complete.
To increase the default scan timeout, update the following setting:
ContentScanningTimeoutMS
It’s set to 10000ms (10 seconds) by default.
This article is part of the SafeSend PC Add-in Deployment Guide, which includes all successive steps needed for a successful deployment. Please refer to Related Articles for direct links to the deployment guide and other processes pertinent to the one detailed in this article.