Product release information for VIPRE Advanced Security for Home - Mac Edition, available February 2021.
What's New
- Support for macOS Big Sur
- Support for Apple M1 Chip
Special Instructions
Step 1: Choose your situation below to find out your next steps.
I haven't upgraded to macOS Big Sur yet
You'll want to upgrade to the latest version of VIPRE before upgrading to macOS Big Sur.
Please be aware, some users who installed the latest version of VIPRE before upgrading to macOS Big Sur have reported a "System Extension Blocked" error when upgrading to Big Sur. Please refer to the Known Issues section below, VIPREMAC-2147 for the workaround if you experience this.
How to enable or disable VIPRE application updates.
Application updates
The VIPRE application needs to occasionally update itself to fix bugs, provide the latest features, and patch out potential software or system vulnerabilities. By nature, outdated applications can be exploited for security vulnerabilities.
Application auto-update will automatically download and apply these software updates when they are released, keeping your VIPRE app current.
You can check the version of VIPRE you’re running in the About screen.
To enable or disable application updates
If necessary, you can temporarily turn off application updates.
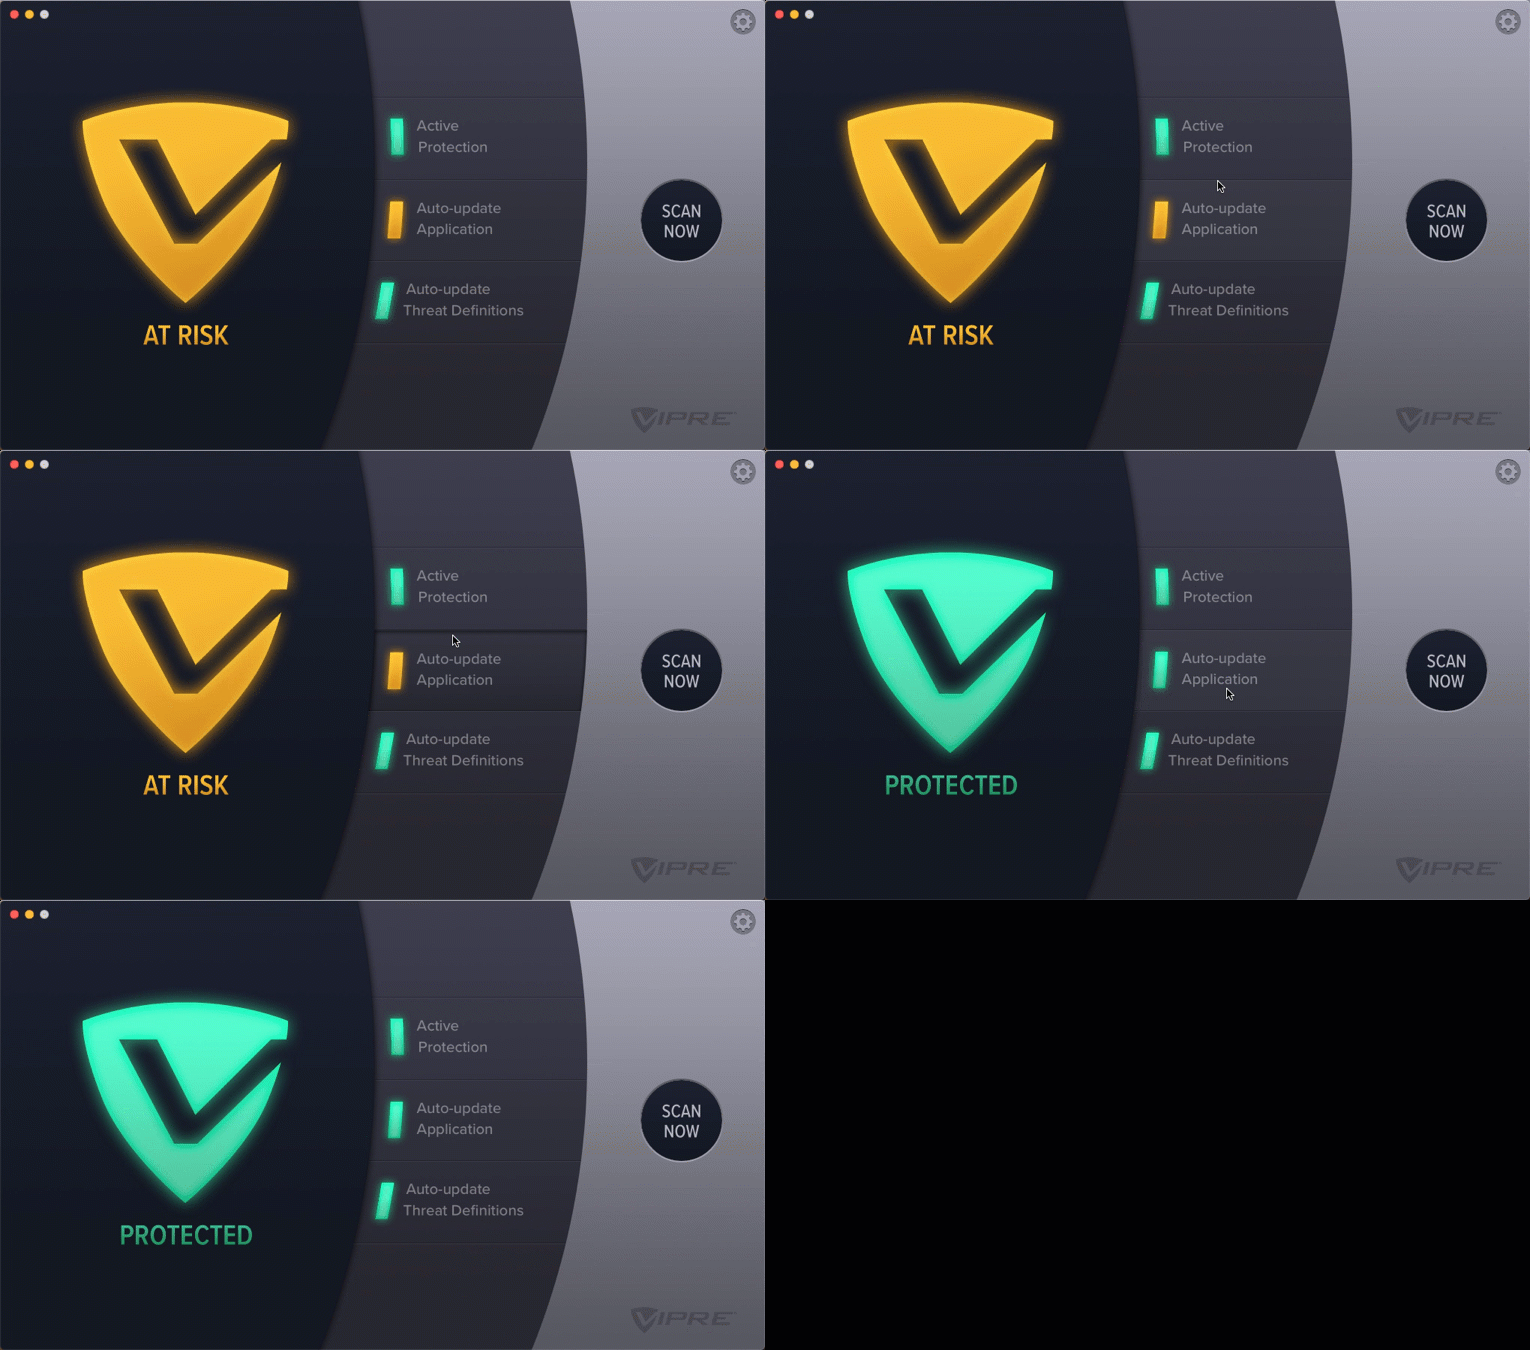
- On the main VIPRE screen, click the Auto-Update Application button to toggle it on (green) or off (yellow).
Important
When application updates are off, VIPRE cannot update itself to the most current version, and the application will not deploy the latest features or bug fixes. It could, therefore, become vulnerable to software exploits, and become less effective in protecting you. By turning off Auto-update Application, VIPRE will change to At Risk, and the VIPRE logo will turn yellow to show that you are At Risk and not fully protected.
I've already upgraded to macOS Big Sur
If you have already updated your operating system to macOS Big Sur, you may see the following notification:
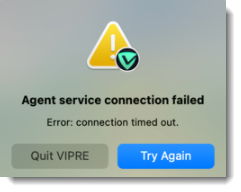
- Select Quit VIPRE
- Download the latest version of VIPRE Advanced Security for Home - MacOS
- Double-click the downloaded VIPREAdvancedSecurity.pkg file to begin the installation
- On the introduction screen, click Continue
- On the License screen, you're presented with the End-User License Agreement; click Continue
- Review the license agreement; if you agree with the terms, click Agree
- On the Installation Type screen, choose an install location or click Install to use the default
- On the Destination Select screen, click Continue
- The installer will ask for an admin User Name and Password to continue; enter your username and password and click Install Software
- The installer will copy the application to your hard disk; when you see "The installation was successful" click Close to finish
- Reboot your computer to complete the process
- Complete the required post-installation steps below to allow VIPRE full disk access
Step 2: Complete the Required Post-Installation Steps
Allow VIPRE Full Disk Access
To keep your macOS system properly protected, Full Disk Access must be granted to VIPRE.
Why VIPRE needs Full Disk Access
As of macOS 10.14 Mojave, applications no longer have full access to all disk locations by default. Instead, Apple has given users the ability to decide if an application should have that access. For VIPRE, full disk access is needed to be able to scan all disk locations. Without this access, VIPRE cannot scan all disk locations, including Home and Time Machine backups and thus may not detect threats in those areas.
How to grant full disk access to VIPRE
VIPRE needs full disk access to thoroughly scan for, quarantine, and report threats. To grant full disk access, follow the steps listed in the table below. If you are not comfortable with granting this access, please contact us.
Note: Administrator privileges are required to perform these steps.
| Steps | Screen Displayed |
| 1. Open System Preferences and then click Privacy and Security | 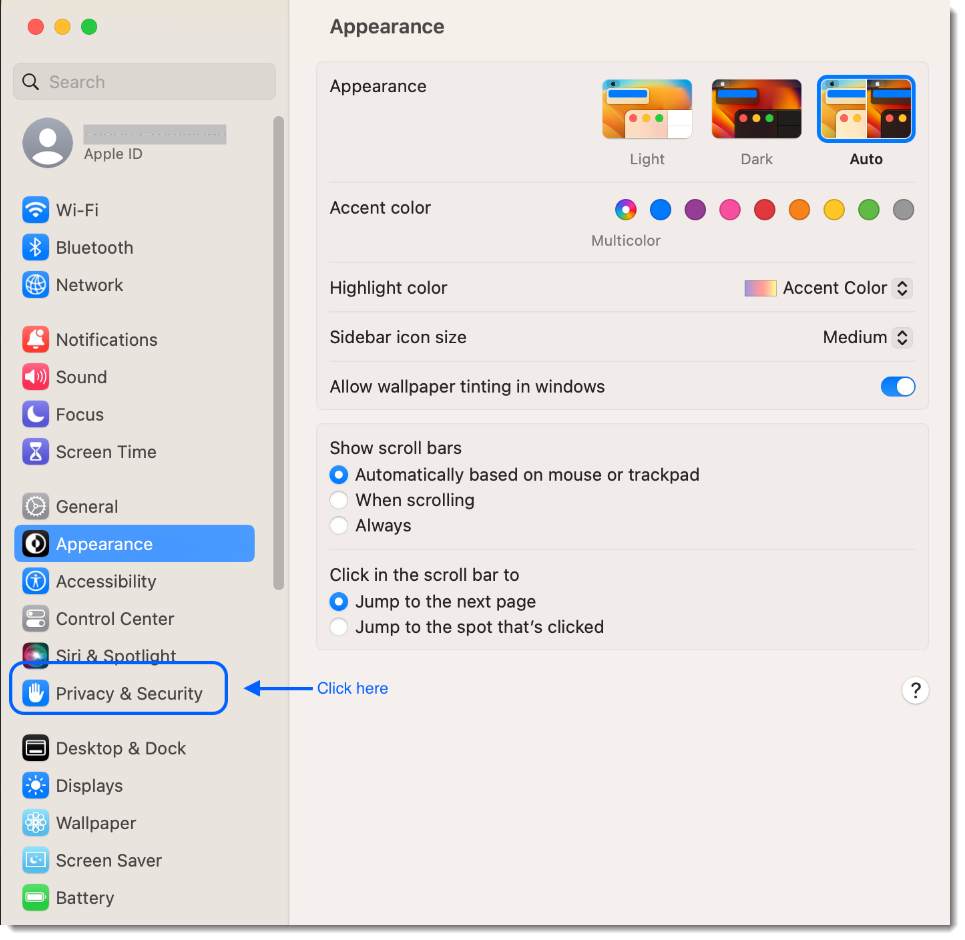 |
| 2. Click Full Disk Access, then Click the lock to make changes | 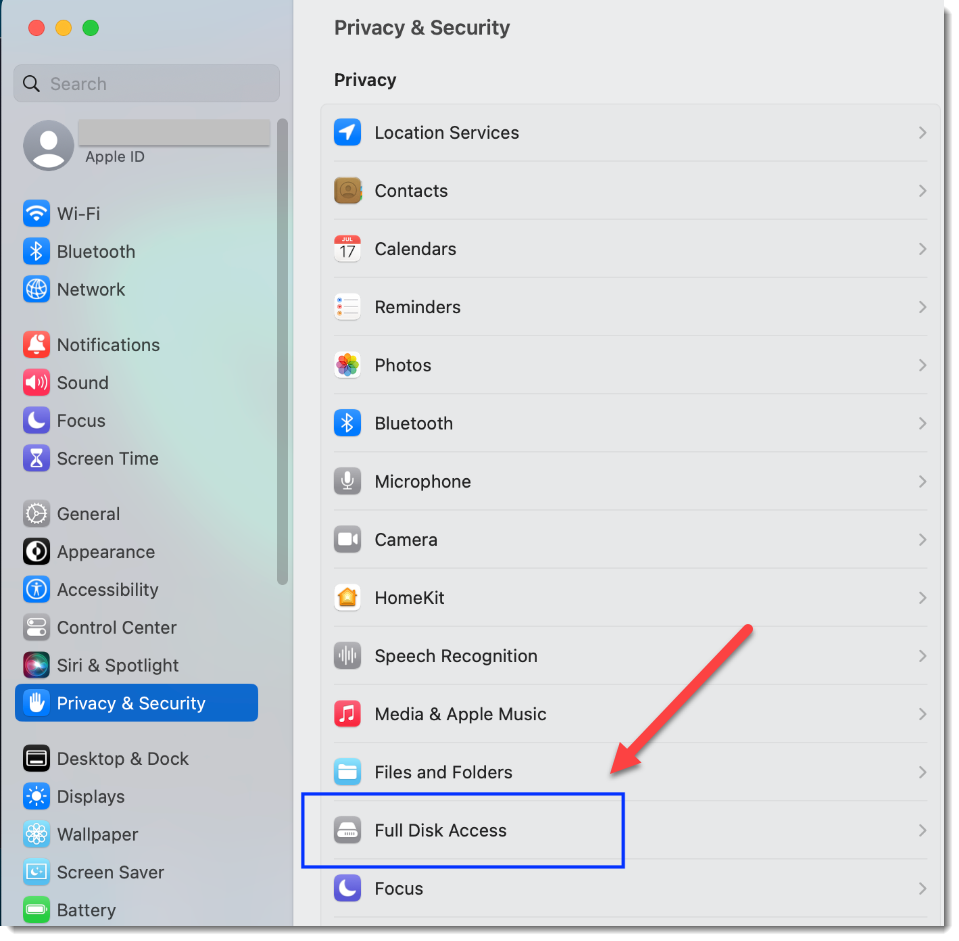 |
| 3. In the right column, look for the VIPRE logo and the word agent, then toggle the switch to blue to allow the VIPRE agent to have full desk access | 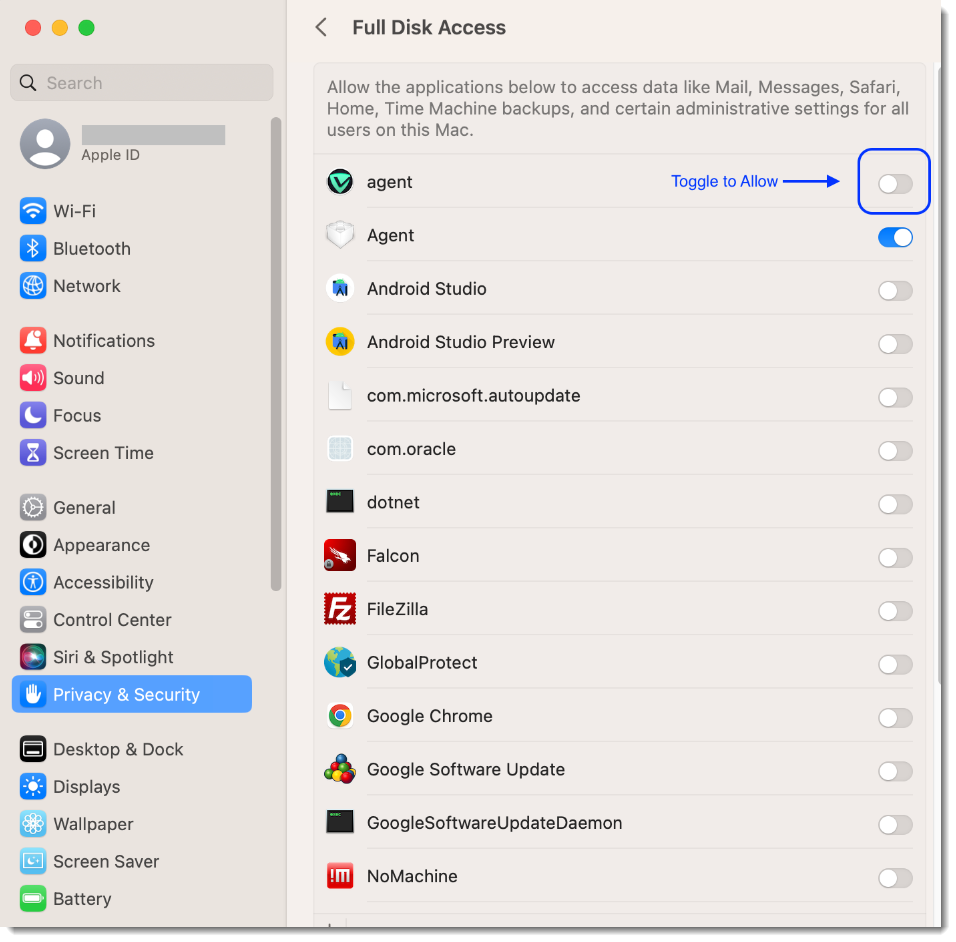 |
| 4. Enter administrator credentials then click Modify Settings | 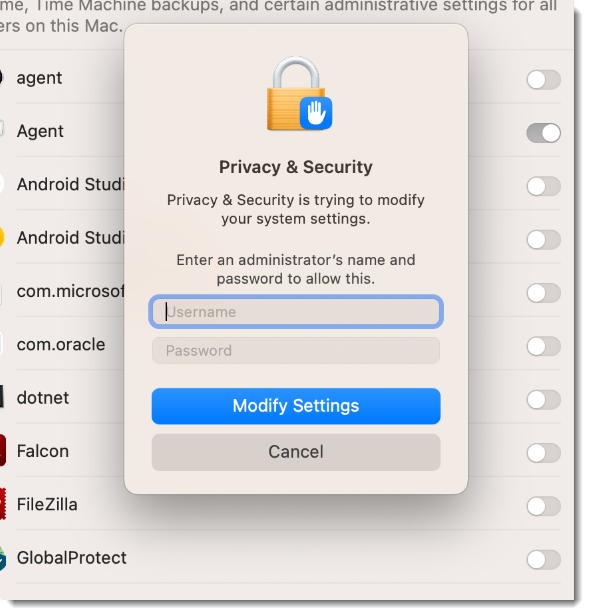 |
That's it! Verify that the VIPRE agent is toggled on to allow/blue then close the Settings dialog box. VIPRE now has Full Disk Access.
System Requirements
| Product or Component | Minimum Requirement |
|---|---|
| VIPRE Advanced Security for Home - Mac Edition | Operating System:
Your Mac must also have:
|
Known Issues and Workarounds
This section lists issues that are known at the time of release. In some cases, these are bugs that we are working to resolve with a subsequent release. Other items may be due to causes outside of our control, such as bugs with other vendors' software. In all cases, we have tried to provide a workaround for you to consider, should you experience an issue.
If you have questions about a specific issue, please provide the issue ID (if applicable) when contacting our Technical Support team.
Bugs Fixed in this Release
- [VIPREMAC-2076] - Replacement of "legacy system extension" for macOS 10.15.4+
Known Issues in this Release
| Ticket Number | Description | Workaround |
|---|---|---|
| VIPREMAC-601 | Problem turning on Active Protection if system software from "ThreatTrack Security, Inc" is not allowed in macOS Security & Privacy Settings | Adjust your Mac's security preferences to ensure the VIPRE system extension is allowed to load properly https://success.vipre.com/advanced-security-home-mac-get-started/home-mac-allow-system-extension |
| VIPREMAC-1974 | As of macOS 10.14 Mojave, applications no longer have full access to all disk locations by default, which VIPRE requires in order to scan all disk locations and detect potential threats | Grant full disk access to VIPRE https://success.vipre.com/advanced-security-home-mac-get-started/home-mac-full-disk-access |
| VIPREMAC-2147 | Users who do not update to macOS 11 Big Sur but do install VIPRE with Big Sur support will experience a "System Extension Blocked" error when upgrading to macOS 11 |
|
| VIPREMAC-930 | Unchecking the option to Send Anonymous Usage Data under General > Privacy, will not stay unchecked after a computer shutdown or reboot | Repeat the instructions here to opt-out of sharing anonymous data each time your computer is rebooted until a fix is implemented |