
Our guided setup will walk you through everything you need for your initial configuration of VIPRE Email Archiving. So, let's get started!
Step 1: Log in to VIPRE Email Archiving
- Navigate to the VIPRE Email Archiving portal and log in
- To find the portal link for your region, click here
- When you log in, you will be in one of the following user-type modes:
- Administrators can create new user accounts and are the only user type that can reset passwords; they have no access to search
-
Privileged Users can search across archives and all emails in your VIPRE Email Archiving site unless one or more searchable domains are added
- Any searches performed by Privileged Users create an audit transcript that is sent to the Data Guardian(s)
-
Data Guardians are email addresses where transcripts of administrator access and privileged user searches are sent
- A minimum of 1 Data Guardian must be created before any basic user accounts can be created
- Basic Users are users who have access to one or more email addresses/inboxes for their account and are not typically audited
You'll learn more about these user types and how to create them in Step 3.
Click the back arrow to return to the previous step.
Step 2: Journaling Setup
Select a mailbox to receive non-delivery reports before you enable journaling. This should be an email account that you do not use for anything else, as emails to and from this address will not be journaled.
Microsoft 365
The instructions below are for Microsoft 365 but can be used as a guide for any web server application.
Create a Journaling Rule
- Log in to the Microsoft 365 admin console and navigate to Microsoft Purview Portal > Data lifecycle management > Exchange (legacy) > Journal rules
- Click on New Journal Rule
- In the Send Journal Reports to field, enter companytag@yyy.archive.mailanyone.net
- Important: This is an example and not the actual address; your Company Tag is the unique identifier assigned to your account; yyy will be your region, refer to Archiving Portal Access to find the appropriate address
- In the Name field, type a name for the rule
- In the If the message is sent to or received from dropdown menu, select Apply to All Messages
- In the Journal the Following Messages dropdown menu, select All Messages
- Click Save
- Please allow at least 15 minutes for the journaling rule to be fully enabled
Create a Connector
To ensure all mail is successfully received and archived, follow the steps below.
- In the Exchange Admin Center, click the Connectors tab and click the plus sign
- Select Microsoft 365 and Partner Organization from the From and To dropdown lists respectively
- Enter the name of your archive in the Name field to name the Connector and click Next
- Select Only when email messages are sent to these domains and click the plus sign
- Enter companytag@yyy.archive.mailanyone.net (refer to Archiving Portal Access ) and click OK
- Assess the FQDN address of the archive; this is known as a Smart Host
- Select the option Route email through these smart hosts and click the plus sign
- Enter yyy.archive.mailanyone.net (refer to Archiving Portal Access ) and click Save
- Click Next
- Ensure that you enable TLS on the archive connector
To validate the SMTP journal address:
- In the New Connector dialog, click the plus sign
- Enter the email address, which is companytag@yyy.archive.mailanyone.net (refer to Archiving Portal Access ), in the Add Email box and click OK
- Click Validate
The email address will be validated, and the connector will be added.
Google Workspace
The instructions below are for Google Workspace but can be used as a guide for any web server application. Google Workspace adds an extra BCC recipient to every email that comes in or out of the Workspace.
Create a Journaling Rule
- Log in to the Google Workspace admin console and navigate to Gmail > Routing
- Click on Configure at the bottom
- In the text field, type a name for the rule
- Under Email messages to affect, put a checkmark next to Inbound, Outbound, Internal - sending, and Internal - receiving
- Under Also deliver to, check Add more recipients and enter companytag@yyy.archive.mailanyone.net
- Important: This is an example and not the actual address; your Company Tag is the unique identifier assigned to your account; yyy will be your region, refer to Archiving Portal Access to find the appropriate address
- Under Add Recipient > Advanced Options > Headers, add a checkmark next to Add X-Gm-Original-To
- This is for the copy that is sent to the archive
- Click Save
- Please allow at least 15 minutes for the journaling rule to be fully enabled
On-premises Server
The instructions below are for Microsoft Exchange Server but can be used as a guide for any mail server application.
When using Exchange Server with VIPRE Email Archiving, there are two parts to the configuration: setting up a separate send connector and configuring the journaling.
Part 1: Creating a new Send Connector
A new Send Connector is needed to ensure archived mail doesn't go back through the filter and risk being stopped or double archived.
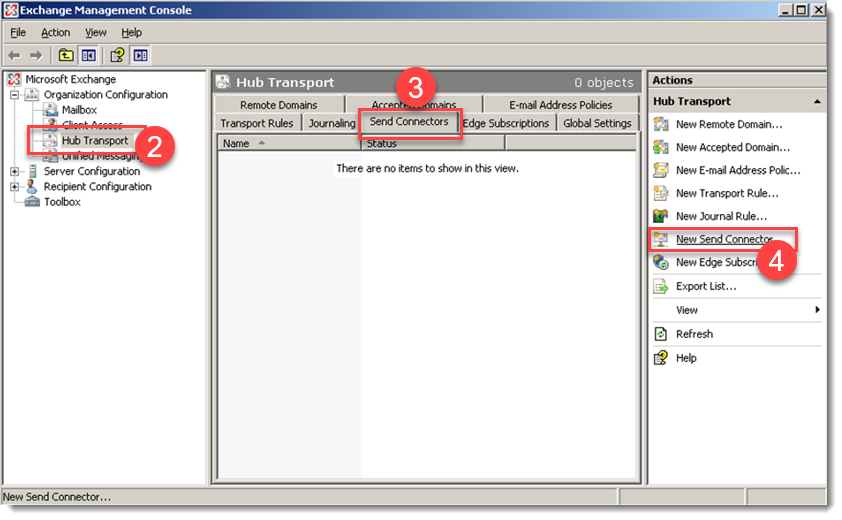
- Log in to the Exchange Management Console (EMC)
- Under Organization Configuration, select Hub Transport
- Select the Send Connectors tab
- On the right, click New Send Connector...
- Name the connector and select Custom from the drop-down
- In the Address space, enter the appropriate address for your region (this link opens in a new tab)
- Make sure the cost is lower than any other smart hosts that might cover this address space
- Click Next
- Pick the option to Use domain name system (DNS) "MX" records to route mail automatically
- Click OK, then Next
- Set authentication to None
- Click Next
- Skip the Source Server settings by clicking Next
- Click Next once more, and finally, New
Part 2: Set up Journaling
The next portion assumes that you are still logged in to the EMC.
- Under Organization Configuration, select Hub Transport
- Select the Journal Rules tab
- On the right, click New Journal Rule...
- Select the following to apply these rules:
- For * If the message is sent to or from…, select Apply to all messages
- For * Journal the following messages…, select Internal Messages Only
- For * Send journal reports to:, enter your archive address
- Give the rule a name and click Save

- Make sure the rule is enabled by looking at the tickbox
This will now start archiving all internal mail.
Click the back arrow to return to the previous step.
Step 3: Create User Accounts
VIPRE Email Archiving has multiple levels of user accounts.
Administrators have no access to the search interfaces, and only administrators can reset passwords or access the Forgotten your Password? login facility. If an administrator uses the Forgotten your Password? feature, a new password will be emailed to the Administrator’s primary email address. There is a single default Administrator, which is used to set up the initial archiving system. Change the email address of this account in the Outbound Email & Alerts section. We recommend having more than one administrator account. Data Guardian transcripts will show which admin accounts have logged in.
- Navigate to Basic Configuration > Local User Accounts
- Click Create New Account
- Enter the required values in the fields
- Admin Level is where you will be able to determine the type of account you are creating - select Administrator
- Click Save
Data Guardians are email addresses to which transcripts of administrator access and privileged user searches will be sent. At least one data guardian must be added before adding any local user accounts.
- Navigate to Basic Configuration > Data Guardians
- In the Data Guardians section, enter the required information in the provided fields
- Click Add
- Click Save
Privileged Users can search across the archives and all emails in their organization's system unless one or more searchable domains are added. Any searches made by Privileged users will raise an audit transcript that is sent to the Data Guardian(s).
- Navigate to Basic Configuration > Local User Accounts
- Click Create New Account
- Enter the required information in the provided fields
- Admin Level is where you will be able to determine the type of account you are creating - select Privileged User
- Click Save Changes; the user account will be created and the password for the account will be displayed on the screen
Basic Users have access to one or more email addresses/inboxes specified for their account. A basic user is not normally audited, but basic accounts can be set up to view any number of different user mailboxes, by entering several secondary email addresses that relate to other mailboxes. In this mode, the basic account should be audited. It is recommended to ensure that the auditing options are used when creating such an account.
- Navigate to Basic Configuration > Local User Accounts
- Click Create New Account
- Enter the required values in the fields
- Admin Level is where you will be able to determine the type of account you are creating - select Basic User
- Click Save
Click here to configure LDAP
VIPRE Email Archiving uses LDAP in three ways:
- To assist when validating a User Login
- If the Translate User option is selected
- To expand email addresses in non-enveloped emails
- To provide User Account lists for selection purposes under User Directory, Mailbox Reader, and Folder Replication
- Navigate to Basic Configuration > LDAP Servers and click Create New Server
- Enter the required values in the fields
- Click Fetch Base DN
- After you have filled out the rest of the form, click Test Connection
- A confirmation message will be displayed and you will see one of the following results:
- The connection is successful and the credentials are correct
- Credentials are incorrect
- The Connection to the LDAP server has failed or is blocked
- Click Save Details
The LDAP server will be integrated.
Click the back arrow to return to the previous step.
Step 4: Configure Outbound Email and Alerts
The Outbound Email & Alerts section allows you to configure settings for emails going out of the VIPRE Email Archiving server as well as setting alerts for outbound emails with details such as:
- Time after which alerts should be sent
- Email addresses to and from which alerts should be sent
- Audit email addresses and more
Outbound emails typically are emails forwarded by users to their inbox, privilege & admin user’s session transcripts sent to the Data Guardians, system status and alert emails – for both regular daily health checks and ad-hoc error alerts.
- Navigate to Basic Configuration > Outbound Email & Alerts
- Check the System-wide SMTP Service field and click the System Alert Settings option on the right
- You will find details on configuring System Alert Settings later in this guided setup
- Enter the required values in the fields
- Click Test SMTP Connection
- Select the required options for Send Mail to and Mail type fields
- Click Test Connection
- Navigate to the VIPRE Email Archiving application window and enter the required values in the fields (hover your mouse over, the field names for additional information and/or example values)
- Click Save
Click the back arrow to return to the previous step.
Step 5: Verify your Setup
To view the incoming mail and verify your setup:
- Log into VIPRE Email Archiving as an Administrator and navigate to Monitor & Reports > System Monitor
- The System Monitor page will be displayed, and you should see the following information:
- New mail items waiting to be processed appear in the Spool Queue
- A spool agent starts to process these items
Refreshing the page should result in the Processed count increasing. Agents 0-5 will show a small-time indication that there have been new incoming emails or there are new emails still coming into the mailbox.
By default, indexes refresh every 30 minutes or as defined. Once you've confirmed that mail is being processed, click Let Recent Mail Become Searchable to refresh the indexes and enable users to search emails that were processed within the last 30 minutes.
To view the search results:
- Log out of the Admin area and log in as a local user
- Click Search
Search results, including recent emails, will be displayed.
Congratulations! VIPRE Email Archiving has been successfully set up!