
Product release information for VIPRE Cloud Console and Agent for Windows v13.1.8510, released on August 22, 2023.
What's New
We are happy to announce a new build for the VIPRE Agent for Windows, bringing it to version 13.1.8510. The VIPRE Cloud Console has also been updated with new features and Agent support. Continue reading below for details.
New Report
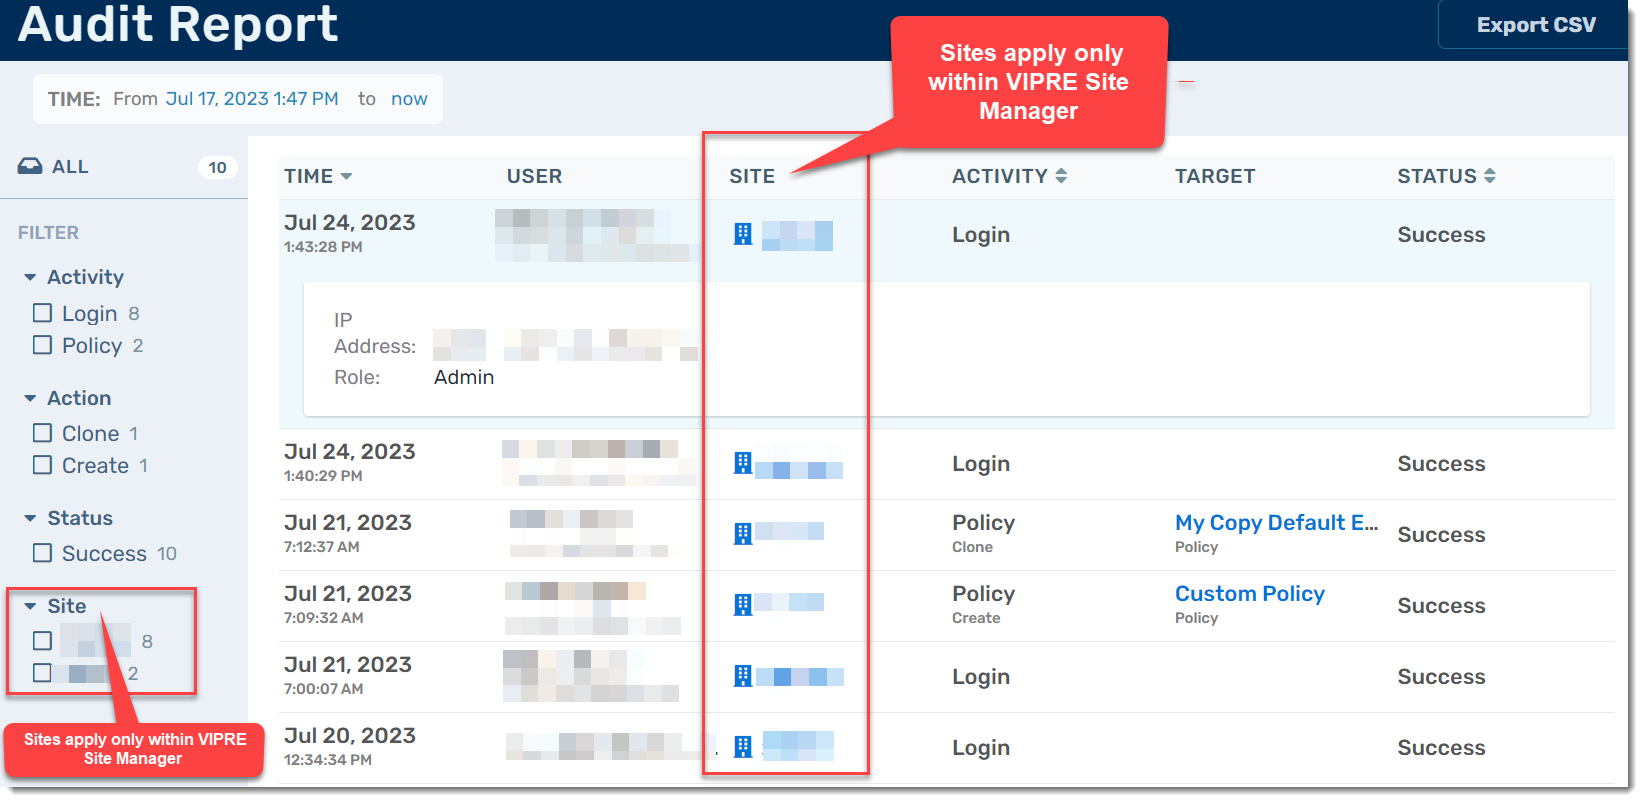
Audit Report details all user actions, including when a user logs in, does a device scan, creates a notification, updates a policy, changes a user account, and more. The level of detail provided depends on the action taken. For example, a policy update will provide more detail than a user logging in.
Audit Report is available in all VIPRE Cloud products.
Click here to learn how to use Audit Reports
To access the Audit Report:
- Within your VIPRE Cloud web console, under Monitor, select Reports
- Choose Audit Report
- You will be presented with a filterable table that includes the time the action took place, the user who performed the action, the action that was performed, the target of that action, and whether or not the action was successful
- In Site Manager, you will also see a column indicating which site the action was performed on
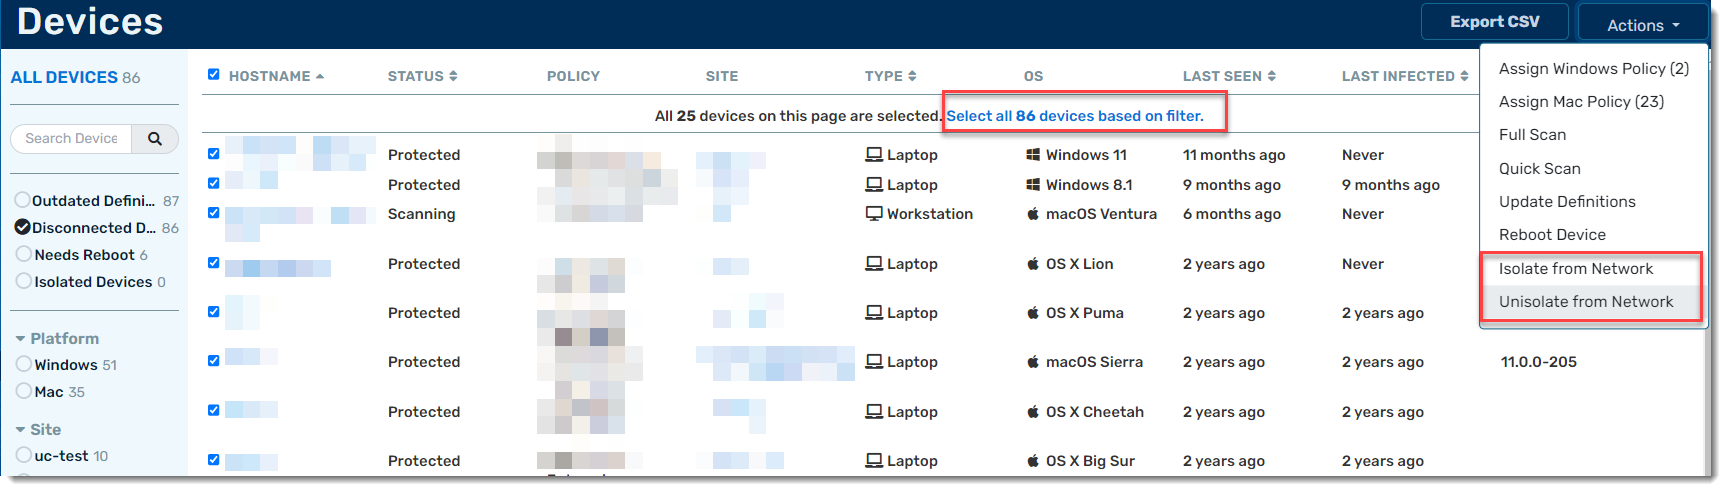
New Action
Isolate from Network and Unisolate from Network both allow you to select multiple devices and perform bulk isolation or bulk de-isolation from the network.
Bulk Isolation and Unisolation are available only with VIPRE Endpoint Detection & Response.
Click here to learn how to use Bulk Isolation/Unisolation from Network
- From within the VIPRE Cloud web console, under Manage, select Devices
- Filter your devices as desired; each page shows 25 devices
- Under the table headers, you should see the option to select all devices based on your filter - click Select all nn devices based on filter
- This will change to say All nn devices based on filter are selected
- Click Actions in the top-right portion of the screen and select Isolate from Network or Unisolate from Network
New Notification
A new notification type has been added to Site Manager called Incident Detected. This notification allows admins at the Site Manager level to create Incident Detection notification emails globally or for specific sites.
Click here to learn how to set up Incident Detection notifications in Site Manager
- From within the Site Manager web console, under SETUP, select System, then choose Notifications
- In the top right, click the Add Notification button
- A window will pop up; complete the following information:
- Name of your notification
- Type: select Incident Detected
- Severity can be low, medium, or high
- Remediation Status can be auto-remediated or unhanded
- Recipients determine who will receive the email notification
- Subject can be customized to include tokens, incident id, hostname, site, device alias, or policy name
- Scope can either be Global or by Site; when choosing Site, you then have the option to use a singular site or multiple sites
- After configuring the notification to your liking, select Preview to see a staged draft of what the email will look like, or click Add Notification
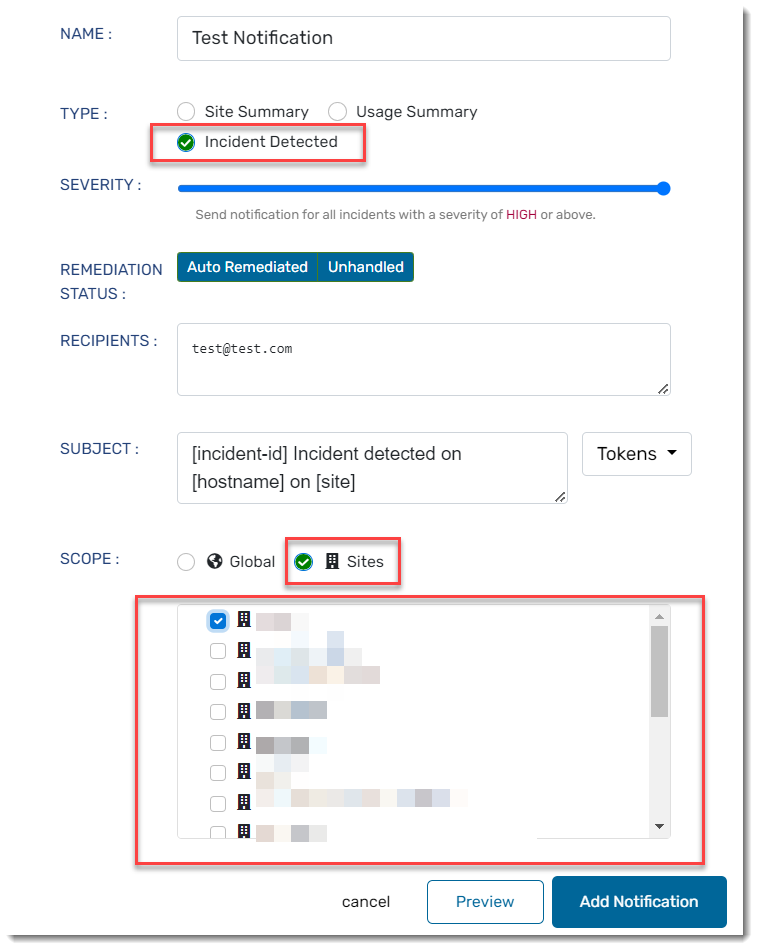
This notification type was already available at the site level within Endpoint Security Cloud and Endpoint Detection & Response; now, it is available at the Site Manager level as well.
New Features
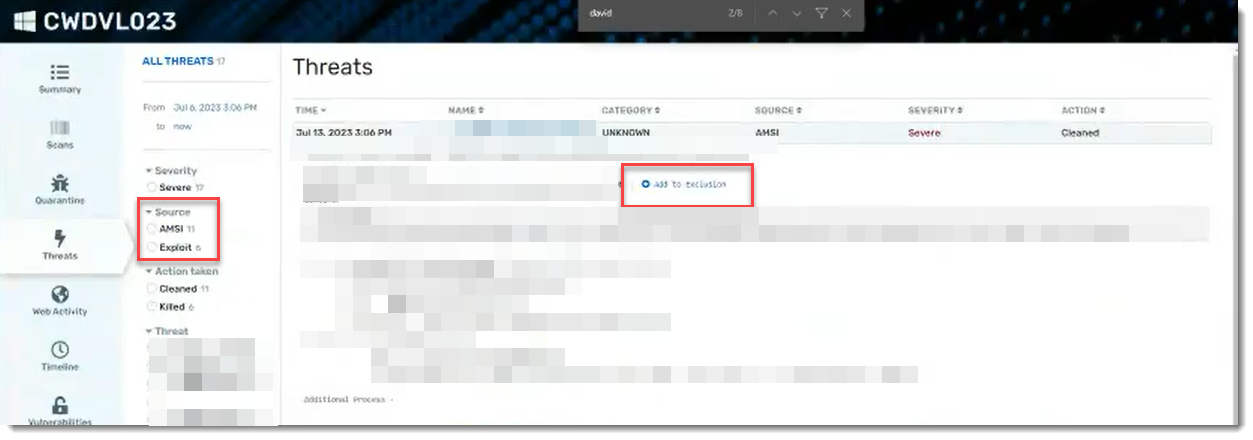
AMSI
We've added the AMSI engine to VIPRE Cloud. AMSI, which stands for Antimalware Scan Interface, is a Microsoft Windows component that works with VIPRE to analyze active, potentially malicious script code that is running to help us detect, identify, and block threats. Scripts can now be excluded from blocking by adding a hash of the script contents to the Hash exclusions.
AMSI is available in Endpoint Security Cloud and Endpoint Detection & Response.
Learn how to use AMSI
AMSI is enabled with Block and disinfect selected by default.
To enable/disable AMSI:
- Within your VIPRE Cloud web console, under Manage, select Policies
- Choose the desired policy, then click Active Protection and scroll down until you see AMSI
- Add a checkmark next to Enable malicious script blocking with Microsoft AMSI protection and select one of the following actions:
- Allow - detects and reports the events but does not block the action
- Block - detects and reports the events and blocks the script
- Block and disinfect - detects and reports the events, blocks and removes the script
To view AMSI detection events:
- Within the VIPRE Cloud web console, under Monitor, select Reports
- Click Threat Summary Report
- Select and click on the name of a threat in the table at the bottom of the page
- Click the device name in the Detections table
- In the light blue side-navigation bar, select Threats
- Filter to choose AMSI then click on a threat to show the details
- If you want to add an exclusion for a particular threat, click the Add to Exclusion link
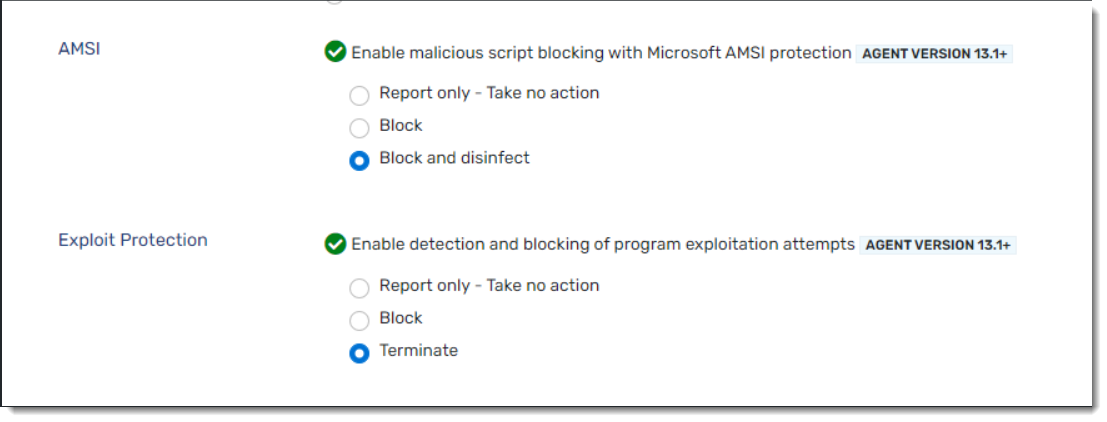
Exploit Detection
We've also added the Exploit Detection engine to VIPRE Cloud, which will provide details about potentially malicious processes that were run on your device and block them. Then you can add exclusions as needed.
Click here to learn how to use Exploit Detection
Exploit Protection is enabled with Terminate selected by default.
To enable Exploit Protection:
- Within your VIPRE Cloud web console, under Manage, select Policies
- Choose the desired policy, then click Active Protection and scroll down until you see Exploit Protection
- Add a checkmark next to Enable detection and blocking of program exploitation attempts and select one of the following actions:
- Allow - detects and reports exploitation attempts but does not block the action
- Block - detects and reports exploitation attempts and blocks the action but does not halt the offending process
- Kill - detects and reports exploitation attempts, blocks the action, and kills the offending process
To view Exploit Protection events:
- Within the VIPRE Cloud web console, under Monitor, select Reports
- Click Threat Summary Report
- Select and click on the name of a threat in the table at the bottom of the page
- Click the device name in the Detections table
- In the light blue side-navigation bar, select Threats
- Filter to choose Exploit then click on a threat to show the details
- If you want to add an exclusion for a particular threat, click the Add to Exclusion link
Exploit Detection is available in Endpoint Security Cloud and Endpoint Detection & Response.
Tamper Protection
Another new addition, Tamper Protection, prevents modifications of your computer's local product folders, registry keys, and virtual memory where the VIPRE Agent resides. Essentially, when Tamper Protection is enabled, it prevents end users from changing or stopping the VIPRE Agent. However, if Tamper Protection is disabled, users on that endpoint can stop the VIPRE Agent. Previous VIPRE versions had a form of Tamper Protection, but this new feature supports disabling this function for troubleshooting purposes.
Click here to learn how to use Tamper Protection
Tamper Protection is enabled by default. To disable Tamper Protection:
- Within your VIPRE Cloud web console, under Manage, select Policies
- Choose the desired policy, then click Agent and scroll down until you see Tamper Protection
- Remove the checkmark next to Enable Tamper Protection
Tamper Protection is now disabled.
Tamper Protection is available in Endpoint Security Cloud and Endpoint Detection & Response.
Ransomware Protection
As part of this update, Ransomware Protection has been added to VIPRE, which helps us to block ransomware more effectively and automatically roll back any changes made by the ransomware. If this feature is disabled, VIPRE will solely block encrypted actions. However, with Ransomware Protection enabled, VIPRE will not only stop further encryption, it will also restore any previously encrypted files.
Click here to learn how to use Ransomware Protection
Ransomware Protection is enabled with Monitor network share paths selected by default.
To enable Ransomware Protection:
- Within your EDR web console, under Manage, select Policies
- Choose the desired policy, then click EDR and scroll down until you see Ransomware Protection
- Add a checkmark next to Enable ransomware protection to rollback files encrypted by ransomware as soon as VIPRE detects and blocks the attack
- Check whether you want it to Monitor network share paths
To view Ransomware Protection events:
- Within the EDR web console, under Monitor, select Reports
- Click Threat Detection Report
- Select and click on the name of a threat in the table at the bottom of the page
- Click the device name in the Detections table
- In the light blue side-navigation bar, select Threats

The Ransomware Protection policy setting is available only with VIPRE Endpoint Detection & Response.
VIPRE Recommends
It's critical to keep all software in your environment as up-to-date as possible. New software releases often fix issues with older product versions that, unless addressed, could leave you vulnerable. As such, VIPRE recommends updating to the most recent version as soon as possible.
Check the current status of older product versions on the VIPRE Product Lifecycle Matrix to learn when support for specific product versions may end.
System Requirements
Select one of the links below for the most recent system requirements for your VIPRE Cloud product:
- VIPRE Endpoint Security Cloud System Requirements
- VIPRE Endpoint Detection & Response System Requirements
Bugs Fixed in this Version
- VPBAGENT-41325: VIPRE failed to reload Threat Scanner signatures during the definitions update on the 32-bit version of Windows
- VPBAGENT-41504: Definition updates during scans resulted in the C:\Program Files\VIPRE Business Agent\Definitions\scan directory taking gigabytes of space until a restart occurred
- VPBAGENT-41512: VIPRE Agent was not sending certain reports when a lost connection was restored
- VPBAGENT-8519: Outlook was crashing due to a conflict between VIPRE Email Protection and emails containing electronic signatures
- VPBAGENT-41120: EDR feature (Enable Extended Investigation) was automatically preventing access to multiple Internal IPs