
Manage your firewall settings, including application and network exceptions, trusted zones, and Intrusion Detection System (IDS) rules, determine which settings your users can access, and learn how to create and manage firewall templates.
Configure User Control Settings for Firewall
To configure the user control settings for the Firewall:
- For the desired policy, open Policy Properties > Firewall
- Configure the following:
- Allow users to configure firewall: When selected, the firewall functionality will be visible in the Agents, allowing the end-users complete control of the firewall settings
- Allow users to disable firewall: When selected, this setting unhides the enable/disable firewall setting in the Agents; firewall configuration settings are not related to this setting
- Allow users to stop/start all traffic: When selected, this setting unhides the stop/start all traffic firewall setting in the Agents. When unselected, the end-users will not be able to stop/start traffic from the Agent
- Open Policy Properties > Firewall > Basic Firewall Protection
- Optionally, select Allow users to trust new network connections
- This setting is ideal for laptop/roaming users
- Click Apply to save changes
Configure Basic Firewall Protection
The Basic Firewall Protection screen allows you to turn on/off the basic firewall protection and control firewall logging for all agents under a policy.
Basic Firewall Protection Settings:
- Enable basic firewall protection: This is the control switch for all sub-controls under Basic Firewall Protection; this includes all exceptions and trusted zones. This does NOT include IDS
- Allow users to trust new network connections: This sets the agent to automatically trust new network connections, which is an ideal setting for users who often travel with a laptop to avoid frequent prompts asking the user whether to allow a network connection
- Enable the Intrusion Detection System (IDS): This is the control switch for all functions on the Intrusion Detection System screen
Basic Firewall Logging:
- Log Events: Enables the logging of all firewall events, detailed below
- Application rules: Displays logged application events that were generated based on the application exceptions (rules)
- Port Rules: Displays logged port events that were generated based on user-defined port exceptions (rules)
- Communication Rules: Displays logged network events that were generated based on the network exceptions (rules)
- Advanced Rules: Displays logged events that were generated based on user-defined advanced exceptions (rules)
- Log packets going to unopened ports: Packet logging is logged in the PUP of the Firewall History; the log refreshes around every 30 seconds and pnly the last 100 items are kept in the log
- Enable stealth mode: This turns on stealth mode on Windows 7 and greater. Stealth mode blocks outgoing ICMP unreachable and TCP reset messages for a port when no application is listening on that port
Important
Port Scans are no longer available in v12. It is still available in Agent v11 and lower, however.
Configure Firewall Application Exceptions
Configure the Application Exceptions to control the access an application will have over your network.
To configure firewall application exceptions:
- Navigate to the Application Exceptions screen. Policy Properties>Firewall>Basic Firewall Protection>Application Exceptions
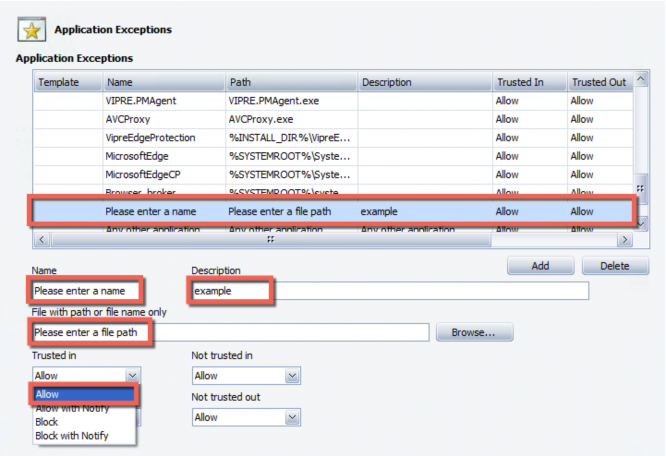
- To add a new application exception, click Add; an exception is added to the table
-or-
To modify an existing application exception, select a row in the Application Exceptions table. Skip to Step 5.
Info
Default exceptions cannot be deleted and only it's firewall action can be modified. Wildcards can be used when creating application exceptions.
To delete an existing application exception, select a row in the Application Exceptions and click Delete, and then click Apply to accept changes.
Info
The column headings are dynamic, allowing you to move their order and sort by a category within that column. Click the filter icon on a column heading to select a filtering option. See Filtering Views for more information on using the available filters.
- Enter a Name and Description for the exception
- Enter a File Path, or click Browse to locate a file
- Select a firewall action (Allow, Allow with Notify, Block, Block with Notify) for the following network conditions:
- Trusted in: applies only to an inbound connection for the Agent's native network(s)
- Trusted out: applies only to an outbound connection for the Agent's native network(s)
- Not trusted in: applies only to an inbound connection for any network that is not native to the Agent
- Not trusted out: applies only to an outbound connection for any network that is not native to the Agent
- Click Apply to save changes
Configure Network Exceptions
Configure the Network Exceptions to set how network exceptions are trusted.
To configure a network exception:
- Navigate to the Network Exceptions screen, then Policy Properties>Firewall>Basic Firewall Protection>Network Exceptions
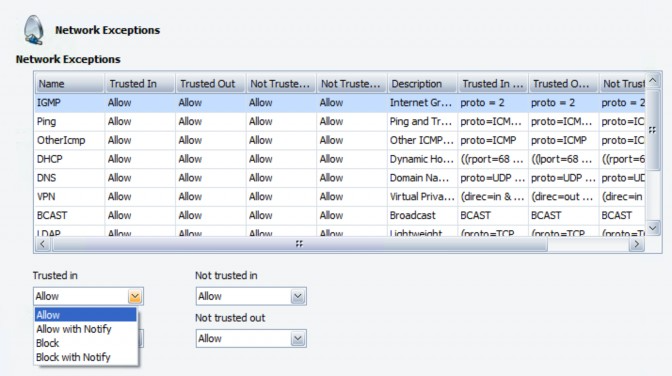
- Select a row from the Network Exceptions table
Info
The column headings are dynamic, allowing you to move their order and sort by a category within that column. Click the filter icon on a column heading to select a filering option. See Filtering Views for more information on using the available filters.
- Select a firewall action (Allow, Allow with Notify, Block, Block with Notify) for the following network conditions:
- Trusted in: applies only to an inbound connection for the Agent's native network(s)
- Trusted out: applies only to an outbound connection for the Agent's native network(s)
- Not trusted in: applies only to an inbound connection for any network that is not native to the Agent
- Not trusted out: applies only to an outbound connection for any network that is not native to the Agent
- Click Apply to save changes
Configure Advanced Exceptions
Create and configure an Advanced Exception for a more complex rule that can include combinations of protocol, local and remote ports, and direction of traffic, or it can consist of specific port or protocol exceptions that are not application-specific.
The advanced exceptions are processed in the order listed and can be rearranged.
To configure advanced firewall exceptions:
- Navigate to the Advanced Exceptions screen. Policy Properties>Firewall>Basic Firewall Protection>Advanced Exceptions
- To add a new advanced exception, click Add. An exception is added to the table, the UI then allows you to continue populating the fields below the table
-or-
To edit an existing advanced exception, select a row in the Advanced Exceptions table. The fields below the table display for the selected item.
-or-
To delete an existing advanced exception, select a row in the Advanced Exceptions table. Click Delete and Apply. Skip to Step 8.
- If new, enter a Name and Description for the exception. You can also modify the name and description of an existing exception
- Optionally, enter the File Path, or click Browse to locate or change a file
- Select a firewall Action (Allow, Allow with Notify, Block, Block with Notify) for the exception.
- Select a Direction for the exception
- Enter one or more of the following:
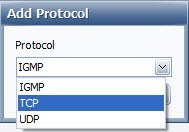
- To add a Protocol, click Add and select a protocol from the popup's drop-down list: ICMP, IGMP, TCP, or UDP
- To add a Local Port, click Add and select Single or Range. Then, enter a port number manually or select from the drop-down list.
- To add a Remote Port, click Add and select Single or Range. Then, enter a port number manually or select from the drop-down list.
- Click Apply to save changes.
Configure Intrusion Detection System (IDS) Rules
This topic applies to VIPRE Premium and VIPRE Endpoint Security only.
The Intrusion Detection System manages the IDS Snort® rules. You can enable/disable IDS rules. The agent(s) will block behavior based on the Snort rule(s) defined.
To enable/disable an IDS rule:
- Navigate to the Intrusion Detection System screen. (Policy Properties>Firewall>Basic Firewall Protection>Intrusion Detection System)
- In the Rules table area, select the desired IDS rule to disable
- In the Enabled checkbox below the table, unselect to disable the rule, or select to enable it
- Click Apply or OK to accept your changes
- Ensure that the "Enable intrusion detection system" checkbox on the Basic Firewall Protection screen is selected
Info
To view a report of detected intrusions, in the Report Viewer, run the "Firewall Daily Intrusions Blocked" report.
Configure Trusted Zones
This topic applies to VIPRE Premium and VIPRE Endpoint Security only.
Configure Trusted Zones for your firewall.
To configure a trusted zone:
- Navigate to the Trusted Zones screen. Policy Properties>Firewall>Basic Firewall Protection>Trusted Zones
- To add a new trusted zone, click Add. A trusted zone is added to the table
-or-
To edit a trusted zone, select a row in the Trusted Zones table. The fields below become editable.
-or-
To delete a trusted zone, select a row in the Trusted Zones table. Click Delete and Apply. Skip the remaining steps.
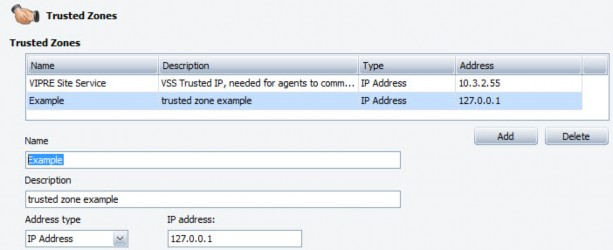
- If new, enter a Name and Description for the trusted zone. You can also modify the name and description of an existing trusted zone
- From the Address type drop-down list, select an address type:
- IP Address: enter an IP address. Once selected, the IP address field is populated with an example IP address. Simply select the address and type over it.
- Range: enter a range of IP addresses. When selected, the First and Last IP address boxes display with examples. Simply select the address and type over it.

- Network: enter an IP address and a Subnet mask. Simply select the address and mask and type over it.
- Click Apply to save changes
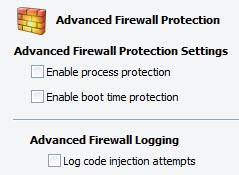
Configure Advanced Firewall Protection Settings
This topic applies to VIPRE Premium and VIPRE Endpoint Security only.
Configure the Advanced Firewall Protection, which consists of process protection, boot time protection, and code injection logging.
To configure advanced firewall protection settings:
- Navigate to the Advanced Firewall Protection screen. Policy Properties>Firewall>Advanced Firewall Protection
- Configure the following:
- Enable process protection: the control switch for the Process Protection screen
- Enable boot time protection: when enabled, prevents outside connection attempts during startup
- Log code injection attempts: the log is accessible from the Agent console (FIREWALL>Firewall History>HIPS). Also, you can generate the "Firewall Daily Intrusions Blocked" report and select the "Code Injection Attempts" column
Info
Code injection statistics for the Agent can be accessed from Agent Console > FIREWALL > Statistics.
- Click Apply to save changes
Add Allowed Code Injectors
This topic applies to VIPRE Premium and VIPRE Endpoint Security only.
Create and configure Allowed Code Injectors by adding a file and assigning an unknown code injector action.
Info
"Enable process protection" must be selected on the Advanced Firewall Protection screen for the code injector settings to take effect.
To add an allowed code injector:
- Navigate to the Process Protection screen. (Policy Properties>Firewall>Advanced Firewall Protection>Process Protection)
- Click Add. A new row in the table is created, allowing you to enter the allowed injector
- In the Unknown Code Injectors Action drop-down, select one of the following: Allow, Allow with Notify, Block, or Block with Notify
- In the Injector Name field, enter a name for the allowed injector
- Click Browse and locate the application (EXE file only) that you want to allow to inject code
- Click Apply or OK to accept your changes
- Ensure that "Enable process protection" on the Advanced Firewall Protection screen is selected
Working with Firewall Templates
Manage Firewall Templates
This topic applies to VIPRE Premium and VIPRE Endpoint Security only.
Create Firewall Templates that you can assign to policies. You can also import/export them across sites and share them with other Administrators. One or more Firewall Templates can be used for any given policy. For example, you can create separate templates that have specific port exclusions for specific server platform configurations and other templates for specific application exceptions. While excluding the desired ports, all others will be blocked.
Info
The column headings are dynamic, allowing you to move their order and sort by a category within that column. Click the filter icon on a column heading to select a filtering option. See Filtering Views for more information on using the available filters.
To create and edit firewall templates:
- In the Site Properties, open Firewall Templates
- Click Add. The Add Template dialog box displays
- Enter a name for the new firewall template and click OK
- Click Edit. The Firewall Template Editor displays allowing you to configure the firewall template
- Configure any of the following firewall settings:
- Application Exceptions
- Advanced Exceptions
- Allowed Web Sites
- Process Protection (Allowed Code Injectors)
- Intrusion Detection System (IDS)
- Assign the firewall template to one or more policies:
- Click Assigned Policies
- In the Available policies area, select the desired policy that you want to assign the firewall template and use the arrows to move the policy to the Selected policies area
- Click OK. You are returned to the Firewall Templates screen
- To view the newly applied settings to the firewall template, click the "+" to expand the properties. From here, you can click on the tabs to view the properties
- Click Apply to accept changes
To copy firewall template settings to a new firewall template:
- In the Site Properties, open Firewall Templates
- Select a template in the grid and click Copy. The Add Template dialog box displays
- Enter the name of the new firewall template and click OK
- Click Apply to accept changes
To export firewall templates:
Firewall templates are saved as XML files and exported across sites or shared with other VIPRE users, such as on the VIPRE Forum. The XML file is stored in the Documents and Settings folder. The exact file path is displayed.
- In the Site Properties, open Firewall Templates
- Select a template in the grid and click Export; the Export Firewall Templates dialog box displays
- Select the firewall templates that you want to export
- Optionally, change the default location where the firewall template file will be saved
- Click Save
- Navigate to the saved XML file and send it to the desired recipient
To import firewall templates:
- In the Site Properties, open Firewall Templates
- Click Import
- Navigate to the firewall template file and open it; the imported template file appears in the Firewall templates list
- Click Apply to accept changes
Assign Firewall Templates to a Policy
This topic applies to VIPRE Premium and VIPRE Endpoint Security only.
Assign one or more firewall templates to a policy. Use the center arrows to move templates from one column to the other.
To assign firewall templates to a policy:
- If you haven't already, ensure that you have firewall templates on your site. Create firewall templates as needed
- Open the Assigned Firewall Templates screen. (Policy Properties>Firewall>Assigned Firewall Templates)
- In the Available Firewall Templates column, select the desired template and use the arrows to move them to the Assigned Firewall Templates column
- Click Apply to accept changes