
Upload and Update Options
There are many circumstances in which a course must be updated at some point in the deployment life-cycle.
iLMS offers a few options to accomplish this task, but selecting the right method of an update can be challenging without knowing the Pros and Cons of each option.
The options for course updates are listed below, continue reading to learn the how and why of each option.
-
New Course
Recommended if at all possible for best performance. -
New Version
This option works well if you are mid-deployment and you've made a few minor changes to the same course. -
Update Content
This option should be used only in extenuating circumstances when the content currently in use needs to be completely replaced during a deployment.
Please exercise caution as this option is only recommended if no file structure changes have taken place between copies of the course.
New Course
Uploading a New course is the cleanest option as far as preserving functionality, analytics, and user progress of its predecessor. This also mitigates any issues that could be caused by changes to the file structure between old and new courses.
This is because uploading your updated course as new course keeps them entirely separate. The new course would be its own entity with its own independent settings. User enrollment would not automatically carry over in this case.
This option is recommended if the previous course is not in active deployment as that is when it's easiest to get all the users enrolled and transitioned into the latest course.
If you are mid-deployment, transitioning enrolled users from the old course to the new course can pose a challenge.

To upload a New Course, follow the steps below:
- From the Admin Portal navigate to the Courses Tab
- Select SCORM/CMI5 from the Menu
- This will bring you to the course import tool as well as the list of all currently previously courses.
- On this page, select the appropriate option from the drop-down. (Usually SCORM 1.2 & 2004)
- Then click the "Choose File" button to select the course file you would like to import and hit “OK”
New Version
Uploading your updated content as a New Version of existing content is the second-safest option when it comes to preserving the integrity of the original course's file structure and reporting.
Adding a New Version to your original upload ensures the following.
* Current enrollment and any enrollment rules associated with the previous course are applied to the new version seamlessly.
* All users who are in progress can continue with their current version without being disturbed.
* Any users launching training from that point forward will view the newest version
This option works well if you are mid-deployment and do not want to transition user enrollment to a new course.
If the updated course is structurally different from the previous course or has different settings or IDs in relation to the exam; however, this option could still negatively affect existing reporting and analytic or not function well under the older courses settings.
To upload your update as New Version of the existing course, follow the steps below:
- From the Admin Portal navigate to the Courses Tab
- Select SCORM/CMI5 from the Menu
- This will bring you to the course import tool as well as the list of all currently previously courses.
- On this page, locate the course which you would like to update and click the "
 " to the left of the title to expand options.
 - This will display a few nested course details and from here clicking "Create New Version" will take you to the appropriate upload screen to add a new version to the existing course.

Update Content
The final option for updating your course is to Update Content. This option has the most inherent risks as it overwrites the files of the existing course. Structural and setting differences between the new and old course will have the largest impact when using this option.
If considering this option, it will work best when changes between the old and new course are very minute, for example, text changes on a slide.
It is important to note that the old copy is not completely wiped away during this process
- only files for which there is a replacement copy in the new course will be overwritten in the old.
- any files in the new course which did not previously exist in the old will be added.
- Files in the old course, which do not have a counterpart in the new course, will remain.
A good thought exercise for determining if a content update is a right answer is to imagine performing the same process in the File Explorer on your desktop machine.
If you were to copy all the new files into the directory of the old course, how much would be replaced? how much would be added? how much of the old set of files would remain?
If the changes between new and old courses are indeed very minor. Then you can update the existing content by following the steps below:
- From the Admin Portal navigate to the Courses Tab
- Select SCORM/CMI5 from the Menu
- This will bring you to the course import tool as well as the list of all currently previously courses.
- On this page, locate the course which you would like to update and click the "
 " to the left of the title to expand options.
 - This will display a few nested course details and from here clicking "Create New Version" will take you to the appropriate upload screen to add a new version to the existing course.

Bulk Update Transcript
Bulk Update Transcript enables the iLMS to integrate and retain historical course transcript data from another LMS through the use of properly formatted CSV files. This feature will create historical courses which are shell courses that have no content, but retain the course transcripts. It is most useful for cases in which course transcript data from one LMS needs to be integrated into the iLMS.
For most cases, this process needs only to be done once.
Tips and Best Practices
- Please upload a.CSV file only.
- Download the template by clicking on Download Template link under the CSV Format section and fill in your data in the specified format. Refer to the Required Formats chart at the bottom of this page.
- To perform a quick one-time Bulk Update Transcript, upload the template, select Submit to Process, set a schedule under the Settings tab for Daily, todays date, and a few minutes past the current time.
Location:
Organization Admin -> Courses -> Bulk Update Transcript

Settings Sub-tab
Various settings are available to customize usage of the bulk update transcript service for file validation and processing.

Enable Bulk Update Transcript
Check this box to turn on the automatic bulk update transcript process, removing the check will cease and desist previously set related processes. Be sure to un-check this box, once Bulk Update Transcript has finished running if a one-time set up is all that is needed.
Schedule
For updates that are needed on a regular schedule, the iLMS will retrieve CSV files according to the radio button selected: daily, weekly, monthly, or yearly.
Once the Start Date and Start Time fields are filled in, the selected date and time will specify the first run for the schedule; it will continue to run at the same time according to the time-frame set above.
Clicking on the blue radio button will clear the date, it will not turn off Bulk Update Transcript.
Note: One time only bulk update transcripts do not need to be set.
(This feature is helpful if 2 LMSs are running, and the iLMS needs to retrieve updated course transcripts regularly.)
Settings
For each user record in the bulk update transcript CSV file, applicable business rules can be specified by checking one or more of the following options:
-
Create Unrecognized Courses and Sessions
Check here, if your CSV will contain courses and/or sessions that do not exist in iLMS.
This feature is helpful when needing to import historical transcript data without actually uploading the course associated with the transcript.
The field below is used to specify the prefix for these courses. -
Set ILT Session End Date same as Session Start Date if Session End Date is Missing (For Instructor Lead Courses Only)
Check here, if the ILT session end date is missing and it is desired for this rule to fill in the ILT session end date to be the same as the session start date. -
Set Enrollment Date and Start Date Same as Completion Date if those are Missing
Check here, if the enrollment date and start date are missing, and it is desired for this rule to fill in the completion date to be the same as the enrollment date and start date. -
Update Blank Values for Non Mandatory Fields in Transcript
Checking this option overwrites blank values in non-mandatory iLMS fields if they are not populated in the CSV -
Process only if all Records are Good
Checking this option will prevent the file from processing if it contains records with errors. -
Use Default Values for Room, Location, and Instructor if the Respective Values are Missing (For Instructor Lead Courses Only)
Check here, if values for Room, Location and Instructor are missing in the CSV and it is desired to use their respective default values.
Notifications
Check this box will send a notification to the email address listed as primary organization administrator each time a bulk update transcript file processes
You can CC other recipients on the emails as well using the "Also Notify" option.
The Edit Notification Template link will open an editable sample notification email.
File Process Order
Use this menu to select the processing order of CSV files in the FTP directory by File Name or Time Stamp, either in Ascending or Descending order.
CSV Format
Select whether to use the iLMS default CSV upload template
Click on the "Download Template" link to see the standard iLMS bulk update transcript template.
or
Convert an existing CSV file into a format compatible with iLMS.
Mapping Fields
When converting an existing CSV file, the fields of that file must be mapped 1:1 to the iLMS built-in fields and the column number specified according to the Upload Fields and Required Formats chart (bottom of this article).

File Upload Sub-Tab
Simply upload a CSV file with this drag and drop feature or through the Select a file option to validate and process it by the bulk update transcript service.
Once the desired file has been uploaded and saved, click to check Submit to Process to indicate that file should be processed during the next scheduled update.

Upload File Upload a .CSV file created according to the selected format:
iLMS default format OR custom format as per mapping details.
Just select one or more .CSV files, then drag and drop them in the designated area.
They will be uploaded simultaneously.
To start processing the file, Bulk Update Transcript under the Settings tab must be enabled, and a time must be set.
Certain fields are required when updating transcripts in the system:
Fields marked with an * in the default template or If using a custom CSV, the mapping section, are required in order to process.
-
Username
This will be the unique identifier field as set for your users. Email or Employee ID.
Learn More Here: iLMS Fields and Unique Identifier -
Course Name
Name of the course to be updated in the transcript data -
Course Status
Status of the course to be updated in the LMS-
Enrollment Date
(Required only if records belong to a certification-enabled course) -
Is Certification Enable+
(Only required if records belong to a certification-enabled course) -
Session Start Date, Session End Date, Room, Location
(Only required if records belong to an ILT course)
-
Enrollment Date
Note: The record limit is 20,001 records per CSV file.
Larger files can be broken up into smaller CSV files and processed in batches.
Uploaded File Details
Displays the details of the uploaded files from the iLMS and the upcoming schedules for the next bulk update transcript process.
Once processed successfully, your file will disappear from the queue awaiting processing.

-
File Name
Uploaded files with corresponding timestamps will be available as links. View and download the file by clicking on each link. -
Upload Date and Time
Displays file upload date and time into system. -
File Validation Status
Displays the following status-
Pending File
Yet to be validated -
In-Progress
File is validating -
Completed
Validation complete
-
Pending File
-
Validation Report
Displays a View Details link after file validation completes. -
Submit To Process
Click on the check mark to submit files for bulk transcript processing. Pending files can also be submitted files for processing. -
Remove
Click on the red button to remove the file at any time before the processing starts. A validation pop-up will appear. -
Refresh
Click this button to refresh the grid page.
FTP Setup Tab
The details for ones FTP server, such as credentials and connection types, can be configured here.

FTP Details
-
Save Check Connection
After entering the company's FTP server details, clink on this link in the upper right corner to test the connection and ensure it is functioning properly. -
FTP Type
Select one of the radio buttons: FTP+SSL, FTP+SSH, or plain FTP. Each type will open its own extended window with designated options below. Please Note: Plain FTP is unencrypted and insecure. -
Host Name
Enter the address for the FTP server (either a DNS address, such as myftp.mycompany.com or a publicly available IP address.) -
Port
Enter the FTP port to which the FTP server is set to bind. -
FTP Mode
Select Active or Passive, depending on the server configuration. -
Remote Directory
Enter the directory that contains the applicable .CSV files, with / being the default root directory. -
Anonymous Login
Check here, if the server allows this option and an anonymous FTP login is desired. -
Username
Specify the FTP user here. -
Password
Specify the FTP users password here.
Proxy Settings
-
Use Proxy
Checking this box will expand the mandatory fields that enable the use of a proxy server to connect to the FTP server.
Otherwise, this feature will not be activated.

-
Proxy Name
Enter the DNS name or IP address for the proxy server. -
Port
Enter the port that is configured for the proxy server. -
Proxy Type
Select either Socks4, Socks4a, Socks5, HttpConnect, FtpSite, FtpUser, or Ftp Open from the drop down menu. -
Username
Enter the username to authenticate to the proxy server.
Password
Enter the password for the user to authenticate to the proxy server.
SSL and SSH settings
-
If using FTP+SSL (FTPS)
- Upload the SSL certificate for the FTP server and optionally provide its password.
- Select either Implicit or Explicit TLS or SSL as a security method, and optionally define which TLS or SSL protocols are allowed.
- Also, one can choose whether to use the Clear Command Channel command for the iLMSs FTP client connection.

-
If using FTP+SSH (SFTP)
- The private SSH key used for the server can be uploaded, and the password can be optionally provided.

-
If using plain FTP
- No further configuration is necessary on this form
Inspired will need to white-list the host name or IP address of your FTP connection to allow access.
- Plain FTP is the least secure option, and therefore, is not recommended.
Bulk Update Transcript Log

The bulk update transcript log page displays all logs of successful and unsuccessful bulk update transcript processes.
During the bulk update transcript process, improperly formatted records are not processed.
If the bulk update transcript is performed, an error log is generated as well as a CSV file with all of the improperly formatted records listed under "Bad Records"
In addition, a CSV file is created with all of the successfully processed records displayed as "Good Records"

-
View Log File
The log file displays basic facts about the bulk transcript update and a list of errors. Types of errors include:-
Missing Field Information
The record was missing information in one of the required fields. -
Course Does Not Exist
The Create unrecognized courses and session checkbox was not checked. This error will occur when a Course or Session for the given transcript record does not already exist in the system.
-
Missing Field Information
-
Download Good Records File
Displays the error-free records that were processed successfully by the bulk transcript update. -
Download Bad Records File
Displays the bad records that failed during the bulk transcript update process. Use this file to make corrections, then upload and update the transcript for the remaining records.
Note: This file contains an extra column containing error codes for all applicable rows in the CSV file.
The extra column must be removed prior to uploading it into the system. If the error codes column is not removed, the system will reject the file.
Required Field Formats for Bulk Transcript Update
When converting an existing CSV file for the purposes of bulk updates, the fields of that file must be mapped 1:1 to the iLMS built-in fields and the
Upload Field Required Formats
| Field name | Data type | Min | Max | Comments/Actions |
|---|---|---|---|---|
| Username * | Character | 1 | 200 | |
| Course Name * | Character | 1 | 150 | Including Prefix specified on Settings page |
| Requirement Type | Character | 1 | 1 | “M” OR “O” (Mandatory/Optional) |
| Enrollment Date+ | DateTime | - | - | Must be in the following format: MM/DD/YYYY |
| Start Date | DateTime | - | - | Must be in the following format: MM/DD/YYYY |
| Due Date | DateTime | - | - | Must be in the following format: MM/DD/YYYY |
| License Expiration Date | DateTime | - | - | Must be in the following format: MM/DD/YYYY |
| Completion Date | DateTime | - | - | Must be in the following format: MM/DD/YYYY |
| Score | Number | 1 | 5 | Between 1 and 100. |
| Time Spent | Number | 1 | 50 | |
| Course Status * | Character | 1 | 1 | N – Not Started, I – In Progress, |
| C – Completed, P – Pass, F – Fail, | ||||
| W – Waived | ||||
| Certification Expiration Date | DateTime | - | - | Must be in the following format: MM/DD/YYYY |
| Certificate Number | Character | 1 | 50 | |
| Session Start Date+ | DateTime | - | - | Must be in the following format: MM/DD/YYYY |
| Session Start Time | DateTime | - | - | Must be in the following format: MM/DD/YYYY |
| Session End Date+ | DateTime | - | - | Must be in the following format: MM/DD/YYYY |
| Session End Time | DateTime | - | - | Must be in the following format: MM/DD/YYYY |
| Instructor Usernames | Character | 1 | 1000 | Value can be Email ID Or Employee ID based on Unique Identifier |
| Location+ | Character | 1 | 255 | |
| Room+ | Character | 1 | 255 | |
| Is Certification Enable+ | Character | 1 | 1 | If record belongs to certificate enable course then place 1 in this field otherwise place 0 or leave blank |
| Is Curriculum | Character | 1 | 1 | To create a curriculum with a name specified in the Course Name column, place 1 in this column, otherwise place 0 or leave blank |
| Curriculum Name | Character | 1 | 150 | To add a course specified in the Course Name column, enter curriculum name in this field. The course will be added in this curriculum. |
| Action | Character | 1 | 1 | Value can be “I” for insert or “U” for update records or leave blank |
Catalog in Learner Center
The course catalog provides an easy way to organize courses into searchable categories. You can turn the catalog on or off, choose which courses to display in the catalog, and which courses to hide from the catalog.
Users can browse or search the catalog, and depending on settings, self-enroll in courses.
Location:
Courses Tab -> Catalog

Catalog Sub-Tab

To edit the catalog and its visibility to learners go to the Courses Tab and select Catalog.
Here on the Catalog tab you can see all courses in your catalog.
There are check-boxes to filter the courses displayed to include courses and curricula that are visible or not visible to learners.
Settings Sub-Tab

Allows you to display or not display the catalog in the Learner Center so that if you do not want to use this feature you don't have to.
Only courses set to display in the catalog will be visible to users.
(See below for details).
To achieve a catalog in which users can browse courses and self enroll, learn more here: User Self Enrollment
Catalog Settings for Courses
Each course has the settings explained below. To access the settings for a particular course, navigate to the Courses Tab -> SCORM/CMI5 and click the title of the course you'd like to edit.

-
Display this course in Learner Center Catalog
By default all courses are not displayed in the Learner Center catalog.
Use this option to display a particular course. -
Show Author/Instructor name in course description
Shows the name of the course creator / owner in the catalog. This is ideal of instructor-led training. -
Show Author/Instructor name in course description as Email link
Allows users to contact the author / instructor via email. This is ideal of instructor-led training. -
Course Location
Allows you to set the location of this particular course in the catalog.
Enrollment Settings
Each course has the settings explained below.
-
Open Enrollment
Registered Users can self-enroll Ideal for optional training, this setting will display an enroll link in the course description allowing the user to self-enroll. Before a user starts a course he or she can un-enroll. -
Closed Enrollment
Users must be enrolled by an admin Ideal for mandatory training, this setting prevents the user from self-enrolling, allowing the admin to control who is enrolled. -
Allow users to request enrollment through the catalog
This allows users to email an enrollment request for closed enrollment courses. For example, if you have a limited number of licenses you might make a course closed enrollment and then allow individual users to request enrollment via email. A request enrollment link is displayed in the catalog. On clicking the link an email opens up addressed to the primary org admin account with the course title in the subject line.
Due Dates
Due dates allow organizations to set a deadline by which training must be completed.
In iLMS you can set up reminders to be sent to users based on whether or not the user has exceeded the due date, ensuring that training completion remains top of mind. (Learn about automatic reminders here: Automatic Reminders)
Due dates can be set in a number of ways.
The way a due date is set is typically dependent on the method by which the user(s) is enrolled.
Direct
If a user is enrolled into a course via their profile, through the individual course, in bulk by csv, or by the Learning Path, their enrollment path will be listed as "direct".
If a user's enrollment is direct then the user will be assigned the default due date unless otherwise specified.
Learn about these enrollment methods here: Course Enrollment Methods
Curriculum
If a user is enrolled into a course as a result of being assigned a curriculum, it will still apply the default due date for each course, but the curriculum will also have its own default due date set in the Curriculum settings.
Learn More about Curricula: Curriculum Enrollment
Group
If a user is enrolled into a course/curriculum via a group the group can specify its own due date rules that will override the defaults set for the course/curriculum.
Learn more about Group Course Assignment: Group Course Enrollment
Exceptions to the Default Due date can also be altered for specific regions, divisions, and departments or for individual users to fit your organization’s needs. This can be done with the settings pages shown below.
Default Due Date
The default due date set for a particular course is set in the course settings.
To change these settings first locate the course, click the course title, and go to "General" under settings in the left-hand column.
Here you can set the course to be due a certain number of days after assignment, or on a specific date if desired.

Other Due Date Rules
Due dates can apply to all users who are enrolled in the course, or to suit the specific needs of an individual, group, or department other rules can be created for just those segments of users. To set due dates that deviate from the default, go to the course settings, select "Enrollment & Due Dates" from the left column, and go to the "Due Dates" tab. The screenshot below provides more details on how to create these rules.

Modifying Due Dates Post-Enrollment
If for any reason the due date(s) set upon enrollment need to be changed, this can be done for an individual user by navigating to their transcript and changing the date manually.
User Profile and Transcript
To change the date for several users an admin can utilize features found in the following locations:
User Search and Filter (Best if date change is for one course, multiple users)
Bulk Update Course Transcripts (Best if needing to update dates for multiple courses, multiple users)
Copy Courses
The copy course tool allows you to copy courses.
Location:
Courses Tab -> Copy Content

New course copies appears as a separate course in the course list and the new courses have their own unique content / media files.
This is a useful tool when you must give training on an annual basis or require varied course settings for whatever reason.
At the end of the year when it must be taken again you can copy it and name it Compliance 2009.
This way, everyone will have a record of taking both Compliance 2008 and Compliance 2009.

Operation

This dropdown lets you select the desired action to perform, in most cases this will be used to "Copy Course".
The other options apply to components of iComposer courses, and older course-building tool that resides within iLMS.
Source

-
Course Name
This option allows you to select the course in the system of which you'd like to make a copy. -
Course Version
Since courses often have multiple versions if there have been updates to the material, you also have the ability to select a particular version of the course to copy. Usually you'll want to the most recent copy. -
Destination Properties
 New Course Name/ New Course Code
Allows you to input the new course name and course code. -
New Course Version Type
This option is often self-selects, based on chosen course.
If selecting a regular course file, this will default to "Multiple Version"
Resetting a user that has failed their course
If a user's course is in Completed status, whether they passed or failed, iLMS will lock their progress. In this case, an administrator will have to reset their course progress to "Not Started" for a learner to retake the course.
1. Find the Learner's Profile
Navigate to Users -> Find Users to search for the user.
Click on the user name when the search is complete to view their transcript information.
2. Navigate to Transcript
Navigate to Transcript tab which will show the status of all courses enrolled to the user. Click on the word "Fail" and a pop-up will open to allow you to change the status.
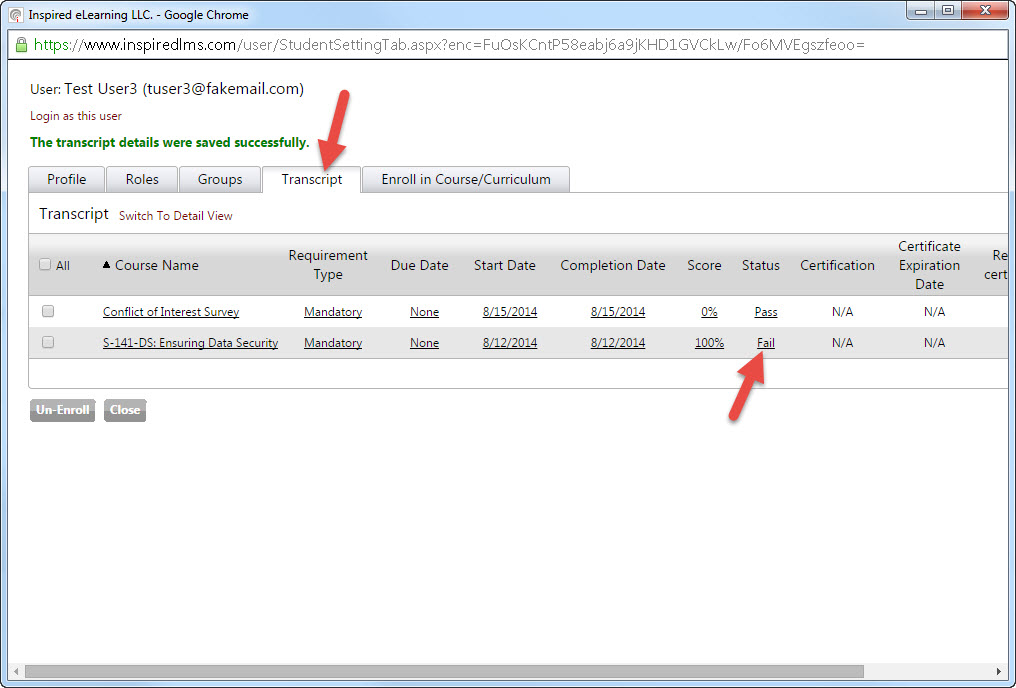
3. Change Course Status
Change the status to "Not Started" from the drop down box and click "Update" to save the change. The user can now re-take their course.

Un-Enrollment rules
Depending on the context, one of two rules will apply to un-enrollment actions, which are outlined in a table below.
The general rule, transcript integrity, states that any actions taken by the user must be kept in the transcript unless explicitly removed by an admin. These actions include starting a course, completing a course, completing an exam, etc.
Un-Enrollment
The transcript integrity rule works in tandem with the group integrity rule, which states that if any user is a member of a group or curriculum they must have all courses in the group or curriculum.
To un-enroll a user from one of these courses requires removing them from the group or curriculum.
The final factor affecting un-enrollment is that a course can have multiple enrollment paths.
Each course has an enrollment path, which defines how the user came to be enrolled in the course, e.g. direct or via a group, curriculum, or department.
Since a single course can have multiple enrollment paths, to remove a course from a user, all enrollment paths must be removed.
The enrollment paths for a particular course are displayed on the "Enroll in Course" tab of a user's profile (see: User Profile and Transcript)
Intent, Expectation, and the Exception Log
How the iLMS behaves depends on the intent and expectation of the admin as defined by the context.
There are two scenarios:
1. An admin wishes to explicitly remove a specific course from a specific user.
The admin can do this by removing one enrollment path at a time.
In these cases a CSV exception log file is created so that anyone still enrolled after the action is noted as well as their full enrollment path.
The admin can use this file to complete the un-enrollment process.
2. An admin wishes to remove a course from a group, curriculum, but not any specific user (implicit un-enrollment).
In this case no exception log file is generated.
Action Contexts
Please see the rules table below to fully understand the action contexts
Action |
Intent and Expectation |
Which Rule Is Followed |
Generate Exception Log? |
|
Un-Enroll course via 1. Find Users 2. Transcript 3. Bulk un-enroll by CSV |
To explicitly remove a specific course from a specific user. | Rule 2 | Yes due to explicit intent |
|
Un-Enroll curriculum from 1. Find Users 2. Transcript 3. Bulk un-enroll by CSV |
To explicitly remove a specific curriculum and its courses from a specific user. | Curriculum Object: Rule 2 Sub-Courses: Rule 1 |
Yes due to explicit intent |
| Remove a course from a group | To remove a course from an object, not any specific user. (implicit un-enrollment) | Rule 1 | No |
|
Remove a curriculum from a group or parent curriculum |
To remove a curriculum from an object, not any specific user. (implicit un-enrollment) | Curriculum Object: Rule 1 Sub-Courses: Rule 1 |
No |
| Remove a course from a curriculum | To remove a course from an object, not any specific user. (implicit un-enrollment) | Rule 1 | No |
Rules
Rule 1: |
Rule 2: |
| A course cannot be removed from a user if any of these conditions are true: 1. The course is available in another group, curriculum, or department in which they are enrolled. 2. If the courses status is in-progress or complete. In other words, only courses that are not started and contain no other enrollment path will be removed. This preserves transcript and group integrity. |
A course cannot be removed from a user if any of these conditions are true: 1. The course is a part of the any curriculum, group, or department in which he or she is enrolled. In other words, if the course contains no other enrollment paths it will be removed from the user irrespective of its status (not started, in-progress, passed, and failed courses will be removed if no other enrollment path exists). This preserves group integrity but allows the admin to explicitly remove history from the transcript. |
Deleting a Group or Curriculum
Action |
Rules |
| Deleting a course | Currently a course cannot be deleted if it is assigned to a user. |
| Deleting a group |
Un-Enrollment Rule 1 Offer to un-enroll users from "not started" courses or to leave the enrollment as it is (changed from direct enrollment, if necessary, for group courses). |
| Deleting a curriculum |
Un-Enrollment Rule 1 Offer to un-enroll users from "not started" courses or to leave the enrollment as it is (changed from direct enrollment, if necessary, for curriculum courses). *A curriculum cannot be deleted if it is nested. |
Policy Management
The policy management feature in iLMS allows your company to manage organization policies, share them with employees, and maintain records of policy acknowledgment.
Location:
Courses Tab -> Policy Management

Create a new policy
Get started by creating a new policy. Click the "Add Policy" button.
Fill out the form with details about your policy and upload a policy document in PDF format.
Clicking help icons next to the form fields will provide additional information about that field.
Additional details about each field can be found below. (click to enlarge image)
Policy Title
This is the title that will appear for the policy in the iLMS admin console.
It will also serve as the title learners see for the US-English version of your policy by default. This can be modified later.
Status
-
Draft
When marked as a draft, this policy will not appear as an option for enrollment in menus. -
Active
Active policies appear as an option for enrollment in menus where applicable, such as Learning Path and Group Enrollment. -
Inactive
Once a policy is no longer needed for new assignments it can be retired by marking it inactive.
Enrollment and acknowledgment records for the policy will remain, but the policy will no longer appear in some enrollment menus when creating new enrollments. It can be changed back to active if needed.
Acceptance Criteria
Users can accept policy documents by checking a box or boxes depending on your company's preference.
The tool offers a few different behaviors.
-
User must accept only final page
This option requires learners to check the acceptance box when they reach the last page of the policy document.
The checkbox will not enable until the last page. -
User must accept each page
This option requires the learner to check a box at the bottom of the page for each individual page of the policy document. -
User can accept policy on any page
This option requires the user to check the acceptance box once from any page in the document.
Acceptance Text
This is the text that will display next to the box that users must check when acknowledging/accepting the policy. Input in this box will serve as the text used for the US-English version of your policy document by default.
This text can be modified for each language.
Upload File
Add a PDF file that provides the details of your policy. To add the file either drag and drop where indicated or click "Select a File" to browse files on your device.
A different PDF can be used for each language. Learn more about adding additional languages later in this article.
Allow Download
This option is enabled by default. When enabled this option will allow users to download a copy of the PDF file.
If disabled the download option will not appear.
Minimum Required Time
This option offers the ability to set the minimum amount of time that learners must spend viewing the policy document. If a time requirement is in place, learners will not be able to submit acceptance of the policy until they have spent the required amount of time viewing the document. Once the time requirement is reached the option to submit is enabled provided they have met acceptance criteria.
Description
This field displays additional information about the policy. It is only visible to iLMS admins when editing the policy.
Edit Policy or Add Additional Languages
To make changes to your policy, or to simply add support for additional languages locate the policy you would like to modify and click the edit icon  in the "Actions" column.

(click to enlarge image)
Modify any of the original policy details as needed.
Add Another Language

(click to enlarge image)
- To add additional languages click the "Add Another Language" button.
- Select a language from the dropdown, fill in the details and provide another PDF file to display for the selected language.
- Click the green checkbox to save the details for the language.
- Repeat this process for each language.
- To edit details for an existing language click the edit icon for the particular language.
Enroll Learners in a Policy
Once the policy is ready and set to "Published" status it can be assigned to learners much like a course.
Policies typically appear in enrollment menus alongside courses for assignment.
There is a special section in the Learning Path tool that lists available policies.
Learn about different enrollment methods here:
Summary of Enrollment Methods