
Search and Filter
The find users page provides powerful features, giving you a single point of administration for a wide range of tasks. From this page, you can create highly specific course lists and then apply actions to those lists, such as managing user profiles, course enrollments, languages, and status both individually and in bulk.
Search Features
If you are looking for a specific user you can use the search features on the left-hand side of the screen to search by first name, last name, email ID, employee ID (This field can be renamed if needed. Instructions here: iLMS Fields and Unique Identifier).
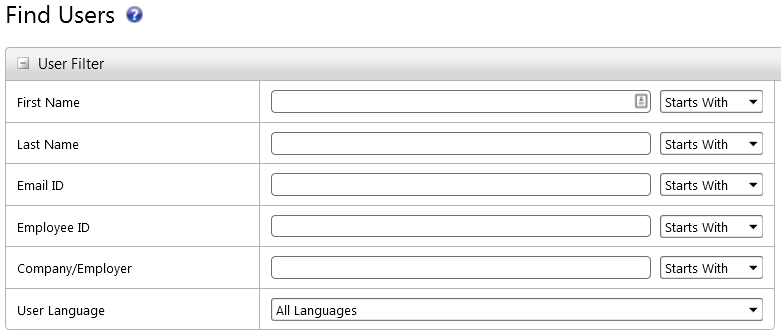
By default, the search is set to "Starts With", meaning if you search for Jan in the first name field you will find all users with those first 3 characters in their first name, such as Jan, and Janet.
To find all users with a "j" anywhere in their first name switch the dropdown next to the field from "Starts With" to "Contains".
Filtering Features
You can also see a filtered list of users based on region, division, department, and language.
Simply use the drop-down menus to filter the list.
You do not have to put anything in the search fields if you are just attempting to filter the user list.
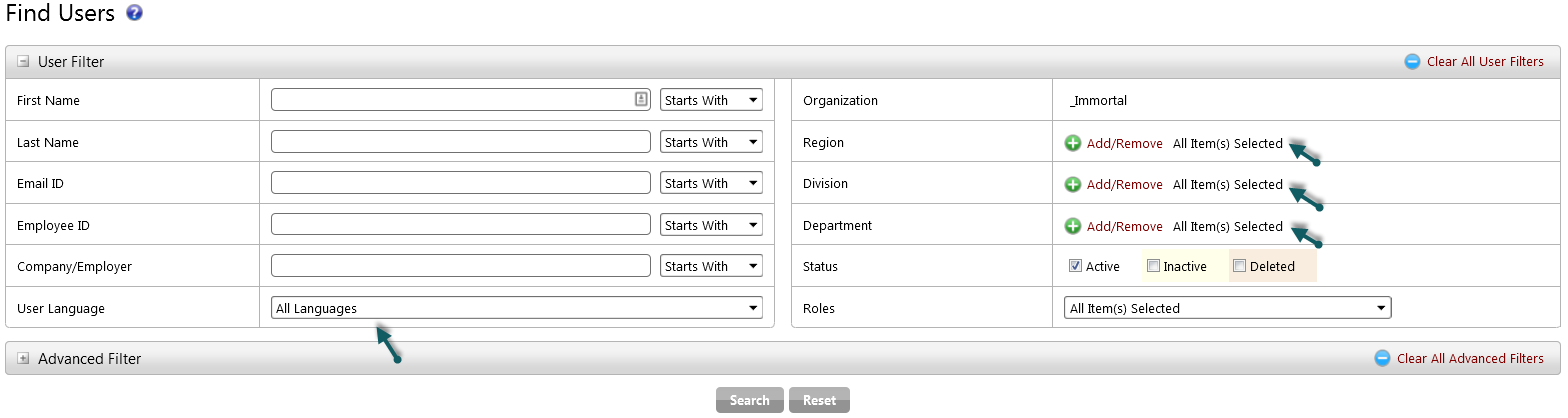
For example, if you are only trying to see all users in a region, simply select that region from the drop-down menu. You can also choose which users to display in the list by using the status and role check boxes.
By default, only active users are shown on this list. Inactive and Deleted users can be included by checking those options for "Status".
Course Filter
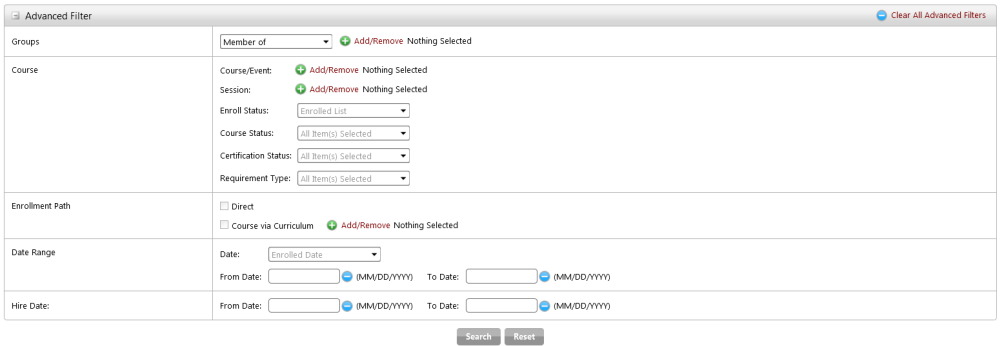
The course filter allows you to further specify who you would like to appear on the list.
Note that you can only choose a course status if you select a course and choose the Enrolled List drop-down, indicating that you want to view all users enrolled in that course. Once you are looking at enrolled users you can further filter the list by date.
Exporting a Report
Once filters have been applied and the desired list of users has been produced, the report can be exported to an excel CSV by clicking the just above the list to the upper-right.

This will produce a report containing all user information that was listed on the page, as well as adding any transcript information for courses and criteria added to the advanced filter.
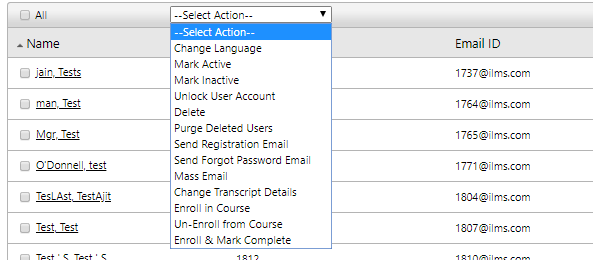
Options and Commands
The actions below can be applied to one or more users by using the check boxes next to each username. Be careful and note that there is an All and All Pages option. Selecting All Pages will apply the action to all users found based on the search criteria.
-
Change Language
This changes the default language for the selected users. By default, users will log in with the language selected. A good use of this feature is to set the default language for a region. You can also simply direct all users to the default login page with the default language. On that landing page, users will be able to change the language. They can also change the language in their profile unless the organization admin disallows this option. -
Mark Active
Marks inactive users active. Only active users appear on lists and reports by default. To use this feature you must first search for active users. -
Mark Inactive
Marks active users inactive. This should be done when an employee leaves your organization. The employees transcript records will be kept until you delete and purge the user account. To use this feature you must first search for active users, which is the default search type. -
Delete
Marks a user as deleted. There is no undo for this action. The employees transcript records will be kept until you purge the user account. -
Purge Deleted Users
This will clear the cache of deleted users. After purging deleted users, there are no longer recovery options. -
Send Registration Email
This sends the default registration email to the user. It is a great way to quickly resend a registration email to users who say they did not receive their registration email or lost or deleted it. -
Mass Email
This brings up a template that allows you to send a mass e-mail to all users selected. Additionally, you can select from Default or Customized e-mail templates. -
Send Forgot Password Email
This will allow you to send the forgot password email to all selected users. -
Change Transcript Details
Allows you to modify course transcript details such as Enroll Date, Start Date, Due Date, Completion Date, Score, and Status to one or more users.
Note: a course/event must be commonly searched between the users to change transcript details. -
Enroll in Course
Allows you to enroll one or more users into a course. -
Un-Enroll from Course
Allows you to un-enroll one or more users from a course. -
Enroll Mark Complete
Allows you to enroll one or more users into a course and change the transcript status to Complete for the course. Please note that all of the activities outlined in this help file are logged to ensure the integrity of the course completion data.
User Hierarchy
The iLMS can be organized into a 3-level hierarchy divided into Regions, Divisions, and Departments with all users located at the Department level.
It is helpful to do this as it increases the ability to create and filter reports, communicate to select groups of users from the iLMS mass email system and to manage course deployments.
The iLMS comes with a default Region, Division and Department, but you can create your own.
Note: If your organization uses an Automated method of User Provisioning , it may not be necessary or recommended to manually make adjustments to the user hierarchy as they may be overwritten.
How to Manually create or edit branches of the User Hierarchy
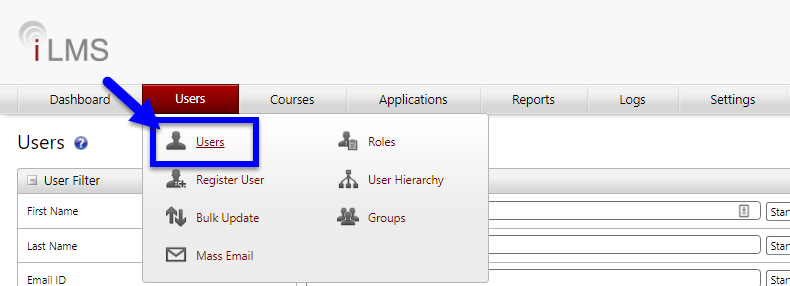
Navigate to the Users Tab, then select "User Hierarchy" from the menu.

To add a top-level branch, Right-click the organization name and click on "Add Region" and enter in a name.

Once the region is created, right-click the region and click on Add Division and enter in a name to add another level.

Once the division has been created, right-click and click on Add Department and enter in a name
Click the Save button.

Right-Clicking an existing branch will also let you edit the name of an existing Region, Division, or Department.
Branches of the hierarchy can be deleted if they are empty of users.
Keep in mind, inactive users are usually filtered out of the user list, but may still be present in the branch.
Note: The defaults cannot be deleted, but they can be renamed.
Roles
Roles - Assigning User Permissions and Level of Access
Roles allow an iLMS admin incredible flexibility when creating permission schemes for additional users of the iLMS admin panel. A top-level admin is able to choose various permissions intended for a particular role as well as setting the users realm (who the admin role can take actions on) and course realm (what courses the admin role can take actions on). A role can have any number of users and all members will have a similar experience when accessing the admin console.
Navigate to the location shown below to view Roles:

System Roles
By default, iLMS has a pre-built selection of Roles for general use. This section will give you information regarding the available system role permissions, their intended uses, and standard permission settings. User accounts can have more than one assigned role or permission set, in order to accomplish tasks within iLMS.
Default System Roles
iLMS comes out-of-the-box with a selection of system roles with pre-defined permissions and realm. System Roles are indicated by the text  displayed next to the role name.
These roles cannot be removed from the system.
Frequently Used System Roles:
-
Learner
This is the lowest level of permissions. All the users are learners by default, so that they may take part in training.
Role Permissions: Contains permissions to access Learner Center. Admin can modify the permissions to hide some of the features of learner center from here. -
System Admin
This role has the highest level of permissions (aside from the Primary Org Admin). Users in this role have access to nearly every feature available to the Primary Org Admin, save Roles, but this can be modified to allow access.
Role Permissions: Contains all the possible permissions except the Roles feature itself. -
Realm Administrator
This role has permissions to users and related features such as registering a user, creating a region, division department etc. This role works well when limited to a specific "Realm" of users, allow managers to modify only users within their own region, division, or department as specified.
Role Permissions: Contains permissions to manage users and organization hierarchy. -
Security Solution Admin***
This role has been created to go hand in hand with our Security First solutions. This role offers a streamlined tool-set for automating course enrollments. This role is unique as it is tied to the system group by the same name. Simply add users to this existing group to assign them this role.
Role Permissions: Can add/remove/edit users, enroll users into training via Learning Path or individually, and has the ability to assign users the Security Solution Manager role. -
Security Solution Manager***
This role has been created to go hand in hand with our Security First solutions. This role offers a streamlined tool-set for automating course enrollments. This role is unique as it is tied to the system group by the same name. Simply add users to this existing group to assign them this role.
Role Permissions: Can add/remove/edit users, enroll users into training via Learning Path or individually, unlike Security Solution Admin users in this role cannot assign an elevated role to others.
*** These roles are tied to special system groups. The permissions of these roles cannot be modified.
Other Available System Roles:
-
Author
All the members of this role have permissions to manage Courses. -
Instructor
All the members of this role have permissions to create sessions for Instructor-led training or Event.
-
Training Manager (For Use in eCommerce Only)
This role is unable to be modified and members cannot be added. It is only able to be edited by the system when licensing courses through the online eCommerce shop.
Overview of Permissions, Realm, Assignment and More
Determining what a role-member can do, and which users and courses they can modify, and assigning a role.
System Roles are great for most general use cases, but in certain circumstances, the existing system roles may need adjustments to suit the organizations goals. Some of the system roles do allow adjustments to the permissions in order to accommodate this need.
In other cases, there may be a need for an entirely new Role or level of permissions to be created in order to achieve a certain goal. This section will detail how to edit or create a role.
Prior to Creating or Modifying Roles, we recommend becoming familiar with the attributes associated to roles. These can be viewed by clicking the name of any Role in the list. Each Role has a defined set of Permissions, a Realm on which they can act, and Groups to which the Role is Assigned.

-
Permissions:
The tools to which the role has access and the actions the role can perform
Full details on Role Permissions can be found here: Roles - Permissions -
Realm:
The Users and Courses which the role can view and act upon.
Full details on Role Permissions can be found here: Roles - User and Course Realms -
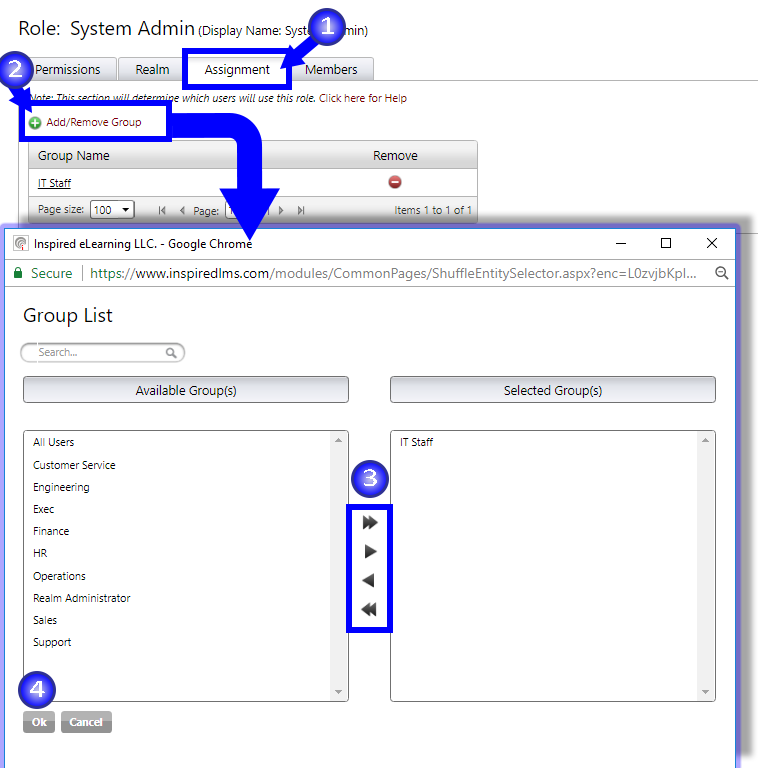
Assignment:
The user groups to which the role is assigned. Steps for assignment are shown in the graphic below.
Learn how to create a group of users here: Creating and Editing User Groups
When creating or modifying roles, it's a good practice to assign the role to yourself so that you may assume the role and preview it as the assigned users will later. Users can have multiple assigned roles and can switch between roles on demand.
Adding, Editing, Copying Deleting Roles

Adding a New Role
Click on the green plus above the Roles list to begin creating a new role. The creation process begins by asking you to name the role. A role name cannot be duplicated so make sure you choose to give a unique name.
Note: It IS possible to have a duplicated display name, which can be entered via the Role Editor.
Once the name has been entered and saved, the Role Editor will be opened automatically.
Editing an Existing Role
To edit an already existing role, click on the role name link or the edit icon to open the Role Editor for that role.
Note: Certain System roles have protective limitations on edits that can be made.
Copying A Role 
You can copy an already available system role (with the exception of specific system roles) or customized role for a quick first step to creating a customized role. A role is copied with a new system-defined name which you can modify at any point in time.
This action copies the following:
- All Permissions
- User and Course Realm
It does not copy
- Members - You will need to assign new members to the copied role.
To copy a role, simply click on the Copy icon for that role.
Deleting A Role
To delete a custom role use the Delete icon. A system role cannot be deleted.
Switching between Assigned Roles
The first time a user logs in to an account with multiple roles they will assume their Learner role and encounter the Learner Center.
This is the training center view your employees, or Learners will see when they are assigned courses. This is where admins will be able to take their own training if assigned.

To switch roles from the Learner Center, Navigate to the Roles button in the upper-right corner of the page.

Select the desired role from the resulting menu to switch to the other role.

Note: To Switch back to the Learner View at any time, perform the same action from the Admin Portal

Roles - Permissions
With the Permissions tab, an admin can choose permissions for a role. Permissions are structured under tabs where each tab represents a set of related features permissions related to that tab. For example; the Users tab contains all the features that can be made available under the Users menu panel. The Miscellaneous tab contains some extra properties which are explained in a later section of this page.

To hide a menu panel, just change the tab to hidden. For example; To hide the Users menu entirely from a role, just change the visible icon to hidden and save the settings. The end result will be that any user with this particular role will not see the Users menu bar option at all.

Use the Expand All Collapse All links to expand and collapse all of the sections on the page. Use up down arrows to expand and collapse sections.


Setting Permissions
View and Read Only
Permission scheme where a user will be able to view but not change or edit any related items.
Full
Allows for full permissions to the respective feature. This includes read, write, create, and delete.
Choose the level of access the user of this role should have per feature.
There is no need to check View and Read Only if Full is checked as Full encompasses all the permissions related to View and Read Only.
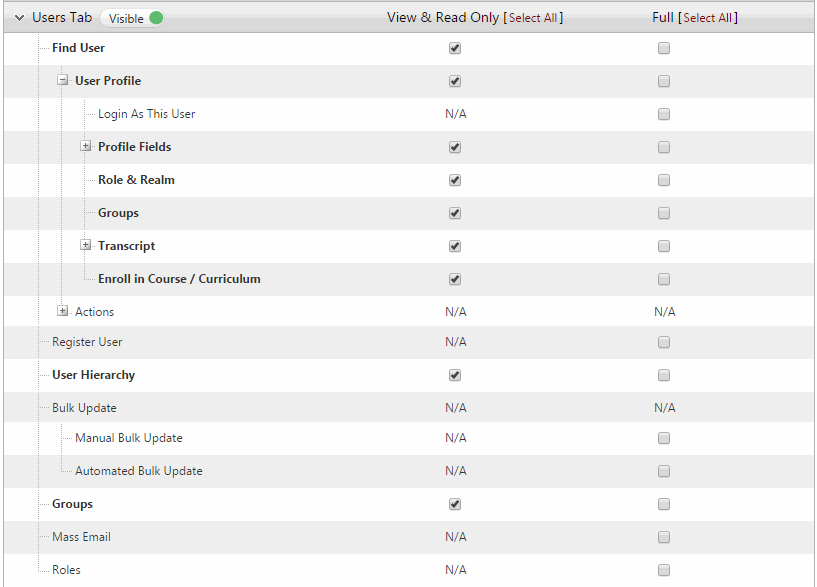
Checking a parent check-box does not automatically check the child features box. In the instance below Full is checked to give full permissions on "Find Users" but its associated sub-features are still unchecked. The creator of this role would have to explicitly check any child feature as this gives the flexibility to mix and match child permissions with Full and Read-only permission sets.

Selecting a child feature, however, will check the necessary parents (and its parent if applicable) View and Read Only check-box if it is not already set. This is required since a child feature cannot be accessed without first having that feature available to them.
In the example below, If nothing is checked, and an admin clicks on the Full check-box of the "Login As This User" feature, it will automatically select the View and Read Only check-box of the "User Profile" and "Find User".

In some cases, instead of a check-box, N/A is mentioned. That means, that the respective permission is either not applicable or that the features permission is controlled by their sub-features. For example, in "Bulk Update", you can not set View and Read Only and only Full is available. Also, The Bulk Update menu option itself will be available only when one type is set (the sub-feature).

A feature row can be seen in one of the three visible states as shown below
-
White background, non-bold text
When a feature is not selected at all. - "Groups" in the screenshot below is an example. -
Grey background, bold text
When a feature is already selected and saved. - "Mass Email" in the snapshot below. -
Blue background, non-bold text
Unsaved changes. - "Roles" in the snapshot below. This helps to clearly identify that there are changes on the page, which are yet to be saved.

Features Dependent on Realm
There are certain features which require access to "All Users and/or All Courses realm" before they can be made available to the role. If the realm set too restrictive (only selected courses, or a particular set of users), then there will be a warning icon prompting the admin to increase the scope of the realm to allow this feature. To Learn more about Realms see: Roles - User and Course Realms

The following table outlines when full realm access is necessary.
Feature Name Tab Name Requires Full User Realm Requires Full Course Realm Groups Users Tab Yes Yes Roles Users Tab Yes Yes Instructors Courses Tab => ILT & Events Yes No Reports Courses Tab => ILT & Events Yes Yes Curricula Courses Tab No Yes Enrollment & Due Dates Courses Tab Yes No Bulk Update Transcript Courses Tab Yes Yes Catalog Courses Tab Yes No Enroll by Group Courses Tab Yes Yes My Reports Reports Tab Yes Yes Automated Export Reports Tab Yes Yes Admin Log Logs Tab Yes Yes Mass Email Log Logs Tab Yes Yes Automated Export Log Logs Tab Yes Yes User Email Log Logs Tab Yes Yes Bulk Update Log Logs Tab Yes Yes Un-Enrollment Exception Log Logs Tab Yes Yes Bulk Update Transcript Log Logs Tab Yes Yes General Settings Tab Yes Yes Portal Settings Tab Yes Yes eCommerce Settings Settings Tab Yes Yes
Permissions by iLMS Tab
Dashboard Tab
This section contains features that are available on the Dashboard.

Users Tab
This section contains features that are available on the Users tab.
Under Profile Fields, there are some fields which are mandatory. These fields are highlighted. Those fields which are mandatory are set from Settings Fields -> Fields and any change that is made there on which fields should be mandatory will be reflected here. (To add additional mandatory fields see: iLMS Fields and Unique Identifier)

Courses Tab
This tab contains features that are available on the courses tab.

Application Tab (Only Appears if PhishProof is Available)
This Tab can only be toggled on and off. Enabling this option for a role gives user full access to PhishProof.

Reports Tab
This tab contains features that are available on the reports tab. Note that My Reports only has Full access available, and will require all users and courses as a realm.

Logs Tab
This tab contains features that are available on the logs tab. Note that there are no actions associated with logs, so a role may either view them, or not.

Settings Tab
This tab contains features that are available on the settings tab.

Miscellaneous

Show In Author List
allow a user of this role to be marked as an author. Any users in this role will be available in the course owner list to set the owner of a course.
Show In Instructor list
Allow a users of this role to be marked as an Instructor. Any users in this role will be available in the instructor list in the iLT Session creation screen.
Mark Members as Realm Administrator for Email Notification (Learn More: Global Email Notifications)
Mark a user as a Realm Administrator. This will affect the email notifications in the TO and CC fields when set to send to Realm Administrators.
Block Automatic Reminders (Learn more: Automatic Reminders)
Tells the system that you want these users to have Realm Administrator functionality for all email notifications EXCEPT for Automatic Reminders.
Roles - User and Course Realms
Realms allow an organization to limit the users or courses to which a role has access. This is useful in the event you'd like a manager to only have access to view or interact with the employees for which they are responsible.
This can also be useful if you have different types of training, for example Harassment training and Security Awareness training. You may want HR to have access to only harassment courses and for IT to only have access to settings around Security related courses.
User Realm
There are two settings to choose from
Users Belonging to Selected Groups
You can select one or more groups to use as the user realm for the role. Each member of the selected groups will be available for the role to take actions on.
Select the "All Users" group, if you want to set the realm on all the users of an organization.

You can add or remove groups using the "Add/Remove Group" link. A easy way to remove a single group is to use the Remove icon in-front of the respective group.
Users Based on the Following Rule
If you want to set the realm based on role members region, division or department, this is the option to choose.

How this works:
Here "Region" is selected.
There are two users who have this role, one whose region is "Region A", another whose region is "Region B".
When the first user accesses the role console, they will only see all of the users in their own region, "Region A".
The second user will see only users of their own region as well, in this case, "Region B".
Override Realm at the User Level
(Customized Realm)
By default all the members of a role inherit a realm based on the rules/settings specified at the role level.
An exception, however, can be created at the user level.
To do this, access the individual role member's user profile and navigate to the Roles tab which will display a list of roles assigned to the user.
The following is an example:

Notice, "N/A" appears for roles where a customized realm is not applicable.
Click on the available edit icon in front of the role name to modify the realm for a specific user. This will override the realm settings that all other role members receive.
You will see two options here:
Inherit Default Realm from Role
This is the default setting and the user's realm will be set to that of the Role.

Customized Realm
Just as mentioned previously in the Role settings. There are two options to choose from
Users Belonging To Selected Groups
You can select specific user groups to which you want to assign as a realm to the user.

Users Belonging To Selected Hierarchy
A realm can also be set at the region, division and/or department level.

Course Realm
In the Role settings for Course Realm
There are three options here to choose from:
All Courses
Select this option if you want to give access to all of the courses available to your organization.
Selected Courses and Self Owned Courses
This will give access to the courses you specifically select, along with any courses the role member creates.

Courses Based on the Following Rule and Self-Owned Courses
You can set a rule here based on course name and code. You can preview the courses from the preview link before you click save.
This option will give access to all of the courses which satisfy the rule along with any courses that the role member creates.

Profile and Transcript
Clicking on a user's name when displayed in lists throughout the iLMS takes you to the user's profile, this section allows you to view and modify a user's personal information such as:
Name, employee or email ID, password, hierarchical location, and more. It also allows you to view assigned roles, group memberships, transcript data, and it also offers a way to quickly assign any courses or curricula to the individual.
Profile Tab

-
Text box fields (First Name, Middle Name, etc.)
These allow you to modify specific fields. The first and last name information will appear throughout iLMS reports as well as on the user's welcome page and course certificates.- Other key information shown is the email ID and employee ID, which can be used to login to the system.
- To modify the fields that display in the user profile, or to change the unique ID that identifies users in your system see field settings here:
iLMS Fields and Unique Identifier
-
Email ID
Allows you to modify email ID which is used to login to iLMS. -
Change Password (If added to field display list)
Allows you to change the users password. -
Region, Division, and Department Drop Down Menus
Allows you to change the region, division or department where the user is located.
(Learn more about hierarchy here: User Hierarchy)
Note: If your organization users automated provisioning and user update methods. Any changes made to the user profile manually may be overwritten upon next automated sync.
Login as this User
This feature allows an admin to assume the role of the specific user's Learner profile. This can be useful when troubleshooting as it allows you to view the system from the Learner's perspective.

Note: Due to system limitations, this feature will not display roles other than "Learner" for the user. If a user has other roles assigned which grant them any level of administrator access, the only way to view the system from their perspective WITH the other roles, is to login with their account from the login Portal.
A recommended alternative would be to assign your own account the specific role to view it as a member in the event there is a reported issue with the role. One user can have multiple assigned roles to switch between.
Roles & Realm Tab
The Roles and Realm tab in the User profile allows you to see all roles which have been assigned to a user. If the user is assigned a Custom role, it also allows you to edit the realm for the specific role for just this user.
To Learn More about Roles and Realm in general see: User Roles and User and Course Realms

Groups Tab
This section of the user profile displays all groups of which the user is a member.
To Learn more about Groups in general see: User Groups
Transcript Tab
The user transcript page allows you to view and modify user course information such as:
enrolled date, due date, completion date, score, status and certificate.
All of this activity is logged to ensure the integrity of course activity data.
You can also un-enroll specific users from courses using this page. (if enrolled directly without group or curriculum)

-
Switch to Detail View
Adds additional fields to the transcript such as Hours, Credits, Time Spent (Minutes). -
Start Date
Allows you to view and change the enrolled date of a course. Click on the date to modify it. -
Due Date
Allows you to view and change the due date of the course. Click on the date to modify it. -
Completion Date
Allows you to view and change the date the course was completed. Click on the date to modify it. -
Score
Allows you to view and change the users score. Click on the score to modify it. -
Status
Allows you to view and change the course status. Click on the status to modify it. -
Certificate
Allows you to view, email or print the user certificate. The email link emails the certificate to the user. This is a handy way to quickly resend certificates to users who say they never received a certificate or those who have lost or deleted it. -
Edit
Allows you to edit users course transcript fields and change the course status.
Enroll in Course/Curriculum Tab
The last tab of the user profile will list all available courses in the iLMS. Courses in which the user is already enrolled will be checked, bolded, and will have the Enrollment Path (method by which they were enrolled) listed.
The Enrollment Path column is very handy when troubleshooting course enrollments, or when encountering issues with un-enrollment from a course.
A user can also be enrolled in new training from this menu. To do this, simply check the box next to the desired course and click the enroll button at the bottom of the list.
To learn more about all the different ways a user can be enrolled in training, as well as what each method can accomplish see: Course Enrollment Methods

Bulk Update Transcript
Bulk Update Transcript enables the iLMS to integrate and retain historical course transcript data from another LMS through the use of properly formatted CSV files. This feature will create historical courses which are shell courses that have no content, but retain the course transcripts. It is most useful for cases in which course transcript data from one LMS needs to be integrated into the iLMS.
For most cases, this process needs only to be done once.
Tips and Best Practices
- Please upload a.CSV file only.
- Download the template by clicking on Download Template link under the CSV Format section and fill in your data in the specified format. Refer to the Required Formats chart at the bottom of this page.
- To perform a quick one-time Bulk Update Transcript, upload the template, select Submit to Process, set a schedule under the Settings tab for Daily, todays date, and a few minutes past the current time.
Location:
Organization Admin -> Courses -> Bulk Update Transcript

Settings Sub-tab
Various settings are available to customize usage of the bulk update transcript service for file validation and processing.

Enable Bulk Update Transcript
Check this box to turn on the automatic bulk update transcript process, removing the check will cease and desist previously set related processes. Be sure to un-check this box, once Bulk Update Transcript has finished running if a one-time set up is all that is needed.
Schedule
For updates that are needed on a regular schedule, the iLMS will retrieve CSV files according to the radio button selected: daily, weekly, monthly, or yearly.
Once the Start Date and Start Time fields are filled in, the selected date and time will specify the first run for the schedule; it will continue to run at the same time according to the time-frame set above.
Clicking on the blue radio button will clear the date, it will not turn off Bulk Update Transcript.
Note: One time only bulk update transcripts do not need to be set.
(This feature is helpful if 2 LMSs are running, and the iLMS needs to retrieve updated course transcripts regularly.)
Settings
For each user record in the bulk update transcript CSV file, applicable business rules can be specified by checking one or more of the following options:
-
Create Unrecognized Courses and Sessions
Check here, if your CSV will contain courses and/or sessions that do not exist in iLMS.
This feature is helpful when needing to import historical transcript data without actually uploading the course associated with the transcript.
The field below is used to specify the prefix for these courses. -
Set ILT Session End Date same as Session Start Date if Session End Date is Missing (For Instructor Lead Courses Only)
Check here, if the ILT session end date is missing and it is desired for this rule to fill in the ILT session end date to be the same as the session start date. -
Set Enrollment Date and Start Date Same as Completion Date if those are Missing
Check here, if the enrollment date and start date are missing, and it is desired for this rule to fill in the completion date to be the same as the enrollment date and start date. -
Update Blank Values for Non Mandatory Fields in Transcript
Checking this option overwrites blank values in non-mandatory iLMS fields if they are not populated in the CSV -
Process only if all Records are Good
Checking this option will prevent the file from processing if it contains records with errors. -
Use Default Values for Room, Location, and Instructor if the Respective Values are Missing (For Instructor Lead Courses Only)
Check here, if values for Room, Location and Instructor are missing in the CSV and it is desired to use their respective default values.
Notifications
Check this box will send a notification to the email address listed as primary organization administrator each time a bulk update transcript file processes
You can CC other recipients on the emails as well using the "Also Notify" option.
The Edit Notification Template link will open an editable sample notification email.
File Process Order
Use this menu to select the processing order of CSV files in the FTP directory by File Name or Time Stamp, either in Ascending or Descending order.
CSV Format
Select whether to use the iLMS default CSV upload template
Click on the "Download Template" link to see the standard iLMS bulk update transcript template.
or
Convert an existing CSV file into a format compatible with iLMS.
Mapping Fields
When converting an existing CSV file, the fields of that file must be mapped 1:1 to the iLMS built-in fields and the column number specified according to the Upload Fields and Required Formats chart (bottom of this article).

File Upload Sub-Tab
Simply upload a CSV file with this drag and drop feature or through the Select a file option to validate and process it by the bulk update transcript service.
Once the desired file has been uploaded and saved, click to check Submit to Process to indicate that file should be processed during the next scheduled update.

Upload File Upload a .CSV file created according to the selected format:
iLMS default format OR custom format as per mapping details.
Just select one or more .CSV files, then drag and drop them in the designated area.
They will be uploaded simultaneously.
To start processing the file, Bulk Update Transcript under the Settings tab must be enabled, and a time must be set.
Certain fields are required when updating transcripts in the system:
Fields marked with an * in the default template or If using a custom CSV, the mapping section, are required in order to process.
-
Username
This will be the unique identifier field as set for your users. Email or Employee ID.
Learn More Here: iLMS Fields and Unique Identifier -
Course Name
Name of the course to be updated in the transcript data -
Course Status
Status of the course to be updated in the LMS-
Enrollment Date
(Required only if records belong to a certification-enabled course) -
Is Certification Enable+
(Only required if records belong to a certification-enabled course) -
Session Start Date, Session End Date, Room, Location
(Only required if records belong to an ILT course)
-
Enrollment Date
Note: The record limit is 20,001 records per CSV file.
Larger files can be broken up into smaller CSV files and processed in batches.
Uploaded File Details
Displays the details of the uploaded files from the iLMS and the upcoming schedules for the next bulk update transcript process.

-
File Name
Uploaded files with corresponding timestamps will be available as links. View and download the file by clicking on each link. -
Upload Date and Time
Displays file upload date and time into system. -
File Validation Status
Displays the following status-
Pending File
Yet to be validated -
In-Progress
File is validating -
Completed
Validation complete
-
Pending File
-
Validation Report
Displays a View Details link after file validation completes. -
Submit To Process
Click on the check mark to submit files for bulk transcript processing. Pending files can also be submitted files for processing. -
Remove
Click on the red button to remove the file at any time before the processing starts. A validation pop-up will appear. -
Refresh
Click this button to refresh the grid page.
FTP Setup Tab
The details for ones FTP server, such as credentials and connection types, can be configured here.

FTP Details
-
Save Check Connection
After entering the company's FTP server details, clink on this link in the upper right corner to test the connection and ensure it is functioning properly. -
FTP Type
Select one of the radio buttons: FTP+SSL, FTP+SSH, or plain FTP. Each type will open its own extended window with designated options below. Please Note: Plain FTP is unencrypted and insecure. -
Host Name
Enter the address for the FTP server (either a DNS address, such as myftp.mycompany.com or a publicly available IP address.) -
Port
Enter the FTP port to which the FTP server is set to bind. -
FTP Mode
Select Active or Passive, depending on the server configuration. -
Remote Directory
Enter the directory that contains the applicable .CSV files, with / being the default root directory. -
Anonymous Login
Check here, if the server allows this option and an anonymous FTP login is desired. -
Username
Specify the FTP user here. -
Password
Specify the FTP users password here.
Proxy Settings
-
Use Proxy
Checking this box will expand the mandatory fields that enable the use of a proxy server to connect to the FTP server.
Otherwise, this feature will not be activated.

-
Proxy Name
Enter the DNS name or IP address for the proxy server. -
Port
Enter the port that is configured for the proxy server. -
Proxy Type
Select either Socks4, Socks4a, Socks5, HttpConnect, FtpSite, FtpUser, or Ftp Open from the drop down menu. -
Username
Enter the username to authenticate to the proxy server.
Password
Enter the password for the user to authenticate to the proxy server.
SSL and SSH settings
-
If using FTP+SSL (FTPS)
- Upload the SSL certificate for the FTP server and optionally provide its password.
- Select either Implicit or Explicit TLS or SSL as a security method, and optionally define which TLS or SSL protocols are allowed.
- Also, one can choose whether to use the Clear Command Channel command for the iLMSs FTP client connection.

-
If using FTP+SSH (SFTP)
- The private SSH key used for the server can be uploaded, and the password can be optionally provided.

-
If using plain FTP
- No further configuration is necessary on this form
Inspired will need to white-list the host name or IP address of your FTP connection to allow access.
- Plain FTP is the least secure option, and therefore, is not recommended.
Bulk Update Transcript Log

The bulk update transcript log page displays all logs of successful and unsuccessful bulk update transcript processes.
During the bulk update transcript process, improperly formatted records are not processed.
If the bulk update transcript is performed, an error log is generated as well as a CSV file with all of the improperly formatted records listed under "Bad Records"
In addition, a CSV file is created with all of the successfully processed records displayed as "Good Records"

-
View Log File
The log file displays basic facts about the bulk transcript update and a list of errors. Types of errors include:-
Missing Field Information
The record was missing information in one of the required fields. -
Course Does Not Exist
The Create unrecognized courses and session checkbox was not checked. This error will occur when a Course or Session for the given transcript record does not already exist in the system.
-
Missing Field Information
-
Download Good Records File
Displays the error-free records that were processed successfully by the bulk transcript update. -
Download Bad Records File
Displays the bad records that failed during the bulk transcript update process. Use this file to make corrections, then upload and update the transcript for the remaining records.
Note: This file contains an extra column containing error codes for all applicable rows in the CSV file. The extra column must be removed prior to uploading it into the system. If the error codes column is not removed, the system will reject the file.
Required Field Formats for Bulk Transcript Update
When converting an existing CSV file for the purposes of bulk updates, the fields of that file must be mapped 1:1 to the iLMS built-in fields and the
Upload Field Required Formats
| Field name | Data type | Min | Max | Comments/Actions |
|---|---|---|---|---|
| Username * | Character | 1 | 200 | |
| Course Name * | Character | 1 | 150 | Including Prefix specified on Settings page |
| Requirement Type | Character | 1 | 1 | “M” OR “O” (Mandatory/Optional) |
| Enrollment Date+ | DateTime | - | - | Must be in the following format: MM/DD/YYYY |
| Start Date | DateTime | - | - | Must be in the following format: MM/DD/YYYY |
| Due Date | DateTime | - | - | Must be in the following format: MM/DD/YYYY |
| License Expiration Date | DateTime | - | - | Must be in the following format: MM/DD/YYYY |
| Completion Date | DateTime | - | - | Must be in the following format: MM/DD/YYYY |
| Score | Number | 1 | 5 | Between 1 and 100. |
| Time Spent | Number | 1 | 50 | |
| Course Status * | Character | 1 | 1 | N – Not Started, I – In Progress, |
| C – Completed, P – Pass, F – Fail, | ||||
| W – Waived | ||||
| Certification Expiration Date | DateTime | - | - | Must be in the following format: MM/DD/YYYY |
| Certificate Number | Character | 1 | 50 | |
| Session Start Date+ | DateTime | - | - | Must be in the following format: MM/DD/YYYY |
| Session Start Time | DateTime | - | - | Must be in the following format: MM/DD/YYYY |
| Session End Date+ | DateTime | - | - | Must be in the following format: MM/DD/YYYY |
| Session End Time | DateTime | - | - | Must be in the following format: MM/DD/YYYY |
| Instructor Usernames | Character | 1 | 1000 | Value can be Email ID Or Employee ID based on Unique Identifier |
| Location+ | Character | 1 | 255 | |
| Room+ | Character | 1 | 255 | |
| Is Certification Enable+ | Character | 1 | 1 | If record belongs to certificate enable course then place 1 in this field otherwise place 0 or leave blank |
| Is Curriculum | Character | 1 | 1 | To create a curriculum with a name specified in the Course Name column, place 1 in this column, otherwise place 0 or leave blank |
| Curriculum Name | Character | 1 | 150 | To add a course specified in the Course Name column, enter curriculum name in this field. The course will be added in this curriculum. |
| Action | Character | 1 | 1 | Value can be “I” for insert or “U” for update records or leave blank |
Admin Log
All admin activity in relation to interaction with user accounts is logged. The log database can be accessed from this page.
Location:
Admin log can be found under the Logs Tab

Admin
Allows you to select the admin whose actions you would like to track or you can select the all admins option.

Duration
Allows you to view a complete report of all Admin activity ever recorded in the system or all activity that occurred from X date to Y date.

Exports
Export the Admin Log as a .csv file.

Fields

-
Date
The date on which the action took place -
Admin Taking Action
The admin account which performed the action
(Note: LDAP connector displays as primary org admin, despite not being an actual user) -
Affecting User
The user account on which the action was performed -
User Email ID
The email ID of the impacted user -
User Employee ID
The employee ID of the impacted user