
Table of Contents
Step 1: Create a Smart Host on G SuiteStep 2: Configure an inbound mail gateway in G SuiteThere are two steps to creating a Smart Host with G Suite. See both sections below to properly set this up.
Step 1: Create a Smart Host
In order for outbound email from G Suite to be routed through VIPRE, we need to add an outbound gateway to G Suite and point it to VIPRE.
- Log into your G Suite account
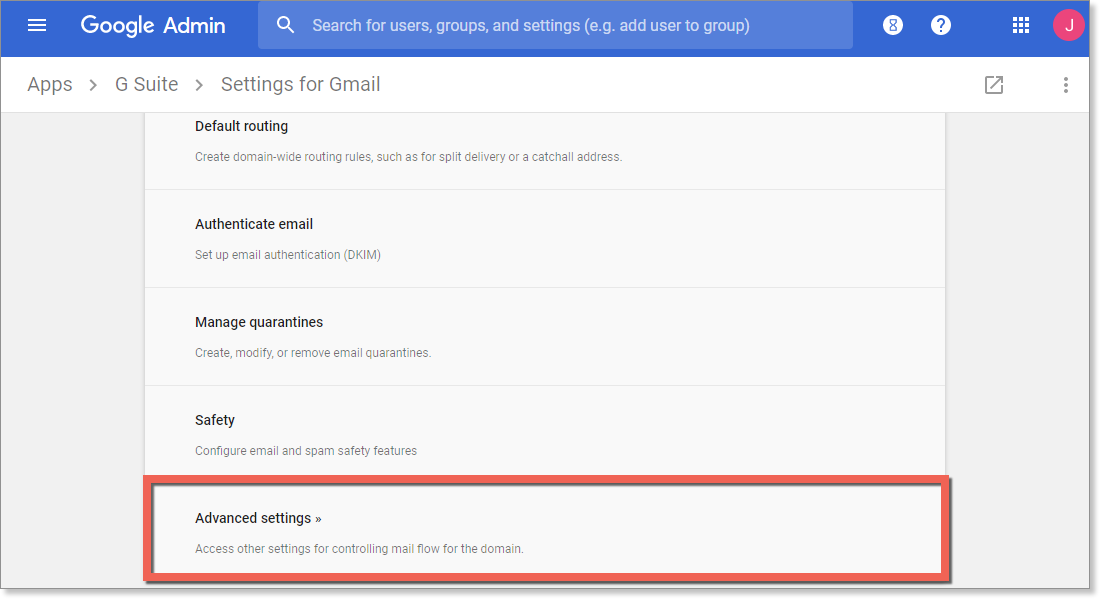
- Select Apps > G Suite > Gmail
- Scroll down and select Advanced Settings
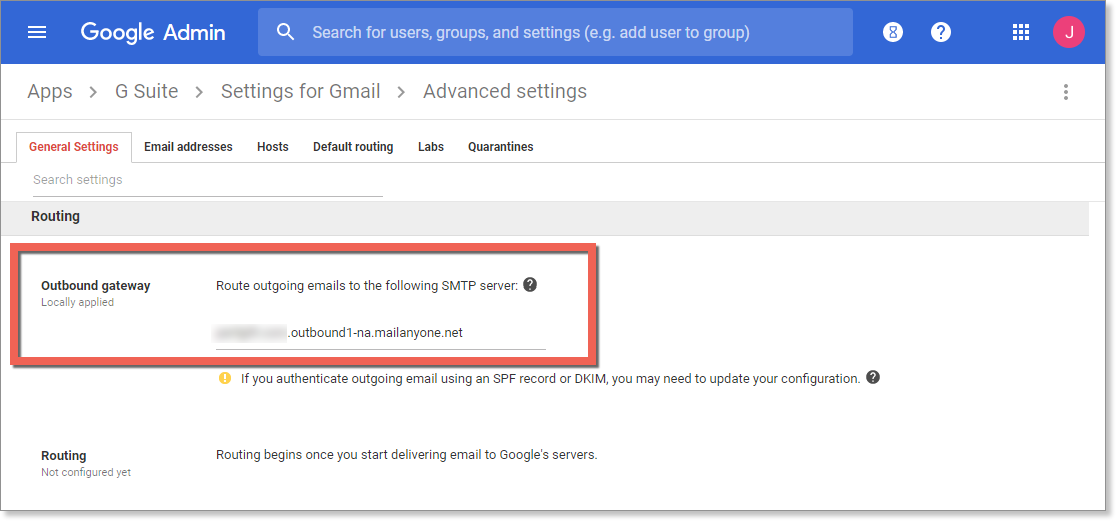
- In Advanced Settings, scroll down to Outbound gateway and type in your outbound gateway name (e.g. domain-com.outbound1-na.mailanyone.net )
- In the bottom right of the screen, select Save
These changes may take up to 1 hour to propagate to all users.
Step 2: Configure an Inbound Mail Gateway
- We recommend that G Suite clients also add the VIPRE IPs to the G Suite Inbound Gateway. This prevents Google from performing SPF checks on the sending domain against the VIPRE IPs. To configure an inbound mail gateway:
- Update your domain’s MX records to refer to the inbound mail gateway server (see Related Articles for details)
- Configure the inbound mail gateway server to deliver mail to the G Suite mail servers. The configuration steps differ depending on the gateway server
- Log in to your G Suite account
- Select Apps > G Suite > Gmail
- Scroll down and select Advanced Settings
.png)
- Scroll down to Inbound gateway
- Hover the cursor to the right of Inbound gateway
- To create a new inbound gateway setting, select Configure
or - To edit an existing setting, select Edit
- To create a new inbound gateway setting, select Configure
- Under Gateway IPs, enter the information for each gateway
- Select Add
- Enter the following network ranges (select the appropriate tab below)
North America
| Subnet | Subnet Mask | CIDR | IP Range |
|---|---|---|---|
| 208.70.128.0 | 255.255.248.0 | /21 | 208.70.128.0–208.70.135.255 |
| 72.35.12.0 | 255.255.255.0 | /24 | 72.35.12.0–72.35.12.255 |
| 72.35.23.0 | 255.255.255.0 | /24 | 72.35.23.0–72.35.23.255 |
United Kingdom
| Subnet | Subnet Mask | CIDR | IP Range |
|---|---|---|---|
| 192.162.216.0 | 255.255.252.0 | /22 | 192.162.216.0–192.162.219.255 |
| 208.70.128.0 | 255.255.248.0 | /21 | 208.70.128.0–208.70.135.255 |
| 72.35.12.0 | 255.255.255.0 | /24 | 72.35.12.0–72.35.12.255 |
| 72.35.23.0 | 255.255.255.0 | /24 | 72.35.23.0–72.35.23.255 |
Denmark
| Subnet | Subnet Mask | CIDR | IP Range |
|---|---|---|---|
| 185.38.180.0 | 255.255.252.0 | /22 | 185.38.180.0–185.38.183.255 |
| 2a01:77c0:1180:: | ffff:ffff:fffc:: | /46 | 2a01:77c0:1180::–2a01:77c0:1183:ffff:ffff:ffff: |
| 89.104.206.0 | 255.255.254.0 | /23 | 89.104.206.0–89.104.207.255 |
| 2a01:77c0:0006:: | ffff:ffff:fffe:: | /47 | 2a01:77c0:0006::–2a01:77c0:0007:ffff:ffff:ffff: |
| 192.162.216.0 | 255.255.252.0 | /22 | 192.162.216.0–192.162.219.255 |
Sweden
| Subnet | Subnet Mask | CIDR | IP Range |
|---|---|---|---|
| 185.38.180.0 | 255.255.252.0 | /22 | 185.38.180.0–185.38.183.255 |
| 2a01:77c0:1180:: | ffff:ffff:fffc:: | /46 | 2a01:77c0:1180::–2a01:77c0:1183:ffff:ffff:ffff: |
| 89.104.206.0 | 255.255.254.0 | /23 | 89.104.206.0–89.104.207.255 |
| 2a01:77c0:0006:: | ffff:ffff:fffe:: | /47 | 2a01:77c0:0006::–2a01:77c0:0007:ffff:ffff:ffff: |
| 192.162.216.0 | 255.255.252.0 | /22 | 192.162.216.0–192.162.219.255 |
- Select Save
Google provides additional detailed instructions in their article Set up an inbound mail gateway.