
This article covers hardware, software, and network prerequisites. Then it steps you through installing the software, adding a firewall rule, and updating your VIPRE policies to use the new proxy.
The four steps to install and configure VIPRE Update Proxy are as follows:
- Perform prerequisite checks
- Install VIPRE Update Proxy
- Create and test a new firewall rule
- Update your VIPRE Cloud policies
Additionally, you may choose to uninstall VIPRE Update Proxy.
Step 1: Perform prerequisite checks
To run VIPRE Update Proxy effectively, you need
Hardware / Software
- A PC with a network connection
- Any Desktop or Server version of Windows
- Microsoft .NET Framework 4.0 or higher
Network prerequisites
The chosen host machine should
- have a static IP address
- be on the same internal network as your VIPRE Cloud agents
- be reachable by your VIPRE Cloud agents across the internal network
- be behind your external firewall
- use a firewall to restrict access to only
- the VIPRE Update Proxy port you choose
- local networks with VIPRE Cloud agents that require updates
- be able to access these internet hosts and download these file types
Additionally, the host machine should not
- be connected to external or public networks
- be dual-homed
- have any special access, except for local permissions to the VIPRE Update Proxy and firewall permissions to connect to the external VIPRE update services
- example: the host you use should not be a gateway to access a protected internal network
Step 2: Install VIPRE Update Proxy
Installation is quick and simple. It is also displayed in the Introduction to VIPRE Update Proxy video.
- Download the VIPRE Update Proxy installer (above) to your host machine, and launch it
- Select an installation directory and click Next
- Choose an unused port for VIPRE Update Proxy to listen on, and click Next.
We recommend choosing an unused port instead of the default (18085), as it is the default port for Nginx. - Choose a local directory for VIPRE Update Proxy to use for the cache, and click Install.
The software installs VIPRE Update Proxy and sets it to start as a system service - When installation is complete, click Finish.
The VIPRE Update Proxy installer opens the default web browser and performs two tests (Installation and Connection). - Once the tests finish, verify the messages below are displayed to indicate the tests were successful
- Installation - The update proxy software installation and service registration succeeded, and the proxy is now running on the port you selected. This should always succeed – If the install process encounters any issues, it will notify you before this point.
- Connection - The update proxy succeeded in caching a small, remote test file. If the test cannot reach the VIPRE content servers in a given test period, it will fail.
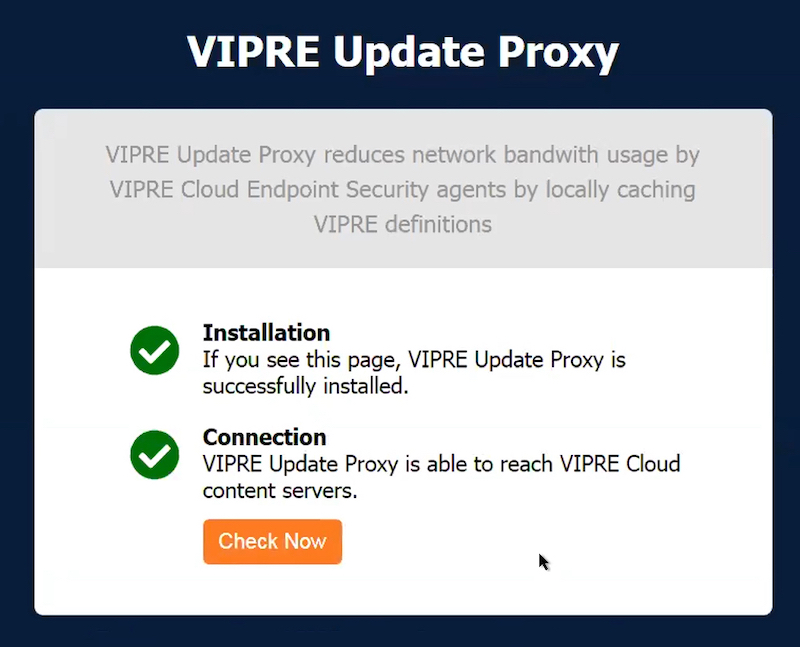
If the connection test fails, check that your host can reach the necessary update servers and download required file types, then click Check Now to test again after making any changes.
The update proxy runs under Windows Services as “VIPRE Update Proxy” and is set to start automatically on boot.
Step 3: Create and test a new firewall rule
On the host, create a firewall rule which allows inbound traffic on the specified port to the proxy executable. Ensure your rule allows only required domains or connections from your local network.
Below is a sample Windows 7 firewall rule.
- Rule type: Inbound / Program
- Program path: /Program Files (x86)/VIPRE Update Proxy/nginx/nginx.exe
- Action: Allow the connection
- Profile: (This is specific to your setup. Select whichever options allow only the required connections.)
- Name: Give the rule a name and optional description
Test the firewall rule by pointing a web browser from a different host to VIPRE Update Proxy. (e.g. http://PROXYHOST:18085/vup/index.html)
In this example, replace PROXYHOST with the hostname or IP of your host machine and replace 18085 with the port you selected during install.
- If successful, you will see the VIPRE Update Proxy confirmation page (above)
- If unsuccessful, check the following:
- Confirm that you have entered the hostname or IP address correctly
- Confirm that the port number specified in the URL matches the port specified during the install of VIPRE Update Proxy
- Confirm your firewall rule on the host is correct
- If you’re still having problems, disable the firewall rule and/or re-install the proxy to confirm you can connect to the host from your test machine without any additional settings in place
Step 4: Update your VIPRE policies
Agent update proxy settings are configured at the policy level in VIPRE Cloud.
Because all agents on a policy use the same update settings, agents should be segregated by policy. For example, you may wish to use a policy to group agents by a specific subnet, or at a branch office location.
Configure a policy to use VIPRE Update Proxy
- In VIPRE Cloud, navigate to Policies > Edit policy > Agent > Updates & Communication
- Under Update Communications, select Use a local update server
- Enter the VIPRE Update Proxy host location (e.g. http://10.32.10.136:18085 )
- In the top right, select Save
Policy changes are picked up by each agent the next time they sync with the Cloud console (usually within a minute or so).
You're done! Your VIPRE Cloud agents will now use VIPRE Update Proxy on your local host.
Uninstall VIPRE Update Proxy
When uninstalling VIPRE Update Proxy from the proxy host, you should perform the following steps:
Step 1 - Configure your policies to no longer use VIPRE Update Proxy
- In VIPRE Cloud, navigate to Policies > Edit policy > Agent > Updates & Communication
- Under Update Communications, deselect Use a local update server
- In the top right, select Save
Repeat steps 1–3 for every policy that uses VIPRE Update Proxy.
Policy changes are picked up by each agent the next time they sync with the Cloud console (usually within a minute or so).
Step 2 - Uninstall VIPRE Update Proxy from the proxy host
- Log on to the proxy host machine
- Uninstall VIPRE Update Proxy using Windows Add/Remove Programs functionality