
Activate your Trial of VIPRE Site Manager
Accessing your free trial couldn't be easier. Follow these steps to get started with VIPRE Site Manager today!
Sign Up for the Trial
For simplicity's sake, all VIPRE Site Manager accounts begin with a free, fully-functional trial product. We want you to test drive the product, put it through its paces, and decide whether it's right for you.
If you are an existing VIPRE partner, signing up through our Partner Portal provides some benefits to registration and automatically fills out some of your trial information.
Pick the option that best defines your role with VIPRE
Let's Get Started
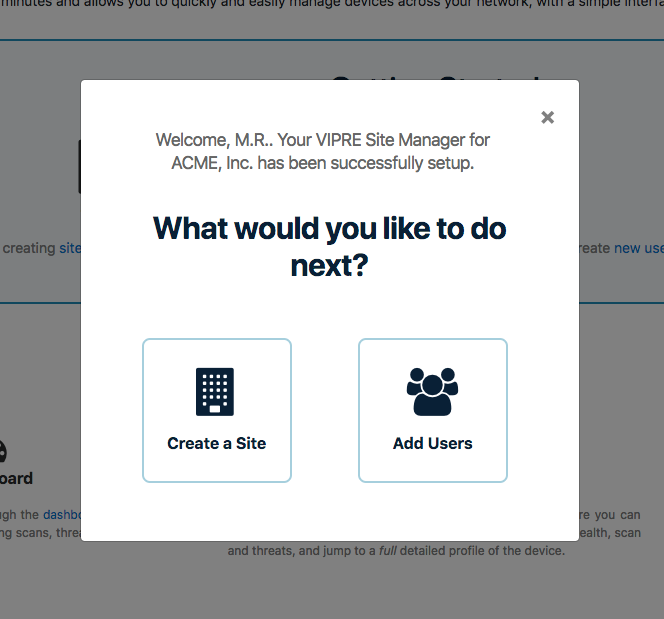
Now that you've provisioned a trial of VIPRE Site Manager, you're presented with the follow screen and two suggestions:
- Create a Site - Provision tenant sites (billed or trials) with just a few clicks.
- Add Users - Add some additional team members and invite them to explore the product. You can also learn more about User roles in Site Manager.
If you just can't decide, we recommend creating a site or two. From there, you can navigate into those sites and then deploy some VIPRE agents to protect tenant endpoints.
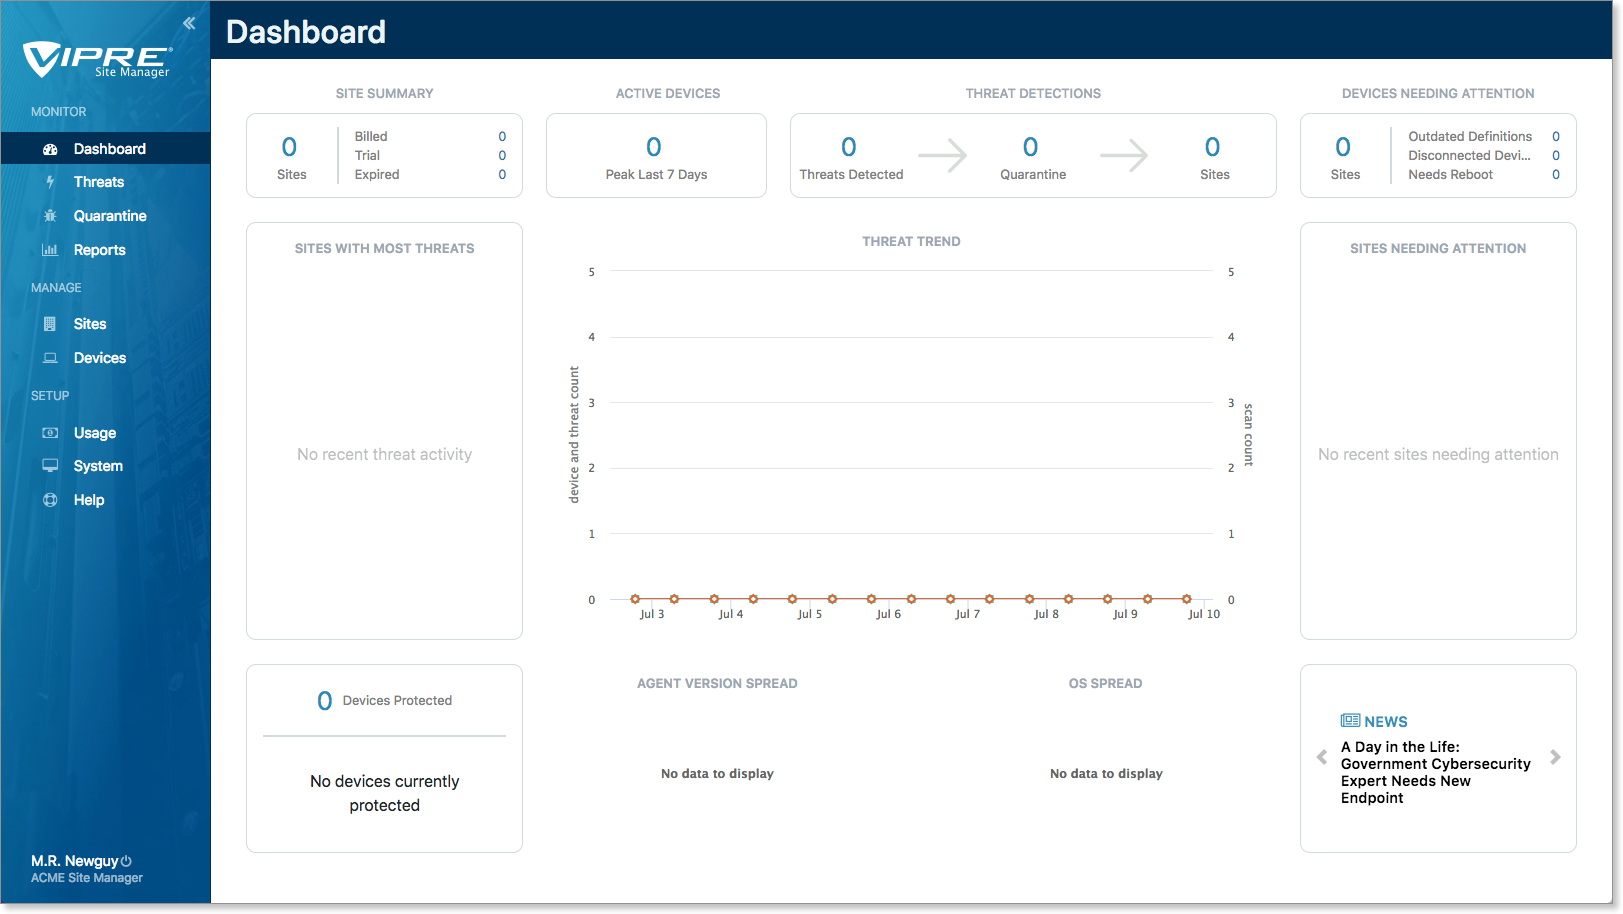
When you first log into VIPRE Site Manager, it feels a bit empty until you create sites and then deploy agents.
-
Next Step
- Add Button
Add User Accounts
Creating administrator and analyst user accounts allows your team to log in and access the product.
VIPRE Site Manager users may belong to either an admin or analyst role. These roles apply to Site Manager settings only; all users have full admin abilities when they navigate into a customer site.
- Analyst role – Limited to standard system access at the Site Manager level. This includes management of threats, scans, quarantined items, report views, site overviews, and device screens.
- Admin role – The Admin role has full access to Site Manager product configuration, as well as user management and can create/edit/delete tenant sites. They can also update the Site Manager site name.
CAUTION: Because VIPRE Site Manager is a site management product, both admins and analysts have full super-admin access to customer sites. You do not have a visible user account on the individual tenant site, but you have full admin access.
Learn how to Manage Users.
User Management Overview Video
Add users
To add users to Site Manager
- Select System > Users > Add User
- Fill out the user information. A phone number is optional, but may be useful if you need to contact the user quickly
- Choose either Admin or Analyst
- Select Add User
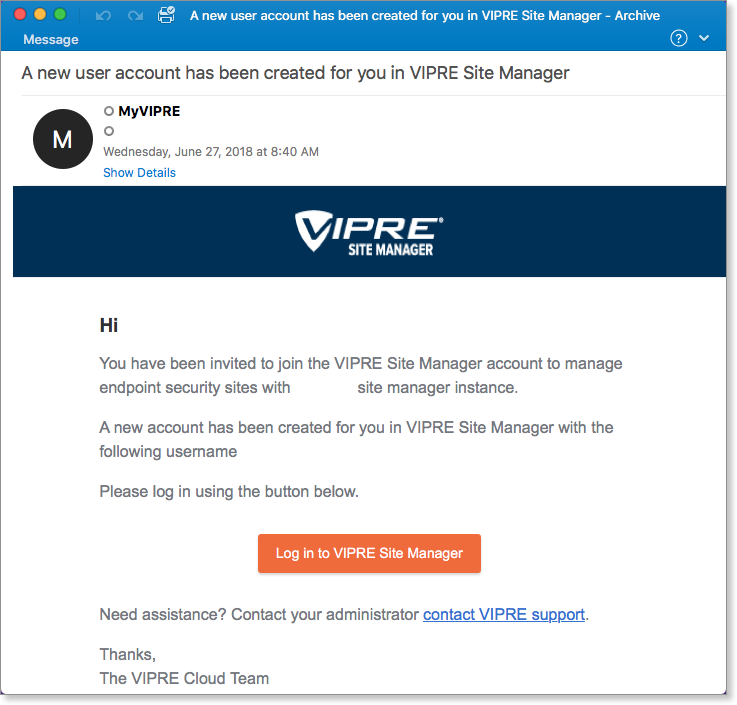
New users receive an email with login credentials and a "Log in to VIPRE Site Manager" button and link.
-
Next Step
- Add Button
Create Tenant Sites
Adding tenant sites for your customers is easy—it takes seconds. Follow these steps to learn how.
Add new Tenant Sites
Creating a site immediately provisions a new VIPRE Endpoint Cloud instance with the customer details you provide.
To create a new tenant site
- From the main menu, select Sites
- In the top right of the screen, select Create Site
- Fill out or select the following items
- Site Type - Select EDR+MDR, EDR, or ESC
- Site Name - This functions as the direct URL to the site
- Company Name - This is internal, referential information that is designed to make it easier for your organization to manage the customer
-
Billing Contact - This is the person that you would contact if you had an issue with billing for this customer
- (Optional) Read-only account - Selecting the box next to Create read-only user account for billing contact will create a read-only account intended for customer use; this makes it easier for the customer to track their own resource usage. This is also referred to as the view-only tenant role
-
Type- Select Billed or Trial:
- Billed creates a standard, billable client site
- Trial creates a 30-day trial site that customers can use when they are evaluating your service and determining whether they want to commit; see Trial Sites for more information
- Estimated seats - This is the number of devices that you believe the customer will use. This is just a reminder for your business; the system will not automatically respond to overages. Instead, the estimated seats number can be used for quick reference, and to identify customers who may be utilizing their service more than first anticipated
- Contract End Date - As above, the Contract End Date is only a reminder — you can later sort by expiration date to find the customers whose contracts you need to start negotiating. By default, this is set to a year in the future for Billed sites and a month out for Trial sites
- Includes (when choosing EDR+MDR or EDR) - Site creation will show you what it includes
- Add-ons (when choosing ESC) - Site creation will give you the option to decide which add-ons to include with your site for an additional cost
- Select Create to add the site to Site Manager
In a few seconds, the customer is automatically added to your list of sites, and you are now able to deploy agents or setup policies. Refer to Related Articles for details on how to deploy agents or set up policies for both all VIPRE Cloud products.

-
Next Step
- Add Button
Set up Trials for your Customers
Trial tenant sites are free, 30-day customer sites that are fully functional – and help your customers experience VIPRE before they decide to commit.
Trial sites
Creating a trial tenant site involves the same process as creating a tenant billed site. VIPRE Site Manager has native trial support to make it easier for you to distinguish between billed customers and trial customers. Trial sites are limited to 50 active devices.
In nearly every respect, a trial site functions as a billed site. Trial sites show up on the dashboard and you will be able to see which devices are active, view items in quarantine, and when agents need attention.
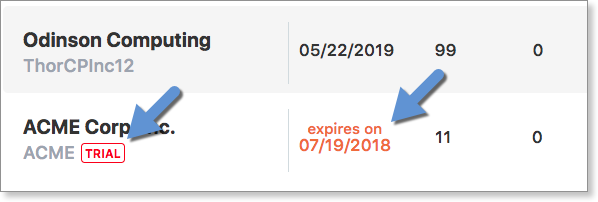
Trial sites and upcoming expiration dates are clearly marked.
Learn more about interacting with trial sites
- View Trial Site Usage - Trial site usage can be viewed to determine how much a potential customer is using the product
- Convert a Trial Site to a Billed Site - When a customer is ready to pay for service, converting them from a trial to a paid site takes only a few seconds
-
Next Step
- Add Button
Automated Notifications
Create rich, detailed email notifications to provide automated, summarized digests about your customer sites and product usage.
Automated Email Notifications
You can set up daily or weekly summaries to track site and device health, ranging from a single site to your entire architecture. Or, track active device usage at your preferred frequency through reports in HTML or CSV format.
Some additional examples:
- Send your Sales team a weekly summary of just your trial sites Thursdays at 9 AM
- Set up a CSV report showing usage data across all tenant sites on the first of the month
- Keep an eye on a single customer with a daily summarized report at 4 PM
VIPRE Site Manager supports both Site Summary (at-a-glance health information) and Usage Summary (customer activity) reporting through email notifications.
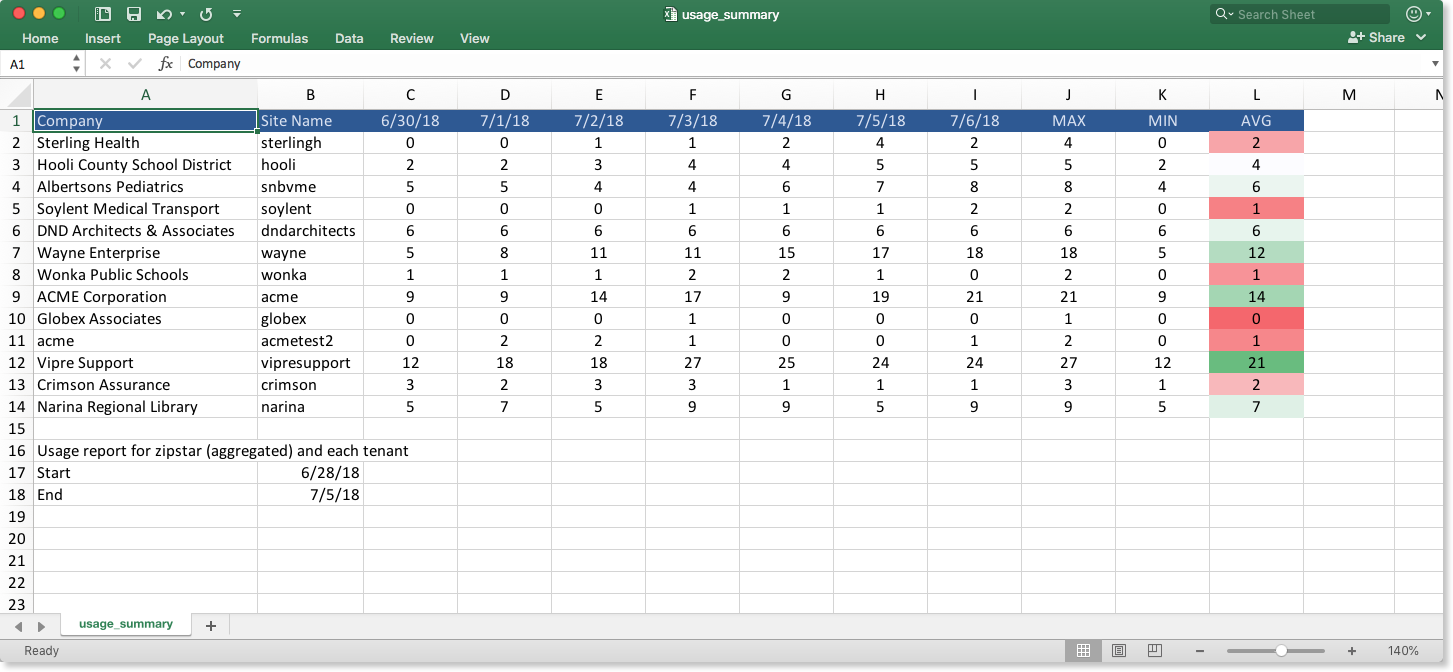
Setting up recurring CSV reports allows you to import your usage data into other applications such as Microsoft Excel or Google Sheets, and stylize them as you wish.
VIPRE Cloud Alert Notifications
Of course, you can also set up email alert notifications for threats from each VIPRE Cloud site.
ESC Notifications
Set up Immediate Alerting of Threats Found
VIPRE can send immediate email notifications to alert you when a threat is found. You can specify the threat levels, detection types, and devices for which you want alerts.
Immediate Email Notifications
When VIPRE discovers a threat, an alert is triggered. Alerts are surfaced through various areas in VIPRE Cloud including the Dashboard, Threat Detection Report, Threat Summary Report, and Scan Report.
VIPRE can also notify you immediately of threats found with email alerts, known as Threat Detected Notifications.
When creating a Threat Detected Notification, you have full control over which threat types you will receive emails for and who will get the alert notifications. Immediate email notifications can be customized to meet your needs. Multiple notifications can be created, each with a specific set of criteria, including
- source - Active Protection, scans, or email
- severity - the level of the threat, from lowest (unknown) to highest (severe)
- scope - which agents detected the threat: all agents on your site, or those in specific policies
The subject of the email uses the name of the notification you create. Each notification can be sent to one or more email addresses or email aliases (comma-separated).
Benefits of the Threat Detected notification email
The Threat Detected Notification email contains details on the threat found. Links within the email take you directly to the threat details view within VIPRE Cloud. This enables you to quickly and easily perform an immediate investigation to quickly determine if this is an isolated incident or a widespread threat.
With the flexibility of the notifications system, you can choose to be alerted on only critical severity levels. Or, you may choose to have notifications for one policy emailed to personnel responsible for a particular group of devices and another set of notifications emailed to another individual responsible for the devices in other policies. Of course, with the options available there are many combinations that can be used to accommodate your specific needs.
Set up Email Notification
Notification setup is found within the System tab, under the Notifications sub-tab.
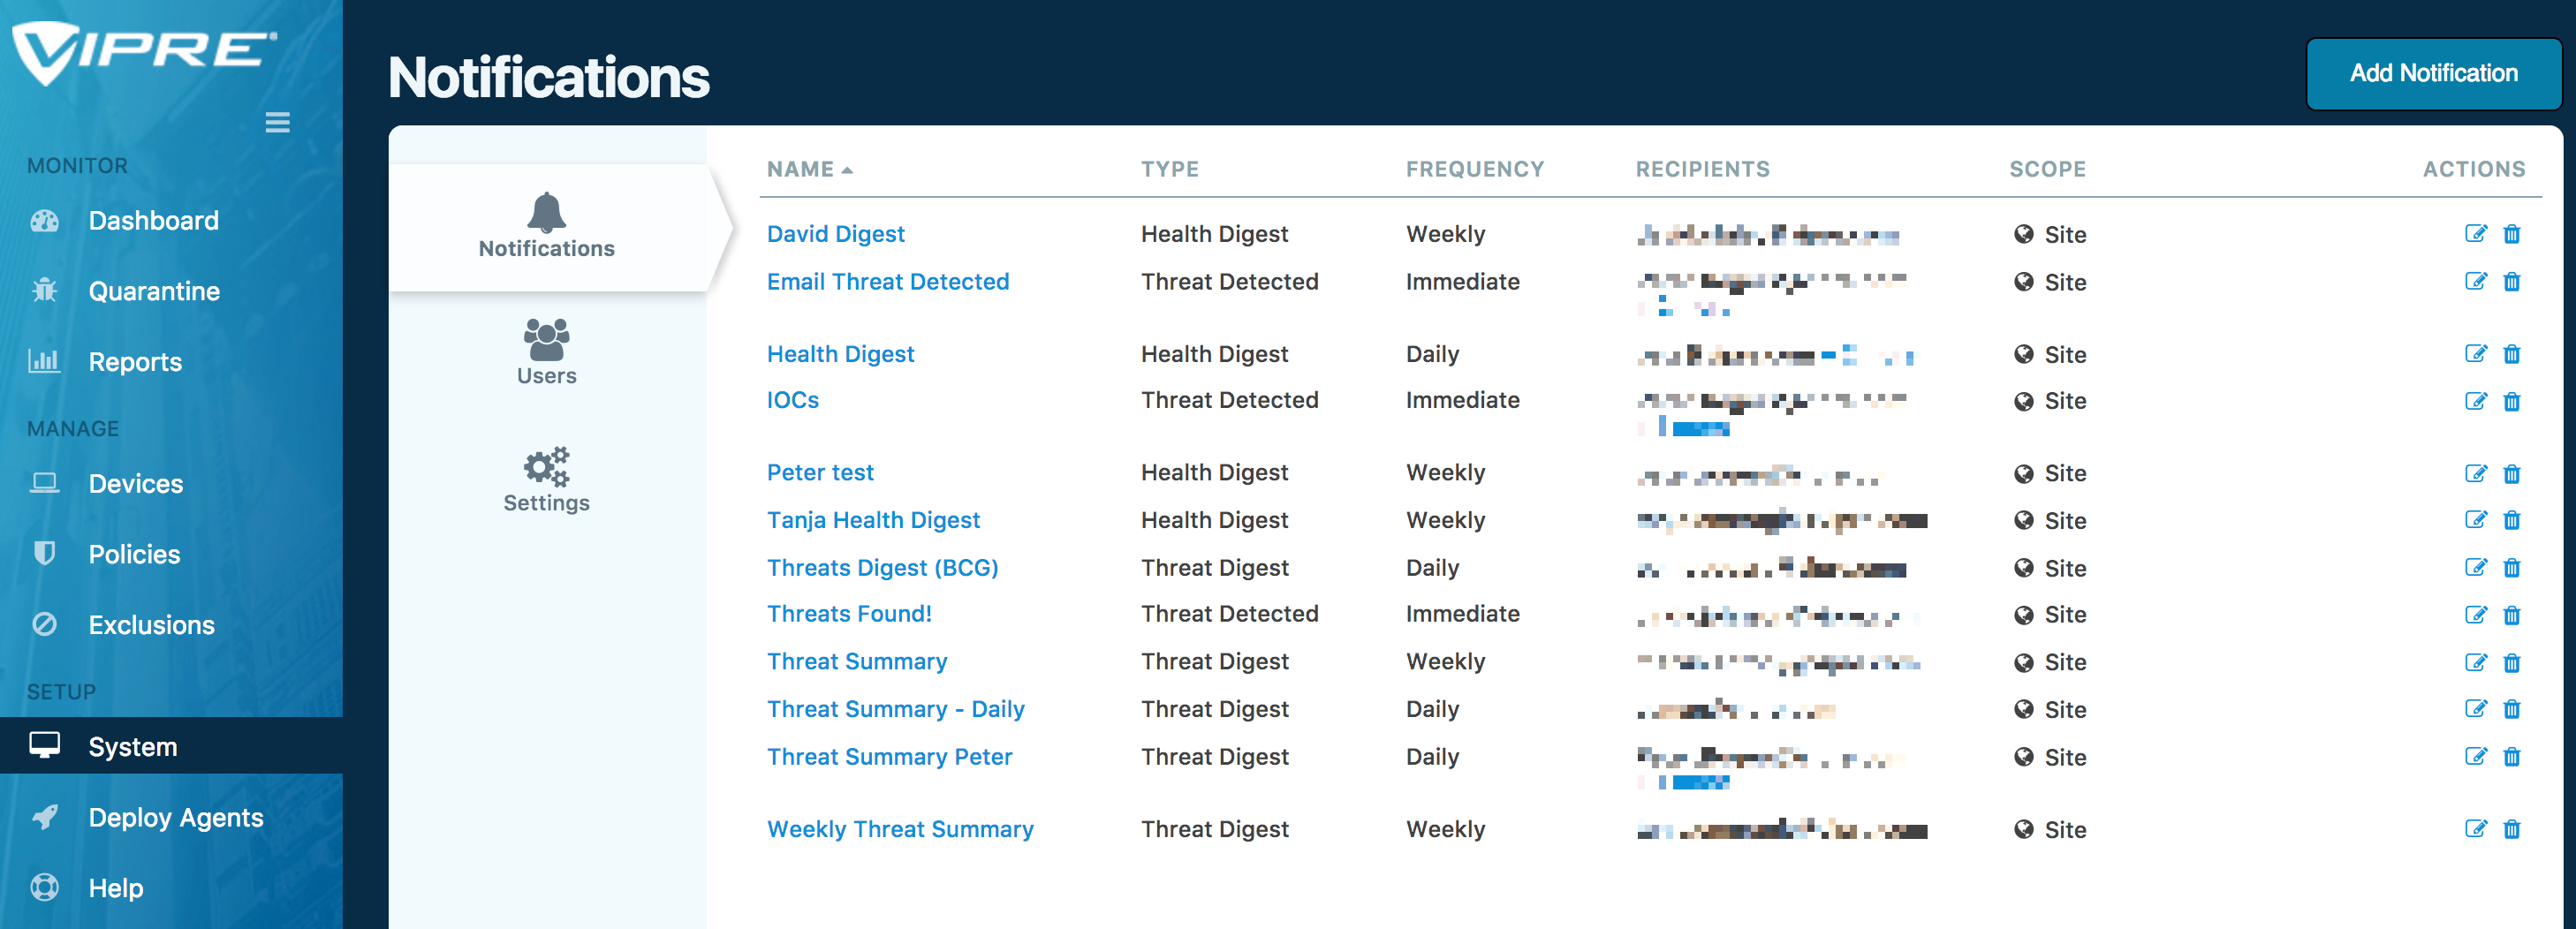
Click on the Add Notification tab at top right, ensure the Threat Detected notification type is selected, then configure your Threat Detected Notification to your needs.
Recommendations
- At a minimum, we recommend you set up alert notifications for threat categories Elevated through Severe. Most threats will be immediately blocked and/or quarantined, but it's a good idea to stay on top of new threats as they come in to ensure that quarantined files don't start to pile up and side effects don't cause system issues.
EDR Notifications
EDR - System
VIPRE Endpoint Detection & Response's System tab houses several ways to customize your experience. Select a topic below for full details.
Notifications
There are four different types of notifications:
- Threat Detected
- Incident Detected
- Health Digest
- Threat Digest
To add a new notification:
- Navigate to System > Notifications and click the Add Notification button in the top-left corner
- Name your notification
- Select the type of notification with a checkmark
- If you chose Threat Detected:
- Select one or more sources
- AP (Active Protection)
- Scan
- AMSI
- Exploit
- Ransomware
- Slide the severity bar to choose:
- Unknown severity and everything above it
- Low severity and everything above it
- Moderate severity and everything above it
- Elevated severity and everything above it
- High severity and everything above it
- Severe severity
- Select one or more sources
- If you chose Incident Detected:
- Slide the severity bar to choose:
- Unknown severity and everything above it
- Low severity and everything above it
- Moderate severity and everything above it
- Elevated severity and everything above it
- High severity and everything above it
- Severe severity
- Select a Remediation Status:
- Auto-Remediated
- Unhandled
- Slide the severity bar to choose:
- If you chose Health Digest or Threat Digest:
- Adjust the frequency you would like the notifications to be sent
- If you chose Threat Detected:
- Add email addresses of those you want to receive the notifications; emails should be separated by commas when adding more than one
- If desired, you can edit the subject of the email notification with options from the drop-down menu
- Set the scope to determine if the notifications should be across the whole site or only for a specific policy
- Select Preview to see a draft of what the email will look like
- Click Done to return to the previous screen and make changes if desired
- When ready, click Add Notification
You've created a new notification.
Users
VIPRE EDR supports two user roles: analyst and admin.
- Analyst role - limited to deploy agents, investigate threats, manage quarantine. Includes ability to view policies and exclusions, but cannot modify
- Admin role - full access to the configuration of the product, including policy creation and editing, exception definitions, and system settings. Includes all permissions of the analyst role
Create a User
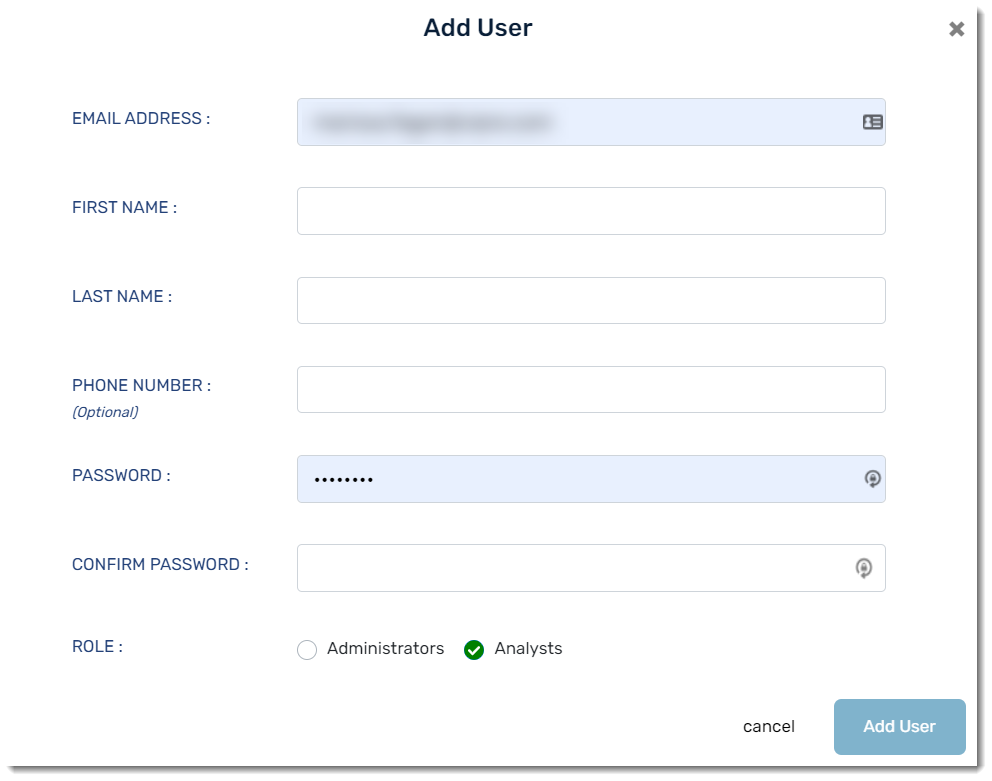
As an admin, you may create users with either admin or analyst roles. You will need each user's first/last name and email address. A phone number is optional.
- Click System > Users > Add User
- Enter the user details
- Click Add User
New users will receive a welcome email from VIPRE with their account confirmation, support details, a Log In button and site link. You will need to separately send each user their password or they can click reset password on the login page to change it.
Important
A user's email address is locked to their account. If a user's email address changes, you will need to create a new account for them.
Edit an Existing User
At any time, an admin may edit a user's existing information, reset their password, or change their role.
- Navigate to System > Users
- Under Actions, select one of the following options

- Edit User: Change first name, last name, phone number, or role
- Change Password: Set a new password for the chosen user
- Delete User: Permanently remove the user and their information from the system
This change takes effect the next time the user logs in.
Settings
The Settings page in the System tab enables you to adjust:
- Timezone - Selecting your local time zone affects scheduled events in VIPRE Cloud, such as timed notifications
- Disconnected Device Interval - How long before non-responsive devices are considered to be disconnected
- Outdated Definitions Interval - How long before current definitions are considered outdated
- Update Agent - Whether to auto-approve new Agent software releases, or notify the admin
Timezone
To change the timezone:
- Choose your timezone from the drop-down
- In the top-right, select Update settings
Important
The selected timezone affects the scheduling of Email Digest notifications and scheduled updates. It does not affect dates and times in the VIPRE Cloud user interface.
Disconnected Device Interval
The Disconnected Device Interval setting is the amount of time that passes before VIPRE Cloud marks a non-communicating device as disconnected. You may choose between 1 and 15 days; the default setting is 3 days.
To change the Disconnected Device Interval:
- Choose a number of days from the drop-down
- In the top-right, select Update settings
Outdated Definitions Interval
The Outdated Definitions Interval setting is the amount of time that passes after a definitions release before VIPRE Cloud considers the current definitions to be outdated. You may choose between 1 and 15 days; the default setting is 3 days.
To change the Outdated Definitions Interval:
- Choose a number of days from the drop-down
- In the top-right, select Update settings
Update Agent
The Update Agent setting determines whether new agent software updates are made available to your devices automatically, or if notification (and manual approval) should occur.
To change the Update Agent setting:
- Select one of the following:
- Auto approve - Makes the latest agent software update immediately available to devices that request an update
- Notify - Sends a notification email to administrators; no new agent software is available until manually approved
- In the top-right, select Update settings
The agent software update process can be customized many ways, depending on your organizational needs and your test environment requirements. See Manage agent software updates for additional information on how the process works, and which options to consider when making this change.
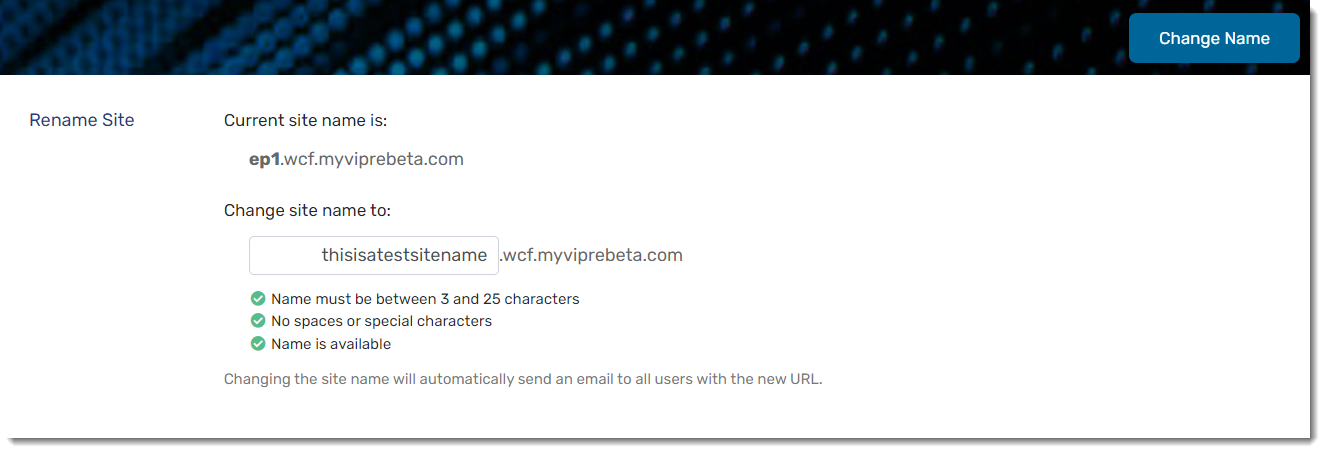
Site Name
You can find your current site name and rename your site if you desire.
Important
Changing your site name will change the URL you use to access VIPRE Endpoint Detection & Response. Once you change the site name, an email is automatically send to all users with the new URL.
To change your site name:
- Navigate to Setup > System > Site Name
- Here is where you can see your current site name
- Under Change site name to: you can add your new name in the textbox
- Your new site name must be between 3 and 25 characters long
- Your new site name must not contain spaces or special characters
- Your new site name must be available
- Click the Change Name button in the top-left corner of the screen
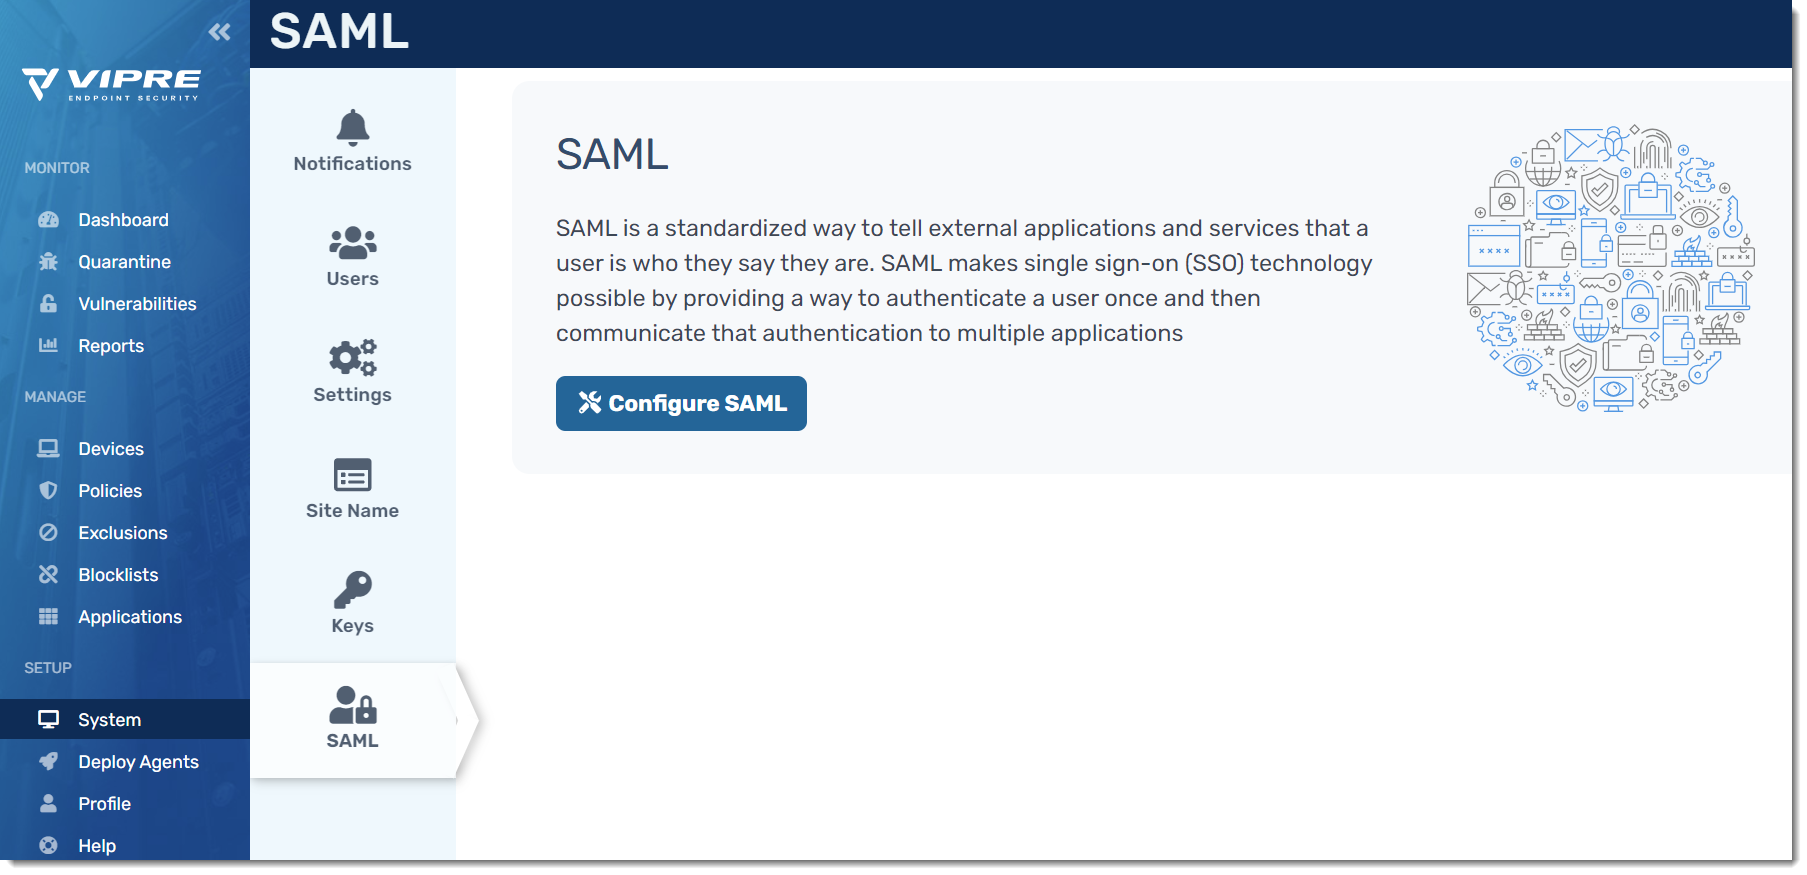
SAML
VIPRE Cloud supports using SAML, allowing for integration with SSO identity providers.
What is SAML?
SAML (Security Assertion Markup Language) is an open standard that allows for authentication and authorization between an identity provider (IDP) and a service provider (SP).
Configuration
SAML configuration occurs in the IDP admin portal and the VIPRE Cloud admin portal.
We've provided Okta-specific instructions for configuring SAML with VIPRE Cloud for single sign-on below. If your IDP is not Okta, you can still use the instructions below as a general guide. If you require further assistance, contact Technical Support.
- Log in to your VIPRE Cloud portal
- On the left-side menu, find SETUP
- Click System, then select SAML
- Click Configure SAML
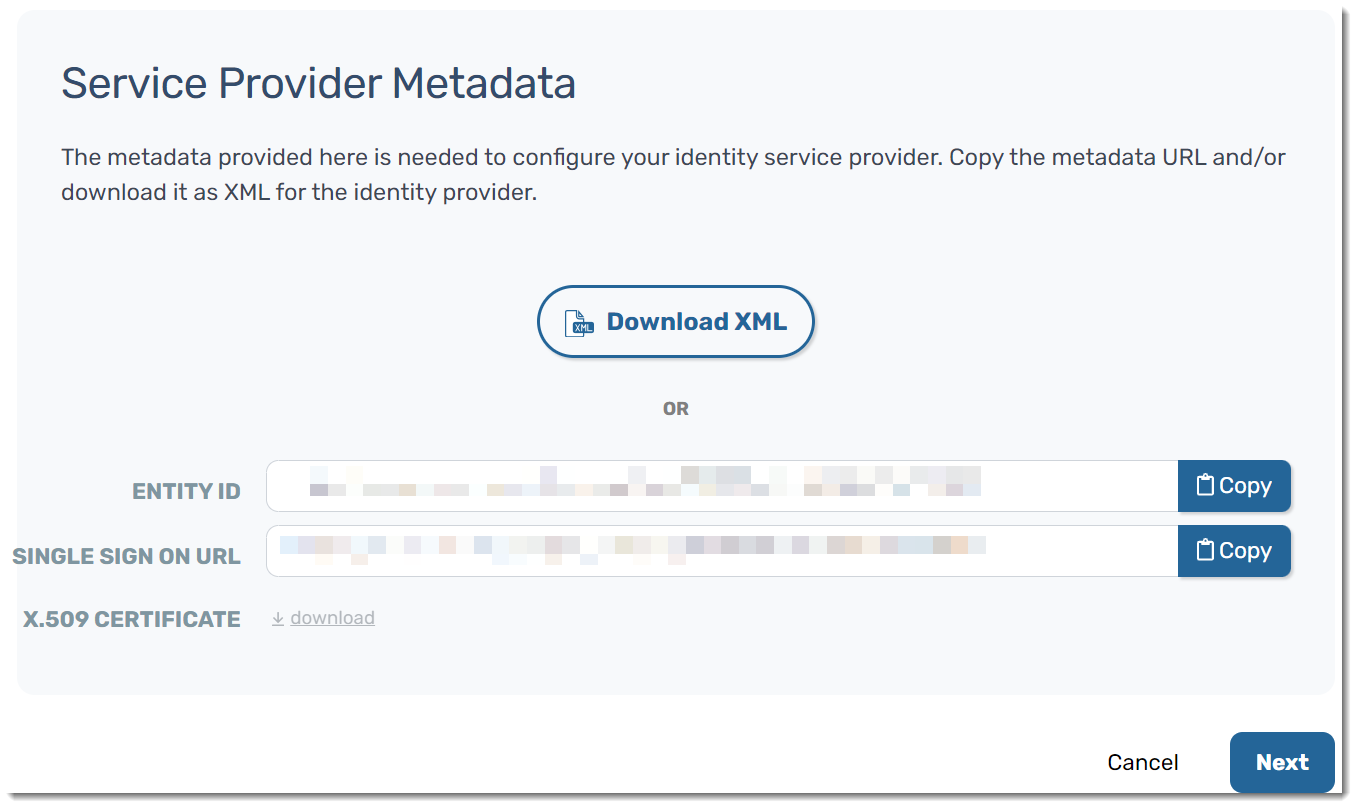
- You will presented with Service Provider Metadata, giving you options to download the XML or copy the metadata and manually add it to your IDP
- For this example, we are going to copy the metadata manually
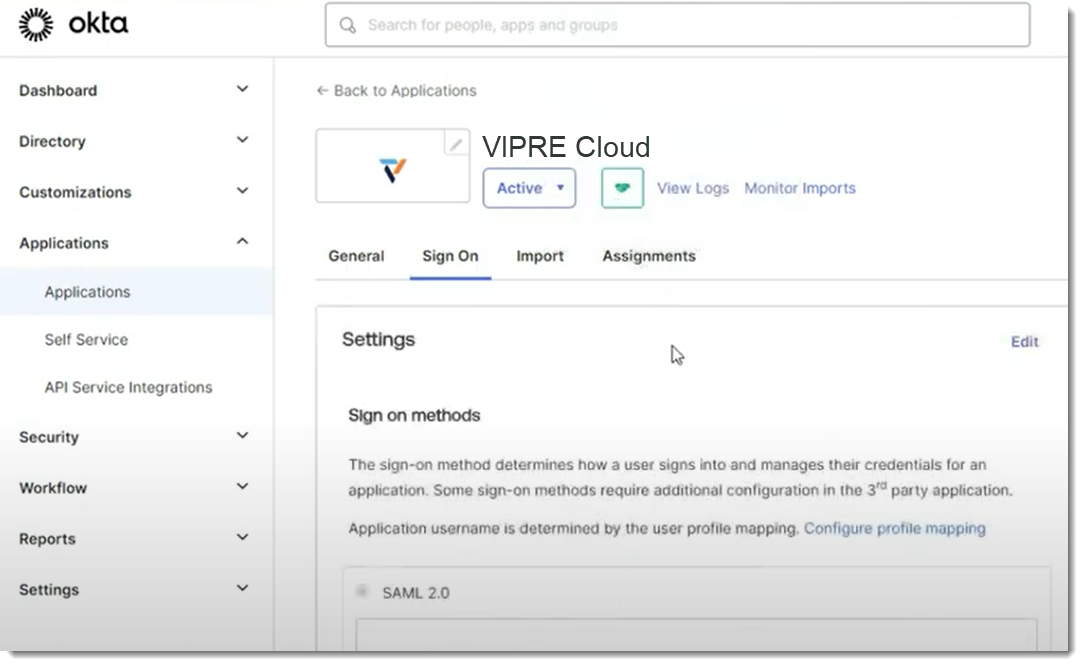
- Open a separate browser tab and navigate to your Okta admin portal
- In your Okta portal, select Applications > Applications on the left-side menu
- In the main part of the screen, select Add Application
- Click Create a New App in the top-right
- Select SAML 2.0 as the Sign on Method and click Create
- On the General tab, under SAML Settings, click Edit
- App name can be any name you want to use to identify the VIPRE Cloud application within Okta
- All other options are based on your organization's desired decisions
- Click Next to get to the Configure SAML screen within Okta
- Go back to the browser tab that has your VIPRE Cloud portal open and copy the Entity ID from the Service Provider Metadata screen
- In the browser tab that you're using for Okta, paste the Entity ID into the Audience URI (SP Entity ID) field
- Go back to the browser tab that has your VIPRE Cloud portal open and copy the Single Sign On URL from the Service Provider Metadata
- In the browser tab that you're using for Okta, paste the Single Sign On URL into the Single sign on URL field
- Under Single sign on URL, Use this for Recipient URL and Destination URL should already be checked by default
- Ensure the following configurations are set in your Okta portal:
- Name ID format should be set to EmailAddress
- Application username should be set to Email
- Scroll to the bottom of the page and click Next
- Click Finish
VIPRE Cloud is now configured in Okta. The next step is to configure Okta in VIPRE Cloud.
- You will see the Okta Application screen; click on the Sign On tab to find the Identity Provider Metadata
- In a separate browser tab, navigate to the MetadataURL from Okta and download the XML file
- Go back to the browser tab with VIPRE Cloud portal and click Next to get to the Identity Provider Metadata page
- Drag and drop the XML file in the box or click Select a file… to upload the XML file you downloaded in Step 22 above

- The Entity ID and Single Sign On URL will be filled in; next to Provider Name, enter how you want this to appear on the VIPRE Cloud sign-in page
- Click Next
- Here, we will test our SAML setup
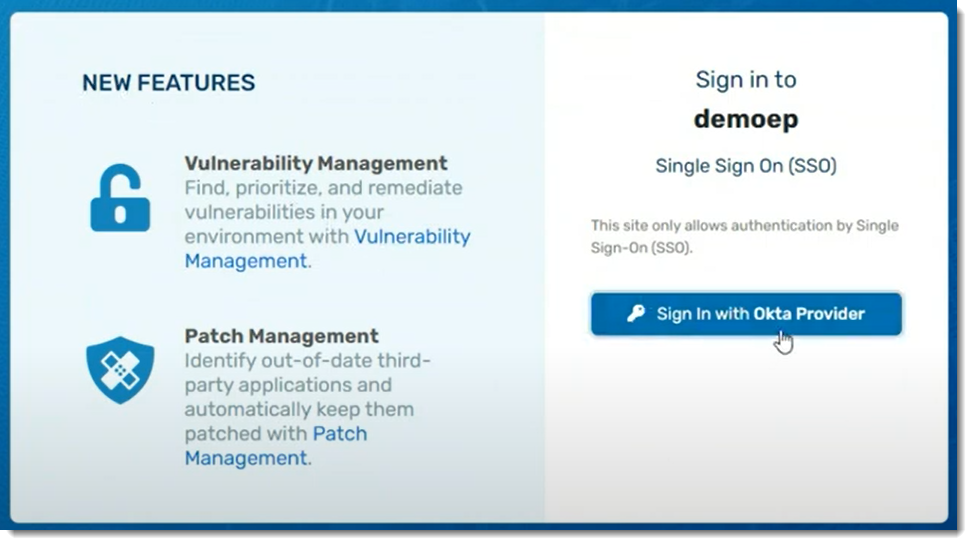
- Step 1: Copy the login URL into a new browser tab
- You should see the login page for your IDP
- Step 2: Enter your credentials and log in to your IDP
- Step 3: Review the results of the test
- Step 1: Copy the login URL into a new browser tab
If you need to review the log or redo the test, you can complete those actions at the bottom of the page.
- Click Next
- The SAML Configuration Summary page allows you to see all of the settings in one place; when you are ready, click Save & Enable
Once SAML is enabled for all users, you can choose to enforce SSO login only, deactivating password authentication.
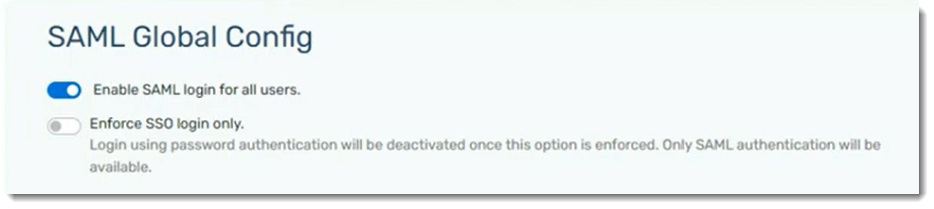
Congratulations! SAML SSO is now configured for use with your VIPRE Cloud site.
EDR+MDR Notifications
EDR+MDR - System
VIPRE Endpoint EDR+MDR's System tab houses several ways to customize your experience. Select a topic below for full details.
Notifications
There are four different types of notifications:
- Threat Detected
- Incident Detected
- Health Digest
- Threat Digest
To add a new notification:
- Navigate to System > Notifications and click the Add Notification button in the top-left corner
- Name your notification
- Select the type of notification with a checkmark
- If you chose Threat Detected:
- Select one or more sources
- AP (Active Protection)
- Scan
- AMSI
- Exploit
- Ransomware
- Slide the severity bar to choose:
- Unknown severity and everything above it
- Low severity and everything above it
- Moderate severity and everything above it
- Elevated severity and everything above it
- High severity and everything above it
- Severe severity
- Select one or more sources
- If you chose Incident Detected:
- Slide the severity bar to choose:
- Unknown severity and everything above it
- Low severity and everything above it
- Moderate severity and everything above it
- Elevated severity and everything above it
- High severity and everything above it
- Severe severity
- Select a Remediation Status:
- Auto-Remediated
- Unhandled
- Slide the severity bar to choose:
- If you chose Health Digest or Threat Digest:
- Adjust the frequency you would like the notifications to be sent
- If you chose Threat Detected:
- Add email addresses of those you want to receive the notifications; emails should be separated by commas when adding more than one
- If desired, you can edit the subject of the email notification with options from the drop-down menu
- Set the scope to determine if the notifications should be across the whole site or only for a specific policy
- Select Preview to see a draft of what the email will look like
- Click Done to return to the previous screen and make changes if desired
- When ready, click Add Notification
You've created a new notification.
Users
EDR+MDR supports two user roles: analyst and admin.
- Analyst role - limited to deploy agents, investigate threats, manage quarantine. Includes ability to view policies and exclusions, but cannot modify
- Admin role - full access to the configuration of the product, including policy creation and editing, exception definitions, and system settings. Includes all permissions of the analyst role
Create a User
As an admin, you may create users with either admin or analyst roles. You will need each user's first/last name and email address. A phone number is optional.
- Click System > Users > Add User
- Enter the user details
- Click Add User
New users will receive a welcome email from VIPRE with their account confirmation, support details, a Log In button and site link. You will need to separately send each user their password or they can click reset password on the login page to change it.
Important
A user's email address is locked to their account. If a user's email address changes, you will need to create a new account for them.
Edit an Existing User
At any time, an admin may edit a user's existing information, reset their password, or change their role.
- Navigate to System > Users
- Under Actions, select one of the following options
- Edit User: Change first name, last name, phone number, or role
- Change Password: Set a new password for the chosen user
- Delete User: Permanently remove the user and their information from the system
This change takes effect the next time the user logs in.
Settings
The Settings page in the System tab enables you to adjust:
- Timezone - Selecting your local time zone affects scheduled events in VIPRE Cloud, such as timed notifications
- Disconnected Device Interval - How long before non-responsive devices are considered to be disconnected
- Outdated Definitions Interval - How long before current definitions are considered outdated
- Update Agent - Whether to auto-approve new Agent software releases, or notify the admin
Timezone
To change the timezone:
- Choose your timezone from the drop-down
- In the top-right, select Update settings
Important
The selected timezone affects the scheduling of Email Digest notifications and scheduled updates. It does not affect dates and times in the VIPRE Cloud user interface.
Disconnected Device Interval
The Disconnected Device Interval setting is the amount of time that passes before VIPRE Cloud marks a non-communicating device as disconnected. You may choose between 1 and 15 days; the default setting is 3 days.
To change the Disconnected Device Interval:
- Choose a number of days from the drop-down
- In the top-right, select Update settings
Outdated Definitions Interval
The Outdated Definitions Interval setting is the amount of time that passes after a definitions release before VIPRE Cloud considers the current definitions to be outdated. You may choose between 1 and 15 days; the default setting is 3 days.
To change the Outdated Definitions Interval:
- Choose a number of days from the drop-down
- In the top-right, select Update settings
Update Agent
The Update Agent setting determines whether new agent software updates are made available to your devices automatically, or if notification (and manual approval) should occur.
To change the Update Agent setting:
- Select one of the following:
- Auto approve - Makes the latest agent software update immediately available to devices that request an update
- Notify - Sends a notification email to administrators; no new agent software is available until manually approved
- In the top-right, select Update settings
The agent software update process can be customized many ways, depending on your organizational needs and your test environment requirements. See Manage agent software updates for additional information on how the process works, and which options to consider when making this change.
Site Name
You can find your current site name and rename your site if you desire.
Important
Changing your site name will change the URL you use to access the EDR+MDR web console. Once you change the site name, an email is automatically sent to all users with the new URL.
To change your site name:
- Navigate to Setup > System > Site Name
- Here is where you can see your current site name
- Under Change site name to: you can add your new name in the textbox
- Your new site name must be between 3 and 25 characters long
- Your new site name must not contain spaces or special characters
- Your new site name must be available
- Click the Change Name button in the top-left corner of the screen
SAML
VIPRE Cloud supports using SAML, allowing for integration with SSO identity providers.
What is SAML?
SAML (Security Assertion Markup Language) is an open standard that allows for authentication and authorization between an identity provider (IDP) and a service provider (SP).
Configuration
SAML configuration occurs in the IDP admin portal and the VIPRE Cloud admin portal.
We've provided Okta-specific instructions for configuring SAML with VIPRE Cloud for single sign-on below. If your IDP is not Okta, you can still use the instructions below as a general guide. If you require further assistance, contact Technical Support.
- Log in to your VIPRE Cloud portal
- On the left-side menu, find SETUP
- Click System, then select SAML
- Click Configure SAML
- You will presented with Service Provider Metadata, giving you options to download the XML or copy the metadata and manually add it to your IDP
- For this example, we are going to copy the metadata manually
- Open a separate browser tab and navigate to your Okta admin portal
- In your Okta portal, select Applications > Applications on the left-side menu
- In the main part of the screen, select Add Application
- Click Create a New App in the top-right
- Select SAML 2.0 as the Sign on Method and click Create
- On the General tab, under SAML Settings, click Edit
- App name can be any name you want to use to identify the VIPRE Cloud application within Okta
- All other options are based on your organization's desired decisions
- Click Next to get to the Configure SAML screen within Okta
- Go back to the browser tab that has your VIPRE Cloud portal open and copy the Entity ID from the Service Provider Metadata screen
- In the browser tab that you're using for Okta, paste the Entity ID into the Audience URI (SP Entity ID) field
- Go back to the browser tab that has your VIPRE Cloud portal open and copy the Single Sign On URL from the Service Provider Metadata
- In the browser tab that you're using for Okta, paste the Single Sign On URL into the Single sign on URL field
- Under Single sign on URL, Use this for Recipient URL and Destination URL should already be checked by default
- Ensure the following configurations are set in your Okta portal:
- Name ID format should be set to EmailAddress
- Application username should be set to Email
- Scroll to the bottom of the page and click Next
- Click Finish
VIPRE Cloud is now configured in Okta. The next step is to configure Okta in VIPRE Cloud.
- You will see the Okta Application screen; click on the Sign On tab to find the Identity Provider Metadata
- In a separate browser tab, navigate to the MetadataURL from Okta and download the XML file
- Go back to the browser tab with VIPRE Cloud portal and click Next to get to the Identity Provider Metadata page
- Drag and drop the XML file in the box or click Select a file… to upload the XML file you downloaded in Step 22 above
- The Entity ID and Single Sign On URL will be filled in; next to Provider Name, enter how you want this to appear on the VIPRE Cloud sign-in page
- Click Next
- Here, we will test our SAML setup
- Step 1: Copy the login URL into a new browser tab
- You should see the login page for your IDP
- Step 2: Enter your credentials and log in to your IDP
- Step 3: Review the results of the test
- Step 1: Copy the login URL into a new browser tab
If you need to review the log or redo the test, you can complete those actions at the bottom of the page.
- Click Next
- The SAML Configuration Summary page allows you to see all of the settings in one place; when you are ready, click Save & Enable
Once SAML is enabled for all users, you can choose to enforce SSO login only, deactivating password authentication.
Congratulations! SAML SSO is now configured for use with your VIPRE Cloud site.
-
Next Step
- Add Button
Check your Usage Data
The Usage screen provides a billing-oriented look at active devices for customer sites over time.
From the main panel, select Usage
The Usage screen defaults to the Billed Sites selection. Review the site summary numbers at the top of the screen; we have Total Sites, Number of Active Sites, and the Peak Count. Compare this information to the site data inventory on the Sites screen.
Sites are active when they have 1 or more devices protected by VIPRE.
Adjust the current view’s statement period by selecting a different month in the top right of the screen.
The ‘totals’ displayed at the top of the screen give you a quick heads-up on the proportion of your active users to inactive customers. The number of peak active devices is the total active deployments billed across all your tenant sites.
Daily Active Devices shows peak active device totals per day.
Select a vertical peak date
Selecting a peak date here filters the information below, allowing you to view a specific day’s device use by site.
By default, All Billed Sites shows the site name, Estimated Seats, peak usage and a small trend graph.
Estimated Seats is the number of client seats manually entered when creating the site. It is not calculated in any way for billing. So, if the number of current peak usage continues to lag behind the estimated seats, it could be time for you to step in and offer remedial services.
Also, note that the peak active devices at the top of this page is the sum of all devices in the Peak column.
Select a site from the list
This opens an individual view of the customer’s daily active devices. Select a report date range by clicking on the current default date next to Statement Period. The Estimated Seats and expiration data are repeated for quick reference.
In the upper right, select the Actions button
Here, you can choose Go to site to navigate into the customer site.
You could use the site analytics to assist and advise the customer. Bringing more devices on line, for example, could help insulate the customer from existing threat—as well as provide an up-sale opportunity for you.
In the Usage screen, select Trial Sites
This feature tracks trial sites in much the same way as billed sites.
Select the site name an active trial
An individual site data window opens. The estimate seats number and the site expiration date also appear beneath the statement period.
Select the Actions button on the upper right of the window
The dropdown menu enables you to navigate into the customer's trial site.
You could, for example, use the site analytics to alert the customer that the trial period is about to expire AND how VIPRE Cloud has helped insulate them from existing threats during the trial period.