Product release information for VIPRE Cloud Mac Agent v11.0.28.404, available February 24, 2021; updated December 14, 2021.
What's New
- Support for macOS Big Sur
- Support for Apple M1 Chip
Special Instructions
Follow up step-by-step instructions below to update your endpoints running macOS to the latest version of the VIPRE Mac Agent.
Step 1: Installation
Whether your endpoints are currently running a previous version of macOS, or they've been upgraded to macOS Big Sur, the steps below walk you through the necessary steps to update to the latest version of VIPRE Cloud Mac Agent. Please note, this process requires action at both the admin-level in the Console and on the endpoint itself.
Endpoint Actions
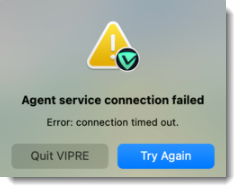
If you have already updated your operating system to macOS Big Sur, you may see the following notification:

- Select Quit VIPRE
Now that the new version of VIPRE is available, you'll need to uninstall the old version then install the new version.
- Open the Applications folder
- Select Utilities
- Double-click Terminal
- In the Terminal app, type the following and press Enter on your keyboard:
sudo /Library/Vipre/Agent/uninst.sh
- Enter your password and press Enter on your keyboard
Admin-level Actions
- From the Deploy Agents screen, select the Create Policy Installer option

- Select the desired policy and click Next
- Click Download Installer
- Run the downloaded installer file to start a VIPRE Mac Agent install on the endpoint; when the installation is complete, the agent will automatically register with VIPRE Cloud
Step 2: Complete the Post-Installation Steps
Due to tightened security requirements in later versions of macOS a few additional install steps are now needed, such as allowing the VIPRE system extension to load and allowing full disk access through Mac System Preferences.
Allowing Full Disk Access
As of macOS 10.14 Mojave, applications no longer have full access to all disk locations by default. Instead, Apple has given users the ability to decide if an application should have that access. For VIPRE, full-disk access is needed to be able to scan all disk locations for malware. Without this access, VIPRE cannot scan all disk locations, including Home and Time Machine backups, and thus may not detect threats in those areas.
- Refer to Related Articles for more details on allowing full disk access.
Allowing the VIPRE System Extension
The first time you run VIPRE on an endpoint, you will need to adjust the Mac's Security Preferences to ensure the VIPRE system extension is allowed to load properly.
- Refer to Related Articles for more details on allowing VIPRE system extension.
Allowing Notifications
When you use macOS Catalina (10.15), you can see notification popups only if you allow them.
- Refer to Related Articles for more information on allowing notifications in macOS Catalina.
System Requirements
| Product or Component | Minimum Requirement |
|---|---|
| VIPRE Endpoint Security Cloud Mac Agent | Operating System:
Your Mac must also have:
|
Known Issues and Workarounds
This section lists issues that are known at the time of release. In some cases, these are bugs that we are working to resolve with a subsequent release. Other items may be due to causes outside of our control, such as bugs with other vendors' software. In all cases, we have tried to provide a workaround for you to consider, should you experience an issue.
If you have questions about a specific issue, please provide the issue ID (if applicable) when contacting our Technical Support team.
Bugs Fixed in this Release
- [VIPREMAC-2076] - Replacement of "legacy system extension" for macOS 10.15.4+
Known Issues in this Release
| Ticket Number | Description | Workaround |
|---|---|---|
| VIPREMAC-2147 | Users who do not update to macOS 11 Big Sur but do install VIPRE with Big Sur support will experience a "System Extension Blocked" error when upgrading to macOS 11 |
|
| VC-7032 | macOS 11.1 is not recognized as macOS Big Sur. UI shows “macOS 11.1” instead. | There is no workaround at this time - Once VIPRE Cloud Console v1.8.0 is released, the next time the Mac agent sends a heartbeat the correct OS name will be shown in the user interface. |