
Welcome
If you're starting out with a trial of VIPRE Endpoint Security Cloud, visit our 30-day trial guide first.
If you've already purchased VIPRE Cloud, whether as part of a bundled solution or a standalone product, click the next step below.
-
Next Step - Protect your Devices
- Add Button
Protect your Devices
When you first use VIPRE Cloud you can choose to first deploy agents using default policies, or you can set up customized policies for use by your agents. This article explains these choices and guides you to your next steps.
First things first: You are not yet protected!
The first time you log in to VIPRE Cloud, you are asked if you'd like to Deploy Agents or Set Up Policies.
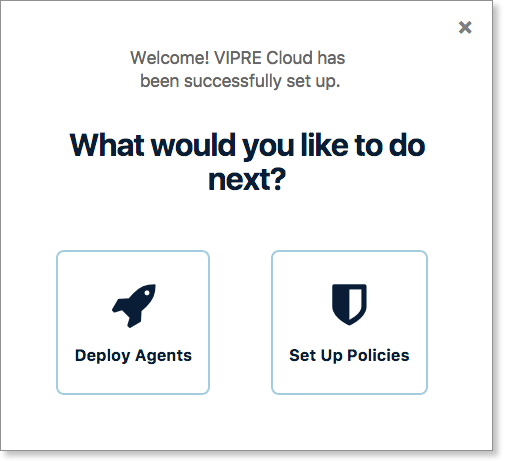
Important: Until you have deployed agents to your devices, VIPRE is not protecting them.
You must deploy an agent to a device to protect it. At this point, VIPRE is waiting on your decision, and you need to take further action before your devices are protected and managed by VIPRE.
About agents and policies
A brief overview of VIPRE agents and the concept of policies.
| What is an agent? | What is a policy? |
| An agent is the VIPRE software that runs on your endpoint devices. For more information, see Introduction to devices and agents. | A policy is a group of settings that controls the behavior of the agent on each device. For more information, see Learn about policies. |
Choose to deploy agents or set up policies first
This criteria will help you determine whether to (1) Deploy Agents or (2) Set Up Policies when you first use VIPRE Cloud.
1. Deploy Agents first
If you're eager to protect your devices with our recommended settings, this is the best option.
Reasons to choose Set Up Policies first
- You want to review any settings
- You are not deploying to a test environment
- You want to customize the end user experience such as whether their system automatically reboots after agent install
Next step for deploy agents
If you are choosing to deploy agents using the default policies, your next step is to follow the steps in this article: Deploy agents.
2. Set Up Policies first
If you'd prefer to review and customize policies before protecting your devices, this is the best option.
Reasons to choose Deploy Agents first
- You're OK using our default policies to start with
- You're deploying to a test environment: it's fine if something unexpected happens
Next step for set up policies
If you are choosing to set up a custom policy before deploying protection to a device, your next step is to see this article: Learn about policies.
Troubleshooting
Can I bring back the "first run" screen?
Yes. Copy and paste the following URL, replacing sitename with the name of your site:
https://sitename.myvipre.com/home/first
When ready, click the next step below.
-
Next Step - Set up Team Access
- Add Button
Team Access
Share Endpoint Security Cloud (ESC) with your team! As part of the onboarding process, this article helps you with understanding the user roles and where to create user accounts.
Team access and roles
As you set up your ESC environment, consider adding other team members to share the management of deploying agents or responding to threats. The roles to choose from are
- Analyst - Assign to users responsible for monitoring and investigating threats, managing the quarantine, and deploying agents. Can also view policies and exclusions.
- Admin - Assign to users responsible for working with policy settings, defining exclusions, and managing user accounts or system settings. This role also includes the permissions of the analyst role.
When adding a user, you will need to provide
- email address
- first and last name
- password
- role
Create users
User management is done within the System tab under Users: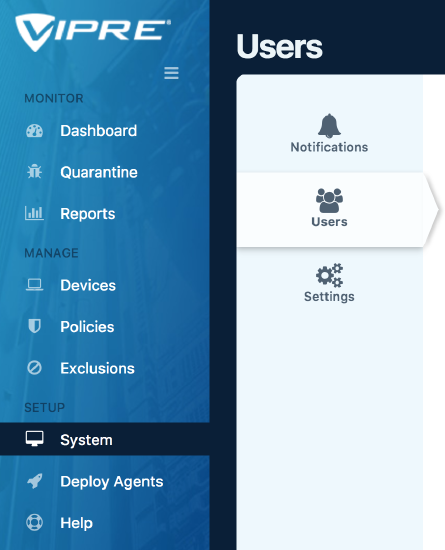
For detailed steps and other considerations on adding users, refer to this article: Add and edit users
When ready, click the next step below.
-
Next Step - VIPRE Cloud's Dashboard
- Add Button
Dashboard
A high-level overview of the Dashboard's major areas and functions. We also explain which sections are historical vs. real-time data, and how to know immediate action is needed.
Front and center in VIPRE Cloud, and the first screen you see when you log in, is the Dashboard. The Dashboard is a one-stop shop to get a quick picture of the overall security posture and health of your environment. Each highly consumable section provides insight into a particular area of VIPRE's protection.
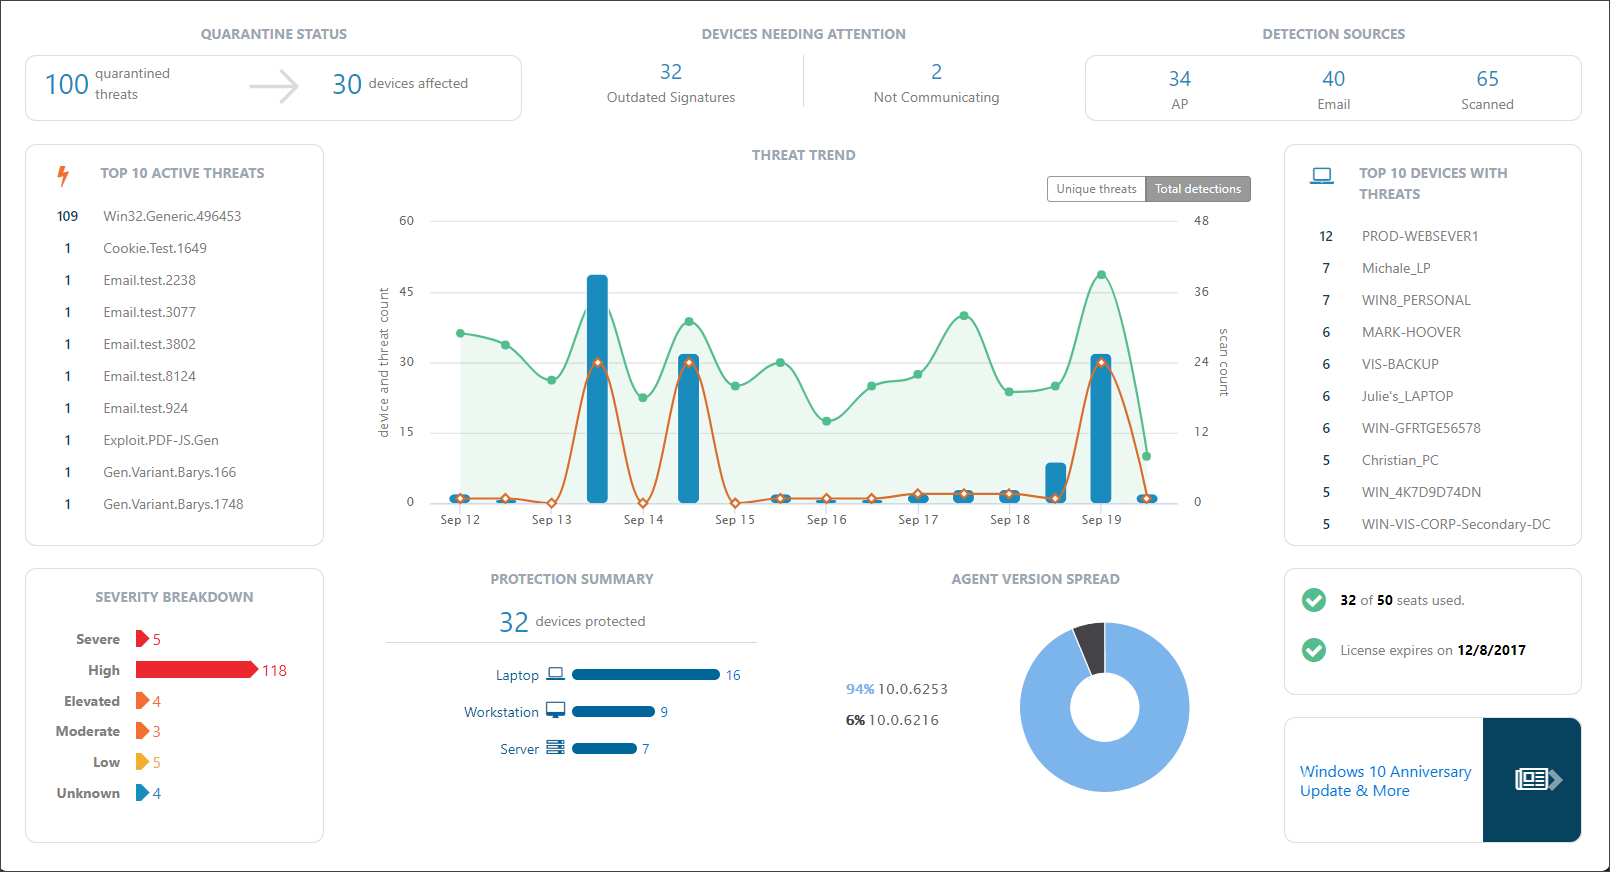
Explore the areas of the dashboard
The VIPRE dashboard is a great starting point to keep your environment safe. Nearly every aspect of the dashboard provides drill down capabilities that provide lots of detail about specific threats.
Click on the images below to see a larger version.
 |
Quarantine Status A real-time summary of the number of threats currently in quarantine and how many different devices those threats were found on.You can drill down here to delete those threats or unquarantine any file that is verified as accidentally quarantined (a false positive). The new quarantine counts will be immediately reflected on the dashboard. |
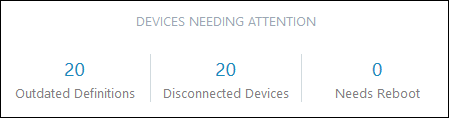 |
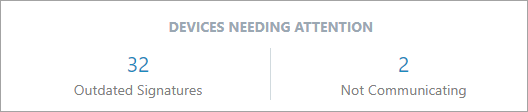
Devices Needing Attention A summary of devices that may be having trouble because they
You will want to investigate these devices to ensure that all of your systems stay protected. As each device issue is resolved, the counts will be updated on the dashboard. |
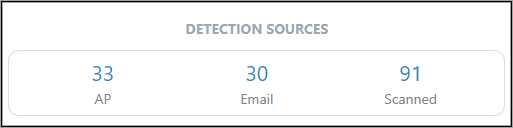 |
Detection Sources A historical summary of discovered threats and which VIPRE engine detected them
|
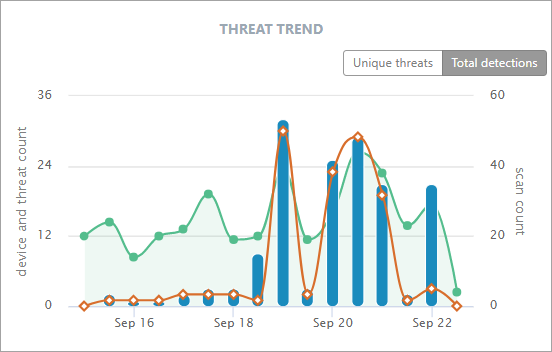 |
Threat Trend A historical timeline summary of the threats we've seen. Each day is broken into 2 x 12-hour periods. The three data groups shown are
You can use the toggle switch at the top-right to swap the graph data between all threats or just unique threats (e.g. if the same virus is found on three endpoints, those will be shown as one unique threat). |
 |
Top 10 Active Threats A historical summary of the Top 10 active threats. Use to ensure that no particular threat is infecting your environment. An excessive count of a threat is an indication of a widespread issue. Drill down into a threat for more details on the threat itself, the devices it has impacted, and how it was detected. |
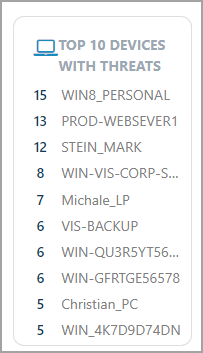 |
Top 10 Devices With Threats A historical summary of the Top 10 Devices with threats. Use this to identify which devices may be particularly susceptible to threats and that may be a particular risk to your environment. |
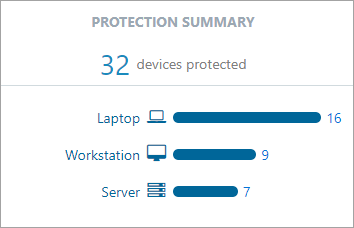 |
Protection Summary View a breakdown of the number of devices in each category that VIPRE is currently protecting. |
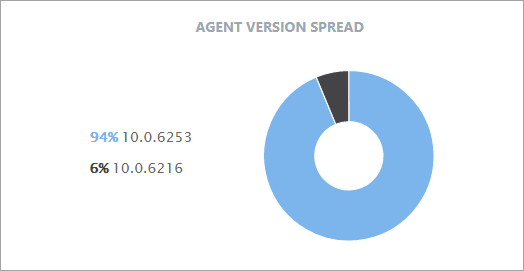 |
Agent Version Spread View a summary of the agent software versions that are currently deployed or available.We are continuously improving our engine detection technology, so it is always a good idea to keep your agents up to date! |
How to view a different date range
By default, the Dashboard shows data for the last seven days. You can drill down on particular items of interest to explore more information and customize your timeline.
When ready, click the next step below.
-
Next Step - Set up Immediate Alerts
- Add Button
Immediate Alerts
VIPRE can send immediate email notifications to alert you when a threat is found. You can specify the threat levels, detection types, and devices for which you want alerts.
Immediate Email Notifications
When VIPRE discovers a threat, an alert is triggered. Alerts are surfaced through various areas in VIPRE Cloud including the Dashboard, Threat Detection Report, Threat Summary Report, and Scan Report.
VIPRE can also notify you immediately of threats found with email alerts, known as Threat Detected Notifications.
When creating a Threat Detected Notification, you have full control over which threat types you will receive emails for and who will get the alert notifications. Immediate email notifications can be customized to meet your needs. Multiple notifications can be created, each with a specific set of criteria, including
- source - Active Protection, scans, or email
- severity - the level of the threat, from lowest (unknown) to highest (severe)
- scope - which agents detected the threat: all agents on your site, or those in specific policies
The subject of the email uses the name of the notification you create. Each notification can be sent to one or more email addresses or email aliases (comma-separated).
Benefits of the Threat Detected notification email
The Threat Detected Notification email contains details on the threat found. Links within the email take you directly to the threat details view within VIPRE Cloud. This enables you to quickly and easily perform an immediate investigation to quickly determine if this is an isolated incident or a widespread threat.
With the flexibility of the notifications system, you can choose to be alerted on only critical severity levels. Or, you may choose to have notifications for one policy emailed to personnel responsible for a particular group of devices and another set of notifications emailed to another individual responsible for the devices in other policies. Of course, with the options available there are many combinations that can be used to accommodate your specific needs.
Set up Email Notification
Notification setup is found within the System tab, under the Notifications sub-tab.
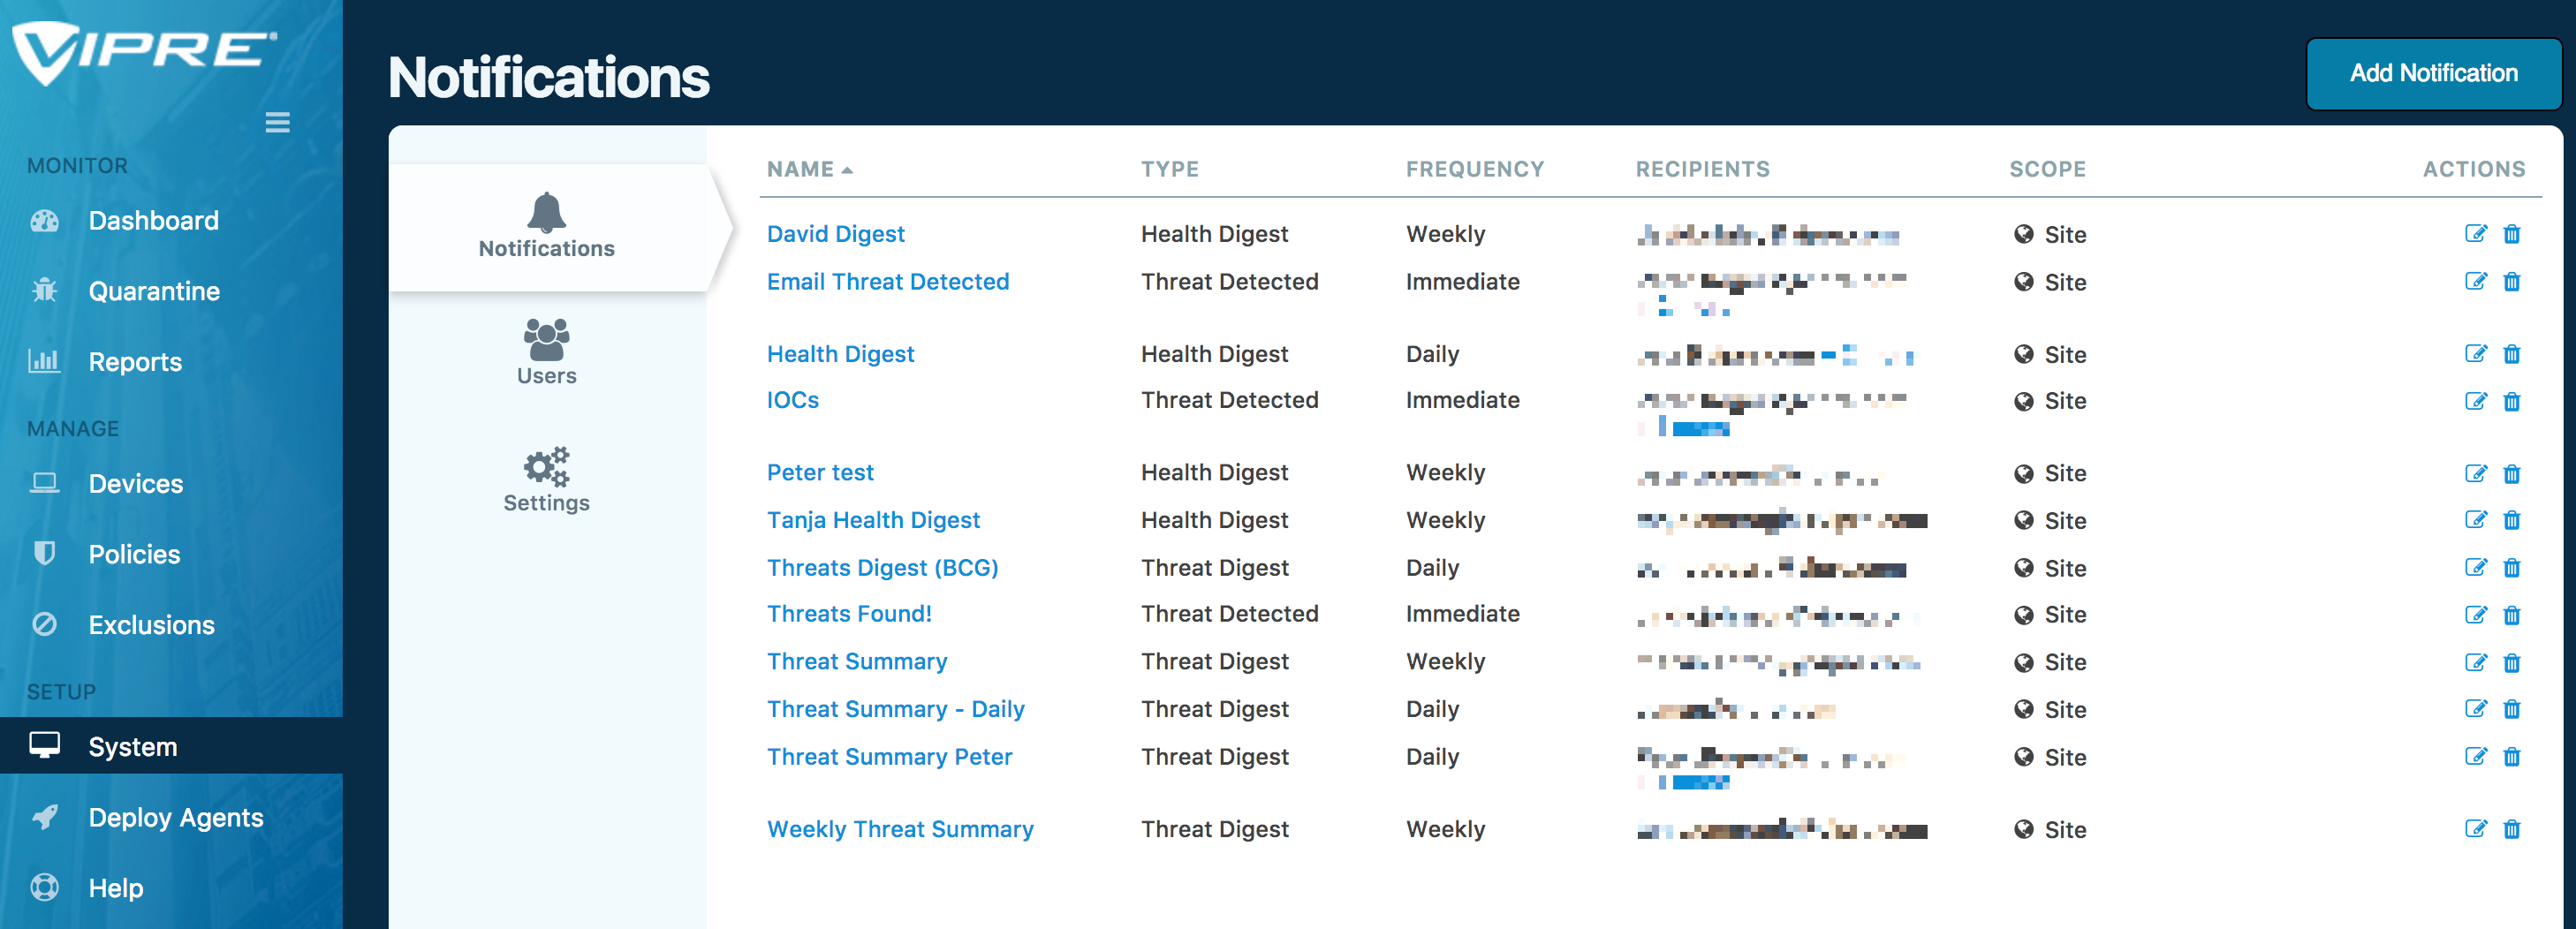
Click on the Add Notification tab at top right, ensure the Threat Detected notification type is selected, then configure your Threat Detected Notification to your needs.
Recommendations
- At a minimum, we recommend you set up alert notifications for threat categories Elevated through Severe. Most threats will be immediately blocked and/or quarantined, but it's a good idea to stay on top of new threats as they come in to ensure that quarantined files don't start to pile up and side effects don't cause system issues.
When ready, click the next step below.
-
Next Step - Threat Response
- Add Button
Threat Response
What threat response entails, and how VIPRE Cloud can bolster your defenses against different types of threats. It also gives direction on where to begin investigating when threats do occur.
Monitoring Threats
VIPRE provides a couple of handy ways to alert you to newly-discovered threats: you can look for them in our dashboard or you can have threat notifications delivered to you via email (as either real-time threat alerts or a daily threat summary). The email alert channel is a great way to stay on top of threats as they happen, and reduces the need to spend time proactively working with the console. Email alerts however allow you to instantly drill down on relevant data, which leads you right back into the console where you can respond to and remediate the discovered threats. Our discussion here will focus on using the dashboard to monitor and respond to threats, whether you are brought to the dashboard by an alert or go there directly.
Monitoring Threats with the Dashboard
The first line of defense in responding to threats involves keeping a close eye on the information displayed in the VIPRE dashboard. Use the dashboard to drill down and view the appropriate level of detail when investigating or remediating quarantined threats in your environment.
Some of the most common threats include
- Email-based threats
- Network-based threats
- Device-based threats
Email-based Threats
The most common type of malware attack is sourced from email messages. Malware authors attempt to coerce users into triggering attacks through the use of malicious attachments or suspect URLs. Attackers use these email techniques in order to gain a foothold on the endpoint system.
If VIPRE discovers a suspicious file attachment or URL in an email, it will remove and quarantine the attachment or replace the URL with a warning, thereby eliminating the risk that an inattentive user might click on the threat.
Network-based Threats
Malicious links in email or suspicious websites can trigger network-based exploits. There are also direct network exploits, such as a recent Server Message Block (SMB) exploit leveraged in the WannaCry ransomware breakout. Any over the air attack on a network device (man in the middle, Bluetooth attack, packet sniffing) is also considered a network-based threat.
VIPRE will block many types of network-based threats and prevent network traffic from entering a target device. No action is typically required in this case.
Device-based Threats
A device based attack involves the activating of malicious content on a device. This could occur through the transferring a file from a physical device, such as a USB flash drive, or from a remote file share.
File-based threats found on a device will be quarantined, and processes behaving in a malicious manner will be stopped. Quarantined threats should be reviewed regularly and action is taken to delete the threat or, in the case of a rare false positive, unquarantine the threat.
Respond to Threats
To respond to threats, be sure to monitor real-time threat data under the VIPRE dashboard or the Quarantine screen. In the Quarantine screen, you can search for threats according to their severity, category, or threat source.
In the VIPRE dashboard, be sure to watch the following areas for indicators that something is amiss.
.png)
To protect your environment, VIPRE Cloud filters suspicious threats and displays the information on the Quarantine screen. Use the Quarantine screen to perform any of the following tasks
- View threat detail
- Delete a threat
- Search for threats
- Ignore a threat


Threat Severity Levels
Detected threats are assigned a severity level which is useful for triage. The levels, which are described below, are labeled as Severe, High, Elevated, Moderate, Low, and Unknown.
| Severity level | Description |
| Severe | Severe risks are typically installed without user interaction through security exploits and may allow an attacker to remotely control the infected machine. Such risks may allow the attacker to install additional malware and use the compromised machine to participate in denial of service attacks, spamming, and botnets, or to transmit sensitive data to a remote server. The malware may be cloaked and not visible to the user. These risks severely compromise the system by lowering security settings, installing 'backdoors,' infecting system files or spreading to other networked machines. A severe risk should be seriously considered for immediate removal as it may completely compromise your privacy and security by allowing an attacker to remotely control your machine, exploit it for illicit purposes, or make dangerous changes to your computer without your knowledge or consent. |
| High | High risks are typically installed without user interaction through security exploits, and can severely compromise system security. Such risks may open illicit network connections, use polymorphic tactics to self-mutate, disable security software, modify system files, and install additional malware. These risks may also collect and transmit personally identifiable information (PII) without your consent and severely degrade the performance and stability of your computer. High risk should be seriously considered for immediate removal as it may compromise your privacy and security, make dangerous changes to your computer's settings without your knowledge or consent; or severely degrade your computer's performance and stability. |
| Elevated | Elevated risks are typically installed without adequate notice and consent, and may make unwanted changes to your system, such as reconfiguring your browser's homepage and search settings. These risks may install advertising-related add-ons, including toolbars and search bars, or insert advertising-related components into the Winsock Layered Service Provider chain. These new add-ons and components may block or redirect your preferred network connections, and can negatively impact your computer's performance and stability. Elevated risks may also collect, transmit, and share potentially sensitive data without adequate notice and consent.An elevated risk should be considered for removal or remain quarantined as it may compromise your privacy and security, make unwanted changes to your computer's settings, or negatively impact your computer's performance and stability. |
| Moderate | Moderate risks are often bundled with functionally unrelated software or installed without adequate notice and consent and may display unwanted advertising on the user's desktop. Such risks may track users' online browsing habits and transmit non-personally identifying data back to a server in order to target advertising. These risks may be configured to start automatically with the operating system, use an auto-updater that the user cannot control, or install other functionally separate programs without adequate notice and consent. A moderate risk should be considered for removal or remain quarantined as it may negatively impact your privacy and security or make unwanted changes to your computer's settings. |
| Low | Low risks should not harm your machine or compromise your privacy and security unless they have been installed without your knowledge and consent. A low risk may be a program, network tool, or system utility that you knowingly and deliberately installed and that you wish to keep. Although some low-risk programs may track online habits -- as provided for in a privacy policy or End User License Agreement (EULA) -- or display advertising within the applications themselves, these programs have only vague, minimal or negligible effects on your privacy. Low risks may also be cookies, which can be used to track your online activities, though without identifying you personally. A low risk may be kept or removed at your discretion. A low risk has only vague or minimal privacy and security effects. If this is a program that you knowingly and deliberately installed, you may consider keeping it. If it is a cookie, then you may consider removing it. |
| Unknown | Unknown is assigned to threats that may not have enough intel, or metadata, to be able to determine the appropriate severity level. For those threats, rather than assign a level that may not be appropriate, VIPRE assigns them to Unknown so that Administrators or Threat Researchers know to review these as carefully as the threats reported at the higher severity levels. |
Further Investigation
Since VIPRE proactively blocks threats before targeted devices are impacted, most threat response is limited to cleaning out the quarantine and handling the occasional false positive. However, there are a few circumstances where the additional investigation might be desirable:
- In some cases, VIPRE is not able to completely clean up all files related to a specific threat, for example, if locked files are in use, etc. In this scenario, additional action may be required on the affected machine to finalize the threat clean up.
- You may discover that a particular device or user seems to be repeatedly affected by threats again and again. This could be caused by system misconfiguration, user carelessness, or some underlying, undetected problem. If you see repeated infections of a particular target system (the timeline device view is a good way to discover this), you may wish to look more deeply at the underlying causes.
When ready, click the next step below.
-
Next Step - Devices & Agents
- Add Button
Devices and Agents
What are devices to VIPRE Cloud? A device, also known as an endpoint, is protected and managed by VIPRE. Examine the monitoring views and actions available for devices.
Devices and how they relate to agents
Devices, or endpoints, are protected by VIPRE with agent software. When first implementing VIPRE in your environment, the VIPRE agent software needs to be deployed to each of your devices in order to protect them.
Throughout VIPRE Cloud, devices refers to your endpoints and their health; agents refers to the VIPRE software on your endpoints and the health of that software.
View devices protected by VIPRE
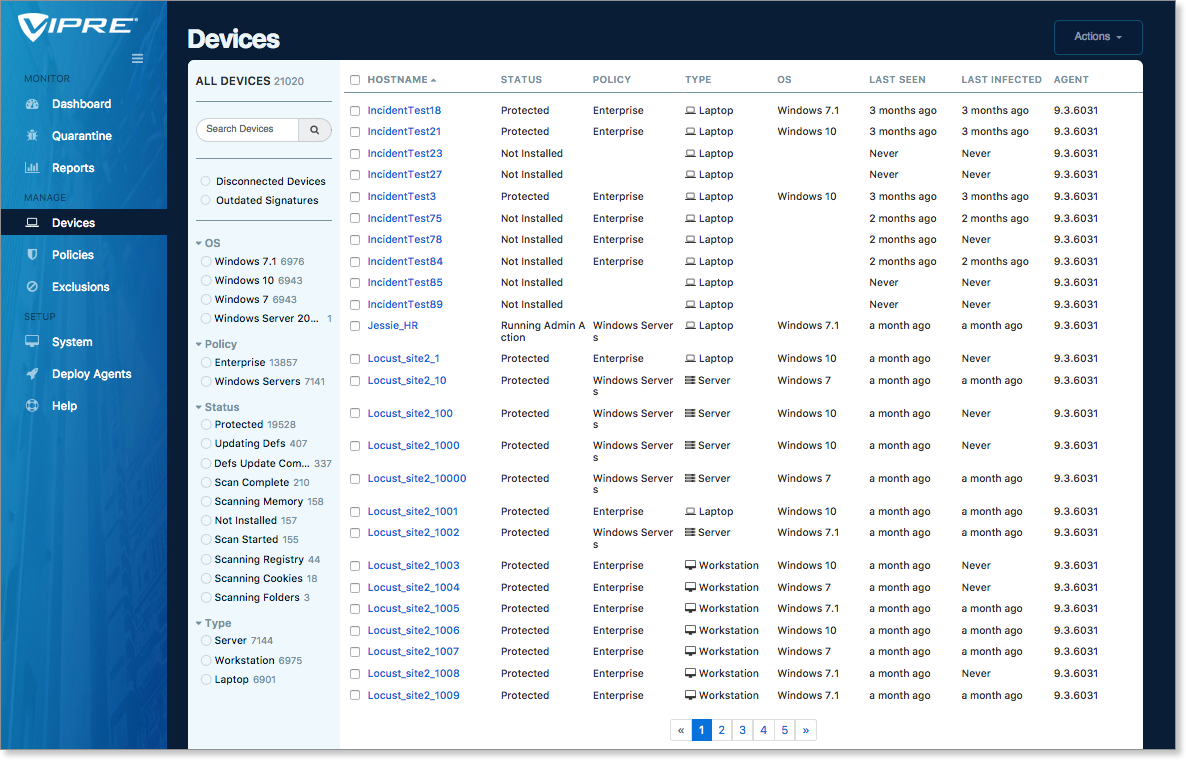
The Devices page shows you an overview of every device that has checked in with VIPRE Cloud. You can quickly scan the columns to learn many details on the behavior of your devices.
You can see the device name, whether it is protected, which policy is applied to it, what type of device it is, the Operating System version, etc.
Filtering devices
Because you can potentially have hundreds (or thousands) of devices on your site, it is often necessary to filter the list to limit the visible information. You can select filters to focus your view, and very quickly find devices that need action, are outdated, are disconnected, or have some other problem.
Exploring device details
Once you have located a device you'd like more information on, simply click the name of the device to drill down into it. From here, you're taken to the device details, shown on the Summary tab.
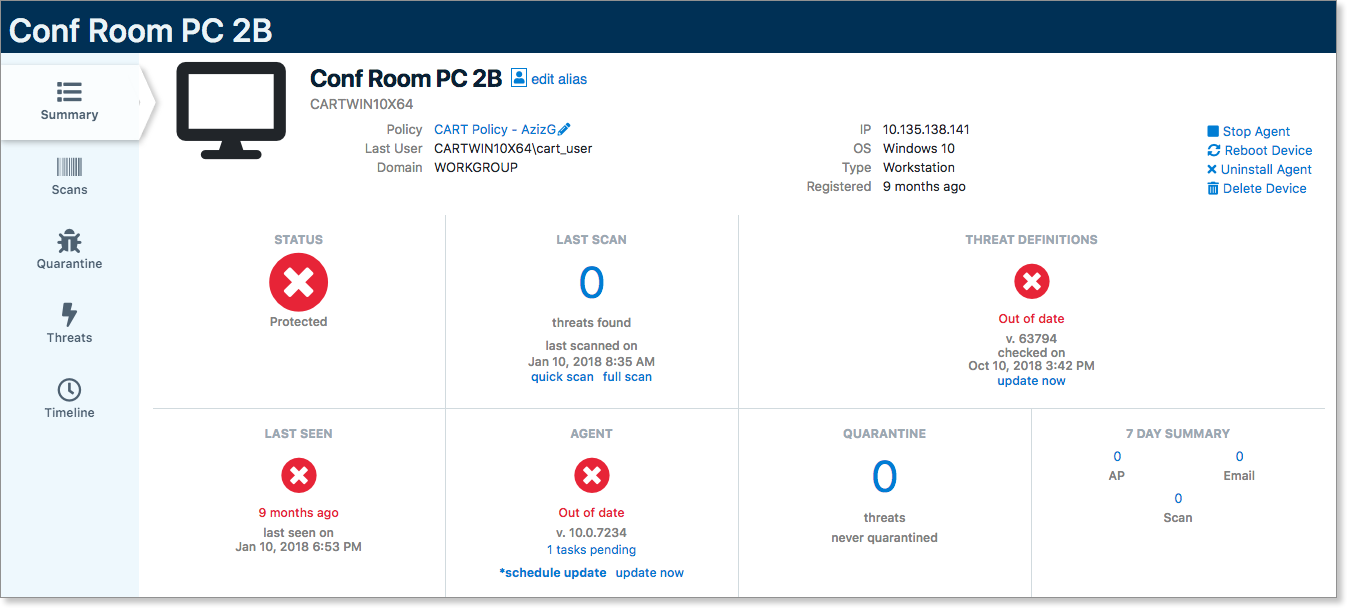
The device's summary screen is like a mini-dashboard for the selected device. The STATUS section in the top left shows an immediate all-in-one status of the device. Is it good to go, or does it need looking into?
The other sections of this screen provide further key information: Scan time, threat definitions, last time the device checked in, agent software version – all the top items you'll want to check when determining at a high level if a device is in performing properly.
Along the top, you have some network and admin-level items: Domain, IP address, OS. The quick-action links in the top right give you single-click common actions to perform on that device: Stop the agent, reboot the device, or uninstall the agent.
The tabs on the left show even more information for each category: Latest scan details, items in quarantine on this device, threats found, and a super-useful vertical timeline that shows the history of the device.
From this screen, you can also assign an alias to the device. Refer to Related Articles for more information on using aliases.
When ready, click the next step below.
-
Next Step - Policies
- Add Button
Policies
EDR - Policies
A policy is a group of settings that controls the behavior of the VIPRE agent on each device. All agent options are controlled through policies, including:
- scheduled scan times
- amount of user interaction on the agent
- whether to remove incompatible software during agent install
- device control and more
Policies are often created with types of devices in mind, such as servers, laptops, and desktops. You might also create policies that collect more specific groups of devices in your infrastructure, like "Windows 10 desktops" or "Sales MacBooks."

A policy is tailored to the group of devices that it protects. Every agent must be assigned a policy. You can define any number of policies for your site to meet your specific needs.
Exploring Policies
The Policies tab (Manage > Policies on the left side menu) in VIPRE Cloud is your spot for managing policies. Select the desired operating system to see which policies relate.
Once you've chosen and selected a policy to review, under Summary, you will see a list of all your policies along with default policy assignments, plus a quick summary of which protection features are enabled for any given policy. From here, you can drill down to see detailed policy settings as well as create or clone policies to create new, custom policies.
Policies available at first launch
VIPRE Cloud initially provides two predefined policies:
- Default Enterprise - ideal for most workstations and laptops - this is also the default policy to which all but servers will be assigned
- Default Servers - settings that consider specific server hardware/software needs
These policies are based on the most common settings needed for these types of devices. They're also a good jumping off point for creating your own custom policies.
Policy Defaults
When agents are deployed, you get to choose whether a specific policy is pre-assigned to the agents you are deploying, or whether the agent will adopt the default policy. If you allow the default policy, then the agent will report back the type of system it was deployed to (server, laptop, desktop), and the device will be automatically placed into the appropriate policy (as defined by the default policy settings on the Summary tab).
If you drill down on a specific policy, you can see all the devices associated with that policy and easily assign additional devices to that policy. When you assign a new policy to a device, the agent will pick up the new policy the next time it checks in with VIPRE Cloud.
You can also edit specific policy settings to define the behavior you want for the agent. When working with policies, you will see that related settings are grouped together for easier management.
Settings Groups
The list below shows the group names and sub-groups, along with a brief description of their purpose.
Important
Available settings will vary based on the operating system selected for the policy.
-
Agent
- User Interface - show agent icon on taskbar or menu bar; allow/disallow user to perform manual scans; cancel, pause, and resume scans; customize reboot message; enable automatic reboot
- User Prompts - show balloon messages, customize reboot message, automatic reboot
- Permissions - allow/disallow user to open agent UI; manage quarantine, exclusions, scan schedules, scan history, or remediate manual scans
- Operating System - disable Windows Defender, integrate with Windows Security Center, NT event logging; show agent in installed programs; wake from sleep for scheduled scans, laptop power save mode
- Uninstall Protection - when enabled, requires an autogenerated password to uninstall the VIPRE Agent
- Data Retention - auto-delete quarantine and scan history data; specify length of time for data retention when auto-delete is enabled
- Updates & Communications - control frequency of definitions and agent software updates, enable use of beta agents when available
- Incompatible Software - specify if incompatible software is automatically removed when agent is installed; set reboot behavior when removing incompatible software
- Tamper Protection - enabled by default; prevents modifications of your computer's local product folders, registry keys, and virtual memory where the VIPRE Agent resides
- Device Control - limits how users may transmit sensitive information to third-party devices, as well as protects the endpoint from potential third-party threats
-
Scanning
- General - on demand (user right-click option), USB drives on insert, randomize scheduled scan times, handling of missed scans
- Quick Scan - set day and time, locations, and item types (e.g., cookies, rootkits, processes)
- Full Scan - set day and time, locations, and item types (e.g., cookies, rootkits, processes)
-
Active Protection
- Active Protection - enable/disable active protection and set level to high-risk extensions only, execution only, or all touched files; enable runtime active protection, enable disinfect on ATC code buffer detections, configure runtime process scanning allowing you to scan the process executable on launch, scan the process commandline arguments on launch, and scan the process memory
- Interaction - control the amount of user interaction allowed with Active Protection
- HIPS[Removed as of Windows Agent v13.4+] - enable/disable the Host Intrusion Prevention System and control how code injection is handled (e.g., allow, block, prompt)
- AMSI - enable malicious script blocking with Microsoft AMSI protection
- Exploit Protection - enable detection and blocking of program exploitation attempts
-
Web/DNS Protection (Windows Only)
- Network Attack Protection - enable/disable NAP, configure granular response control independently for different threat types, enable enhance detections, inspect encrypted server traffic
- DNS Protection - enable/disable DNS traffic filtering
- Web Protection - enable/disable Malicious URL Blocking for HTTP or HTTPS traffic, specify ports to filter, enable Man-in-the-Middle engine to intercept encrypted traffic; legacy browser extensions have been[Removed as of Windows Agent v13.4+]
- Logging & Interaction - enable logging, or allow the user to configure
-
Web Access Control (Windows Only)
- Web Access Control - enable/disable web access control
- Access Control Level - select a level to block specific website categories
- Scheduling - have Web Access Control run 24 hours a day or set a specific schedule
-
Email Protection (Windows Only)
- General - enable/disable email and anti-phishing
- Clients - enable/disable protection for Microsoft Outlook or other email clients
- Interaction - allow user to enable/disable
-
Threat Handling (Windows Only)
- Remediation - by item type, specify whether to allow, report only, quarantine, or delete items that are detected as possible threats
-
Patching (Windows Only)
- Application Scanning - enable/disable application scans to look for security vulnerabilities
- Application Updates - enable/disable automatic application updates based on a schedule
-
EDR (Must subscribe to VIPRE Endpoint Detection & Response or EDR+MDR)
- Extended Investigation - enable/disable features to support extended investigations, including event and alert collection, correlation, and incident creation and management
- Remote Shell (Windows Only) - enable/disable remote shell access; you can also limit the set of available commands to only low-risk commands
- Ransomware Protection (Windows Only) - enable ransomware protection to help VIPRE block ransomware more effectively and automatically roll back any changes made by the ransomware; when disabled, VIPRE only blocks encrypted actions; however, when enabled, VIPRE stops further encryption and restores any previously encrypted files
-
Firewall (Windows Only)
- General - enable firewall
- Interaction - determine how users can interact with the firewall via the Agent
- Logging - enable/disable logging for events or port scans
- Application Rule Default - rules to apply for applications
- Advanced Rules - rules to set communication direction, application, protocol, ports
-
IDS (Windows Only) [Removed as of Windows Agent v13.4+]
- General - enable intrusion detection system
- Intrusion Actions - set response based on priority of detection
- IDS Rules - view or disable rules
-
Next Step - Exclusions
- Add Button
Exclusions
Learn what exclusions are and why it is important to have them. Understand how exclusions are handled with VIPRE. Includes recommendations on how to determine what exclusions you may need in your environment.
What exclusions are and why have them
Exclusions are lists of items such as files, domains, and processes that VIPRE should ignore; in essence, telling VIPRE what not to scan.
Certain types of software can be impacted by antivirus programs. Some software may experience strange behavior. For example, processes may be blocked by the antivirus programs based on behavior traits exhibited by the software; file lock contention may occur during scans; and so on. This is especially common with certain categories of software such as server software, databases, data backup, key loggers, and more that either require exclusive access to specific files or that use files that, although benign, contain patterns that antivirus software sees as suspicious.
How exclusions work
Exclusions are communicated from VIPRE Cloud to the agents as part of the policy. As the agents protect your devices, the exclusions are applied.
VIPRE provides an initial set of exclusions that is applied to all devices for resources that we know to be potential issues. Our own virus definition files, for example, would lead VIPRE to believe it had found malware if it were not excluded.
Administrators can create custom exclusions to accommodate the specific needs of their organization. Exclusions are defined in an exclusion list. That list is then associated to one or more policies (scope=policy). Alternatively, a list may be associated to all devices (scope=site).
Exclusion lists provide the flexibility to define exclusions once, and apply them to as many policies as required.
How to know what to exclude
Knowing what needs to be excluded from antivirus is not always intuitive. Sometimes VIPRE will tell you it blocked a process or quarantined a file that you know to be benign; in this case you can simply add that program or file to the exclusion list. In other cases, however, software may not work correctly for non-obvious reasons.
When first deploying, consider the following
- test - deploy to a group of test devices for your environment
- monitor - perform normal activity on the test systems to determine if VIPRE blocks or impacts application behavior - you may need to disable VIPRE to determine if it is the cause of any observed odd behavior
- research - look for vendor recommendations for third-party software used in your organization. Some vendors maintain a specific list of resources to exclude for antivirus programs. For example, Microsoft maintains a Microsoft Anti-Virus Exclusion List for their software.
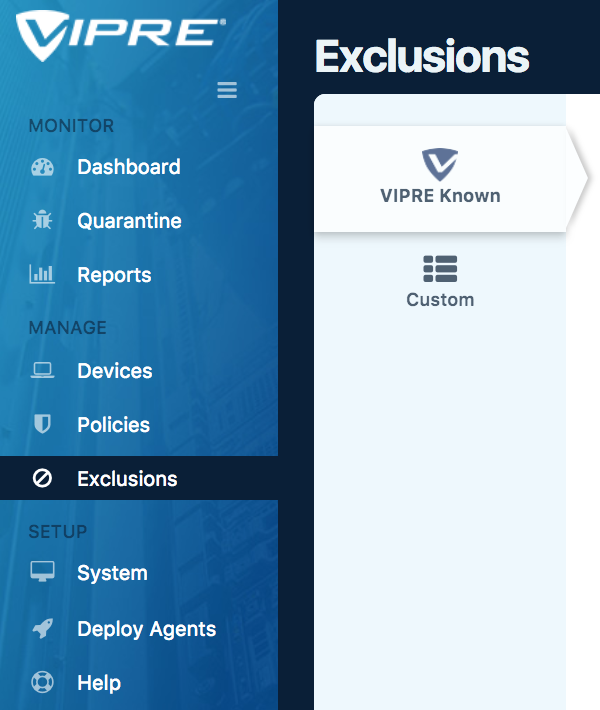
Predefined and custom exclusions
Exclusions are viewed and managed from the Exclusions page. Custom lists can be created for Windows and Mac policies. For Windows based policies, a VIPRE Known list is provided.
- VIPRE Known - read-only exclusions for Windows OS that come with VIPRE Cloud, curated by the VIPRE Team. VIPRE manages both the default VIPRE Base Exclusions and VIPRE Server Exclusions lists. We push out additions to these exclusions that work across our entire customer base.
- Custom - any lists of exclusions that you create
Your instance of VIPRE Cloud comes with VIPRE Base Exclusions, which applies to all of your Windows devices. Additionally, VIPRE Server Exclusions is automatically assigned to Windows Servers (through the Windows Servers policy, one of the default policies included with VIPRE Cloud).
As suggested in this article, the need to create custom exclusions is common practice when using antivirus software. When adding exclusions, be sure to follow your vendors' specific recommendations. Note however that excluding resources at a higher level than what is recommended can be a security exposure. For example, do not exclude items at the directory, or folder, level when the vendor lists specific files in the folder.
When ready, click the next step below.
-
Next Step - Reports
- Add Button
Reports
VIPRE Cloud's interactive analytics reports are the best way to review what VIPRE has learned about your security health. This article serves as an introduction to each.
You can access VIPRE's reports at any time through the Reports menu item on the left, or by clicking most items on the Dashboard, or from within your email digests.
In fact, VIPRE Cloud uses these report screens as its primary method of displaying data. Almost every informational link within VIPRE Cloud displays additional data through a report view. In this way, reports are a primary method of interacting with VIPRE Cloud and navigating through current and past threat trends.
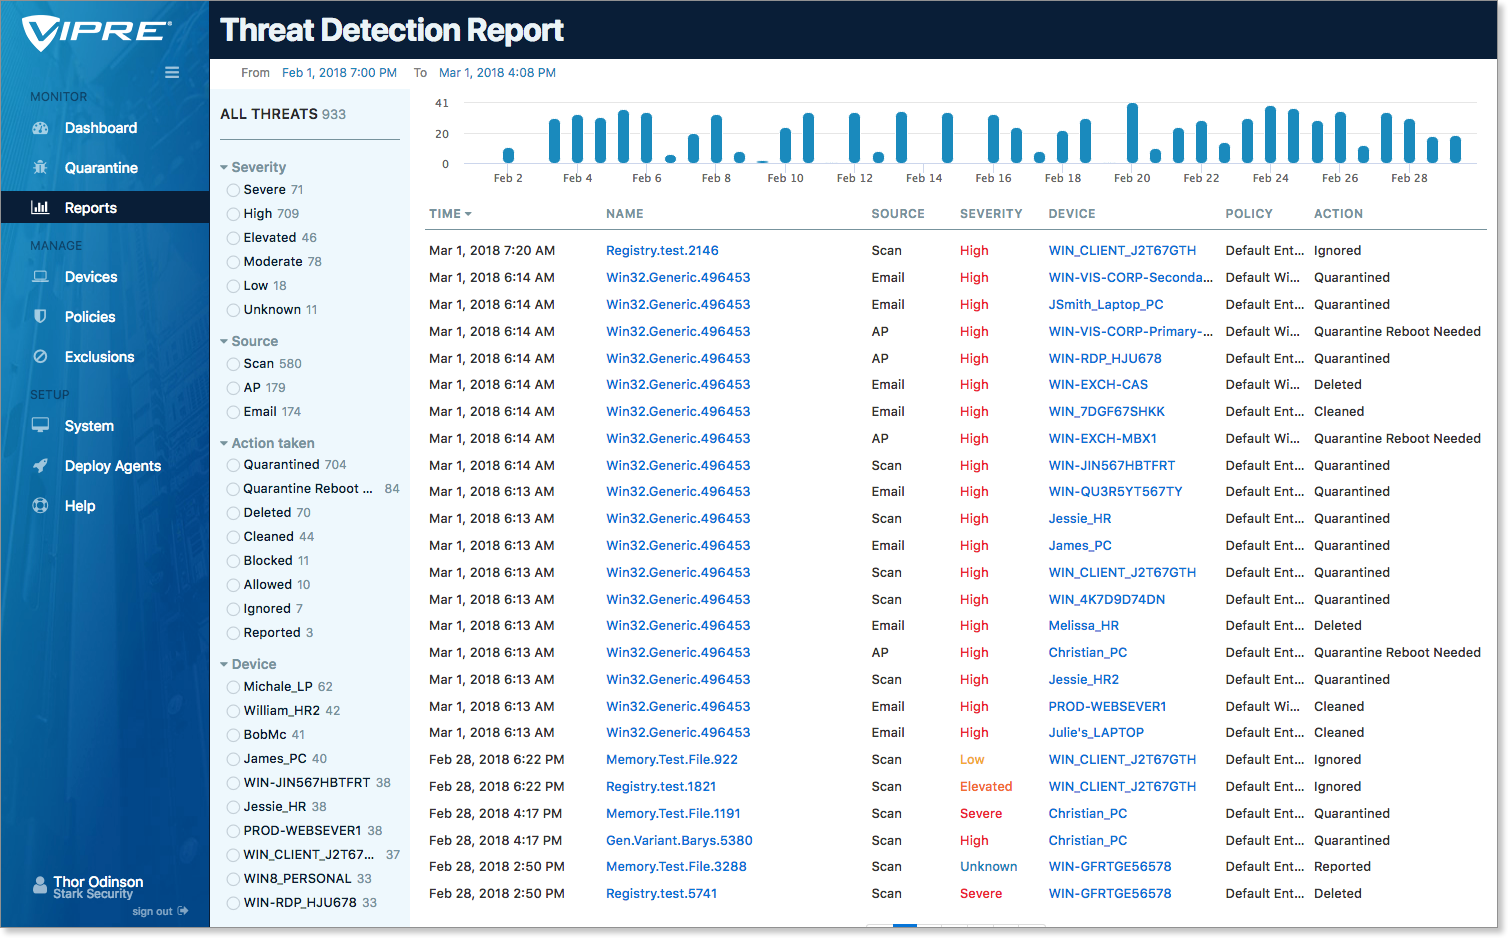
Threat Detection Report
The Threat Detection Report provides an easy-to-understand summary of how your systems were targeted, with a day-to-day timeline of detected threats. Quickly filter by Threat Level, Source, Action Taken, or Specific Device using the filters on the left. Adjust the date range on the upper left of the display to help narrow down a threat timeframe.
Clicking a filtered item immediately updates the rest of the display allowing you to see the most relevant information. For example, if a particular segment on the timeline displays a disproportionately high number of threats, clicking on the blue bar for that range immediately filters the view to only that time period.
Threat names and device names are links that take you deeper into the details for those items. For example, select a device name to drill into the Device Detail screen for that endpoint. Select a threat name to dive into details for that threat on the Threat Summary Report.
Threat Summary Report
While the Threat Detection Report displays threats along a timeline, the Threat Summary Report enables you to drill down and gain insight on threats VIPRE has blocked, quarantined, or deleted. There are many interactive sections on the Threat Summary Report, which adjust to display information relevant to your choice.
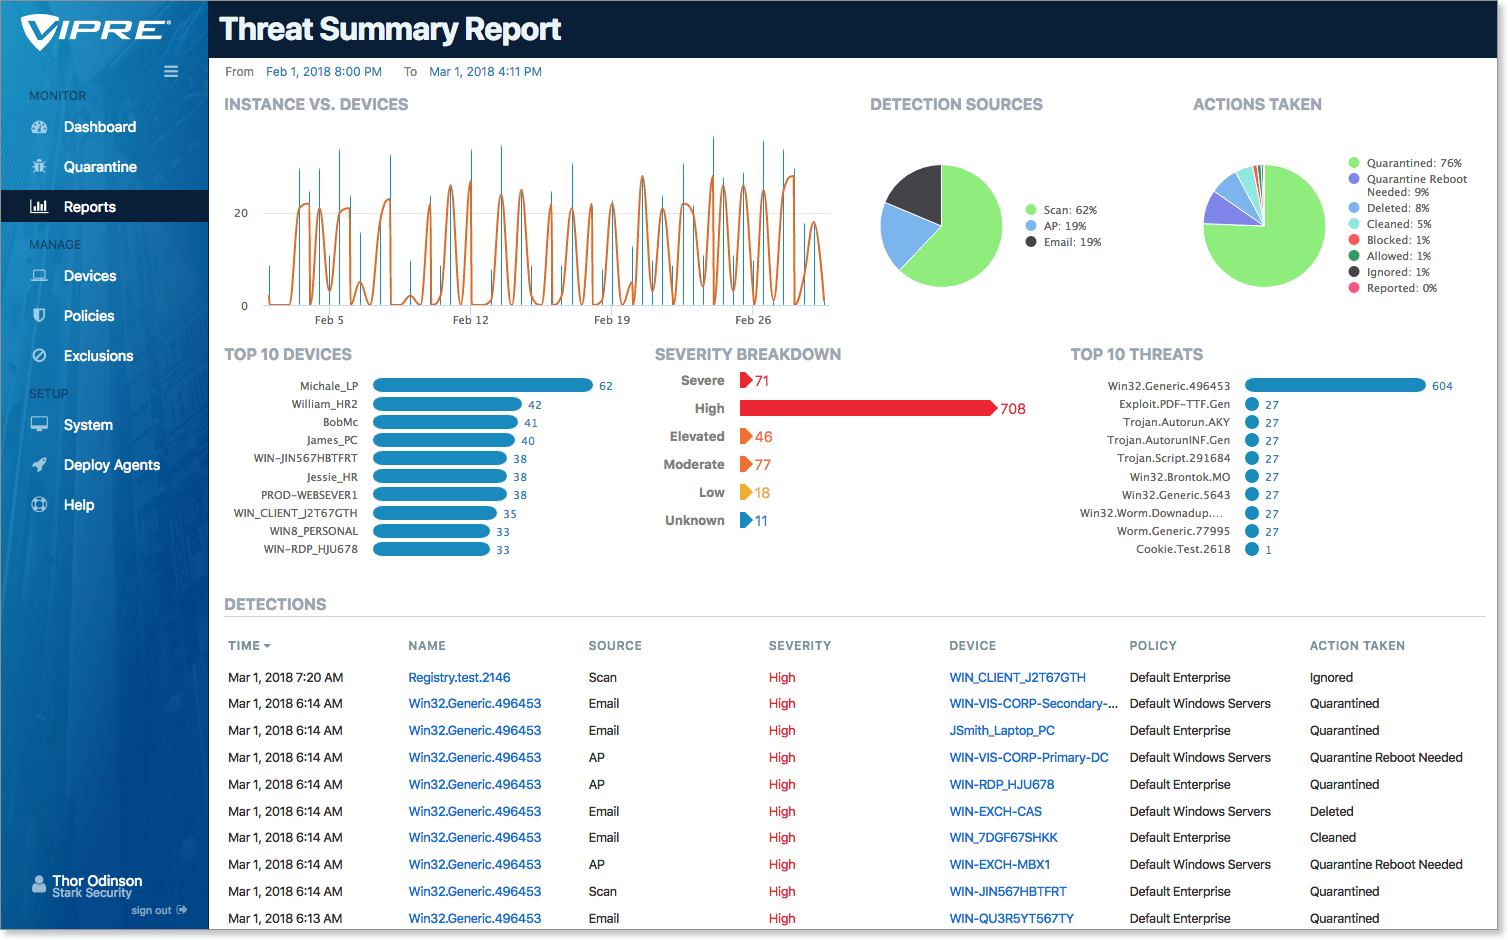
The following are brief descriptions of the Threat Summary Report sections:
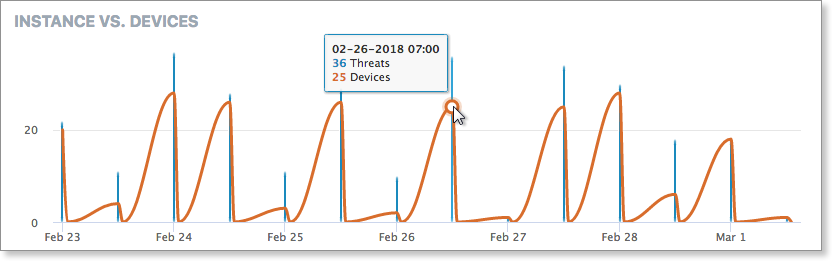
Instances vs. Devices
Instances vs. Devices correlate threats to devices for a given period, providing a focus on the devices that are most vulnerable.
This display shows, by detection period, the number of threats (blue) as well as the number of devices WITH threats (orange) on your network. Hovering over any given data point will display the particulars. Selecting a blue bar immediately adjusts the rest of the on-screen data to match that point in time.
Detection Sources
The Detection Sources chart highlights which VIPRE engine discovered the selected threats. By knowing the threat vectors and how they attacked your devices, you can draw some conclusions about where you might need to shore up your defenses.
- Scan - VIPRE’s primary scanning engine. Scans files for malware, viruses, etc.
- Email - VIPRE’s email scanning engine. Scans local email messages for malicious URLs and attachments.
- AP - VIPRE’s Advanced Active Protection. This is the “on-access” scanner that detects suspicious activity for executables or applications in memory.
Selecting sources in the Detection chart further filters the on-screen information.
.png)
Actions Taken
The Actions Taken chart shows how VIPRE handled processed threats. A file could have been quarantined or deleted; an email might have been cleaned; a bad URL might have been blocked. Here you can see which actions were taken.
As in Detection Sources (above), select a piece of the pie to adjust the current filter and effect the detailed Detections listing below.
.png)
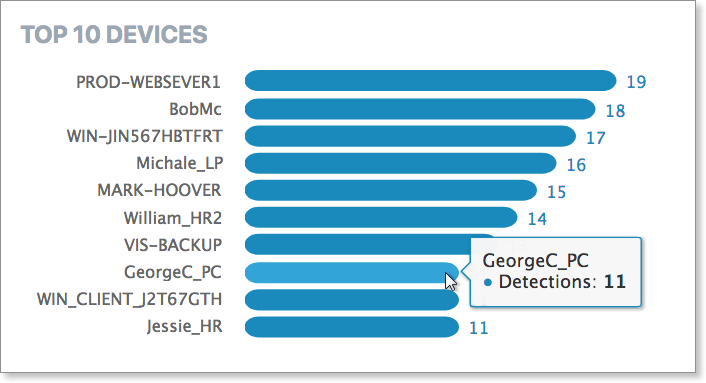
Top 10 Devices
Top 10 Devices lists the top ten devices with threats found on your network.
In general, this data reflects the devices on your network that are most prone to threats at a given time. Selecting the devices in this list also allows you to add/remove from the current Threat Summary filter, which is automatically reflected on the rest of the screen items.
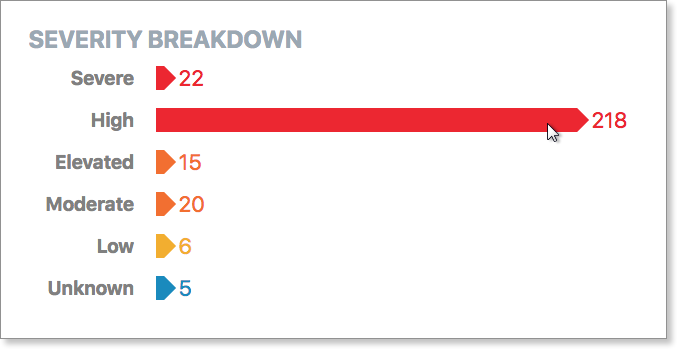
Severity Breakdown
This is your intelligence report on the threat levels discovered over the given time period.
The Severity Breakdown shows the number of threats for each threat level that have been processed by VIPRE for the given period. Threat levels are color-coded and fall into 6 categories, severe, high, elevated, moderate, low, and unknown.
Selecting a threat level (or multiples) here will filter the data on the rest of the screen.
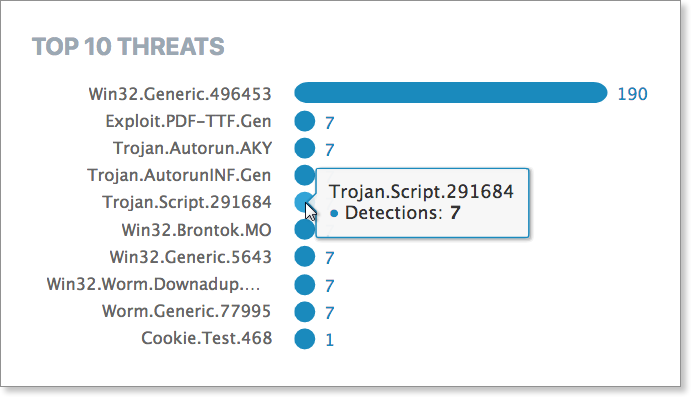
Top 10 Threats
Top 10 Threats shows the top threats across all devices in your network for the selected period. You may select a single threat or multiple threats here to filter the on-screen results to match.
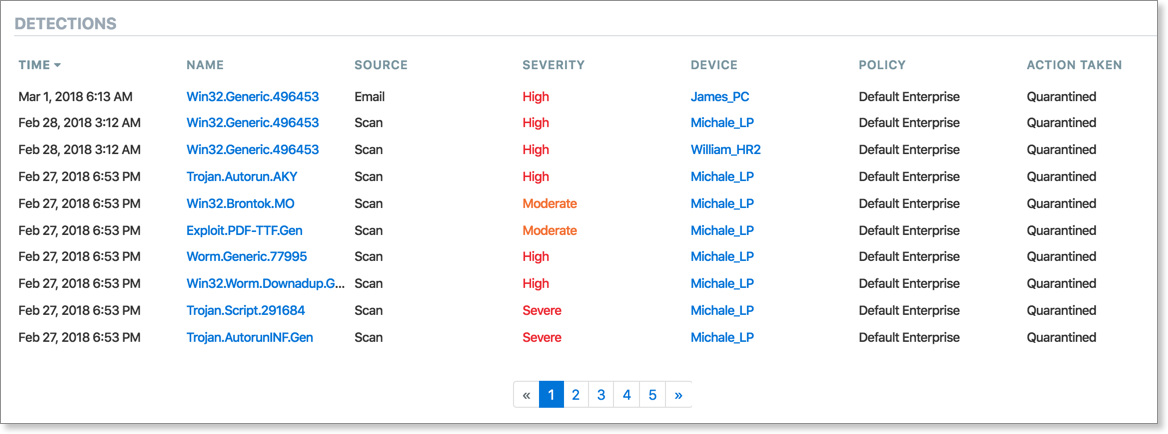
Detections
The Detections section, constantly updated whenever you select or filter information above, correlates much of the above information in a simple interactive table. Here, you can click on a threat name (in blue) to dive into the Threat Details screen for that threat, or a Device Name to drill down into that device.
By default, the Detections section is sorted with the latest threats at the top; clicking the column headers allows you to re-sort as needed. Note the tabs on the bottom of the report allow for navigation between multiple pages (if applicable).
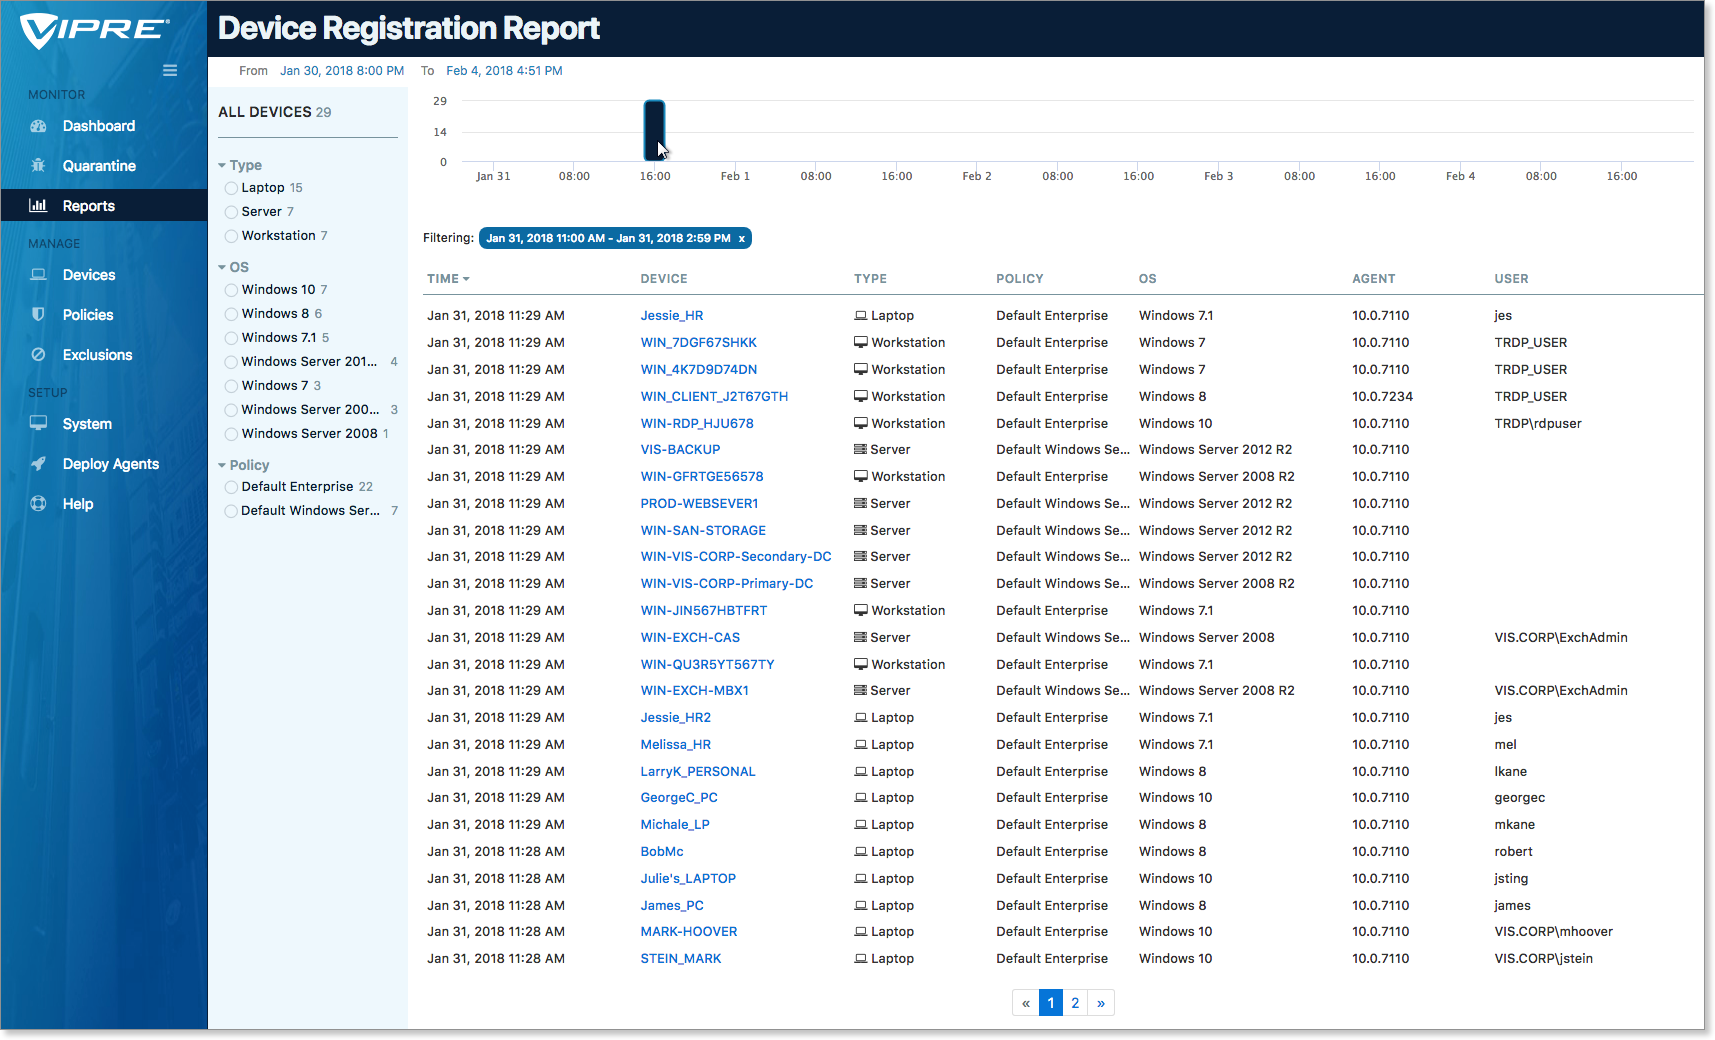
Device Registration Report
The Device Registration Report is an inventory of all devices registered and protected by VIPRE Cloud. This report allows for a deep-dive into when the devices were registered. Whereas the Devices screen shows current devices, you can use this report to pull up a history of all your devices and when they first were connected to VIPRE Cloud.
Click through Device names to view the Device Details screen. Data here includes the name of the device, its type, what detection policies are in effect, the operating system, agent, and user.
Removing the VIPRE agents from a device releases a paid seat (license), allowing an agent install on a different device.
Having a handle on device details is an additional tool for hardware resource management. All an organization’s devices can be isolated by OS, which might be useful for future software patches, OS upgrades, and budget planning.
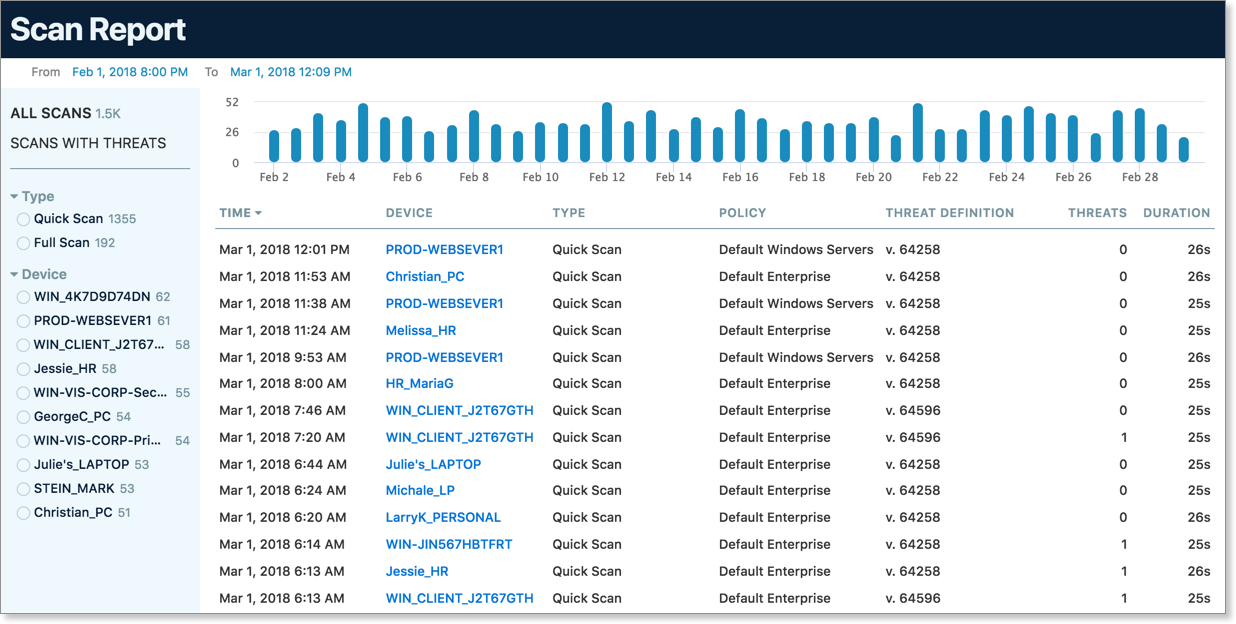
Scan Report
Monitor VIPRE's scan activity with this inventory of scans per device. As in the Threat Detection Report, you can (and should!) select specific and custom date ranges by clicking on the “From” date at the top of the report.
Filter the report by selecting Type (Quick Scan or Full Scan) or filter by specific devices. You may choose All Scans (default) or limit to only Scans With Threats for a quick overview of scans where threats were discovered.
You could use this report as a resource to track compliance. For example, see which scans were running on any particular day during a threat incident. Or, businesses with AV requirements can show VIPRE Cloud is actively protecting their devices and verify that scans are running as expected and as scheduled. Customers subject to both internal and outside compliance audits can tap into this report for proof of compliance.
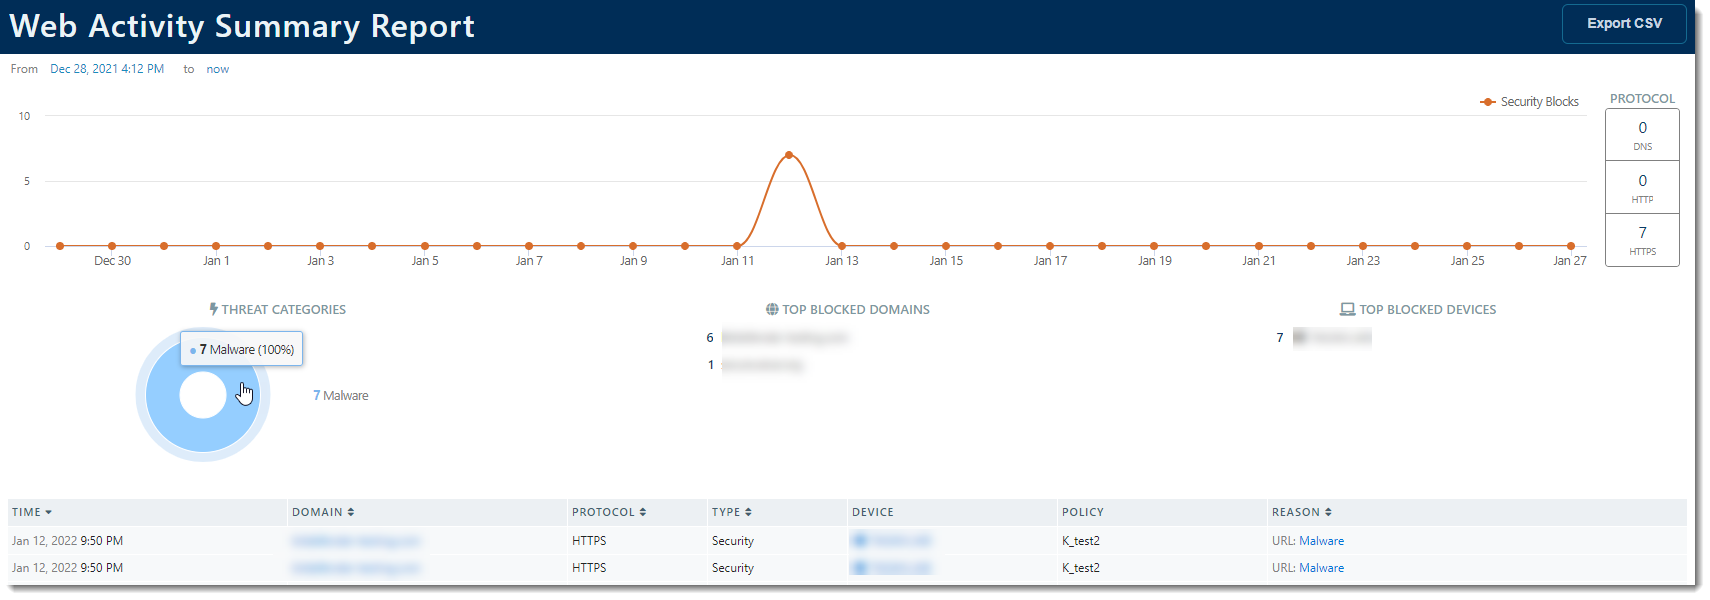
Web Activity Summary Report
The Web Activity Summary Report displays a list of blocked domains and the devices that attempted to reach them. The presented table provides:
- The date and time the domain was accessed
- The domain that was accessed
- The protocol used to access the domain
- The hostname of the device used to access the domain
- The policy that device belongs to
- The reason the offending domain was blocked
License Summary Report
Keep tabs on your VIPRE Cloud licensing with this numerical chart, which displays the number of licensed seats on your network. Confirm here that you have enough licenses available for a scheduled agent deployment, for example, or confirm that a group uninstalls succeeded properly. Unexpected gaps in licensing can be further investigated by correlating the dates/times with other reports.
- Licensed seats: How many devices the license you purchased will cover
-
Active seats: How many devices you actually have protected; in the example below, there are 32 out of 50 devices currently protected
- The number of devices shown here updates every 24 hours
.png)
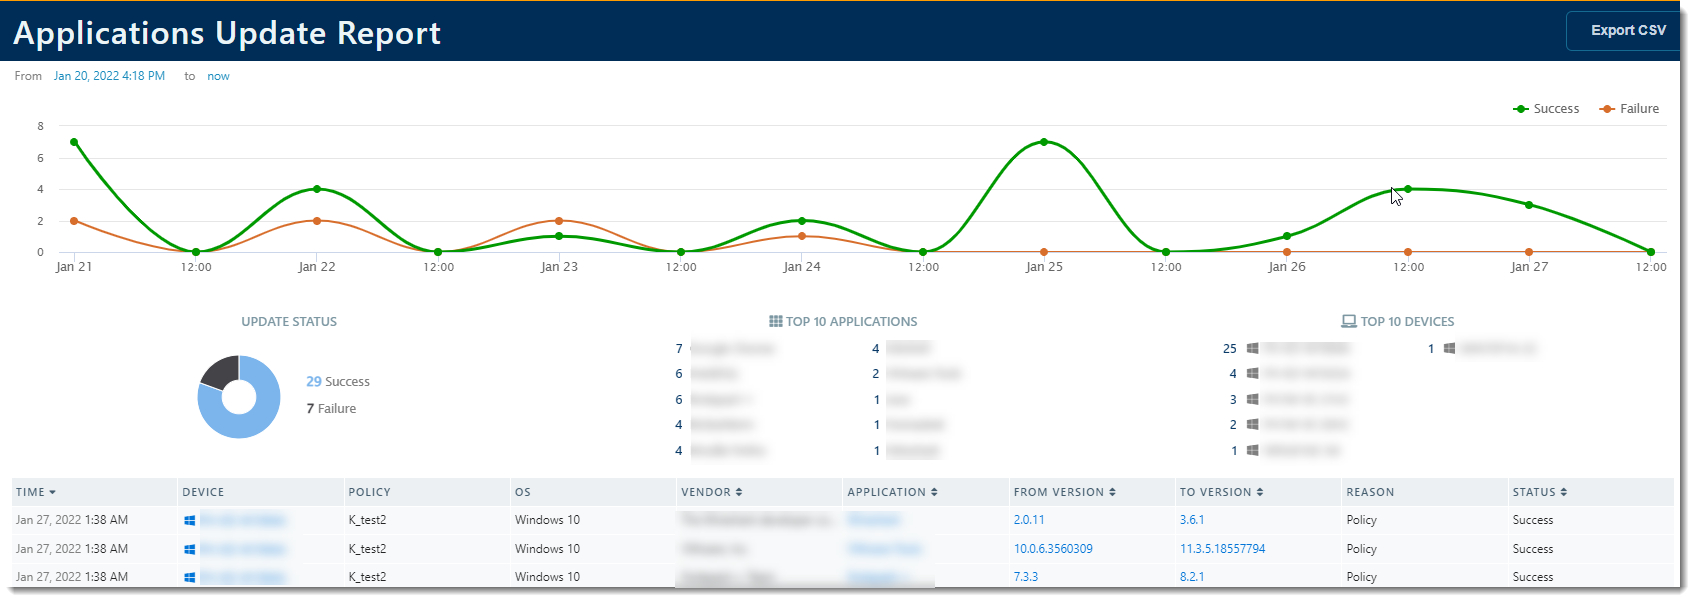
Applications Update Report
The Applications Update Report provides a detailed report of applications that need to be updated, the hostname of the device they're on, the policy the device is on, the operating system, the application, the current version, the most recent version.
On this page, you can determine a time range anytime between now and the last 30 days. There are a couple of graphs at the top of the page that indicate application update successes versus failures.
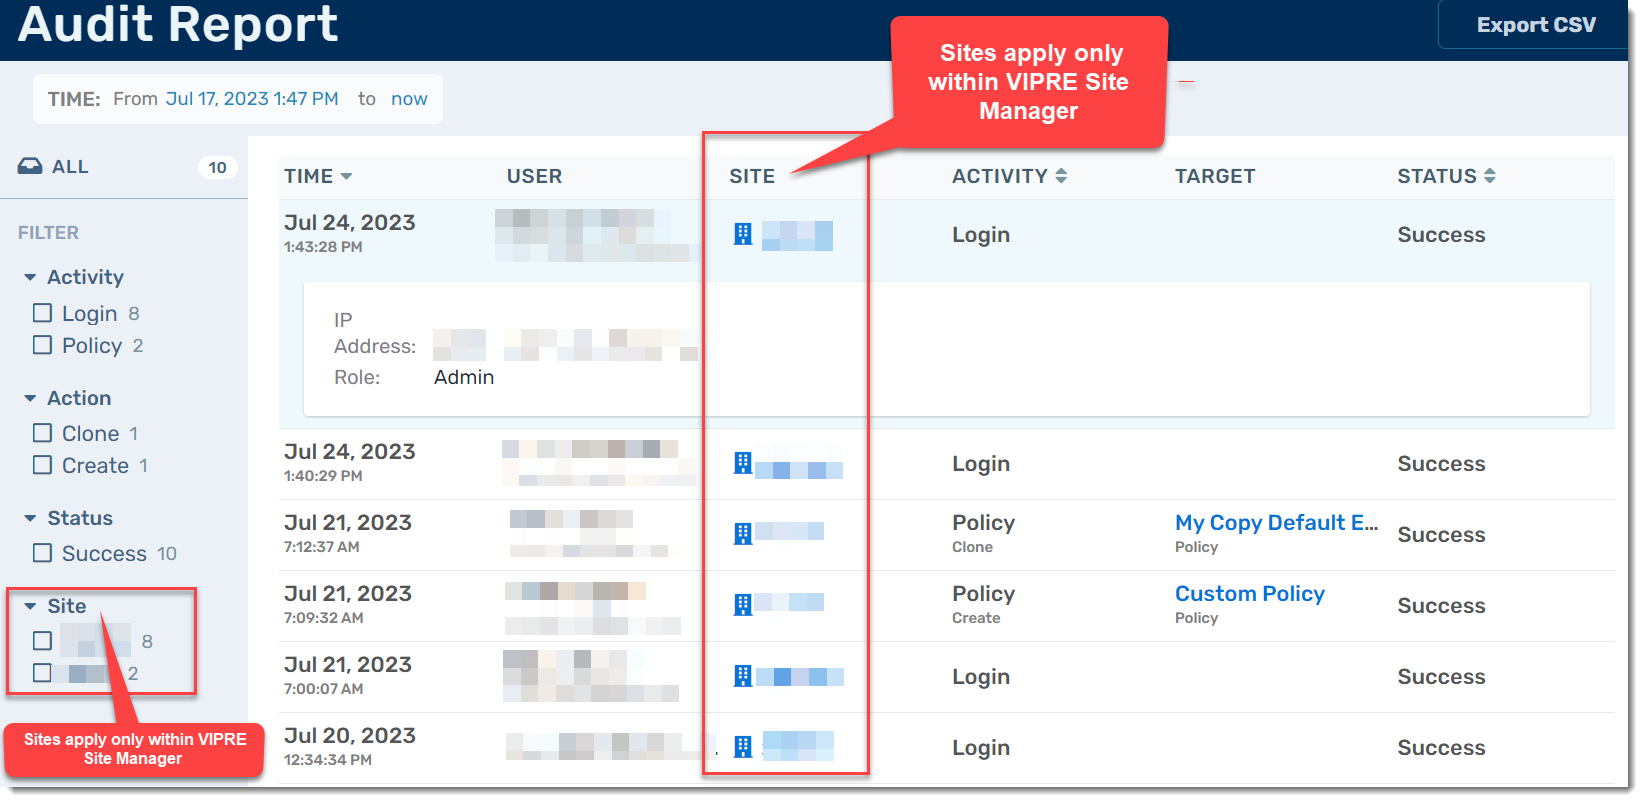
Audit Report
The Audit Report details all user actions, including when a user logs in, does a device scan, creates a notification, updates a policy, changes a user account, and more. The level of detail provided depends on the action taken. For example, a policy update will provide more detail than a user logging in.
When ready, click the next step below.
-
Next Step - Add-ons
- Add Button
Congratulations! You have completed the foundational setup of VIPRE Endpoint Security Cloud.
If you did not purchase any add-ons, you're done and can refer to the full product documentation guide for additional details and release notes.
If you have purchased the Web Access Control add-on, read on to set it up:
Web Access Control
Here we walk you through enabling the Web Access Control add-on for VIPRE Endpoint Security Cloud.
Configure Web Access Control
- From the Endpoint Security Cloud console, click on Policies and select the appropriate policy from the main window
- Choose Web Access Control on the second left-side menu
- In the main window, select the radio button next to Enable Web Access Control
- This feature is for Agent version 12 or higher
- Select the level of access control you want to configure:
- Low: Examples include pornography, violent cartoons, suicide
- Medium: Examples include everything in Low as well as things like advertisements, dating, gambling, illegal software
- High: Examples include everything in Low and Medium as well as things like discussion boards, games, hacking, weapons, and more
- Custom: Selecting Low, Medium, or High before selecting Custom allows you to start with that level as a template
- Next to Scheduling, select one of the following:
-
Apply Web Access Control 24x7
- The access level configured within Web Access Control is in effect 24 hours a day, seven days a week
-
Apply Web Access Control only during these hours
- The access level configured within Web Access Control is in effect only during the hours and days of the week of your choosing
- You can also add an exception if desired
- e.g., Monday - Friday 8 am - 6 pm except during the hours of 12 pm - 1:30 pm
-
Apply Web Access Control 24x7
- Click Save at the top right of the screen
Congratulations! You have configured Web Access Control.