
Individual User Registration
Register an Individual User
In the event that you need to register an individual user in the iLMS system, this can easily be done in the iLMS Admin Portal by navigating to the Users tab and selecting "Register User".

The Register User form will allow you to manually fill out all of the fields included in the Users profile. Any fields marked with * are mandatory.

Note: The number, order, and names of these fields can be modified in Settings -Fields.
Article Here: iLMS Fields and Unique Identifier
Checkbox Options:
User Must Change Password at Next Login
This setting will force the user to change their password after the next successful login.
Send Registration Mail
This setting will immediately (on Save) send a new registration e-mail to the user. This e-mail, unless altered, will have all the information needed to log into the system.
Bulk Update Users (CSV)
Bulk Update
Bulk Update allows you to register, update, inactivate, activate, and delete users from the iLMS by uploading a spreadsheet. You can use the blank template provided or download a list of current users, make changes as needed and then upload it back into the system.
Up to 5,000 users can be updated at one time using this process.
Step 1: Beginning Bulk Update
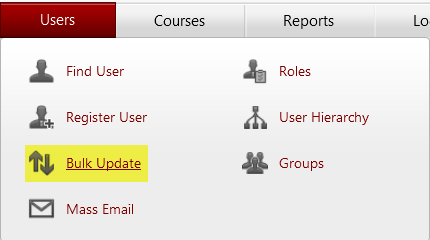
1. From the Users tab, click the Bulk Update link.
2. Download the blank CSV template by clicking Download template file or click Download user list to download a current list of users. You can then edit this list and re-upload it to apply the changes. Browse allows you to view and select the CSV file you would like to use to bulk update employee IDs.

You can download a copy of of the CSV template here: template.csv
If you use a Mac OS machine please ensure the CSV file is opened in Excel as opposed to the Numbers program.
3. The following fields are required when registering new users in the system:
- First name
- Last name
- Employee ID (Only required when users are allowed to login using their Employee ID)
- Email ID
- Region,Division and Department
Note: The file must be saved as a CSV file type or it will not upload to the iLMS.
Note: There is a 5,000 record limit for the Bulk Update feature. For 5000 records, you will need to split the update into multiple templates.
For more information character limits, restrictions, and input types see the article here:
Upload Fields Required (*) Formats
Please follow this link to view information on user profile fields corresponding to the bulk update template region/time/language columns:
Region, Time, and Language Codes
4. If you are hosting training in more than one language, you can set the default language for users by entering the language name in the language field.
5. If you need to update a users e-mail ID, enter it in the New Email ID field
6. To update existing users add one of the following codes to the Action field:
| blank |
Field Left Blank: If the users e-mail is already in the system, any fields that don't match will be replaced with data from the spreadsheet. Otherwise, a new user will be created in the iLMS. |
| R |
Register: The new user will be added. |
| U |
Update: Any changes to any fields in the spreadsheet will be made in the iLMS database. |
| A |
Activate: Marks the user active. |
| I |
Inactivate: Marks the user inactive. This is an ideal solution for managing employees who leave your organization. Inactive users do not appear in reports by default , but they do retain their transcript information for reporting and can be reactivated at any time. |
| D |
Delete: Deletes the user from all iLMS databases. This operation cannot be undone. User transcripts are retained, but cannot be included in reporting. |
7. Click the Browse button, point to the CSV file you created and click Open.
8. Check any check boxes that apply. (See the bulk update help file for more details on the options available.)
9. Click the Upload button.
Step 2: Bulk Update Confirmation
Once you click on upload button, system validates uploaded file and display confirmation screen. Confirmation screen gives you a chance to verify the details and then complete or cancel the bulk update process.T his screen shows 3 types of information.
User Records with Errors
Any record with an error in it will be displayed. The bulk update process can continue even if there are records with errors. Those users will not be registered or updated and a spreadsheet of just the bad records will be created so you can download it, correct the errors, and re-upload them.

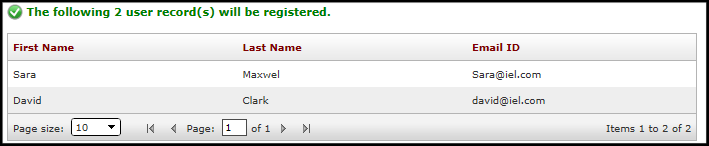
New User Records with No Errors
This is the list of good records that will be bulk registered. All of these records will be saved on the system in the bulk update log.
Existing User Records with No Errors
This is the list of good records that will be updated. All of these records will be saved on the system in the bulk update log.
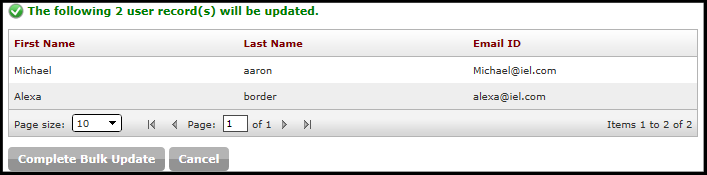
Complete Bulk Update
Executes the bulk update process.
Please do not use the back or forward button or navigate away from the page until the operation is complete.
Step 3: Bulk Update Results
This page shows a summary of the results and allows you to download log files, which will be stored in the system and accessible at any time.
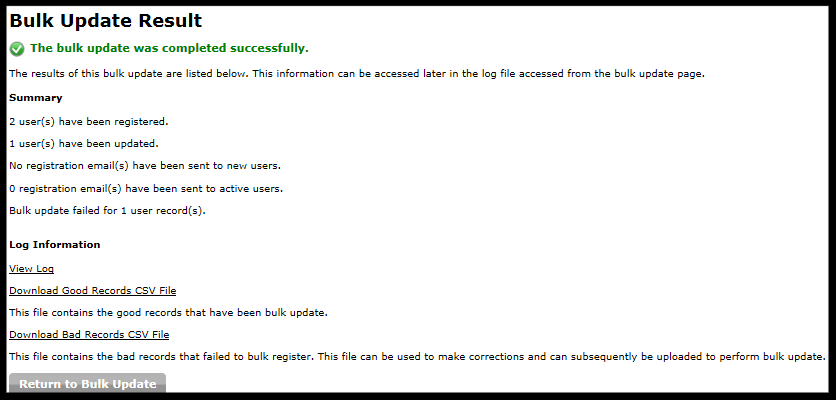
If bulk update complete with an error or get failed then you will see the following screen

View Log
Allows you to view a log of all actions taken during the bulk update process.
Download Good Records CSV File
Allows you to view the good records that have been bulk registered or updated.
Download Bad Records CSV File
Allows you to view the bad records that were not able to be bulk registered or updated. It is a good idea to download this file, make corrections, and re-upload it to complete the process.
Automated User Bulk Update (CSV)
Automatic Bulk Update allows you to use an FTP, FTP+SSH (SFTP), or FTP+SSL (FTPS) connection to automatically download bulk update spreadsheets from your FTP server and have the iLMS process them.
As opposed to the 5,000 user limit in the manual Bulk Update process, up to 20,001 users can be updated through the Automatic Bulk Update process at one time.
- To access the Automatic Bulk Update in your Admin Portal, navigate to the Users tab
- Select "Bulk Update" from the menu

3. Once in the bulk update menu, click on the automatic tab.

Descriptions for each field on the settings form are listed below:
Enable Automatic Bulk Updates
Check this box to turn on the automatic bulk update process.
FTP Details and Schedule
Below, you will enter the details for your FTP server, such as credentials and connection type.
Save Check Connection
After entering your FTP server details, you may use this to test the connection and ensure it is functioning properly.
FTP Type
Here you may choose FTP+SSL (FTPS) or FTP+SSH (SFTP)
Note: Plain FTP is no longer supported. Connection must use SFTP or FTPS connection.
Choosing any of the radio buttons will change which options are available to you below this section.
Host Name
The address for your FTP server
(either a DNS address, such as myftp.mycompany.com or a publically available IP address.)
Port the FTP port to which your FTP server is set to bind.
FTP Mode
You may select Active or Passive, depending on your server configuration.
Remote Directory
The directory that contains your spreadsheet files, with / being the default root directory.
Anonymous Login
Check this if your server allows, and you wish to use, an anonymous FTP login.
Username
Specify the FTP user here.
Password
Specify the FTP users password here.
Download and Execute File Order
Choose to sort by File Name or Time Stamp, either in Ascending or Descending order if your FTP directory has multiple spreadsheets present.
Use PGP to Decrypt File
If you have PGP configured, you may select this box to use your previously configured PGP settings to decrypt the PGP-encrypted spreadsheet files.
Use Proxy
Checking this box will allow you to use a proxy server to connect to the FTP server.

Proxy Name
The DNS name or IP address for your proxy server. Port The port that is configured for your proxy server.
Proxy Type
You may choose either Socks4, Socks4a, Socks5, HttpConnect, FtpSite, FtpUser, or FtpOpen.
Username (under proxy if "User Proxy" enabled)
The username to authenticate to your proxy server.
Password (under proxy if "User Proxy" enabled)
The password for the user to authenticate to your proxy server.
FTP+SSL/SSH settings

If you are using FTP+SSL (FTPS), you must upload the SSL certificate for your FTP server and optionally provide its password.
You may select either Implicit or Explicit TLS or SSL as a security method, and may optionally define which TLS or SSL protocols are allowed. You may also choose whether to use the Clear Command Channel command for the iLMSs FTP client connection.
If you are using FTP+SSH (SFTP), you must upload the private SSH key used for your server and optionally provide the password used.
If you use plain FTP, no further configuration is necessary.
Schedule
Here you may set the schedule that the iLMS retrieves your spreadsheets: daily, weekly, monthly, or yearly.

The Start Date and Start Time specify the first run for the schedule; it will continue to run at the same time according to the time-frame set above.
Settings
For each user record in the bulk update spreadsheets, you may specify the following options:

- If a registration email is to be sent to New or Existing users
- Require that users change their password upon next login
- Create unrecognized (new) regions, divisions, and departments specified in the spreadsheets
- Whether a blank value in a non-mandatory fields will overwrite information in that field in the users profile
(The default setting is to not modify values in the spreadsheet that are blank.)
Notifications
Here you may choose whether to notify the primary organization administrator of each bulk update and optionally CC other recipients on the emails.

CSV Format
Choose whether to use the default CSV upload template to match the spreadsheets being uploaded or convert your spreadsheets into a format readable by the iLMS. You may click Download Template to see the standard iLMS upload template.

If you pick the latter option, you must map the fields 1:1 from your spreadsheet to the iLMS built-in fields and specify the column number.
Ensure that the names match identically; for instance, if your First Name* column is the same as the default templates First Name*, you must also include the asterisk.
See the Mapping details below:

For more information on available fields, character limits, restrictions, and formats see the articles below:
Bulk Update Log
The bulk update log page allows you to view all logs of successful and unsuccessful bulk updates whether automated or manual.
Location:
Logs Tab -> Bulk Update Log

During the bulk update process any improperly formatted records will fail and produce an error.
If errors are found you have the option of registering/updating the well formatted records or cancelling out completely.
If you move forward and perform the update, an error log is generated as well as a CSV file with all of the improperly formatted records "Bad Records" and a CSV file with all of the well formatted records "Good Records"
Note: You can reach the logs from the tool, Bulk Update, as well after processing a file

View Log File
The log file allows you to view the basic facts about the update and a list of errors.
Download Good Records File
Allows you to view the good records that were bulk updated.
Download Bad Records File
Allows you to view the bad records that failed the bulk update process. You can use this file to make corrections, then upload and register these users.
This file contains an extra column containing error codes for all applicable rows in the spreadsheet. The extra column must be removed prior to uploading it into the system. If the error codes column is not removed, the system will reject the file.
iLMS LDAP Connector: About the Connector and Setup
The iLMS LDAP connector is an optional component for the iLMS. It is used to synchronize user accounts with any standard LDAP compliant user account system, such as Microsoft Active Directory. This fully automates the process of adding, editing, inactivating, and deleting user accounts, as well as moving users to new departments in the iLMS.
How It Works
Each organization can have one or more connections to one or more directory services. The connection can be to the entire directory service, synchronizing all user accounts, or at the level of an organizational unit (OU) so that only users within a particular OU are synchronized. Synchronization is one way, meaning edits within the iLMS do not filter back to your master user account database, and occurs on a user defined schedule, typically running once per night.
Connections to the directory service are made through a iLMS LDAP Connector, a windows application that resides on the same network as the directory service. Using our secure API and a Windows service (installed by the installer), users are pushed to the iLMSdatabase for synchronization.
Pre-requisites for using iLMS LDAP Connector
- Windows operating system with .Net Framework v4.8 and above.
- iLMS API must be enabled in the LMS (Settings Tab - iLMS API)
- api.inspiredlms.com may need to be white-listed to ensure communication
Note: If your organization downloaded and installed iLMS LDAP connector prior to 5/18/2021, there is a newer version available that supports both TLS 1.1 and TLS 1.2.
- To use the new LDAP connector the old version must be uninstalled first.
- The new connector must then be downloaded and installed. Connection settings for your organization are saved, so once you install the new connector and put in API information your connection settings will repopulate on their own.
- The older version needed .Net Framework 4.6.2 or newer in order to operate, but the new installer requires v4.8 and above.
The newer version of .Net Framework can be downloaded here: https://dotnet.microsoft.com/download/dotnet-framework/net48
Important Facts about LDAP Connector
- LDAP connector is a one-way synchronization. It fetches users data from AD or Directory servers and adds/updates them in iLMS.
- It cannot fetch users password from AD or Directory servers.
- Multiple connections either pointing to multiple directory servers or to same directory server but different Organization Units/Groups/Distribution Lists, as long as the connection is installed on one machine.
- During the setup installation, the connector creates a Windows Schedule task to facilitate automatic sync of users as specified.
Preparation - Steps to download the application from iLMS
To Download the LDAP Connector, Navigate to the settings tab in iLMS.
Select "Directory Services" from the dropdown.
On the Directory Services page select "LDAP Connector"
Download the tool by clicking on the "Download LDAP Connector Tool" button on the resulting page.
This will download a zip file named LDAP_Connector_Setup.zip.
Move this zip file to a system that is part of the domain and has access to the LDAP directory.

Steps to install the iLMS LDAP connector
Extract the zip file that was downloaded and you will see a file named setup.exe
Right click on this file and select Run as administrator to execute the connector setup. The installer could take several minutes to complete.

When complete you will see the screen shown below indicating the installer has completed.
Click Finish.

- Right-click on the iLMS LDAP Connector icon that was created on the desktop and select Properties.
- Click on the Compatibility tab.
- Under Privilege Level, make sure that the check box "Run this program as an administrator" is checked.
- Click OK to save this setting.

Configuring the iLMS LDAP connector
Open the iLMS LDAP connector program using the shortcut that was placed on the Windows Desktop.
You will be presented with a setup screen that will ask for API information for your iLMS organization.
This information can be found in the iLMS under Settings -> iLMS API.
Populate the fields and click on Save.
Once complete, click the LDAP Connections icon in the top right portion of the screen, then Add New LDAP Connection from the resulting Window.

Connection Settings

You will need to populate the following details for the connector to access your AD server and locate user accounts:
-
Server Name
Hostname of Server is Highly Encouraged, but IP will work as well -
Is SSL Enabled
If you have the ability to do LDAP over SSL we HIGHLY recommend using this more secure option for the connection. -
Base DN
This the full DN that specifies the location in which all desired users are located in AD -
User DN
This is the full DN for the account the connector will use to access the AD server. We recommend using a service account for this. -
Password
This is the corresponding password for the service account specified in the User DN field. -
User Search Filter
- This filter allows for you to pare down which users are imported into iLMS.
- This works much like the advanced custom search feature in AD, so it is a good idea to test any filter in AD first BEFORE running your first sync with it in the iLMS LDAP connector.
- Each Search filter will be unique to your organizations Active Directory structure and training goals in iLMS.
- We do recommend at the very least filtering for the user object class and excluding disabled user accounts.
That filter would look something like this:
(&(objectClass=user)(!(userAccountControl:1.2.840.113556.1.4.803:=2)))
For further guidance on LDAP filter syntax, there are many good online resources including many from articles from Microsoft like the one found here:
Microsoft | Search Filter Syntax
Note: The needs of your filter will likely be unique to your organization, but should generally follow the LDAP filter syntax set by Microsoft.
Our team will gladly review filters for syntax errors and can make suggestions, but cannot build the filter for your organization.
We do not have the insight into your unique AD environment to determine the best filter to fit your needs.
Once these settings have been populated, you can then use the green check to ensure the connection to Active Directory is working successfully.
This does not sync users, it only tests the connection to the AD server

iLMS Fields Mapping
In this section, you will map the existing fields in iLMS to their corresponding AD attributes.
For the most accuracy, we recommend locating a sample user in AD and viewing the Attribute Editor for that user to ensure attribute names are typed exactly as they appear in AD.
iLMS field names marked with an asterisk * are required to be populated for every user.
Please note that you are free to use default attributes listed left-column or you may manually enter in the AD attribute that best fits the specified iLMS field.
The default value will populate in the users profile in the event the attribute from AD is left blank. At a minimum, It is recommended to map First Name, Last Name, and Email Address or Employee ID to attributes from AD.

Note:
If you would like to add additional attributes from AD and you do not currently see a field in iLMS that corresponds to the value you would like to add, then you can adjust which fields are used in a users iLMS profile by logging into the iLMS Admin Portal.
This can be done by navigating to Settings Tab -> Fields, and adding and removing the desired fields. (iLMS Fields and Unique Identifier)
It will take a few moments for the connector to realize the changes in the editor.
Note:
There are special characters which are restricted for user in iLMS fields, such as % + ; “ < >, for a full list of which characters can not be used in specific fields, please see the table at the bottom of this article.
Note:
The LDAP Connector can only pull in plain-text values from fields.
We do not recommend mapping lookup fields in AD such as "Supervisor Name' and "Supervisor Email" the connector will pull in the full DN path for the supervisor's user record.
If data from a lookup field is needed we've seen customers successfully use Power Shell scripts to extract the desired values from the Lookup field and populate them as plain-text into a custom AD user attribute that can then be used by the LDAP connector.
Inspired is unable to provide assistance with Powershell scripting as this is outside the scope of our tools and services, so this extra step is up to the discretion and ability of the individual or organization performing the setup.
Once all the desired iLMS fields have been mapped to their AD attribute counterparts, you can Save your changes, close X the Edit Connection window, and move forward with performing a manual sync of your user data.

Note: We recommend always leaving the option Mark User(s) Inactive selected as inactive user accounts are retrievable in the event that a sync does not go as planned.
Also, you do have the option to enable registration emails here, but this setting in the connector may be overridden by the option specified under iLMS Global Email Notifications ( Settings Tab -> Email Notifications - >General category)
Email Notification Types, Enable Location, and Triggers
Testing User Synchronization
To test the connection, filters, and user provisioning you will need to perform a manual sync. This task can be performed from the main screen of the LDAP connector after closing out the connection editor.
- Simply Select the Connection you would like to Sync
- Then click the Synchronize option in the right pane, show below.
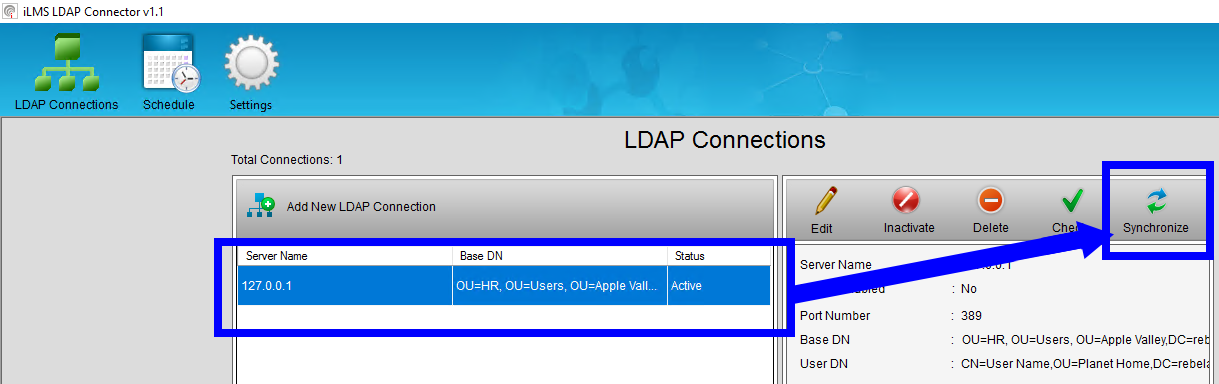
Once the sync begins the progress bar will appear, and upon completion, you will be able to view the full results of the synchronization in the log provided.
( Logs are stored here: C:\Program Files (x86)\Inspired eLearning Inc\LDAP_Connector\Logs )
Reviewing LDAP logs or Troubleshooting Sync Issues
There are two types of logs provided by the iLMS Connector, Detailed and Limited.
The type of log generated by the connector upon running a sync can be selected under Settings, located the main screen of the LDAP connector.
We generally recommend sticking with limited logging for regular day-to-day once your connector is set up as this saves storage space and only displays high-level details, but during initial setup and for troubleshooting purposes we recommend temporarily enabling detailed logs for the duration of troubleshooting.
Detailed logs are more useful in troubleshooting and checking a sync as it provides details about individual users that are synced.
For this example, we will be reviewing a detailed log to determine the results of the sync. Once the log has been opened for view, it is recommended to scroll to the bottom to view the Summary section which indicates the total number of users visible to the connector based on connection settings and the number of those users which were successfully synced to iLMS.

- If the 2nd number is 0 or less than expected, then there is likely an issue with the Base DN, User Search Filter, or permissions of the service account provided in the User DN. The connection does not see the users where specified.
- If only the 1st number is 0 or less than expected, then the issue is likely in the iLMS Attribute Mapping Section. The connection sees users, but they cannot sync.
- To identify which fields are the issue in iLMS Field Mapping, scroll up in the log above the summary section to view log entries for individual users included in the sync. Any accounts which failed to sync will have a reason listed next to "Result Response Message: ".
For Example:
"Result Response Message: Email ID is missing "
This would indicate that the email ID was either not populated in AD or that the attribute name in the mapping section did not match the actual attribute name used by AD.
- To identify which fields are the issue in iLMS Field Mapping, scroll up in the log above the summary section to view log entries for individual users included in the sync. Any accounts which failed to sync will have a reason listed next to "Result Response Message: ".
- The detailed log is useful when troubleshooting issues with the sync of individual users as well. Simply search for the user in the log and the error will provide details on why the user was not synced. If the user does not exist there may be an issue with Base DN or LDAP search filter which may be excluding the user.
Scheduling Automatic Synchronization
After testing to ensure that users are populated correctly, you can use the scheduler to run the iLMS / LDAP synchronization tool on a regular cadence of your choosing.

Additional Information | Restricted Characters
| ID & Field Name | Restricted Characters | LDAP Connector |
|---|---|---|
| First Name | % + ; “ < > | |
| Middle Name | % + ; “ < > | |
| Last Name | % + ; “ < > | |
| Employee ID | % + ; “ < > | |
| Hire Date | All Date & Time format supported | |
| User Language | % + ; “ < > Allowed Format: Any language name which exist in the Organization |
|
| Job Title | % + ; “ < > | |
| Address1 | % + ; “ < > | |
| Address2 | % + ; “ < > | |
| City | % + ; “ < > | |
| Country | Allowed: All country Names |
|
| State (US or Canada) | Allowed: All State Names |
|
| State/Province/Region (Non US) | % + ; “ < > | |
| ZipCode | % + ; “ < > | |
| Email ID | Allowed Characters 1. Alphanumeric 2. -`~!@#$&*()=}{|':./_ |
`~!@#$&*()=}{|':./_ as first character is not allowed in LDAP Connector. First character should be alphanumeric for LDAP Connector |
| Phone | % ;"<> | |
| Fax | % + ; “ < > | |
| Region | % + ; “ < > | |
| Division | % + ; “ < > | |
| Department | % + ; “ < > | |
| Company/Employer | % + ; “ < > | |
| Timezone | Allowed Format: Any timezone supported |
|
| Custom Field1 | % + ; “ < > | |
| Custom Field2 | % + ; “ < > | |
| Custom Field3 | % + ; “ < > | |
| Custom Field4 | % + ; “ < > | |
| Supervisor Name | % + ; “ < > | |
| Supervisor Email ID | Allowed Characters 1. Alphanumeric 2. -`~!@#$&*()=}{|':./_ |
`~!@#$&*()=}{|':./_ as first character is not allowed in LDAP Connector. First character should be alphanumeric for LDAP Connector |
Entra Active Directory Connector: Setting up User Sync w/ iLMS
Entra Active Directory (Entra ID) is Microsoft’s enterprise cloud-based identity and access management (IAM) solution. The Entra ID connector in iLMS allows you to input the details of an Entra directory to seamlessly synchronize your user accounts through a secure connection using Microsoft Graph API.
Requirements for Initial Setup:
- Admin access to Entra Active Directory
- A tenant in Entra containing users
- An application under the tenant
- A client secret for the application
- "User.Read.All" Microsoft Graph API permission for the application
- iLMS admin console access
Important Facts about Entra Active Directory Connector:
- This tool uses a one-way synchronization. It fetches user data from the Entra directory and adds/updates/inactivates users in iLMS
- It cannot fetch user passwords from Entra. We do have another tool that can be used for Single SignOn with Entra using SAML. More info here: Single Sign-On with Entra (Link to Microsoft Article)
- You can set up connections to multiple Entra directories. It is best if the users do not overlap between these directories. If multiple Entra user accounts exist with the same unique identifier used in iLMS, that could cause issues.
- The first sync with Entra ID will be a full sync that pulls in all specified user info and provisions iLMS accounts. After the initial sync the connector will only look for changes to Entra user accounts and will make changes in iLMS accordingly as users are modified, added, and inactivated in Entra. Any changes made to user profiles directly in iLMS will not be recognized by the Entra connector unless a change takes place to the user record in Entra.
Entra ID - Preparation
To set up the initial connection between Entra ID and iLMS, some data is needed from the Entra and we need to ensure the correct permissions are in place.
Gather Information
The following 3 values are needed from Entra ID:
- Directory (tenant) ID
- Application (client) ID
- Client Secret Value
To locate these values follow these steps:
- In Entra Active Directory, locate the tenant you would like to use.
- From the tenant, navigate to "App registrations" in the left-hand column.
- We recommend creating a new application and naming it something descriptive such as "iLMS_Entra_Connector".
- Click the application display name to view details for the application.
- From the Application overview screen, 2 of the necessary values are visible.
Both the Directory (tenant) ID and Application (client) ID are listed on this screen.

(click to view enlarged image)
- To locate the 3rd value, navigate to "Certificates & Secrets" from the left-hand column within the application.
- Create a new client secret for iLMS to use. Immediately after creation, copy and hold onto the data from the "Value" field.
(Client secret values cannot be viewed, except for immediately after creation. Be sure to save the secret when created before leaving the page.)

(click to view enlarged image)
Check Application Permissions
Once all 3 of the necessary values have been located in Entra ID it's time to ensure the application will have the necessary permissions to read and sync user profile data from Entra via API.
- From the application, navigate to "API Permissions".
- Ensure the application has "User.Read.All" permissions for Microsoft Graph and that the status column states "Granted" for your tenant.

(click to view enlarged image)
- If these permissions are not present, you may need to add a permission for this application and select "User.Read.All" from the user category.
- After the appropriate permission has been added the "Grant admin consent" button may need to be clicked as well.
Once all the necessary values have been gathered and the permissions are set up correctly, it's time to input details into the iLMS admin console to establish a connection.
iLMS Admin Console - Create a New Directory Connection
Location:
Settings Tab -> Directory Services -> Entra Active Directory Connector
In iLMS navigate to the settings tab and select "Directory Services" from the resulting menu.

(click to view enlarged image)
Click "Add Directory" to create a new Entra ID connection.
Input Directory Info and Test Connection
Start by filling out only the first four fields under the "Directory Info" section.
The directory name is just a descriptive label for your connection that will be used in iLMS. Populate the other 3 fields with the corresponding values from Entra ID.
Click "Test Connection" to ensure the details are correct and a connection can be established between the two systems. This will result in a success message or an error. Make any necessary adjustments until the connection is successful.

Once the Entra Directory is successfully connected, its time to fill out the other details.
Filter
This section is not required. In the event that the Entra directory contains more users than you would like to register in iLMS, this field can be used to create a filter that only selects users that meet specific criteria. The expected format of the filter is the same as used with Microsoft Graph API.

Only the portion that typically appears after the "=" in the API request is required for this field.
This example filter shown would return only users with a displayname field that starts with the letter J.
| For more examples and information about supported filters see Additional Filter Information at the bottom of this article. Note: Custom Filters are only applied to syncs of users. Groups are not included. |
We highly recommend testing filters prior to implementation using Microsoft's Graph explorer.
This will help ensure the right set of users is selected before any accounts are provisioned in iLMS.
Graph explorer can be found here:
https://developer.microsoft.com/en-us/graph/graph-explorer
Send a GET request with this URL to fetch and filter users.
https://graph.microsoft.com/v1.0/users?$filter=something eq 'this'
Relevant Microsoft API documentation can be found here:
https://docs.microsoft.com/en-us/graph/query-parameters#filter-parameter
Sync Schedule
This determines the day, time, and frequency that iLMS will sync user data.

Other Business Rules
Check applicable boxes to determine if unrecognized user hierarchy values (region/division/department) can be created by Entra and whether users should receive a registration email immediately upon creation in iLMS.

iLMS User Fields Mapping
In this section, you will map the existing fields in iLMS to their corresponding Entra ID fields (attributes).
For the most accuracy, we recommend locating a sample user in Entra to ensure attribute names are entered exactly as they appear. The dropdown offers a selection of the most commonly used attributes, but you can also type in the attribute names as needed.
iLMS field names marked with an asterisk * are required to be populated for every user account.
The left-hand column allows you to specify a default value that will be populated for all iLMS user accounts. This is most commonly used for iLMS fields such as region/division/department if there is no applicable Entra user profile attribute that can be mapped.
If you do populate your own attributes for region/division/department please ensure that the checkbox for "Create Unrecognized Regions, Divisions, and Departments is checked in the "Other Business Rules" section of connection settings.
At a minimum, It is recommended to map First Name, Last Name, and Email Address or Employee ID. Any other fields marked as mandatory for the organization in iLMS will also be required.
This section displays all visible user profile fields for your organization. To add additional fields to map they must be enabled for your organization. More info about fields here: iLMS Fields and Unique Identifier

Once all the desired settings are in place and the fields are mapped, click "Save" at the bottom of the page to start the first sync.
Directory List, Sync Info, and other Connection Settings
After the initial setup, the status of all of your directory connections can be viewed under Entra Active Directory Services.
Location:
Settings Tab -> Directory Services -> Entra Active Directory Connector
 (click to view enlarged image)
-
Directory Name
This displays the name of the directory provided in the settings -
Directory (tenant) ID
The Entra tenant ID associated with the connection -
Last Sync
The date/time the last sync occurred for the connection. This section also provides the current status of the sync, whether it is in progress, successful, or failed.
A JSON log file is also available which contains a summary of the most recent sync.
Just click the page icon next to the status to generate a log file to download. -
Next Sync
The date/time that the next sync will occur. This date/time is calculated based on the schedule specified in the connection settings. -
Enabled
A green check indicates the connection is enabled. If you would like to disable the connection and prevent further syncs click the pencil icon to edit the connection settings and click the "Enable Directory" toggle at the top of the settings page to set as disabled. Repeat this process to re-enable the connection at any time. -
Sync Now
To initiate a sync outside of the normal schedule click this icon. A sync will begin immediately. -
Actions
Edit and Delete. Clicking the pencil icon allows you to modify the existing connection and the red icon deletes the connection from iLMS permanently.
Additional Filter Information
Note: Custom Filters are only applied to syncs of users. The ability to filter based on Group is not available currently.
Supported Filters:
- starts with
- endsWith
- eq (equals)
- ne (not equals)
- and
- or
- any
- not
Filter Examples:
- endsWith(mail, 'domain.com')
- endsWith(mail, 'domain.com ') or mail eq 'first.last@otherdomain.com'
- endsWith(mail, 'domain.com') and mail ne 'first.last@otherdomain.com'
- startsWith(mail,'firstname')
- startsWith(givenName,'firstname')
- department eq 'human resources'
- givenName eq ‘firstname’
- endsWith(mail,'domain.com') and not startswith(mail,'this')
Filter Compatible Attributes:
| AccountEnabled City CompanyName Country CreatedDateTime Department DisplayName EmployeeHireDate EmployeeId EmployeeType FaxNumber GivenName Id |
JobTitle MobilePhone OfficeLocation PostalCode PreferredLanguage State StreetAddress Surname UsageLocation UserPrincipalName UserType ageGroup |
assignedLicenses assignedPlans businessPhones consentProvidedForMinor creationType deletedDateTime employeeOrgData externalUserState externalUserStateChangeDateTime identities imAddresses mailNickname onPremisesImmutableId |
onPremisesLastSyncDateTime onPremisesProvisioningErrors onPremisesSamAccountName onPremisesSecurityIdentifier onPremisesSyncEnabled onPremisesUserPrincipalName otherMails passwordPolicies passwordProfile provisionedPlans proxyAddresses showInAddressList |
We highly recommend testing filters prior to implementation using Microsoft's Graph explorer.
This will help ensure the right set of users is selected before any accounts are provisioned in iLMS.
Graph explorer can be found here:
https://developer.microsoft.com/en-us/graph/graph-explorer
Send a GET request with this URL to fetch and filter users.
https://graph.microsoft.com/v1.0/users?$filter=something eq 'this'
Relevant Microsoft API documentation can be found here:
https://docs.microsoft.com/en-us/graph/query-parameters#filter-parameter
iLMS SSO: SAML Setup
Overview of SAML Settings in iLMS
The SAML settings section in the iLMS will require information from your SAML configuration. The information needed in the iLMS configuration should be available from your SAML implementation as well. Hover over Settings in the administrator dashboard.

Download Metadata from iLMS
Click on SAML Expand the service provider section and click the click here download link to receive the metadata.

Service Provider
The automatically populated information in this section may be required by your identity provider to configure Single Sign-on.

Identity Provider - Issuer
In the Issuer section, enter the corresponding information from your identity provider to configure SSO.
or
Select "Import Metadata" to import the Metadata from the Identity-Provider you are using and the data will populate automatically.

-
Sign-in page URL
This will be used to redirect the user to login again if the iLMS doesn't receive a SAML token with the request. -
Verification Certificate
Allows your organization to upload the security certificate provided by your Identity provider.
Note: This must be in .cer format. -
Sign-out page URL
will close the Learner Center window upon logout and redirect the user to your organization's login page if specified, or redirect the user to any other specific URL. -
Change Password URL
will be associated with the Change Password link in User Profile page in the Learner Center.
User Identifier
Enter the primary identifier for your learners Email ID field. By default this is the NameID element, but optionally can be any other standard attribute element.
If your organization has set Employee ID as unique identifier in iLMS, this will display Employee ID in place of Email ID
Unique ID for iLMS can be changed here: iLMS Fields and Unique Identifier

Just-in-Time User Provisioning with SAML

- The Create Un-recognized User Account checkbox will allow the system to create a user that is not registered in the iLMS at the time of Single Sign-on.
- SAML Attributes are then matched to the user profile fields. The first five are the default values for created or updated user profiles and must have matching attributes assigned from the IDP.
- A Default Value is added to any non-mandatory field that is left blank in the SAML token.
- Predefined ADFS 2.0 attributes are available from the drop down on the right for added convenience, but if the desired attribute name is not listed, you may type the correct input.
- Fields marked with an asterisk (*) are mandatory fields for registering a user and iLMS allows further profile fields to be defined. To add/remove fields see instructions here: iLMS Fields and Unique Identifier
Business Rules

-
Create Un-Recognized Regions, Divisions, and Departments
If Checked, this will create new Regions, Divisions, and Departments that do not already exist at the time of Single Sign-on if listed in a user profile. -
Update User Profile During Sign-In
If enabled this will update data in the user profile upon each Sign-on. -
Update Blank Values for Non Mandatory Fields
This allows populated non-mandatory fields to be overwritten with blanks if the profile field(s) in the SAML token is blank upon Sign-On -
Send Error Notification Email
This allows your organization to specify an email address (usually a distro) that will receive error logs each time a user encounters an issue signing in to the iLMS via SSO. This log includes data sent in the SAML token along with the error message received by the user.
Note: a log will only be produced if the user gets far enough in the process that the request hits our system.
Note: If SSO is implemented. We recommend updating the access URL in the email communications sent to users with the SSO URL.
Editing Email Templates
If using LDAP for provisioning, there's an option under the settings there to automatically use the SSO sign-in URL.
iLMS Passwordless Login
Keeping track of passwords can be a hassle. The passwordless login option in iLMS makes things simple. This feature allows users to log in just by clicking a link — no password required.
Location:
Settings Tab -> Passwordless Login

Enable Passwordless Login
Checking the box on this page will enable the passwordless login feature for your organization. Once enabled all existing email notifications, such as registration and enrollment notifications, will generate passwordless login links wherever access links are provided.
To learn more about which email system variables will be impacted by enabling passwordless login please read: Email Notifications and Passwordless Login
Note: Users with any level of access to the iLMS admin portal will not be eligible to use the passwordless login feature. These users will be required to log in with a password and will continue to receive links for the traditional username/password login method in email notifications.
Set an Expiration Period
Passwordless login links will expire after a certain number of days. This time period can be customized to fit your organization's needs.

The links generated can live anywhere from 7 to 365 days. After a link expires it will take the user to a page that prompts the user to request a new link as opposed to logging them in immediately.
The User Experience
Once passwordless login is enabled all email notifications sent to users going forward will include a link that states
Click Here To Access Your Training.
- If the link is valid then the user will be logged directly into the learner center to take training upon clicking the link.
- If the link in the email is no longer valid then the user will be taken to a portal where they can request a new link to log in by inputting their email address.
Each login link requested from the portal will make all previously generated links for the user invalid, so we recommend that the user submit their request for a new link once and wait at least 15 minutes to allow plenty of time for the email to arrive before making any additional requests. The email will typically arrive pretty shortly, but due to the nature of email systems, there is always the potential for things to be delayed.
Note: We recommend that users do not share their passwordless login link with anyone else as this will allow others to access their account.
Send a Passwordless Login Link to a Specific User on Demand
If for any reason an iLMS admin needs to generate a new passwordless login link for a user, they can do so from the admin portal.
To send a user an email with a passwordless login link, follow the steps below:
- Locate the user's profile. This can be done by navigating to Users Tab -> Users, and then searching for the user's account.
- Once you've located the user, click their name to bring up their profile.
- At the top of the user, profile click Send Passwordless Login Link

- Click Ok.
- If the resulting message states the process was successful then an email will be sent to the user with a passwordless login link.
