
When logged in to the Email Cloud administrator portal, there are many options on the left-side menu. This article will walk you through the Service Settings menu options.
VIPRE Recommends
You may have Encryption, Sandboxing, Archiving, and/or Link Isolation as add-ons to VIPRE Email Security Cloud, through VIPRE Email Advanced Threat Protection, or another VIPRE bundled solution.
Click here for details on VIPRE Email Security Cloud Add-ons
Click on a tab below to learn more about the topic.
Quarantine Report
This section allows users to manage spam report controls.
Reporting Content Types
- Spam: These are all the messages caught by the spam filter
- Bulk: These are all 'bulk mail' and 'newsletter' type messages. Essentially, messages that are not true spam as such but may be unwanted
- Quarantine: These are messages caught by administrator-defined policies, also known as the content filter
- Virus: These are messages caught by a virus scan
Reporting Content Options
- Show: This will enable users to view the reported messages
- Release: This will enable users to release any messages
- Allow: This will enable users to add messages to their Allow list
- Deny: This will enable users to add messages to their Deny list
Max Threat Level Spam Included in Summary
- High: This setting will display all spam messages in the summary report regardless of the threat level
- Medium: This setting will omit messages with a high certainty of being malicious from the summary report
- Low: This setting will omit messages with a medium to high certainty of being malicious, leaving only low-threat messages for review
Report Templates
- Default Template: This is the generic template that you can use to generate reports for your users.
-
Customer Template: This template will allow you to modify the template; below is a list of items you can modify:
- Subject: The subject of the summary report.
- Sender Email Address: You can specify which email address the report is coming from.
- Customer Image: You can specify the image that’s included in the report.
- Background Color: You can specify your own background color.
- Template Header: You can specify what goes in the report header.
- Template Footer: You can specify what goes in the report footer.
Delivery Times
You can specify which days and hours you want the reports to be delivered. For most users, the most common practice is once every 24 hours, however, you have the option of setting reports for every hour to as late as once a week.
Check Boxes
- Send Spam Report by Default: This setting determines if someone will get a report even if they are not configured to get a report. This will usually impact new users who have not yet been configured for the report; they will receive the report with the default settings specified.
- Allow automatic login to the end user portal: This setting adds a link to the bottom of the spam report, which will log the user into a limited version of the end user admin portal. Users can view and manage their spam quarantine, Allow, and Deny lists without entering a password. To access other end-user features such as Continuity and My Files, users must log out and log in with their normal portal credentials.
- Allow user-defined delivery times: This setting lets users modify how often they get the report.
- Enable consolidated report: This setting enables consolidated spam report, a report that gets sent to one email address that contains the spam report content of all users on the account. The email address can be specified in the Report to text field, and needs to be one of the users under this account.
Filtering
This section allows you to make changes to the email filtering settings.
General
Bulk Mail Handling
- Bulk Email Detection: The bulk email filter is designed to catch all 'bulk mail' and 'newsletter' type messages. Essentially messages that are not true spam, but that may be unwanted.
Additional Quarantine Settings
- SPF Failure: This will quarantine inbound emails that fails SPF check. The emails will be quarantined as a "policy" and reported in the quarantine report. SPF and DKIM checks may lead to an increase of falsely quarantined messages due to misconfigured domains.
- DKIM Failure: This will quarantine inbound emails that fails DKIM check. The emails will be quarantined as a "policy" and reported in the quarantine report. SPF and DKIM checks may lead to an increase of falsely quarantined messages due to misconfigured domains.
- DMARC Policy: This will enable DMARC (Domain-based Message Authentication Reporting and Conformance) checks and enforce the DMARC policy specified in the sending domain's DNS entry for DMARC. This could be to quarantine the mail or to reject it. Quarantined mail will be quarantined as a 'policy' and can be displayed in the quarantine report. Rejected mails will generate a non-delivery report back to the sender.
- Impersonation Protection: This will quarantine inbound email that fails SPF Check for your own domain. The check is against both the Envelope sender and Mime From.
Settings
- User Level Override: Enabling this will allow users to set their own filtering rules.
- Report Message: This adds a disclaimer to the bottom of inbound emails that will allow users to report missed spam back to the system for retraining; Report Message text can be configured under Policies > Advanced Polices.
User Auto-Creation
When SMTP discovery is enabled this section is used for setting the inbound and outbound thresholds for user creation.
- Outbound Auto-Creation: This allows the system to automatically create internal user records based on a threshold of outbound emails from an email address. The default threshold is 3.
- Inbound Auto-Creation: This allows the system to automatically create internal user records based on a threshold of inbound emails from an email address. The default threshold is 3.
Spam Tagging
This tab allows you to configure Spam Tagging as part of the Email Filtering settings. Spam tagging enables the delivery of anything we would otherwise stop as spam, but with a custom text 'tag' either in the subject line, or hidden in the email headers for filtering downstream. A tag can be applied to low, medium, and high category spam.
To fully enable Spam Tagging:
- Click the checkbox next to Enable Spam Tagging
-
Enable Spam Tagging: This option is disabled by default. Enabling Spam Tagging will deliver incoming emails to your mail server with:
- A low, medium, or high spam classification
- A tag in the email subject or the header
-
Enable Spam Tagging: This option is disabled by default. Enabling Spam Tagging will deliver incoming emails to your mail server with:
- Configure the following settings:
- Spam Tag and Deliver Settings: Selecting Low, Medium, or High determines the spam threat threshold. Please note that selecting Medium or High will result in the delivery of the thresholds under it.
- Tag Type: Selecting a Tag Type from the drop-down menu allows you to choose if a spam tag will be added to the email’s subject line + header or only the header.
-
Tag Message: Tag that is appended to the email subject line and/or header. This is automatically chosen based on your Spam Tag and Deliver setting and is customizable.
- You’ll be able to see a preview of the header next to the Tag Message
- Click Save in the bottom right corner of the page
Spam Tagging has now been configured and enabled.
Inbound Routing & Outbound Relay
These sections control which servers are utilized for bidirectional mail transfer (i.e. regular mail servers) as well as which servers are used for purely outgoing email (i.e. outbound mail servers and external email addresses).
Inbound Routing
-
Inbound Routing: Lists sites and mail servers per site.
- Sites: Sites are containers for mail servers (e.g. by region). There is always one default site per customer.
This section allows you to edit the detailed settings of a site.
- Description: The custom name of the site you would like to add or edit.
- Default Site: Selecting this checkbox will make this site the default site for routing. Doing so will reset the previous default site.
- Mail Server: A list of mail servers. Click on the Plus button to add a server. Click on the Edit button to edit it. Changes only take effect after the Save button is clicked.
- Server: The domain name or IP address of the server.
- Port: The port number of the server. Default is set to 25.
- Priority: The priority of the server, ranging from 1 to 9, where 1 indicates the highest priority. Traffic will be balanced to servers with the same priority settings
Outbound Relay
- IP Addresses: Routes used for outbound email. IP addresses are required for outbound configuration; hostnames are not supported. Microsoft 365 IPs are automatically whitelisted and do not require configuration.
-
Settings: The ability to configure Full Outbound Relay and Delayed Delivery Notification
- Full Outbound Relay: By default, this service is in protected mode and only allows email out from domains configured on your customer account and to recipients specified in the outbound relay section. These recipients allow email to be forwarded from your servers and provide another layer of protection for sensitive email leaving your organization.
- Delayed Delivery Notification: Turn delayed delivery notifications on or off.
- External Email Addresses: If Full Outbound Relay is set to unprotected mode, a list of external addresses can be added as acceptable recipients through the outbound relay service. Thus forwarders on the local server will only be able to relay out to trusted addresses through this service.
- Outbound Email Token: A unique token added to the email header that is generated automatically; meant for use with Microsoft 365 but can be used for any cloud-based email solution.
- Outbound DKIM Signing: DKIM is set up on a global/site level and must be set up on all of your domains.
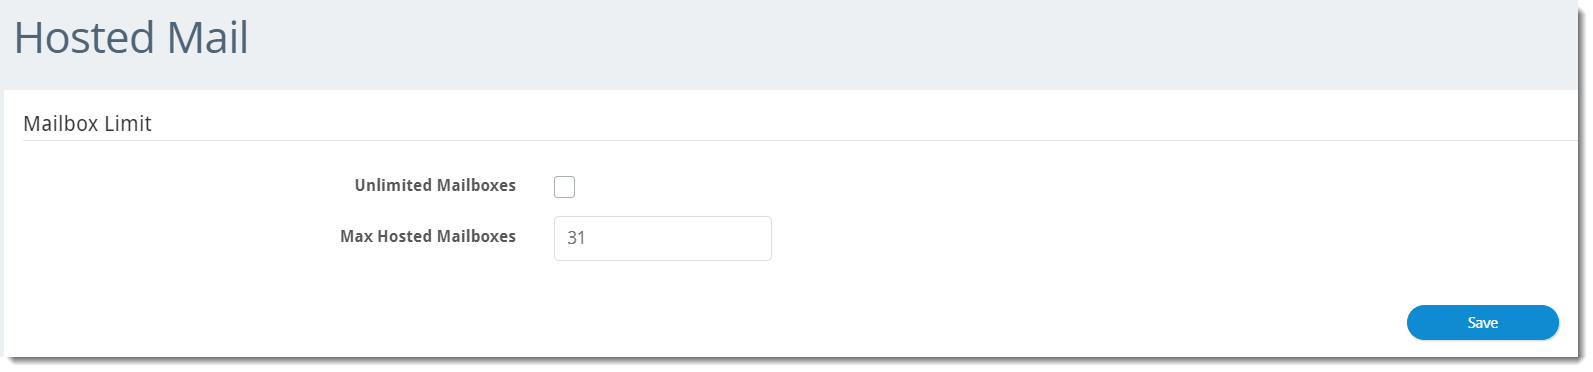
Hosted Mail
The Hosted Mail section controls the number of hosted mailboxes that can be created.
-
Unlimited Mailboxes: If checked, this option puts no limits on the number of hosted mailboxes that can be created
- To enable, click the checkbox and click Save
-
Max Hosted Mailboxes: This option allows you to specify the maximum number of hosted mailboxes that can be created
- To enable, ensure Unlimited Mailboxes is unchecked, specify the desired number, and click Save
Directory Services
This section allows corporate users to sync mailbox lists by syncing with their existing AD (active directory) server.
Connect Tab
Click here for Entra ID
Entra ID for User Management
Microsoft Entra ID (Active Directory) is a cloud-based identity and access mana...
Microsoft Entra ID (Active Directory) is a cloud-based identity and access management service that we've integrated with VIPRE Email Security Cloud allowing Email Cloud to sync user and group accounts that belong to your managed domain.
Important
Only one directory service can be active and enabled at a time. For example, you can use either Azure or LDAP but not both. Enabling one directory service will disable the other. You will be prompted before saving the new configuration.
When switching from one directory service to the other, previously synced users no longer in the current directory service sync will be considered user conflicts. These users can be found in the User Conflict Tab and are marked for deletion as directed in the Delete User After setting.
There are two main parts to set up the Entra ID integration with Email Security Cloud.
Part 1 - Configure Entra ID Integration
Follow the steps below to configure Entra ID to integrate with VIPRE Email Security Cloud. These steps all take place in Entra ID and assume you already have a Microsoft Azure account.
Step 1 - New App Registration
- Navigate to portal.azure.com and log in with your Microsoft Azure account credentials
- On the left-side menu, under Manage, select App registrations
- Click New Registration and name your registration
- Any name will work but it's recommended to use a name that identifies what app you're registering (e.g., in this case, VIPRE Email Cloud)
- Click Single tenant
- Skip the redirect URI and click Register
Step 2 - API Permissions
- On the left-side menu, under Manage, select API Permissions
- Select Add a permission
- Select Microsoft Graph
- This is the API that the Email Cloud portal uses to communicate with Azure
- Select Application Permissions
- Select the following Application Permissions
- Directory > Directory.Read.All
- Group > Group.Read.All
- GroupMember > GroupMember.Read.All
- User > User.Read.All
- Click Add Permissions
- Look for the row that shows User.Read, click the ellipses (...) on the right, and select Remove Permission
- Click Grant admin consent for <your.tenant.name.here>

Step 3 - Certificates & Secrets
- In the breadcrumb trail, select the API name
 Example showing where to locate the tenant and API names. Your tenant name, and API name, won't match this image.
- On the left-side menu, select Certificates & secrets
- Under Client secrets, click New client secret and fill in the following information:
- Description - This can be whatever you want
- Expires - No matter which timeframe you choose, it's important to set a reminder for yourself to both create a new client secret, and save the new client secret into the Azure Connect tab (step 5 below), before expiry. Failure to do so could break the sync between Email Cloud and Entra ID.
- Click Add
Step 4 - Gather Necessary Info for VIPRE Email Cloud
- Open a new text file on your computer and copy/paste the following information from the Microsoft Entra ID portal into the blank text file:
- Under Client secrets, copy the Value and paste it into your blank text file

- In the breadcrumb trail, select the API, copy the Application (client) ID and paste it into your text file
- From the same page, copy the Directory (tenant) ID and paste it into your text file

- Under Client secrets, copy the Value and paste it into your blank text file
Part 2 - Enable and Sync Entra ID
In part two, we'll take what we did in the Entra ID portal and configure it to sync with VIPRE Email Security Cloud.
Step 5 - Connect
- In a separate browser tab, navigate to your Email Cloud admin portal and log in
- On the left-side menu, click Service Settings, then select Directory Services
- On the main page, select Entra ID

- Place checkmark next to Enable Azure Sync
- Copy the Directory (tenant) ID) from your text file and paste it into the Tenant Domain field
- Copy the Application (client) ID from your text file and paste it into the Client ID field
- Copy the Client secret from your text file and paste it into the Client Secret field
- Select a Sync Frequency from the dropdown menu
- The default sync frequency is 6 hours
- Select an amount of time to Delete Users After from the dropdown menu; see the User Conflicts section below for more details
- The default is 7 days
- Click the checkbox if you want to include disabled/deactivated user accounts in your sync
- This is unchecked by default
- If you want to include Custom Filters, enter those in the text field here
- Custom Filters are only applied to syncs of users. Groups are not included.
- For full details, including supported custom filters and examples of queries, visit Custom Filters for use with Entra ID Sync to open a new browser tab
- Click Save in the bottom right
- Click Test in the bottom left to verify the connection
- If successful, a green message will appear in the top-right "Azure Connection test was passed"
- If unsuccessful, a red message will appear in the top-right "Azure Connection test failed"
- Verify the Tenant Domain, Client ID, and Client Secret were copied correctly from the Azure portal
- Click Sync Now
- A green message will appear in the top-right "Azure sync has successfully started"
Once the sync has completed, you will be able to see all of your users by clicking Users in the left-side menu. Looking in the Source column, you will be able to tell which users were added via Azure.
 VIPRE Email Security Cloud - Users
Congratulations! You have successfully configured Entra ID to sync with VIPRE Email Security Cloud! Continue reading below to learn how to further manage your Entra ID integration
Managing Entra ID in Email Cloud
Exceptions
The Exceptions tab is where you can select any name from the User List that you want to exclude from the Entra ID sync with VIPRE Email Cloud. This means any exceptions will also be excluded from any custom filters you set up on the Connect tab.
 VIPRE Email Security Cloud - Entra ID Sync Exceptions
To exclude a user, group, or alias from the Entra ID sync:
- In the User List column, which shows a complete view of your directory server, locate the row with the name of the user, group, or alias you want to exclude
- Click the blue arrow in the same row as the name to add that name to the Exception List
- Click Save
Additions
The Additions tab allows you to manually add users to include in the Entra ID sync. For example, this would be useful for adding any new employees that may need to be added in between syncs.
 VIPRE Email Security Cloud - Entra ID Sync Additions
To include an additional user to your Entra ID sync:
- Type the email address of the user you want to include
- Click Add
Users added to your Entra ID sync via this method will be listed on this tab. They will also show up in the list under Users in the left-side menu with the source as Azure.
User Conflicts
The User Conflicts tab will show users that previously synced in the portal but are no longer in the directory server.
 VIPRE Email Security Cloud - Entra ID Sync User Conflicts
Possible actions within this tab are: Delete, Ignore, Export, Deactivate
Example Use-Case
You notice there two users showing in User Conflicts. Let's say that when you were first setting up Entra ID sync, under the Connect tab, you set Delete Users After to 7 days. You're fine with one of the users being deleted because the employee no longer works for your company. The other user, however, is on maternity leave and will be coming back in 12 weeks.
- Click the checkbox next to the user and select your desired action.
In the example above, you could use Ignore so that the user will not be deleted after 7 days.
Click here for LDAP
LDAP Sync for User Management
This article explains the benefits of using LDAP sync for user management and how...
This article explains the benefits of using LDAP sync for user management and how to enable in Email Security.
What is LDAP sync?
For ease of user management with Email Security, use Lightweight Directory Access Protocol (LDAP) Sync. User information that updates in LDAP will automatically replicate to VIPRE Email Security. This lets you continue to use the LDAP system as a single point of user management.
When LDAP Sync is enabled, Email Security considers LDAP the system of truth. Thus, new users in LDAP are automatically added to Email Security. Disabled or deleted users are automatically deleted from Email Security once the deletion delay interval expires. Email aliases are automatically mapped from LDAP secondary email address data.
The sync process can be scheduled to run every 6, 12, or 24 hours, every three days, or weekly. If immediate sync is needed, such as in the case of offboarding an employee, the Email Security administrator can use the Sync Now action to immediately sync the LDAP changes over to Email Security. Network traffic for the sync process is minimized by Email Security, which places a directory service sync agent local to the LDAP directory service. The data that is transmitted back to Email Security is a subset of the LDAP data.
Summary of benefits
Use LDAP sync to enjoy these benefits
- Quickly add users to a new (or existing) Email Security account
- Keep users' account details updated (e.g., name, phone, notes)
- Easily add email aliases to users' accounts
- Ensure disabled, or deleted users cannot access Email Security
Supported directory services
The Email Security LDAP sync feature has been certified with Microsoft Active Directory Services. Since LDAP is a standard protocol, the feature should work with any standard directory that supports LDAP. However, not all directory implementations use the same attributes to store the same types of information; in some cases, this may cause mismatches in data interpretation. If you are attempting to connect Email Security to some other directory, let us know of any issues so that we can account for different schema mappings.
LDAP sync and manual account management
If desired, user management through LDAP sync can be used in conjunction with manual account management. When used in this manner, the LDAP sync process uses a supplemental approach to reconcile user accounts. For example, an email address that has been manually added to Email Security will have its name, phone number, and notes updated from the directory service data. This also means when the user is disabled or deleted in LDAP, that action will not be recognized in Email Security.
LDAP sync processing considerations
Review the information in this section for an understanding of how LDAP sync works with user management in Email Security.
Synchronization rules
The synchronization process uses these rules when scanning LDAP for updates to make in Email Security. If the rules are not met, then the user is not added to the Email Security account.
- System of truth - when LDAP sync is enabled, it is the system of truth for user management within Email Security
- Primary email address - the domain of the primary email address must match a domain that is managed by the Email Security account
-
Secondary email address (aliases)- the domains of secondary email addresses must match a domain that is managed by Email Security AND the primary email address domain is managed by the same Email Security account.
- list of users - when viewing the list of users, you will see secondary email addresses grouped under the users' account for the primary address
-
Domain changes in Email Security- if a domain is removed from management under Email Security, this results in:
- when the removed domain matches a Primary email domain - the user is immediately removed from Email Security and will not appear under LDAP -> Conflicts
- when the removed domain matches a Secondary email domain - the secondary email address is removed from the primary user, as long as Email Security still manages the primary domain
- LDAP attributes - these attributes sync to Email Security: mail, proxyAddresses, member, givenName, sn (Surname), homePhone, mobile, company, department, and notes
Enabling / Disabling of LDAP sync
Take note of the following points when enabling or disabling LDAP sync. The information in this section assumes the synchronization rules (above) are met.
- Single LDAP source - at this time, LDAP sync supports connecting to just one LDAP source
- Enable for new Email Security account - set up LDAP sync connection and use the Sync Now action to quickly add users
-
Enable for existing Email Security account - upon for the first sync event; Email Security will
- Add users - LDAP users that are not found in Email Security will be added
- Update users - user metadata from LDAP will be added to existing users. Qualifying secondary email addresses will be added.
- Delete users -Unless managed manually or by SMTP, Email Security users that are not found in LDAP are flagged for deletion and will be listed under LDAP -> Conflicts
-
Disable LDAP sync - users will stay in Email Security, and you must now manage manually
- User conflicts - no further action will occur for users identified as conflicts at the time of disabling LDAP sync. However, users flagged for deletion will be automatically deleted when the delay interval expires.
Synchronization frequency
The Email Security Administrator controls the frequency at which the LDAP process runs.
- Frequency - Email Security polls LDAP for changes as frequently as every 6, 12, or 24 hours; every three days, or weekly
- Adjusting frequency - polling interval is adjusted through the Poll LDAP Every setting that is located on the Connect tab under Service Settings -> LDAP
- On-demand synchronization - use the Sync Now action to force immediate sync from LDAP to Email Security. This is especially useful when there is an urgent need to add or remove a user.
User Deletion
- Users deleted from LDAP - upon the next sync polling event, newly deleted users will be flagged for deletion in Email Security
- Users disabled in LDAP - are flagged for deletion in Email Security
- Deletion delay interval - LDAP connection setting Delete Users After controls the delay interval, which can be set to 7, 14, or 30 days; or never
-
Physical deletion- users deleted from LDAP are delayed by a minimum of 7 days before Email Security automatically deletes them
- Accidental deletion - the delay interval protects against unintentional removal, or temporary disablement, of accounts that sync over from LDAP
-
When a user is flagged for deletion
- User access disabled - during the delayed deletion interval, users registered for deletion can no longer access Email Security
- User-level rules - user-specific Email Security rules, such as Allow & Deny, are retained during the delete delay interval. Once the user is automatically deleted when the interval expires, the related user rules are deleted.
- User's Archived emails - for a user that is automatically deleted after the delete interval and later activated in LDAP, they will be automatically synced to Email Security. At that time, the user's email archive will be restored.
- Immediate deletion - during the delete delay interval, a user can be manually deleted from Email Security through the User Conflicts tab within the LDAP section of Service Settings
- Ignore deletion - users deleted from LDAP can be retained in Email Security by using the Ignore action (User Conflicts tab) during the deletion delay interval
- Manual deletion - A user that is manually deleted in Email Security will be added back upon the next sync event with LDAP. The user must be deleted from LDAP for them to be permanently deleted in Email Security.
Important
Only one directory service can be active and enabled at a time. For example, you can use either Azure or LDAP but not both. Enabling one directory service will disable the other. You will be prompted before saving the new configuration.
When switching from one directory service to the other, previously synced users no longer in the current directory service sync will be considered user conflicts. These users can be found in the User Conflict Tab and are marked for deletion as directed in the Delete User After setting.
How to enable LDAP sync for user management
LDAP discovery allows VIPRE to scan your network directory for users and automatically add them to the user list.
Step 1. Prerequisite - Firewall permissions for LDAP
To use LDAP sync, you will need to ensure your firewall permits access from the Email Security data centers to your LDAP server.
- Open one of these LDAP ports, based on your use of SSL (recommended) or non-SSL
- SSL: 636
- Non-SSL: 389
- Permit these server IP addresses
|
Email Security Data Center Network Ranges 192.162.216.0/22 (192.162.216.0-192.162.219.255) 208.70.128.0/21 (208.70.128.0-208.70.135.255) 72.35.12.0/24 (72.35.12.0 - 72.35.12.255) 72.35.23.0/24 (72.35.23.0 - 72.35.23.255) |
Step 2. Set up the LDAP connection
- Login to https://email.myvipre.com/ using your Administrator credentials
If you have multiple accounts to administer, you will be presented with your list of accounts.
- From the Administrator Dashboard, expand the Customers menu, then select Customer List
- From the displayed Customer List, select the Customer to which you are adding users
- From the customer dashboard, expand the Service Settings menu. Then, select LDAP
- On the Connect tab of the LDAP Configuration screen, click the Enable LDAP box
- In the Host field, enter the IP address of the LDAP server
- Ensure the SSL option is selected (highly recommended). Deselect if your environment does not support SSL.
- In the Username and Password fields, enter the user account credentials to be used for the sync process
- Enter the Base DN (Domain Name) information using standard LDAP notation, e.g.; ou=myOU,dc=example,dc=com
- In the Poll LDAP Every drop-down, select the frequency at which you would like the sync process to run
- In the Delete Users After drop-down, select the number of days for the deletion delay interval
- Click Show advanced options to specify the LDAP port (if not using the default 389/636)
- Click Test to verify the connection settings
- Click Save to store the configuration changes
If the connection test has failed, double-check the setting provided, revise as necessary and test again
Step 3. Add users
- To immediately discover and add users, select Sync Now. Otherwise, users will sync at the next polling cycle.
The initial sync may take up to an hour, depending on the number of users to be created.
Important Information
Sync: Disabled/deactivated users and public folders are not synced by default in LDAP. Enable the checkboxes to sync disabled/deactivated users and/or public folders.
Custom Filter: Filters are applied to user and group syncs; LDAP search filters are supported
How to disable LDAP Sync
Email Security retains all users when LDAP Sync is disabled. If any users are flagged for deletion, they will still be deleted at the expiration of the deletion delay interval.
Disable LDAP sync
- Login to https://email.myvipre.com/ using your Administrator credentials
If you have multiple accounts to administer, you will be presented with your list of accounts.
- From the Administrator Dashboard, expand the Customers menu, then select Customer List
- From the displayed Customer List, select the Customer to which you are adding users
- From the customer dashboard, expand the Service Settings menu. Then, select LDAP
- On the Connect tab of the LDAP Configuration screen, uncheck the Enable LDAP box
- Click Save to store the configuration changes
LDAP sync is now disabled.
Managing LDAP in Email Cloud
Exceptions
The Exceptions tab is where you can select any name from the User List that you want to exclude from the LDAP sync with VIPRE Email Cloud. This means any exceptions will also be excluded from any custom filters you set up on the Connect tab.
VIPRE Email Security Cloud - LDAP Sync Exceptions
To exclude a user, group, or alias from the LDAP sync:
- In the User List column, which shows a complete view of your directory server, locate the row with the name of the user, group, or alias you want to exclude
- Click the blue arrow in the same row as the name to add that name to the Exception List
- Click Save
Additions
The Additions tab allows you to manually add users to include in the LDAP sync. For example, this would be useful for adding any new employees that may need to be added in between syncs.
VIPRE Email Security Cloud - LDAP Sync Additions
To include an additional user to your LDAP sync:
- Type the email address of the user you want to include
- Click Add
Users added to your LDAP sync via this method will be listed on this tab. They will also show up in the list under Users in the left-side menu with the source as LDAP.
User Conflicts
The User Conflicts tab will show users that previously synced in the portal but are no longer in the directory server.
VIPRE Email Security Cloud - LDAP Sync User Conflicts
Possible actions within this tab are: Delete, Ignore, Export, Deactivate
Example Use-Case
You notice there are two users showing in User Conflicts. Let's say that when you were first setting up LDAP sync, under the Connect tab, you set Delete Users After to 7 days. You're fine with one of the users being deleted because the employee no longer works for your company. The other user, however, is on maternity leave and will be coming back in 12 weeks.
- Click the checkbox next to the user and select your desired action.
In the example above, you could use Ignore so that the user will not be deleted after 7 days.
Troubleshooting
Firewall settings - Verify the Email Security IP addresses have been allowed through the network and domain controller firewall. Verify that your Directory Service is reachable through your firewall.
Account credentials - Confirm the correct user account credentials for Username and Password have been provided and are accurate.
Connection successful but users not populating
When the sync process runs, users will begin to appear in the Users view of the Admin portal. Follow the suggestions below if you do not see the users populating in this view as the sync process runs. After allowing up to 30 minutes for the initial sync process to complete, if many users are missing, then please reach out to our Support team for assistance.
Sync Now - Click the Sync Now button on the Connect tab of the LDAP Configuration screen. You should receive a notification message indicating the sync process has been started.
Managed domain - Verify domain is a managed domain for this Email Security account. From the Email Admin portal, navigate to Domains. The domain(s) shown here must match the domain of the LDAP users' primary email addresses.
Exceptions Tab
The Exceptions tab is where you can select any name from the User List that you want to exclude from the AD sync with VIPRE Email Cloud. This means any exceptions will also be excluded from any custom filters you set up on the Connect tab.
To exclude a user, group, or alias from the AD sync:
- In the User List column, which shows a complete view of your directory server, locate the row with the name of the user, group, or alias you want to exclude
- Click the blue arrow in the same row as the name to add that name to the Exception List
- Click Save
Additions Tab
The Additions tab allows you to manually add users to include in the AD sync. For example, this would be useful for adding any new employees that may need to be added in between syncs.
To include an additional user to your AD sync:
- Type the email address of the user you want to include
- Click Add
Users added to your AD sync via this method will be listed on this tab. They will also show up in the list under Users in the left-side menu with the source as Azure or LDAP.
User Conflicts Tab
The User Conflicts tab will show users that previously synced in the portal but are no longer in the directory server.
General Templates
This section allows you to customize the general notification template that will be applied to password reset emails.
- Sender Email Address: The address that the notification emails will appear to be sent from (i.e. the MIME From header)
- Logo: An image which will appear at the top of general notification emails.
- Template Header: This will be inserted at the top of general notification emails.
- Template Footer: This will be inserted at the bottom of general notification emails.
SAML
SAML Authentication
VIPRE Email Security Cloud supports the use of SAML, allowing for integration wit...
VIPRE Email Security Cloud supports the use of SAML, allowing for integration with SSO identity providers.
What is SAML?
SAML (Security Assertion Markup Language) is an open standard that allows for authentication and authorization between an identity provider (IDP) and a service provider (SP).
Configuration
SAML configuration occurs in both the IDP admin portal and the VIPRE Email Security Cloud admin portal.
Choose your IDP below for specific instructions on configuring SAML with VIPRE Email Cloud for single sign-on. Please know that while we are working to provide instructions for as many of the most common IDPs as we are able, we have not provided instructions for all of them. If your IDP is not represented below, you can use the instructions below as a general guide. If you require further assistance, contact Technical Support.
Okta
- Log in to the Email Cloud portal
- On the left-side menu, find Service Settings, then select SAML
- Click Configure SAML

- Open a separate browser tab and navigate to your Okta admin portal
- In your Okta portal, select Applications > Applications on the left-side menu
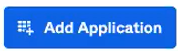
- In the main part of the screen, select Add Application
- Click Create a New App in the top-right
- Select SAML 2.0 as the Sign on Method and click Create
- On the General tab, under SAML Settings, click Edit
- App name can be any name you want to use to identify the Email Security Cloud application within Okta
- All other options are based on your organization's desired decisions
- Click Next to get to the Configure SAML screen within Okta
- Go back to the browser tab that has your Email Cloud portal open and copy the Entity ID from the Service Provider Metadata screen
- In the browser tab that you're using for Okta, paste the Entity ID into the Audience URI (SP Entity ID) field
- Go back to the browser tab that has your Email Cloud portal open and copy the Single Sign On URL from the Service Provider Metadata
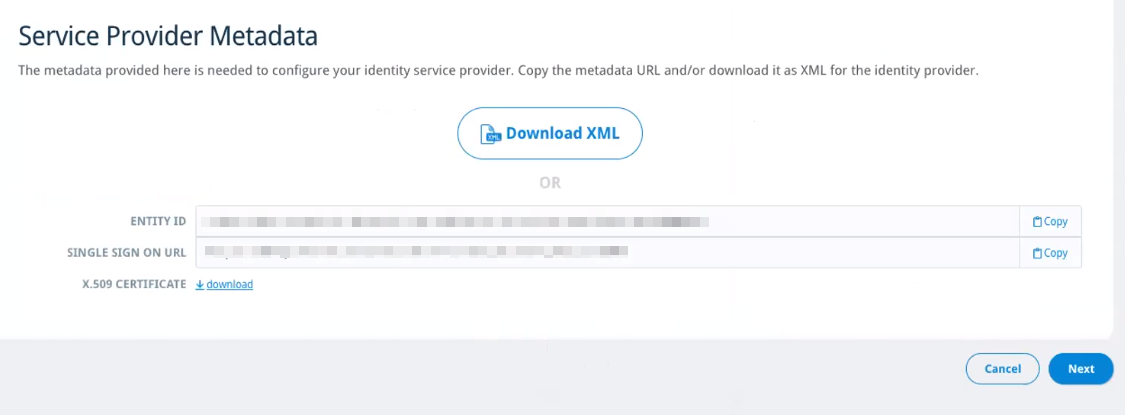
- In the browser tab that you're using for Okta, paste the Single Sign On URL into the Single sign on URL field
- Under Single sign on URL, Use this for Recipient URL and Destination URL should already be checked by default
- Ensure the following configurations are set in your Okta portal:
- Name ID format should be set to EmailAddress
- Application username should be set to Email
- Click Show Advanced Settings at the bottom of the page to continue
- Response should be set to Signed
- Assertion Signature should be set to Signed
- Assertion Encryption should be set to Unencrypted
- All other settings can remain in their default state
- Scroll to the bottom of the page and click Next
- Click Finish
- In the middle of the page, you'll see a message that SAML has not yet been configured; click View Setup Instructions
- You'll come to a page explaining how to configure SAML 2.0 for your application
- Go back to the Email Cloud portal and click Next to get to the Identity Provider Metadata page
- Select Enter Manually
- Go back to the Okta portal and copy the Identity Provider Issuer
- In the Email Cloud portal, paste the Identity Provider Issuer from Okta into the Entity ID field
- Go back to the Okta portal and copy the Identity Provider Single Sign-On URL
- In the Email Cloud portal, paste the Identity Provider Single Sign-On URL from Okta into the Single Sign On URL field
- Go back to the Okta portal and click Download certificate
- In the Email Cloud portal, next to X.509 Certificate, click Upload, then select the certificate you downloaded from Okta
- Next to Mailbox Attribute, select the radio button for Name ID; this is an email address
- Click Next
- On the Test screen, there are multiple steps:
- Copy the login link provided in Step 1
- Open an Incognito browser tab and navigate to the login link
- It will simulate a login screen that should look similar to your Okta admin portal
- You will need to have manually created identical users in both Okta and Email Cloud
- In the navigation pane, expand the Users menu, then select Users.
- On the right side of the Users panel, select the green + plus sign.
- In the Add:User panel, fill out the information in all required fields.
- (Optional) You can add additional information (phone numbers, notes, etc.) by selecting the Additional checkbox.
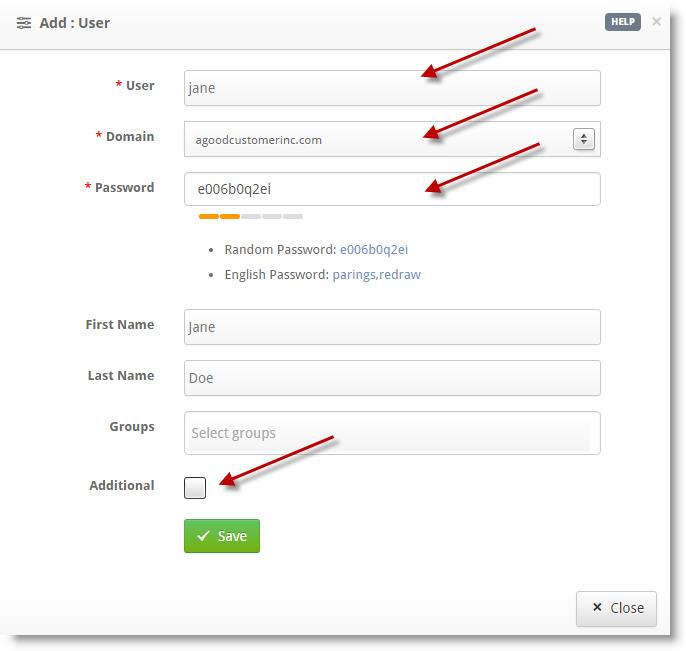
- Once completed, select Save
- (Optional) You can edit Settings, Quarantine, Filtering, and Routing information on a per-user basis.
- Confirm the user information is correct, then select Close
- Log in with your Okta account as directed in Step 2
- Once you log in successfully, go back to your Email Cloud admin portal browser tab and you should see the following test results:
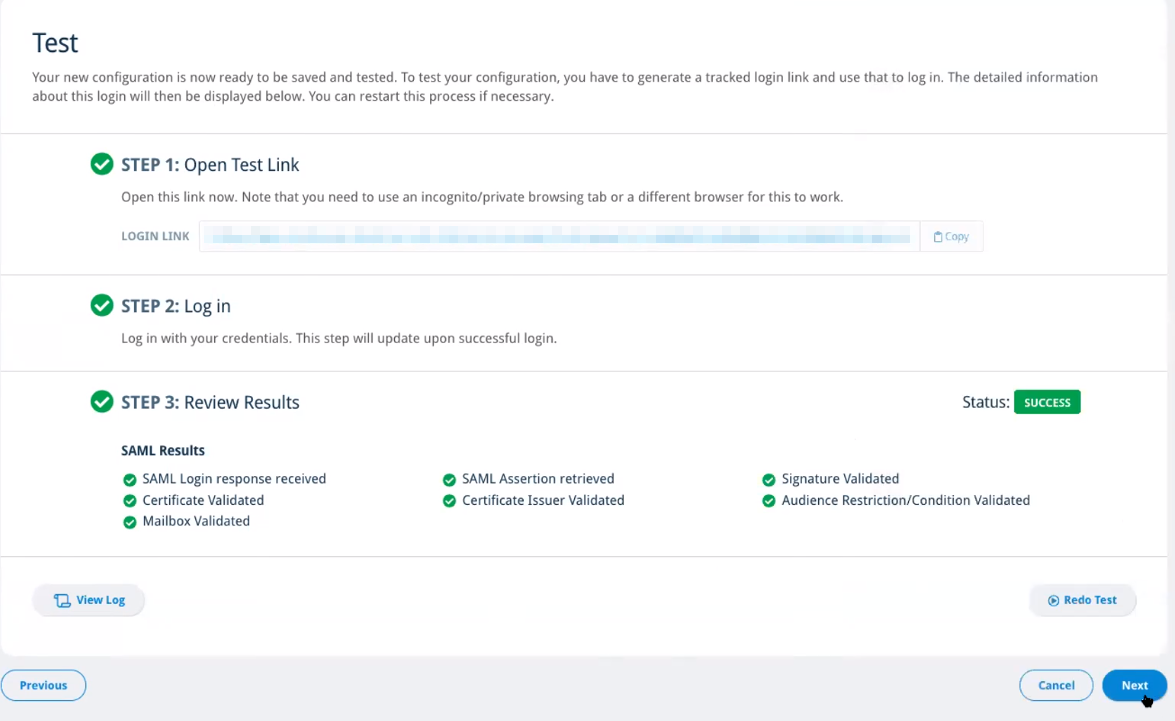
- If you have any errors in Step 3, refer to SAML SSO Error Codes and select Redo Test, noting that you will need to copy the new login link provided in Step 1
- Once all SAML Results pass validation in Step 3, click Next
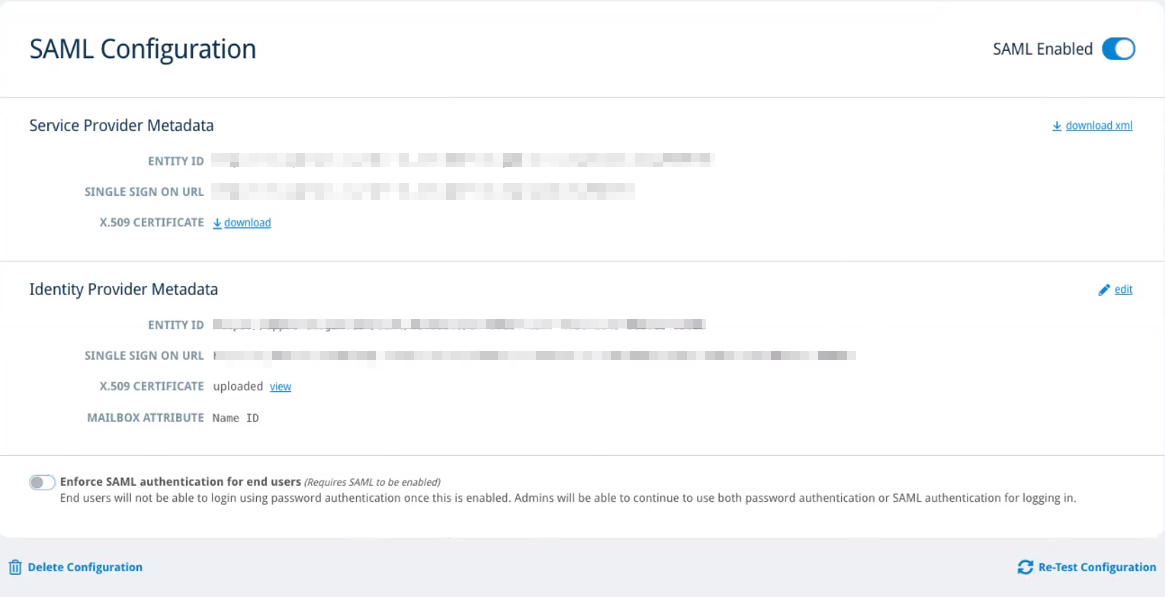
- On the SAML Configuration Summary page, you'll have the option to require all of your users to login via SAML only by selecting Enforce SAML Authentication for End Users
- If you opt to enforce SAML for all of your end-users, a window will pop up asking you to confirm your choice; select OK
- Click Save & Enable to save your configuration and enable SAML
- You can also select Save to save your configuration and enable SAML at a later time
SAML SSO with Okta has now been configured with Email Cloud. Whenever you click SAML on the left-side menu, you'll see a page that looks similar to this:
Access Email Cloud with SSO
Once a user is signed in to Okta, they will only need to enter their email address to access their email.
- Navigate to your Email Cloud login portal
- Click Single Sign On (SSO)

- Enter your email address and click Continue
That's it!
OneLogin
- Log in to the Email Cloud portal
- On the left-side menu, find Service Settings, then select SAML
- Click Configure SAML
- Open a separate browser tab and navigate to your OneLogin admin portal
- In your OneLogin portal, find the application details under Configuration in the left-side menu
- Go back to the browser tab that has your Email Cloud portal open and copy the Entity ID from the Service Provider Metadata
- In the browser tab that you're using for OneLogin, paste the Entity ID into the Audience (EntityID) field
- Go back to the browser tab that has your Email Cloud portal open and copy the Single Sign On URL from the Service Provider Metadata
- In the browser tab that you're using for OneLogin, paste the Single Sign On URL into the ACS (Consumer) URL field
- Paste the same Single Sign On URL into the Recipient field in your OneLogin portal
- Ensure the following configurations are set in your OneLogin portal:
- SAML nameID format = Email
- SAML signature element should be either Assertion or Both from the drop-down menu
- Go back to the Email Cloud portal and click Next to get to the Identity Provider Metadata page
- In the OneLogin portal, in the top-right, choose SAML Metadata from the More Actions drop-down menu to download an XML file

- Go back to the Email Cloud portal and upload the XML file you just created from OneLogin; this will auto-populate the IDP metadata

- Next to Mailbox Attribute, select the radio button for Name ID; this is an email address
- Click Next
- On the Test screen, there are multiple steps:
- Copy the login link provided in Step 1
- Open an Incognito browser tab and navigate to the login link
- It will simulate a login screen that should look similar to your OneLogin admin portal

- Log in with your OneLogin account as directed in Step 2
- Once you log in successfully, go back to your Email Cloud admin portal browser tab and you should see the following test results:
- If you have any errors in Step 3, refer to SAML SSO Error Codes and select Redo Test, noting that you will need to copy the new login link provided in Step 1
- Once all SAML Results pass validation in Step 3, click Next
- On the SAML Configuration Summary page, you'll have the option to require all of your users to login via SAML only by selecting Enforce SAML Authentication for End Users
- If you opt to enforce SAML for all of your end-users, a window will pop up asking you to confirm your choice; select OK
- Click Save & Enable to save your configuration and enable SAML
- You can also select Save to save your configuration and enable SAML at a later time
SAML SSO with OneLogin has now been configured with Email Cloud. Whenever you click SAML on the left-side menu, you'll see a page that looks similar to this:
Access Email Cloud with SSO
Once a user is signed in to OneLogin, they will only need to enter their email address to access their email.
- Navigate to your Email Cloud login portal
- Click Single Sign On (SSO)
- Enter your email address and click Continue
That's it!
Entra ID
If you subscribe to Entra ID for User Management as well and haven't already set up Email Cloud to sync user and group accounts that belong to your managed domain, refer to Related Articles for full details. The following instructions assume that Entra ID and Email Cloud are already syncing users.
- Log in to the Email Cloud portal
- On the left-side menu, find Service Settings, then select SAML
- Click Configure SAML
- Open a separate browser tab and navigate to your Azure admin portal
- In your Azure portal, under Azure Services, select Enterprise Applications
- Click New Application at the top
- On the Browse Entra ID Gallery page, click Create your own application
- Azure will ask you to name your app and how you will be using your new application; add your desired app name in the appropriate field, select Integrate any other application you don't find in the gallery, then click Create at the bottom
- In the left-side menu, under Manage, click Single sign-on
- Select Upload metadata file
- Go back to the browser tab that has your Email Cloud portal open and click download XML from the Service Provider Metadata page
- In the browser tab that you're using for Azure, click Select a file and navigate to the XML file you downloaded from Email Cloud
- Click Add and it will automatically populate the Basic SAML Configuration (Entity ID and Assertion URL)
- Under User Attributes & Claims, click Edit
- Name identifier format should be Email address
- Source should be Attribute
- Source attribute has two possible options:
- user.userprincipalname should only be used if you know for sure the domain in the userprincipalname is a managed domain in Email Cloud
-
user.mail should be used if the domain in the userprincipalnameis not a managed domain in Email Cloud
- Visit Microsoft Docs for full details on Entra ID UserPrincipalName Population
- Click Save
- Scroll down, under SAML Signing Certificate, and click Download next to Federation Metadata XML
- Go back to the Email Cloud portal and click Next to get to the Identity Provider Metadata page
- Upload the XML file you just created from Azure by dragging and dropping the XML file or navigating to where you downloaded the file; this will auto-populate the IDP metadata
- Next to Mailbox Attribute, select the radio button for Name ID; this is an email address
- Click Next
- On the Test screen, there are multiple steps:
- Copy the login link provided in Step 1
- Open an Incognito browser tab and navigate to the login link
- It will simulate a login screen that should look similar to your Azure admin portal
- Log in with your Azure account as directed in Step 2
- Once you log in successfully, go back to your Email Cloud admin portal browser tab and you should see the following test results:
- If you have any errors in Step 3, refer to SAML SSO Error Codes and select Redo Test, noting that you will need to copy the new login link provided in Step 1
- Once all SAML Results pass validation in Step 3, click Next
- On the SAML Configuration Summary page, you'll have the option to require all of your users to login via SAML only by selecting Enforce SAML Authentication for End Users
- If you opt to enforce SAML for all of your end-users, a window will pop up asking you to confirm your choice; select OK
- Click Save & Enable to save your configuration and enable SAML
- You can also select Save to save your configuration and enable SAML at a later time
SAML SSO with Azure has now been configured with Email Cloud. Whenever you click SAML on the left-side menu, you'll see a page that looks similar to this:
Access Email Cloud with SSO
Once a user is signed in to Azure, they will only need to enter their email address to access their email.
- Navigate to your Email Cloud login portal
- Click Single Sign On (SSO)
- Enter your email address and click Continue
That's it!
M365 Integration
Important
Microsoft 365 Integration is available for VIPRE Email Advanced Threat Protection subscribers. Remediation is only available once Microsoft 365 Integration is configured and enabled.
Microsoft 365 Integration and Remediation allows administrators to remediate any email suspected of being malicious or undesirable directly from a user's Microsoft 365 mailbox.
Microsoft 365 Integration
To configure your Microsoft 365 integration:
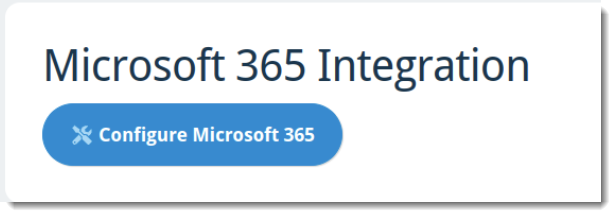
- In Email Cloud, under Service Settings on the left side navigation bar, select M365 Integration
- Click Configure Microsoft 365 to log in to your Microsoft 365 account
- Please note that you must have administrator access to your organization's Microsoft 365 Tenant to ensure a successful integration
- Microsoft will ask you to accept all permissions VIPRE is requesting - click Accept
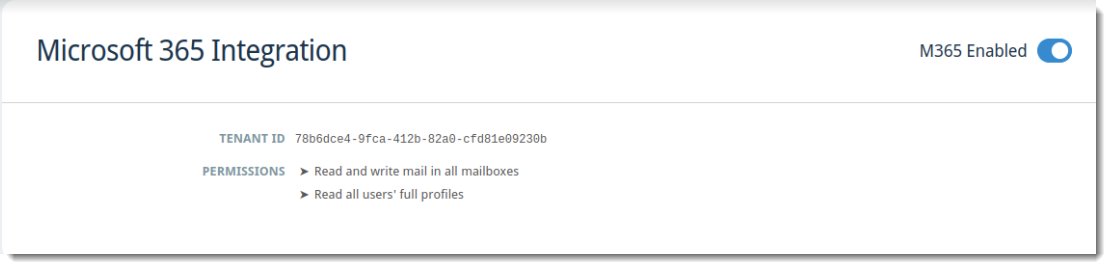
When successfully configured/enabled, the Microsoft 365 Integration screen will look like this:
My Microsoft 365 Integration failed. What do I do?
When the Microsoft 365 Integration is not successful, the screen will look like this:
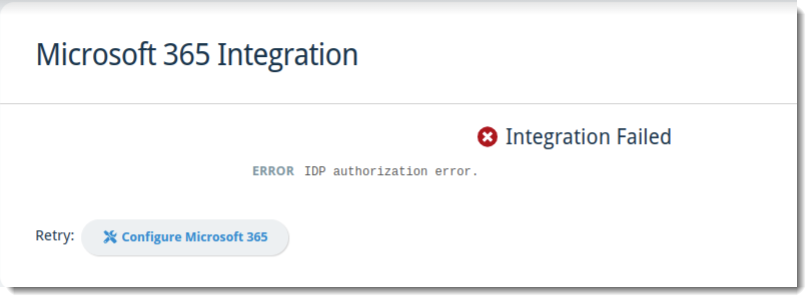
If your integration attempt fails, ensure you have administrative access to your Microsoft 365 tenant and verify your credentials before clicking Configure Microsoft 365 next to Retry.
Remediation
After enabling M365 Integration, there are four places within Email Security where you can remediate email messages:
Message Logs
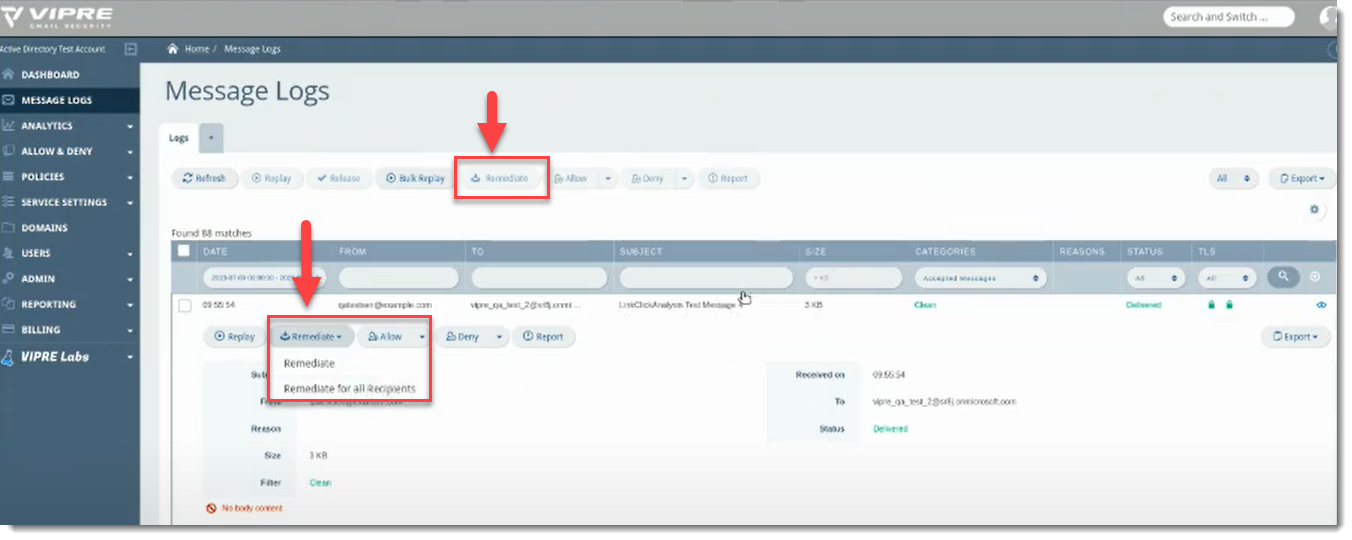
- Select Message Logs on the left side menu
- You will notice the Remediate action at the top; if you expand the details of a specific message, you will have the option to choose Remediate or Remediate for all Recipients
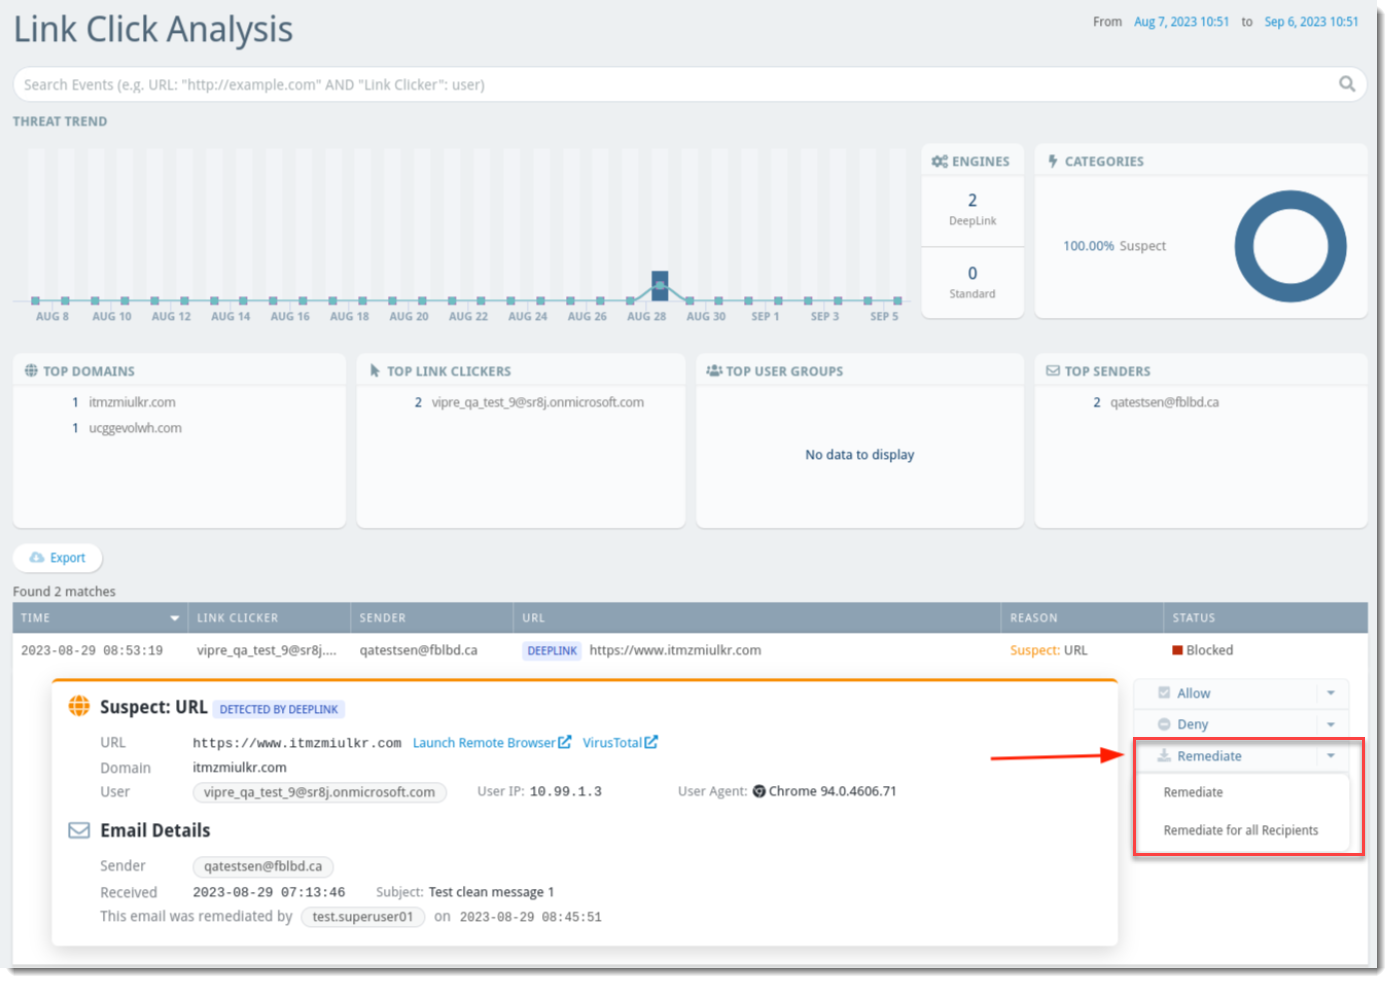
Analytics
- Select Analytics on the left side menu
- Choose Link Click Analysis, Threat Explorer, or Policy Explorer as desired
- Within the data table towards the bottom of the page, you will have the option to choose Remediate or Remediate for all Recipients if you expand the details of a specific message
Once a message has been remediated, it will be removed from the Inbox and moved to a hidden folder.