
Have you ever mistakenly sent an email to the wrong person? Accidentally forwarded attachments with sensitive data? The VIPRE SafeSend PC Add-in is an Outlook add-in that works to prevent those types of mistakes within your organization by requesting manual confirmation from the user when sending emails to recipients outside of your organization.
If you're new to VIPRE SafeSend, this is the place to start. We're here to walk you through deployment with this guided setup. If you haven't seen our product overview and comparison chart though, please visit there first.
How SafeSend Works
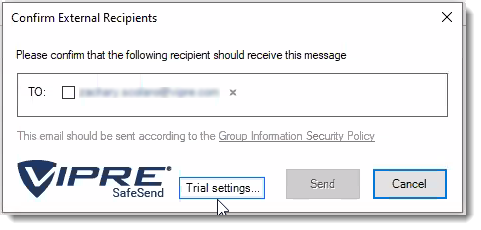
When installed, SafeSend requires validation each time you send an email to an external recipient. You will need to confirm all external recipients of an email before it leaves the network. Upon hitting “Send” or “Send Secure,” the SafeSend pop-up window will appear. To confirm the recipients or any attached file, click on the checkbox beside each of the external recipients (and file if applicable) and hit the Send button.
What's Included
When you unzip your SafeSendArchive-[version].zip file, you will find the following contents. This guide will focus on the files inside the SafeSendPC_[version] folder.
- 3rd Party Licenses (txt file)
- Get_Started_With_SafeSend (pdf)
- Contains helpful links and resources to begin the setup process.
-
SafeSendPC_[version] (For the PC/COM Add-in)
- Administrative Templates: For managing settings via Group Policy after deployment.
- Admin Password: Credentials for local access to settings (not applicable for trial licenses).
- SafeSendSetup: The .MSI installer for the PC add-in.
- SafeSendWeb_5.5.6.12 (For v5.5 of the Web Add-in)
- End-User License Agreement (EULA) (txt)
- Packagename (txt)
- Deployable files (e.g., SafeSendWebPackage[version].zip)
- SafeSendWeb_[version] (For v6.0 and higher of the Web Add-in)
- azure-deploy (txt)
- This is the deployment script that is discussed in detail in Step 1: Deployment Script Customization below
- End-User License Agreement (EULA) (txt)
- azure-deploy (txt)
For these instructions, you will need everything within the SafeSendPC_[version].zip file mentioned above.
Important Terminology
Before we begin, let's define some terms that will show up often within our content.
Initial Install
The local installation of SafeSend that allows you to apply configurations and customizations before deployment to the end-users
Deploy / Deployment
The distribution of SafeSend after all configurations and customizations have been applied to a newly generated MSI (Microsoft Installer)
Customize / Customization
The modification of specific SafeSend features
Configure / Configuration
The use of settings within SafeSend to change its behavior
Complete Setup Checklist
To get you started with VIPRE SafeSend, we've created a checklist to get you from the initial install to configuration and customization, and finally end-user deployment.
| Step | How to accomplish (with links to the respective articles) |
|---|---|
| 1. Initial Install | Initial Install of VIPRE SafeSend |
| 2. Customize |
|
| 3. Configure |
|
| 4. Create a Custom Installer (MSI) | Generate a Custom Installer |
| 5. End-User Deploy |
|
When you are ready, move on to the next step below.
Initial Installation
If you are new to SafeSend and setting it up for the first time, please stop here and navigate to our complete deployment guide.
SafeSend PC add-in can be deployed to end-user PCs individually or using Group Policy, but whether you are planning to use SafeSend on just a couple of computers or in an Enterprise-wide deployment, the first step remains the same: install VIPRE SafeSend locally.
Install Locally
Follow these steps to install SafeSend locally, on an individual PC.
- Double-click on the installer package
- Accept the End-user License Agreement
- Click Install
Now that VIPRE SafeSend is installed on your local PC, it's time to make it work specifically for your needs!
The first thing you'll want to do is customize VIPRE SafeSend to your organization. You can do things like setting the Administrative password and adding your organization's logo for a personalized look and feel. Once you've got it customized, then you'll want to take a look at the settings and really configure how you want SafeSend to behave.
We've already discussed the differences between customizing and configuring, so let's get started.
Add your Organization's Logo
You can customize the look and feel of VIPRE SafeSend by uploading a personalized logo. This optional step is a great way to integrate SafeSend with your organization seamlessly.
Important
This article is part of the SafeSend PC Add-in Deployment Guide, which includes all successive steps needed for a successful deployment. Please refer to Related Articles for direct links to the deployment guide and other processes pertinent to the one detailed in this article.
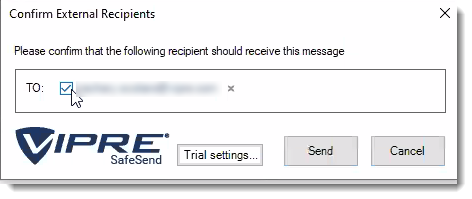
Image Requirements
Before uploading your logo, make sure it meets the following requirements:
- Image size must be no larger than 50x180
- Image type must be .png
Images with transparent backgrounds are recommended so that your logo matches the rest of SafeSend.
Now that you have an image that meets the above requirements, let's move on to uploading it.
Add Logo
- In Outlook, on the top left, click File
- Go down to Outlook Options and select Add-Ins
- Select Add-in Options
- Locate and click Change Logo
- Browse to the image you want to use and click Open
- Click OK at the bottom
Now, your logo is part of SafeSend!
If you are following the guided setup, click Next Step below to continue to the next part of the SafeSend PC Add-in Deployment Guide. Otherwise, see Related Articles below to learn how to store settings.
Prevent End-users from Disabling VIPRE SafeSend
Let's walk through how you can prevent users from disabling the SafeSend PC add-in.
Outlook 2007-2010
It is possible to prevent users from disabling the SafeSend Add-in in Outlook 2007 or 2010 using the registry key DontDisplayHKLMAddin.
The image below shows how it looks after the registry key DontDisplayHKLMAddins has been set. As can be seen, SafeSend is not visible even though it is loaded. This registry key DontDisplayHKLMAddins can also be set using GPO.
Setting this key will affect all HKLM type of add-ins, in that none of them can be disabled by the end-user anymore. This potential issue is solved in Outlook 2013 or later.
- Log in to a normal user account
- Using Regedit, open HKEY_CURRENT_USER\Software\Microsoft\Office\14.0\Outlook
- If the current user does not have a key for "Security", add it
- Add the DontDisplayHKLMAddinsDWORDValue in the Security key. Set the value to 1
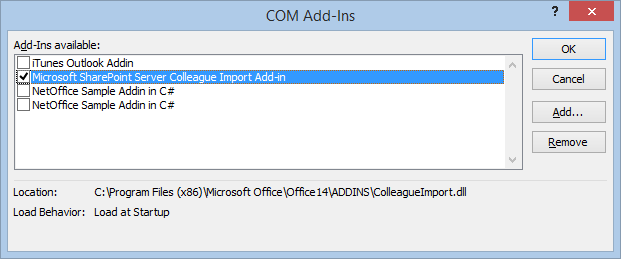
- In the Manage COM Add-ins dialog, click Go. SafeSend is not visible, even though it is loaded.
There is no need to restart Outlook, since Outlook reads this registry entry when you click the Go button.
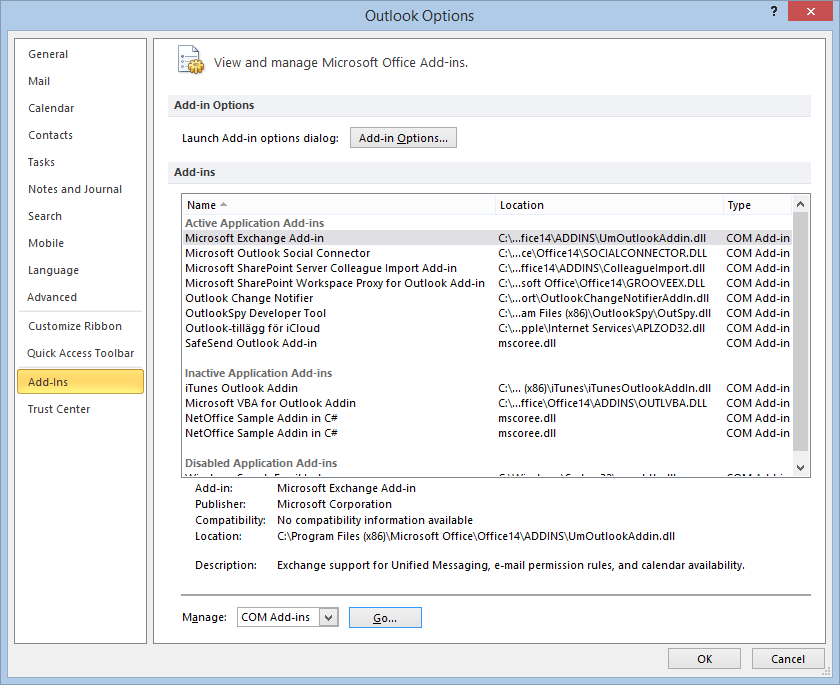
Outlook 2013 or Outlook 2016
It is possible to prevent users from disabling the SafeSend Add-in in Outlook 2013 or Outlook 2016 using group policy.
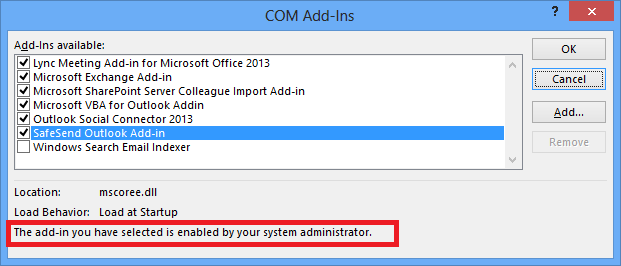
The image below shows how it looks after the group policy setting is enabled. A user cannot uncheck the “SafeSend Outlook Add-in” checkbox as can be seen in the text marked in red.
- Open Group Policy and check that the Office 2013/2016 Administrative Templates are installed
- If the templates are installed, you will see the “Microsoft Outlook 2013/2016” in the User Configuration > Administrative Templates > Microsoft Outlook 2013> Miscellaneous path
- If the templates are not installed, you can download the templates from Microsoft. View this Microsoft article for help installing the template
.png)
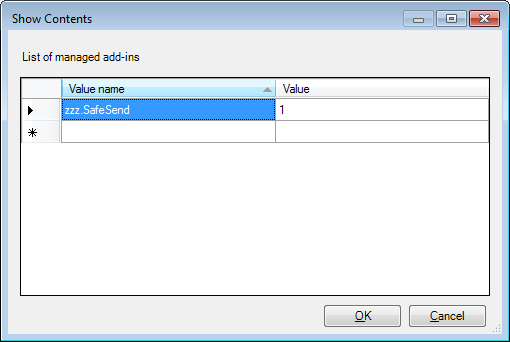
- Enable the “List of managed add-ins” policy setting
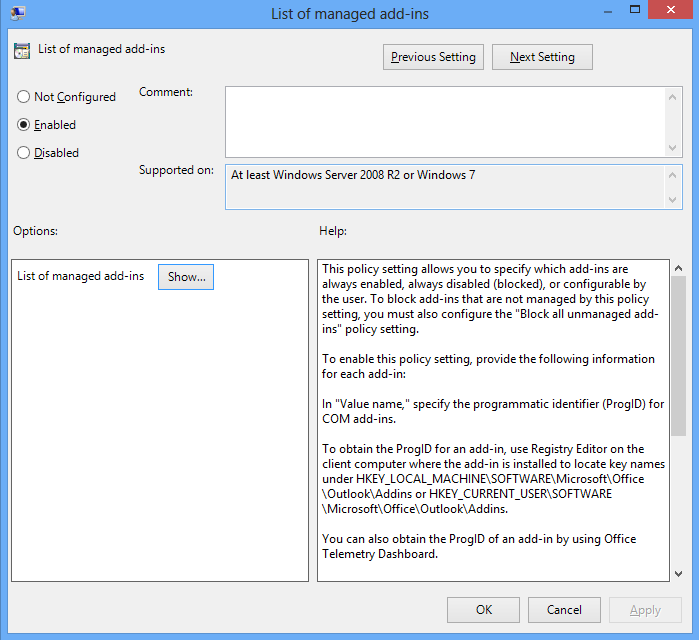
- Write “zzz.SafeSend” (the add-ins progId) and 1 for the Value in this setting. Can also click the “Show” button above to get the dialog below. The value 1 means that SafeSend cannot be disabled by users.
An alternative way to achieve this is to push a registry key manually using GPO; see below for the path.
For Outlook 2013 the “16.0” part should be replaced a “15.0” part. Please note that the registry type should be REG_SZ. This can also be tested on a single machine by creating the registry key in regedit. If GPO is being used then please make sure there is no conflict with another GPO that is configuring the same setting using administrator templates.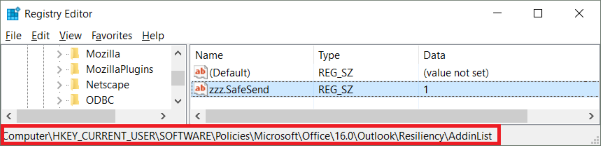
Configure VIPRE SafeSend
If you want to get started using SafeSend with the default configuration, you can skip this step.
Important Information
This article is part of the SafeSend PC Add-in Deployment Guide, which includes all successive steps needed for a successful deployment. Please refer to Related Articles for direct links to the deployment guide and other processes pertinent to the one detailed in this article.
VIPRE SafeSend Settings
There are two ways to get to VIPRE SafeSend's settings, depending on if you are using a trial or have purchased a full license.
Click here if using a trial license
- Select Trial Settings in the Confirmation window pop-up
- In the Logic tab, click on the arrows next to Advanced, Commonly used, and Special cases to see options available to you
- Refer to our settings reference for full details on how to use all settings
Click here if using a full license
- In Outlook, on the top left, click File
- Go down to Outlook Options and select Add-Ins
- Select Add-in Options
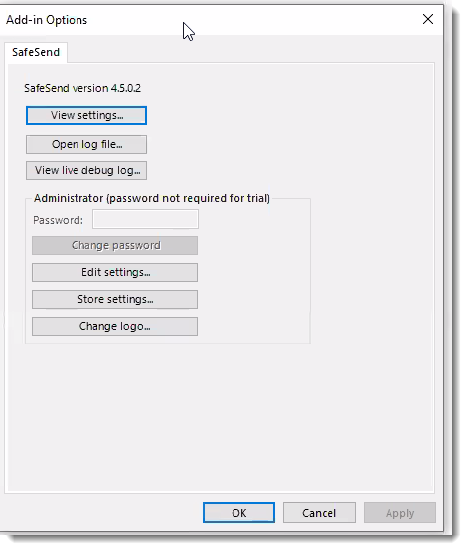
- Click Edit Settings, which allows you to customize the behavior of VIPRE SafeSend
- In the Logic tab, click on the arrows next to Advanced, Commonly used, and Special cases to see options available to you
- Refer to our settings reference for full details on how to use all settings
Helpful Information
While we do provide a comprehensive settings reference to help determine what makes the most sense for your organization, we understand that it can be a little overwhelming. To help make things a little easier for you, VIPRE SafeSend ships with the settings we recommend already configured by default. However, because each organization has unique needs, we suggest going through the settings reference, specifically the Commonly Used and Advanced sections, to ensure SafeSend is set up appropriately for your organization.
If you'll be deploying VIPRE SafeSend via Group Policy and will be moving forward with the default configuration, we've included ADMX/ADML files (administrative templates) in the SafeSendArchive-v.r.m.b.zip file you downloaded that will allow you to push changes to your organization after it's been deployed.
Configure Data Loss Prevention
VIPRE SafeSend can prevent sensitive information from being sent out to the wrong client.
Important Information
This article is part of the SafeSend PC Add-in Deployment Guide, which includes all successive steps needed for a successful deployment. Please refer to Related Articles for direct links to the deployment guide and other processes pertinent to the one detailed in this article.
Within VIPRE SafeSend, DLP (Data Loss Prevention) has three important features:
- Client Keyword/Domain Scanning allows you to identify a set of client keywords or regular expressions and associate those with a set of client domains or individual email addresses
- DLP Content Scanning presents sensitive content to the user, allowing the user to determine if the email should be blocked or sent with additional confirmation
- DLP Scan Password-Protected Attachments allows SafeSend to detect password-protected .zip files and prompt the user to add the password and decrypt the file so it can scan the attachment
It can scan emails and attachments for specific client keywords or regular expressions and require agent confirmation.
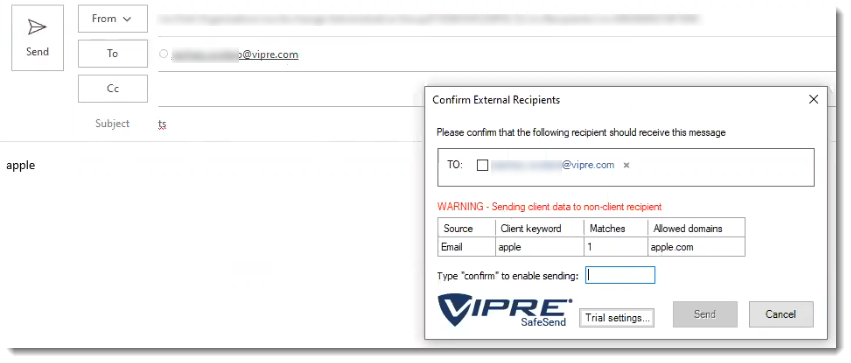
Client Keyword and Domain Scanning
Define Client Data
The client keyword/domain data is configured in Edit Settings, under the Data Loss Prevention (DLP) tab, and stored in the setting SS_ClientKeywordDomainList; it can contain thousands of lines of client/customer data. The principle is that you can identify a set of client keywords or regular expressions and associate those with a set of client domains. Instead of domains, it is also possible to specify individual email addresses as approved recipients.
Syntax: Client1Keyword1,Client1Keyword2,…:Client1Domain1,Client1Domain2,… Client2Keyword1,Client2Keyword2,…:Client2Domain1,Client2Domain2,…
Example: Apple,AAPL:apple.com Microsoft,MSFT:microsoft.com
Display Popup only when Client Data is Found
It is possible to use the setting OnlyPopupForDLPMatch to configure SafeSend to display its confirmation window only when client data has been found in the email.
Supported Attachment File Types
- Text: csv, txt
- PDF: pdf
- HTML: html, xhtml
- Word: doc, docx
- PowerPoint: pptx, ppsx, pptm, ppt, pot, pps
- Excel: xls, xlsx, xlsm, xlt, xltx, xltm
- RTF: rtf
- ZIP: zip (recursively)
Sending to Non-client Recipients
The user is required to type “CONFIRM” in order to send client data to a non-client external domain.
Sending to Approved Recipients
No additional confirmation is required except confirming the external recipient.
Sending Non-client Data Externally
What happens, in this case, depends on the OnlyPopupForDLPMatch setting. If it is enabled then the SafeSend confirmation window will not be displayed. If it is disabled, which is the default behavior, then SafeSend will still show its normal confirmation window. The below screenshot is thus displayed only if OnlyPopupForDLPMatch = 0.
Password Protected Files or Invalid Files
SafeSend displays password-protected files or invalid files in the DLP output table. Password protection is detected on Word, Excel, PowerPoint, PDF, and ZIP files.
Scanning Email Notification
The Scanning Email notification is displayed when OnlyPopupForDLPMatch is enabled, and SafeSend is busy scanning large files. The default time-out for large files is 10 seconds (see ContentScanningTimeoutMS), whereby SafeSend will post an error message in the dialog, saying that the content scan timed out.

DLP Content Scanning
Sensitive content is presented to the user, and you can define if the email should be blocked, or if the user can send the email after an additional confirmation.
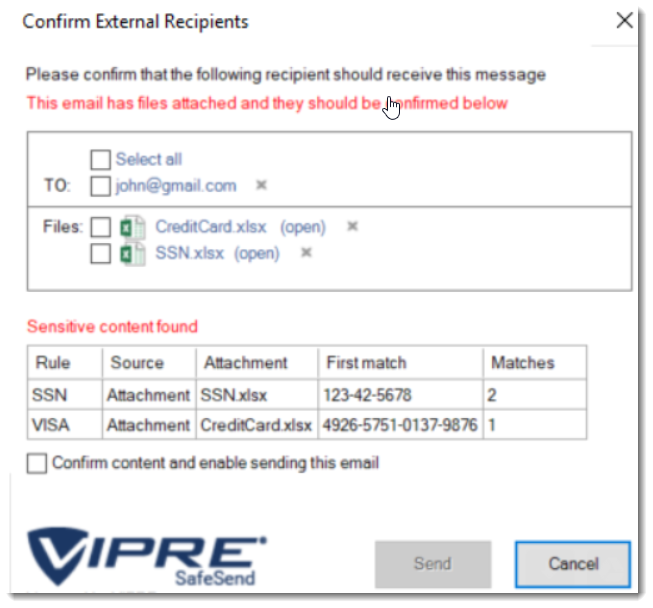
Here you can see that SafeSend scanned an email's content and attachments finding potential Social Security and Credit Card numbers.
Sensitive Content
When you use DLP with VIPRE SafeSend, this is the type of content it looks for within your emails:
- Strings such as ‘Confidential’, ‘Internal’, ‘Restricted’ and ‘Sensitive’.
- US Social Security Number (SSN)
- Credit Card number (VISA, MasterCard, American Express, Diners Club, …)
- Standard health identification card number (NPI)
- Vehicle Identification Number (VIN)
- UK health identification number (NHS, CHI)
- UK national insurance number (NINO)
SafeSend Actions
Once VIPRE SafeSend finds what it's looking for, it performs the following actions:
- Inform the user
- Require confirmation from the user in the form of a checkbox
- Require confirmation from the user by the text “CONFIRM”
- Deny sending the email
Supported Content Types
VIPRE SafeSend supports the following types of documents and attachments:
- Email content (body)
- Email subject
- Attachment filename
- Attachment file types (scans inside attachments)
- Text: csv, txt
- PDF: pdf
- HTML: html, hxtml
- Word: doc, docx
- PowerPoint: pptx, ppsx, pptm, ppt, pot, pps
- Excel: xls, xlsx, xlsm, xlt, xltx, xltm
- RTF: rtf
- ZIP: zip (fully recursive)
- MSG: msg (fully recursive)
DLP Policy
Policy Syntax
The DLP policies are defined using the following syntax:
[policy_name]:[file_types_to_scan]:[action_upon_match]:[regular_expression]
Options for ‘file_types_to_scan’:
- “all”
- “all_excl_pdf”
- “email_content”
- “email_subject”
- “file_name”
- “csv”, “txt”, “pdf”, “html”, “hxtml”, “doc”, “docx”, “rtf”, “xls”, “xlsx”, “xlsm”, “xlt”, “xltx”, “xltm”, “pptx”, “ppsx”, “pptm”, “ppt”, “pot”, “pps”
Options for ‘action_upon_match’:
- “inform”
- “confirm”
- “confirm_text”
- “deny”
If you'd like to skip the policy examples and get straight to the configuration of DLP, we can skip past it and come back if necessary.
Policy Examples
Case-insensitive detection of the string “confidential” in all content types that require user confirmation. The policy is named “Confidential”.
Confidential:all:confirm:(?i)confidentialCase-insensitive detection of the string “confidential” in specific content types. The results are displayed to the user and require no confirmation. The policy is named “Confidential”.
Confidential:email_subject,email_content,doc,docx:inform:(?i)confidentialVISA credit card rule that requires a user confirmation for all content types. The policy is named “VISA”.
VISA:all:confirm:4(?<=\b(?<!\.)4)\d{3}[\W\s]?\d{4}[\W\s]?\d{4}[\W\s]?\d{4}\b
Regular Expressions (regex)
Generic:
Confidential:all:confirm:(?i)confidential
Internal:all:confirm:(?i)internal
Restricted:all:confirm:(?i)restricted
Sensitive:all:confirm:(?i)sensitive
Credit cards:
Visa: 4(?<=\b(?<!\.)4)\d{3}[\W\s]?\d{4}[\W\s]?\d{4}[\W\s]?\d{4}\b
Mastercard 1: 5(?<=\b(?<!\.)5)[1-5]\d{2}[\W\s]?\d{4}[\W\s]?\d{4}[\W\s]?\d{4}\b
Mastercard 2: 5(?<=\b(?<!\.)5)([\W\s][1-5])([\W\s]\d){14}\b
American Express 1: 3(?<=\b(?<!\.)3)(4|7)\d{2}[\W\s]?\d{2}[\W\s]?\d{4}[\W\s]?\d{5}\b
American Express 2: 3(?<=\b(?<!\.)3)([\W\s](4|7))([\W\s]\d){13}\b
Diners Club 1: 3(?<=\b(?<!\.)3)(0[0-5]|[68]\d{1})\d{1}[\W\s]?\d{4}[\W\s]?\d{4}[\W\s]?\d{2}\b
Diners Club 2: 3(?<=\b(?<!\.)3)[\W\s](0[\W\s][0-5]|[68][\W\s]\d{1})([\W\s]\d){11}\b
Discover card 1: 6(?<=\b(?<!\.)6)(011|5[0-9]{2})[\W\s]?\d{4}[\W\s]?\d{4}[\W\s]?\d{4}[\W\s]?\b
Discover card 2: 6(?<=\b(?<!\.)6)[\W\s](0[\W\s](1[\W\s]){2}|5[\W\s](\d[\W\s]){2})(\d[\W\s]){11}\d\b
JCB cards 1: (?=[21|18])(2131|1800)[\W\s]?(\d{4}[\W\s]?){2}\d{3}\b
JCB cards 2: (?=[2|1])(2[\W\s]?1[\W\s]?3[\W\s]?1|1[\W\s]?8[\W\s]?0[\W\s]?0)([\W\s]?\d){10}\b
JCB cards 3: 35(?<=\b(?<!\.)35)\d{2}[\W\s]?(\d{4}[\W\s]?){3}\b
JCB cards 4: 3(?<=\b(?<!\.)3)[\W\s]?5[\W\s]?(\d[\W\s]?){13}\d\b
Standard health identification card number (NPI):
(?<!\\d)\\d{10}(?!\\d)|80840\\d{10}(?!\\d)
Vehicle Identification Number (VIN):
[0-9A-HJ-NPR-Z]{17}
US Social Security Number (SSN):
([^0-9-]|^)([0-9]{3}-[0-9]{2}-[0-9]{4})([^0-9-]|$)
UK health identification number (NHS, CHI):
b([1-9]{1}[0-9]{2}s?-?[0-9]{3}s?-?[0-9]{4})b
(([^wt]?s)?(-)?d){10}
(([^wt]?s)?(_)?d){10}
(([^wt]?s)?d){10}
UK national insurance number (NINO):
[A-CEGHJ-NOPR-TW-Z]{2}[0-9]{6}[ABCDs]{1}
Irish PPS number:
W?d{7}[a-zA-Z]{1,2}W
Other
SSNorHSA:all:confirm:([^0-9-]|^)([0-9]{3}[0-9]{2}[0-9]{4})([^0-9-]|$)
DDAorSAV7:all:confirm:([^0-9-]|^)([0-9]{7})([^0-9-]|$)
DDAorSAV8:all:confirm:([^0-9-]|^)([0-9]{8})([^0-9-]|$)
HSA:all:confirm:([^0-9-]|^)([0-9]{10})([^0-9-]|$)
Health
Birthday:all:confirm:((?i)Birth Date|DOB|Patient Date of Birth|Patient DOB|Patient_DOB)
RX:all:confirm:((?i)rx_number|RxNumber)
Patient Name:all:confirm:((?i)pa_first_name|pa_last_name|patient_first|patient_last|Patient First|Patient First Name|Patient Last|Patient Last Name|first_name|last_name|Patient Address|Patient Full Name|Patient Middle Name|Patient Middle Initial)
Patient Identifier:all:confirm:((?i)Patient Email|Patient experience on drug|patient experience on drug(DELETE)|Patient Gender|Patient height|Patient ID (Internal Reporting)|Patient interest|patient phone #|patient state|patient weight|patient work phone #|patient zip)
PHI:all:confirm:((?i)PHI Consent Date|PHI Consent signed|Prescription Sub-Status Code)
HUB ID:all:confirm:((?i)HUB Identifier|HUB Patient ID)
Identifiers:all:confirm:((?i)Patient_Genotype|Fibrosis Score|Patient Weight|Prescription Transfer|Product Form|Quality of Life Scale|Record Date/Timestamp|SPP Patient Identifier)
ICD:all:confirm((?i)ICD9|ICD-9|ICD10|ICD-10|ICD)
Configuring DLP Content Scanning
VIPRE recommends that you test your DLP rules before deployment using the live testing window. To do this, follow the steps below.
- Access the live testing window at File > Options > Add-ins > Add-In Options > SafeSend > Edit Settings
- Use the setting ContentScanningRules in the ADMX/ADML files for configuration via Group Policy; This setting can be used to push out new rules to all client machines. This setting is named SS_ContentScanningRules in the registry which can also be used for testing settings locally:
HKEY_LOCAL_MACHINE/SOFTWARE/{WOW6432Node}/SafeSend/SS_ContentScanningRules
The ContentScanningLicenseKey needs to be set to a valid license key in a production deployment (not in a trial or POC).
Important
Encrypted MS Office documents go through Office to decrypt - not SafeSend. Depending on your computer and network connection, this could potentially take longer than the default scan timeout. You’ll need to increase the content scanning timeout to allow enough time for the document to be opened, the password to be entered, and the scan to complete.
To increase the default scan timeout, update the following setting:
ContentScanningTimeoutMS
It’s set to 10000ms (10 seconds) by default.
This article is part of the SafeSend PC Add-in Deployment Guide, which includes all successive steps needed for a successful deployment. Please refer to Related Articles for direct links to the deployment guide and other processes pertinent to the one detailed in this article.
Store Settings
When you are deploying VIPRE SafeSend throughout your organization for the first time, this content walks you through the process of using the Store Settings option to permanently save your settings and build a new .msi installer that's been explicitly customized for the needs of your organization.
Helpful Information
Other occasions when you may need to generate a custom installer include:
- Making changes to the configuration on individual PCs
- Making changes to the configuration on roaming profiles in your Group Policy
- Updating the license key on individual PCs after initial purchase when your trial ends
- Updating the license key on individual PCs after extending your full license key for another year
Build .MSI
- In Outlook, on the top left, click File
- Go down to Outlook Options and select Add-Ins
- Select Add-in Options
- Click Store Settings
- Browse to the original .msi installer and click Open
- Browse to the location where you want to save the customized .msi installer
- Create a unique name, so you know the difference between the custom installer and the original installer
- Click Save
.png)
Now, we need to uninstall from the computer you're on so we can re-install your unique version of VIPRE SafeSend!
Uninstall SafeSend
- In Windows, open Control Panel. Under Programs, select Uninstall a program
- Locate SafeSend and select Uninstall
Deploy SafeSend using Group Policy
Here we'll walk you through the process of deploying VIPRE SafeSend to your organization via Group Policy.
Create a Distribution Point
The first step in deploying an MSI through Group Policy Objects (GPO) is to create a distribution point on the publishing server.
- Log on to the server as an Administrator
- Create a shared network folder to house the MSI installer package
- Set the folder permissions to allow access to the distribution package
- Copy the SafeSend MSI to the shared folder
Create a Group Policy Object
The SafeSend .MSI is a per-machine package and should, therefore, be assigned per-machine. SafeSend will then be installed silently for all computers when the machines start.
- Navigate to Start > Programs > Administrative Tools > Group Policy Management Console
- Locate the domain/OU you wish to link the new GPO
- Right-click on your selected domain/OU and select Create a GPO in this domain, and Link it here…
- Name of the new policy, e.g. “SafeSend DLP Outlook Add-In”
- On the left side of the screen, select the GPO
- Under Scope > Security Filtering, add the wanted groups, users and computers
- Right-click on the new GPO and select Edit
- Expand Computer Configuration > Policies > Software Settings > Software installation
- Right-click Software Installation, and select New > Package
- In the Open dialog, enter the full UNC path of the shared package you want to assign
- Be sure to use the UNC path, not not the Browse button
- Click Open
- Click Assigned > OK. The package will be added to the right pane of the Group Policy window
- When the client computers start-up, the assigned package will be installed automatically
Congratulations! VIPRE SafeSend PC add-in has now been successfully deployed to the end-users in your organization.
Deploy SafeSend on Individual PCs
Important
SafeSend cannot be installed from a network share drive. You must copy and run the installer locally. On each PC you want to install VIPRE SafeSend on, double-click on the installer package.
- Accept the End-user License Agreement
- Click Install
Congratulations! VIPRE SafeSend has now been successfully deployed to the end-users in your organization.
Add License Key
Once you have your license key, follow these instructions to apply it to the VIPRE SafeSend PC add-in.
Important
This article is part of the SafeSend PC Add-in Deployment Guide, which includes all successive steps needed for a successful deployment, including how to make changes to the settings and license key persistent. Please refer to that article or Related Articles below for direct links to the deployment guide and other processes pertinent to the one detailed in this article.
- In Outlook, on the top left, click File
- Go down to Outlook Options and select Add-Ins
- Select Add-in Options

- Select Edit settings...
- Under the Logic tab, click the arrow next to Commonly Used
- Look for the field called LicenseKey and paste your license key into the field
.png)
- Click Close Window at the bottom of the window
You have successfully added your license key!
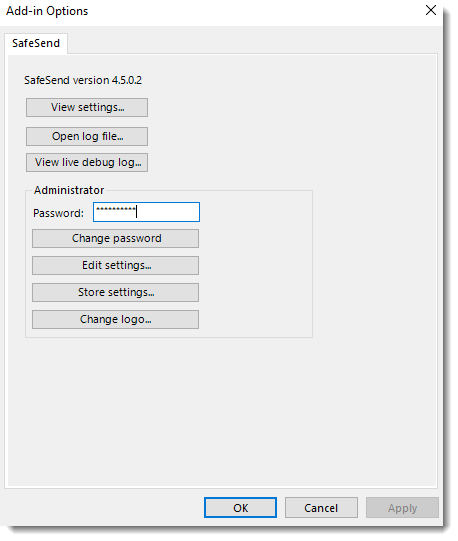
Set Administrator Password
While you're in trial mode, there is no admin password required. Once you purchase a full license, however, you will need to set an admin password in order to view or change any settings.
To set the password:
- In Outlook, on the top left, click File
- Go down to Outlook Options and select Add-ins
- Select Add-in Options
.png)
Under Administrator, you'll notice that all options are grayed out.
- Locate the default password in the SafeSend_Admin_Password.PDF file that came in the SafeSendArchive.v.r.m.b.zip
- Enter the default password in the Password field
- Select Change password
- In the Change password window, enter and confirm your new password, then click OK
.png)
The password is now saved and will be required when viewing or changing SafeSend settings.
Add your Organization's Logo
You can customize the look and feel of VIPRE SafeSend by uploading a personalized logo. This optional step is a great way to integrate SafeSend with your organization seamlessly.
Important
This article is part of the SafeSend PC Add-in Deployment Guide, which includes all successive steps needed for a successful deployment. Please refer to Related Articles for direct links to the deployment guide and other processes pertinent to the one detailed in this article.
Image Requirements
Before uploading your logo, make sure it meets the following requirements:
- Image size must be no larger than 50x180
- Image type must be .png
Images with transparent backgrounds are recommended so that your logo matches the rest of SafeSend.
Now that you have an image that meets the above requirements, let's move on to uploading it.
Add Logo
- In Outlook, on the top left, click File
- Go down to Outlook Options and select Add-Ins
- Select Add-in Options
- Locate and click Change Logo
- Browse to the image you want to use and click Open
- Click OK at the bottom
Now, your logo is part of SafeSend!
If you are following the guided setup, click Next Step below to continue to the next part of the SafeSend PC Add-in Deployment Guide. Otherwise, see Related Articles below to learn how to store settings.
Prevent End-users from Disabling SafeSend
Let's walk through how you can prevent users from disabling the SafeSend PC add-in.
Outlook 2007-2010
It is possible to prevent users from disabling the SafeSend Add-in in Outlook 2007 or 2010 using the registry key DontDisplayHKLMAddin.
The image below shows how it looks after the registry key DontDisplayHKLMAddins has been set. As can be seen, SafeSend is not visible even though it is loaded. This registry key DontDisplayHKLMAddins can also be set using GPO.
Setting this key will affect all HKLM type of add-ins, in that none of them can be disabled by the end-user anymore. This potential issue is solved in Outlook 2013 or later.
- Log in to a normal user account
- Using Regedit, open HKEY_CURRENT_USER\Software\Microsoft\Office\14.0\Outlook
- If the current user does not have a key for "Security", add it
- Add the DontDisplayHKLMAddinsDWORDValue in the Security key. Set the value to 1
- In the Manage COM Add-ins dialog, click Go. SafeSend is not visible, even though it is loaded.
There is no need to restart Outlook, since Outlook reads this registry entry when you click the Go button.
Outlook 2013 or Outlook 2016
It is possible to prevent users from disabling the SafeSend Add-in in Outlook 2013 or Outlook 2016 using group policy.
The image below shows how it looks after the group policy setting is enabled. A user cannot uncheck the “SafeSend Outlook Add-in” checkbox as can be seen in the text marked in red.
- Open Group Policy and check that the Office 2013/2016 Administrative Templates are installed
- If the templates are installed, you will see the “Microsoft Outlook 2013/2016” in the User Configuration > Administrative Templates > Microsoft Outlook 2013> Miscellaneous path
- If the templates are not installed, you can download the templates from Microsoft. View this Microsoft article for help installing the template
- Enable the “List of managed add-ins” policy setting
- Write “zzz.SafeSend” (the add-ins progId) and 1 for the Value in this setting. Can also click the “Show” button above to get the dialog below. The value 1 means that SafeSend cannot be disabled by users.
An alternative way to achieve this is to push a registry key manually using GPO; see below for the path.
For Outlook 2013 the “16.0” part should be replaced a “15.0” part. Please note that the registry type should be REG_SZ. This can also be tested on a single machine by creating the registry key in regedit. If GPO is being used then please make sure there is no conflict with another GPO that is configuring the same setting using administrator templates.
Configure SafeSend
If you want to get started using SafeSend with the default configuration, you can skip this step.
Important Information
This article is part of the SafeSend PC Add-in Deployment Guide, which includes all successive steps needed for a successful deployment. Please refer to Related Articles for direct links to the deployment guide and other processes pertinent to the one detailed in this article.
VIPRE SafeSend Settings
There are two ways to get to VIPRE SafeSend's settings, depending on if you are using a trial or have purchased a full license.
Click here if using a trial license
- Select Trial Settings in the Confirmation window pop-up
- In the Logic tab, click on the arrows next to Advanced, Commonly used, and Special cases to see options available to you
- Refer to our settings reference for full details on how to use all settings
Click here if using a full license
- In Outlook, on the top left, click File
- Go down to Outlook Options and select Add-Ins
- Select Add-in Options
- Click Edit Settings, which allows you to customize the behavior of VIPRE SafeSend
- In the Logic tab, click on the arrows next to Advanced, Commonly used, and Special cases to see options available to you
- Refer to our settings reference for full details on how to use all settings
Helpful Information
While we do provide a comprehensive settings reference to help determine what makes the most sense for your organization, we understand that it can be a little overwhelming. To help make things a little easier for you, VIPRE SafeSend ships with the settings we recommend already configured by default. However, because each organization has unique needs, we suggest going through the settings reference, specifically the Commonly Used and Advanced sections, to ensure SafeSend is set up appropriately for your organization.
If you'll be deploying VIPRE SafeSend via Group Policy and will be moving forward with the default configuration, we've included ADMX/ADML files (administrative templates) in the SafeSendArchive-v.r.m.b.zip file you downloaded that will allow you to push changes to your organization after it's been deployed.
Generate a Custom Installer
When you are deploying VIPRE SafeSend throughout your organization for the first time, this content walks you through the process of using the Store Settings option to permanently save your settings and build a new .msi installer that's been explicitly customized for the needs of your organization.
Helpful Information
Other occasions when you may need to generate a custom installer include:
- Making changes to the configuration on individual PCs
- Making changes to the configuration on roaming profiles in your Group Policy
- Updating the license key on individual PCs after initial purchase when your trial ends
- Updating the license key on individual PCs after extending your full license key for another year
Build .MSI
- In Outlook, on the top left, click File
- Go down to Outlook Options and select Add-Ins
- Select Add-in Options
- Click Store Settings
- Browse to the original .msi installer and click Open
- Browse to the location where you want to save the customized .msi installer
- Create a unique name, so you know the difference between the custom installer and the original installer
- Click Save
Now, we need to uninstall from the computer you're on so we can re-install your unique version of VIPRE SafeSend!
Uninstall SafeSend
- In Windows, open Control Panel. Under Programs, select Uninstall a program
- Locate SafeSend and select Uninstall
Deploy SafeSend using Group Policy
Here we'll walk you through the process of deploying VIPRE SafeSend to your organization via Group Policy.
Create a Distribution Point
The first step in deploying an MSI through Group Policy Objects (GPO) is to create a distribution point on the publishing server.
- Log on to the server as an Administrator
- Create a shared network folder to house the MSI installer package
- Set the folder permissions to allow access to the distribution package
- Copy the SafeSend MSI to the shared folder
Create a Group Policy Object
The SafeSend .MSI is a per-machine package and should, therefore, be assigned per-machine. SafeSend will then be installed silently for all computers when the machines start.
- Navigate to Start > Programs > Administrative Tools > Group Policy Management Console
- Locate the domain/OU you wish to link the new GPO
- Right-click on your selected domain/OU and select Create a GPO in this domain, and Link it here…
- Name of the new policy, e.g. “SafeSend DLP Outlook Add-In”
- On the left side of the screen, select the GPO
- Under Scope > Security Filtering, add the wanted groups, users and computers
- Right-click on the new GPO and select Edit
- Expand Computer Configuration > Policies > Software Settings > Software installation
- Right-click Software Installation, and select New > Package
- In the Open dialog, enter the full UNC path of the shared package you want to assign
- Be sure to use the UNC path, not not the Browse button
- Click Open
- Click Assigned > OK. The package will be added to the right pane of the Group Policy window
- When the client computers start-up, the assigned package will be installed automatically
Congratulations! VIPRE SafeSend PC add-in has now been successfully deployed to the end-users in your organization.
Deploy SafeSend on Individual PCs
Warning
SafeSend cannot be installed from a network share drive. You must copy and run the installer locally. On each PC you want to install VIPRE SafeSend on, double-click on the installer package
- Accept the End-user License Agreement
- Click Install
Congratulations! VIPRE SafeSend has now been successfully deployed to the end-users in your organization.
Configure DLP (Data Loss Prevention)
VIPRE SafeSend can prevent sensitive information from being sent out to the wrong client.
Important Information
This article is part of the SafeSend PC Add-in Deployment Guide, which includes all successive steps needed for a successful deployment. Please refer to Related Articles for direct links to the deployment guide and other processes pertinent to the one detailed in this article.
Within VIPRE SafeSend, DLP (Data Loss Prevention) has three important features:
- Client Keyword/Domain Scanning allows you to identify a set of client keywords or regular expressions and associate those with a set of client domains or individual email addresses
- DLP Content Scanning presents sensitive content to the user, allowing the user to determine if the email should be blocked or sent with additional confirmation
- DLP Scan Password-Protected Attachments allows SafeSend to detect password-protected .zip files and prompt the user to add the password and decrypt the file so it can scan the attachment
It can scan emails and attachments for specific client keywords or regular expressions and require agent confirmation.
Client Keyword and Domain Scanning
Define Client Data
The client keyword/domain data is configured in Edit Settings, under the Data Loss Prevention (DLP) tab, and stored in the setting SS_ClientKeywordDomainList; it can contain thousands of lines of client/customer data. The principle is that you can identify a set of client keywords or regular expressions and associate those with a set of client domains. Instead of domains, it is also possible to specify individual email addresses as approved recipients.
Syntax: Client1Keyword1,Client1Keyword2,…:Client1Domain1,Client1Domain2,… Client2Keyword1,Client2Keyword2,…:Client2Domain1,Client2Domain2,…
Example: Apple,AAPL:apple.com Microsoft,MSFT:microsoft.com
Display Popup only when Client Data is Found
It is possible to use the setting OnlyPopupForDLPMatch to configure SafeSend to display its confirmation window only when client data has been found in the email.
Supported Attachment File Types
- Text: csv, txt
- PDF: pdf
- HTML: html, xhtml
- Word: doc, docx
- PowerPoint: pptx, ppsx, pptm, ppt, pot, pps
- Excel: xls, xlsx, xlsm, xlt, xltx, xltm
- RTF: rtf
- ZIP: zip (recursively)
Sending to Non-client Recipients
The user is required to type “CONFIRM” in order to send client data to a non-client external domain.
Sending to Approved Recipients
No additional confirmation is required except confirming the external recipient.
Sending Non-client Data Externally
What happens, in this case, depends on the OnlyPopupForDLPMatch setting. If it is enabled then the SafeSend confirmation window will not be displayed. If it is disabled, which is the default behavior, then SafeSend will still show its normal confirmation window. The below screenshot is thus displayed only if OnlyPopupForDLPMatch = 0.
Password Protected Files or Invalid Files
SafeSend displays password-protected files or invalid files in the DLP output table. Password protection is detected on Word, Excel, PowerPoint, PDF, and ZIP files.
Scanning Email Notification
The Scanning Email notification is displayed when OnlyPopupForDLPMatch is enabled, and SafeSend is busy scanning large files. The default time-out for large files is 10 seconds (see ContentScanningTimeoutMS), whereby SafeSend will post an error message in the dialog, saying that the content scan timed out.
DLP Content Scanning
Sensitive content is presented to the user, and you can define if the email should be blocked, or if the user can send the email after an additional confirmation.
Here you can see that SafeSend scanned an email's content and attachments finding potential Social Security and Credit Card numbers.
Sensitive Content
When you use DLP with VIPRE SafeSend, this is the type of content it looks for within your emails:
- Strings such as ‘Confidential’, ‘Internal’, ‘Restricted’ and ‘Sensitive’.
- US Social Security Number (SSN)
- Credit Card number (VISA, MasterCard, American Express, Diners Club, …)
- Standard health identification card number (NPI)
- Vehicle Identification Number (VIN)
- UK health identification number (NHS, CHI)
- UK national insurance number (NINO)
SafeSend Actions
Once VIPRE SafeSend finds what it's looking for, it performs the following actions:
- Inform the user
- Require confirmation from the user in the form of a checkbox
- Require confirmation from the user by the text “CONFIRM”
- Deny sending the email
Supported Content Types
VIPRE SafeSend supports the following types of documents and attachments:
- Email content (body)
- Email subject
- Attachment filename
- Attachment file types (scans inside attachments)
- Text: csv, txt
- PDF: pdf
- HTML: html, hxtml
- Word: doc, docx
- PowerPoint: pptx, ppsx, pptm, ppt, pot, pps
- Excel: xls, xlsx, xlsm, xlt, xltx, xltm
- RTF: rtf
- ZIP: zip (fully recursive)
- MSG: msg (fully recursive)
DLP Policy
Policy Syntax
The DLP policies are defined using the following syntax:
[policy_name]:[file_types_to_scan]:[action_upon_match]:[regular_expression]
Options for ‘file_types_to_scan’:
- “all”
- “all_excl_pdf”
- “email_content”
- “email_subject”
- “file_name”
- “csv”, “txt”, “pdf”, “html”, “hxtml”, “doc”, “docx”, “rtf”, “xls”, “xlsx”, “xlsm”, “xlt”, “xltx”, “xltm”, “pptx”, “ppsx”, “pptm”, “ppt”, “pot”, “pps”
Options for ‘action_upon_match’:
- “inform”
- “confirm”
- “confirm_text”
- “deny”
If you'd like to skip the policy examples and get straight to the configuration of DLP, we can skip past it and come back if necessary.
Policy Examples
Case-insensitive detection of the string “confidential” in all content types that require user confirmation. The policy is named “Confidential”.
Confidential:all:confirm:(?i)confidentialCase-insensitive detection of the string “confidential” in specific content types. The results are displayed to the user and require no confirmation. The policy is named “Confidential”.
Confidential:email_subject,email_content,doc,docx:inform:(?i)confidentialVISA credit card rule that requires a user confirmation for all content types. The policy is named “VISA”.
VISA:all:confirm:4(?<=\b(?<!\.)4)\d{3}[\W\s]?\d{4}[\W\s]?\d{4}[\W\s]?\d{4}\b
Regular Expressions (regex)
Generic:
Confidential:all:confirm:(?i)confidential
Internal:all:confirm:(?i)internal
Restricted:all:confirm:(?i)restricted
Sensitive:all:confirm:(?i)sensitive
Credit cards:
Visa: 4(?<=\b(?<!\.)4)\d{3}[\W\s]?\d{4}[\W\s]?\d{4}[\W\s]?\d{4}\b
Mastercard 1: 5(?<=\b(?<!\.)5)[1-5]\d{2}[\W\s]?\d{4}[\W\s]?\d{4}[\W\s]?\d{4}\b
Mastercard 2: 5(?<=\b(?<!\.)5)([\W\s][1-5])([\W\s]\d){14}\b
American Express 1: 3(?<=\b(?<!\.)3)(4|7)\d{2}[\W\s]?\d{2}[\W\s]?\d{4}[\W\s]?\d{5}\b
American Express 2: 3(?<=\b(?<!\.)3)([\W\s](4|7))([\W\s]\d){13}\b
Diners Club 1: 3(?<=\b(?<!\.)3)(0[0-5]|[68]\d{1})\d{1}[\W\s]?\d{4}[\W\s]?\d{4}[\W\s]?\d{2}\b
Diners Club 2: 3(?<=\b(?<!\.)3)[\W\s](0[\W\s][0-5]|[68][\W\s]\d{1})([\W\s]\d){11}\b
Discover card 1: 6(?<=\b(?<!\.)6)(011|5[0-9]{2})[\W\s]?\d{4}[\W\s]?\d{4}[\W\s]?\d{4}[\W\s]?\b
Discover card 2: 6(?<=\b(?<!\.)6)[\W\s](0[\W\s](1[\W\s]){2}|5[\W\s](\d[\W\s]){2})(\d[\W\s]){11}\d\b
JCB cards 1: (?=[21|18])(2131|1800)[\W\s]?(\d{4}[\W\s]?){2}\d{3}\b
JCB cards 2: (?=[2|1])(2[\W\s]?1[\W\s]?3[\W\s]?1|1[\W\s]?8[\W\s]?0[\W\s]?0)([\W\s]?\d){10}\b
JCB cards 3: 35(?<=\b(?<!\.)35)\d{2}[\W\s]?(\d{4}[\W\s]?){3}\b
JCB cards 4: 3(?<=\b(?<!\.)3)[\W\s]?5[\W\s]?(\d[\W\s]?){13}\d\b
Standard health identification card number (NPI):
(?<!\\d)\\d{10}(?!\\d)|80840\\d{10}(?!\\d)
Vehicle Identification Number (VIN):
[0-9A-HJ-NPR-Z]{17}
US Social Security Number (SSN):
([^0-9-]|^)([0-9]{3}-[0-9]{2}-[0-9]{4})([^0-9-]|$)
UK health identification number (NHS, CHI):
b([1-9]{1}[0-9]{2}s?-?[0-9]{3}s?-?[0-9]{4})b
(([^wt]?s)?(-)?d){10}
(([^wt]?s)?(_)?d){10}
(([^wt]?s)?d){10}
UK national insurance number (NINO):
[A-CEGHJ-NOPR-TW-Z]{2}[0-9]{6}[ABCDs]{1}
Irish PPS number:
W?d{7}[a-zA-Z]{1,2}W
Other
SSNorHSA:all:confirm:([^0-9-]|^)([0-9]{3}[0-9]{2}[0-9]{4})([^0-9-]|$)
DDAorSAV7:all:confirm:([^0-9-]|^)([0-9]{7})([^0-9-]|$)
DDAorSAV8:all:confirm:([^0-9-]|^)([0-9]{8})([^0-9-]|$)
HSA:all:confirm:([^0-9-]|^)([0-9]{10})([^0-9-]|$)
Health
Birthday:all:confirm:((?i)Birth Date|DOB|Patient Date of Birth|Patient DOB|Patient_DOB)
RX:all:confirm:((?i)rx_number|RxNumber)
Patient Name:all:confirm:((?i)pa_first_name|pa_last_name|patient_first|patient_last|Patient First|Patient First Name|Patient Last|Patient Last Name|first_name|last_name|Patient Address|Patient Full Name|Patient Middle Name|Patient Middle Initial)
Patient Identifier:all:confirm:((?i)Patient Email|Patient experience on drug|patient experience on drug(DELETE)|Patient Gender|Patient height|Patient ID (Internal Reporting)|Patient interest|patient phone #|patient state|patient weight|patient work phone #|patient zip)
PHI:all:confirm:((?i)PHI Consent Date|PHI Consent signed|Prescription Sub-Status Code)
HUB ID:all:confirm:((?i)HUB Identifier|HUB Patient ID)
Identifiers:all:confirm:((?i)Patient_Genotype|Fibrosis Score|Patient Weight|Prescription Transfer|Product Form|Quality of Life Scale|Record Date/Timestamp|SPP Patient Identifier)
ICD:all:confirm((?i)ICD9|ICD-9|ICD10|ICD-10|ICD)
Configuring DLP Content Scanning
VIPRE recommends that you test your DLP rules before deployment using the live testing window. To do this, follow the steps below.
- Access the live testing window at File > Options > Add-ins > Add-In Options > SafeSend > Edit Settings
- Use the setting ContentScanningRules in the ADMX/ADML files for configuration via Group Policy; This setting can be used to push out new rules to all client machines. This setting is named SS_ContentScanningRules in the registry which can also be used for testing settings locally:
HKEY_LOCAL_MACHINE/SOFTWARE/{WOW6432Node}/SafeSend/SS_ContentScanningRules
The ContentScanningLicenseKey needs to be set to a valid license key in a production deployment (not in a trial or POC).
Important
Encrypted MS Office documents go through Office to decrypt - not SafeSend. Depending on your computer and network connection, this could potentially take longer than the default scan timeout. You’ll need to increase the content scanning timeout to allow enough time for the document to be opened, the password to be entered, and the scan to complete.
To increase the default scan timeout, update the following setting:
ContentScanningTimeoutMS
It’s set to 10000ms (10 seconds) by default.
This article is part of the SafeSend PC Add-in Deployment Guide, which includes all successive steps needed for a successful deployment. Please refer to Related Articles for direct links to the deployment guide and other processes pertinent to the one detailed in this article.
Generate a Custom Installer
When you are deploying VIPRE SafeSend throughout your organization for the first time, this content walks you through the process of using the Store Settings option to permanently save your settings and build a new .msi installer that's been explicitly customized for the needs of your organization.
Helpful Information
Other occasions when you may need to generate a custom installer include:
- Making changes to the configuration on individual PCs
- Making changes to the configuration on roaming profiles in your Group Policy
- Updating the license key on individual PCs after initial purchase when your trial ends
- Updating the license key on individual PCs after extending your full license key for another year
Build .MSI
- In Outlook, on the top left, click File
- Go down to Outlook Options and select Add-Ins
- Select Add-in Options
- Click Store Settings
- Browse to the original .msi installer and click Open
- Browse to the location where you want to save the customized .msi installer
- Create a unique name, so you know the difference between the custom installer and the original installer
- Click Save
Now, we need to uninstall from the computer you're on so we can re-install your unique version of VIPRE SafeSend!
Uninstall SafeSend
- In Windows, open Control Panel. Under Programs, select Uninstall a program
- Locate SafeSend and select Uninstall
Deploy SafeSend using Group Policy
Here we'll walk you through the process of deploying VIPRE SafeSend to your organization via Group Policy.
Create a Distribution Point
The first step in deploying an MSI through Group Policy Objects (GPO) is to create a distribution point on the publishing server.
- Log on to the server as an Administrator
- Create a shared network folder to house the MSI installer package
- Set the folder permissions to allow access to the distribution package
- Copy the SafeSend MSI to the shared folder
Create a Group Policy Object
The SafeSend .MSI is a per-machine package and should, therefore, be assigned per-machine. SafeSend will then be installed silently for all computers when the machines start.
- Navigate to Start > Programs > Administrative Tools > Group Policy Management Console
- Locate the domain/OU you wish to link the new GPO
- Right-click on your selected domain/OU and select Create a GPO in this domain, and Link it here…
- Name of the new policy, e.g. “SafeSend DLP Outlook Add-In”
- On the left side of the screen, select the GPO
- Under Scope > Security Filtering, add the wanted groups, users and computers
- Right-click on the new GPO and select Edit
- Expand Computer Configuration > Policies > Software Settings > Software installation
- Right-click Software Installation, and select New > Package
- In the Open dialog, enter the full UNC path of the shared package you want to assign
- Be sure to use the UNC path, not not the Browse button
- Click Open
- Click Assigned > OK. The package will be added to the right pane of the Group Policy window
- When the client computers start-up, the assigned package will be installed automatically
Congratulations! VIPRE SafeSend PC add-in has now been successfully deployed to the end-users in your organization.
Deploy SafeSend on Individual PCs
Warning
SafeSend cannot be installed from a network share drive. You must copy and run the installer locally. On each PC you want to install VIPRE SafeSend on, double-click on the installer package
- Accept the End-user License Agreement
- Click Install
Congratulations! VIPRE SafeSend has now been successfully deployed to the end-users in your organization.