
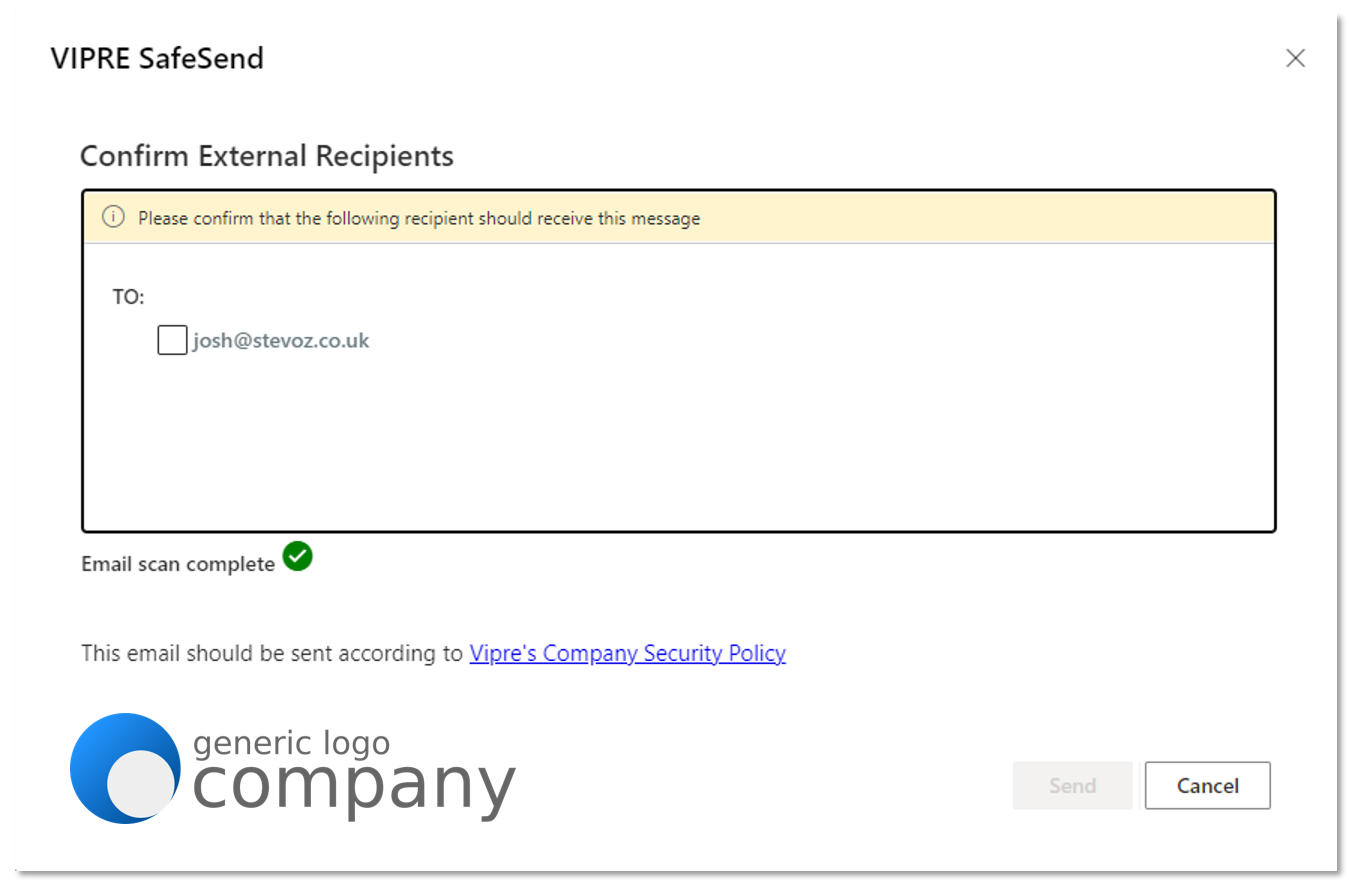
Have you ever mistakenly sent an email to the wrong person? Accidentally forwarded attachments with sensitive data? The VIPRE SafeSend Web Add-in is an Outlook add-in that works to prevent those types of mistakes within your organization by requesting manual confirmation from the user when sending emails to recipients outside of your organization.
If you're new to VIPRE SafeSend, this is the place to start. We're here to walk you through deployment with this guided setup. If you haven't seen our product overview and comparison chart, though, please visit there first.
How SafeSend Works
When installed, SafeSend requires validation each time you send an email to an external recipient. You will need to confirm all external recipients of an email before it leaves the network. Upon hitting “Send” or “Send Secure,” the SafeSend pop-up window will appear. To confirm the recipients or any attached file, click on the checkbox beside each of the external recipients (and file if applicable) and hit the Send button.
What's Included
When you unzip your SafeSendArchive-[version].zip file, you will find the following contents. This guide will focus on the files inside the SafeSendWeb_5.5.6.12 folder.
- 3rd Party Licenses (txt file)
- Get_Started_With_SafeSend (pdf)
- Contains helpful links and resources to begin the setup process.
- SafeSendPC_[version] (For the PC/COM Add-in)
- Administrative Templates: For managing settings via Group Policy after deployment.
- Admin Password: Credentials for local access to settings (not applicable for trial licenses).
- SafeSendSetup: The .MSI installer for the PC add-in.
-
SafeSendWeb_5.5.6.12 (For v5.5 of the Web Add-in)
- End-User License Agreement (EULA) (txt)
- Packagename (txt)
- Deployable files (e.g., SafeSendWebPackage[version].zip)
- SafeSendWeb_[version] (For v6.0 and higher of the Web Add-in)
- azure-deploy (txt)
- This is the deployment script that is discussed in detail in Step 1: Deployment Script Customization below
- End-User License Agreement (EULA) (txt)
- azure-deploy (txt)
For these instructions, you will need everything within the SafeSendWeb_5.5.6.12 folder mentioned above.
When you are ready, move on to the next step below.
Install and Configure SafeSend Web Add-in
Install SafeSend Web Add-in
While SafeSend v4.6 will work with any .NET CORE 3.1 capable web server, we recom...
If you are new to SafeSend and setting it up for the first time, please stop here and navigate to our complete deployment guide. If you are already viewing this article from within the complete deployment guide, please disregard this message and continue below.
Prerequisites
Before you install the SafeSend web add-in, please verify that you have all of the required prerequisites listed here.
- Verify that your organization meets the System Requirements
- If your organization uses Microsoft Azure web server, ensure you have access to create a web app
- Certificate; This is a file you can create yourself or obtain through a third-party certificate authority; it is not provided to you by VIPRE
To generate a certificate signing request (CSR):
- Generate a Certificate Signing Request (CSR) using openssl with the following shell command:
openssl req -newkey rsa:2048 -keyout safesend.key -out safesend.csr - Enter a PEM passphrase. Once the certificate has been received from the third-party certificate authority (CA), you will need this passphrase in later steps
-
When prompted, provide the Country, State, Locality, Organization, Unit, and Common Name
- The Email Address, challenge password, and optional company name may be left blank
-
This will create a safesend.CSR and safesend.key file. Submit only the safesend.CSR file to the third-party CA of your choice
- You will need to wait for the certificate to be issued before proceeding with the remaining steps; this could take several business days
- If the generated certificate is returned as a PEM file, you will need to export the private key to a Pfx file so it can be uploaded to Azure
-
Run the following shell command (Note that this command assumes the file from the CA is named safesend.PEM; adjust as necessary)
openssl pkcs12 -export -out safesend.pfx -inkey safesend.key -in safesend.pem- Enter the PEM passphrase from Step 2 above
-
Enter an export password
- This can be different from the passphrase and will be used later when uploading the pfx file to Azure
- Enter the export password a second time to verify
Important
- SafeSend will work with any .NET CORE 8.0 capable web server
- Microsoft requires the site where the add-in is hosted to be SSL-secured
- Deploying the SafeSend web add-in can take up to 12 hours to propagate the network
- Any changes made to Settings.json require the website to be restarted to take effect; This should be done outside of normal operating hours to avoid potential service interruptions
- When deploying multiple instances of the SafeSend server, you'll need to provide a strong password with a minimum length of 16 characters using the following setting:
"ApiSecret": "<YOUR_API_SECRET>",
Graph API and Web Server Setup
Towards the beginning of this setup, there is some back-and-forth between the Graph API and Web Server Setup, so please ensure you read the instructions below carefully.
VIPRE Recommends
SafeSend web add-in will work with any .NET CORE 8.0 capable web server, and we include instructions for two specific web servers below, however we recommend Microsoft Azure due to it's ease of install and maintenance.
Step 1: Create Web App
The following instructions take place within Microsoft Azure.
- Navigate to portal.azure.com and log in with your Microsoft Azure account credentials
- On the top menu, hover your mouse over App Services and select Create Web App
- A new page called Create Web App will load
- Select the desired Resource Group from the drop-down menu
- Under Instance Details:
- Choose a web app name that reflects your use; For our purposes, we'll use SafeSend8, but you can use any name that you want
- Publish - defaults to Code; this can stay as-is
- Runtime stack - .NET 8.0 (LTS)
- Operating System - choose your preferred operating system to host SafeSend
- Region - Select your region
- Click Review + Create, then Create on the following page
Upon creation of the web app, you will be provided with a URL for your SafeSend site. Make note of this URL as you will need it in the next step.
Step 2: Graph API Setup
These instructions are for admins utilizing the SafeSend Web Add-in with Microsoft 365. These steps do not apply if you are using Microsoft Exchange Server.
Click here for Graph API Setup instructions
Web Add-in: Microsoft Graph API Setup for SafeSend
These instructions are for admins utilizing the SafeSend Web Add-in with Microsoft 365. These steps do not apply if you are using Microsoft Exchange Server.
Important
The following steps involve navigating third-party interfaces. While these instructions are accurate at the time of publication, vendors frequently update their user interface (UI) and menu layouts. Please use this guide as a reference for the specific VIPRE data and configurations required; the exact navigation paths within the third-party application may vary slightly.
- Sign in to Microsoft Azure Active Directory Admin Center with your administrator credentials
- Select App Registrations, then click New Registration
- On the Register an Application page, set the following values:
- Name: VIPRE SafeSend Graph API Resource
- Supported account types:
- If you're using within a single domain, select Accounts in this organizational directory only (Single Tenant)
- If the Microsoft Azure portal you're logging in to is not the same account that you're using to sign in to your Microsoft 365 account, select Accounts in any organizational directory (Multitenant)
- In the Redirect URI section, select Single-page application (SPA) from the drop-down menu, then set URI to your SafeSend site URL using the following format: 'https://<yoursafesendsiteurl>/login'
- Choose Register
- On the SafeSend page, copy and save the Application (client) ID and AppTenantID; you'll need these later
- Under the Manage section, select Authentication
- Under Implicit Grant and Hybrid Flows, check the box next to Access Tokens (used for implicit flows) and ID Tokens, and click Save
- Still, under the Manage section, select Certificates & Secrets, then Certificate
- Under Certificates, select Upload Certificate
- Select a certificate file (.cer extension) and enter a value for Description
- This is a file you can create yourself or obtain through a third-party certificate authority; it is not provided to you by VIPRE
- Click Add, then copy and save the Thumbprint value; you'll need this later for a setting called AppCertificateThumbprint
- Select a certificate file (.cer extension) and enter a value for Description
- Enter a value for Description, select an appropriate option for Expires, then click Add
- Still, under Manage, select Expose an API
- Choose the Set link that appears after Application ID URI
- In the Set App URI panel, change the default value by adding your host before the GUID listed
- Example: If the default value is api://05adb30e-50fa-4ae2-9cec-eab2cd6095b0, and your app is running on <yoursafesendhost>, the value should be api://<yoursafesendhost>/05adb30e-50fa-4ae2-9cec-eab2cd6095b0
- Click Save
- Select Add a Scope
- A panel will open; enter access_as_user as the Scope name
- Who can consent? should be set to Admins only
- Fill in the fields for configuring the admin consent prompt with values that are appropriate for the `access_as_user` scope
- This enables the Office client application to use your SafeSend add-in's web APIs with the same rights as the current user
- Examples:
- Admin consent display name**: Office can act as the user
- Admin consent description**: Enable Office to call the add-in's web APIs with the same rights as the current user
- Set State to Enabled
- Select Add Scope
- In the Authorized client applications section, identify the applications that you want to authorize to your SafeSend add-in's web application
- Each of the following IDs needs to be pre-authorized:
- d3590ed6-52b3-4102-aeff-aad2292ab01c (Microsoft Office)
- ea5a67f6-b6f3-4338-b240-c655ddc3cc8e (Microsoft Office)
- 57fb890c-0dab-4253-a5e0-7188c88b2bb4 (Office on the web)
- 08e18876-6177-487e-b8b5-cf950c1e598c (Office on the web)
- bc59ab01-8403-45c6-8796-ac3ef710b3e3 (Outlook on the web)
- Each of the following IDs needs to be pre-authorized:
- For each of the IDs above, take the following steps:
- Select Add a client application button
- In the panel that opens, set the Client ID to the respective GUID
- Check the box for api://<yoursafesendhost>/$App ID GUID$/access_as_user
- Select Add application
- Under Manage, select API Permissions, then Add a Permission
- On the panel that opens, choose Microsoft Graph then Delegated Permissions
- Using the Select Permissions search box, search for the following permissions
- Calendars.ReadWrite.Shared
- Files.ReadWrite
- Mail.ReadWrite.Shared
- offline_access
- openid
- profile
- User.Read
- Select the checkbox for each permission as it appears; after selecting the permissions, click Add Permissions at the bottom of the panel
- On the same page, choose Grant Admin Consent for [tenant name] button
- Select Yes to confirm
Important
After choosing Grant Admin Consent for [tenant name], you may see a banner message asking you to try again in a few minutes so that the consent prompt can be constructed. If you see that message, you can continue to the next step, however, it is important that you do not forget to come back to this step.
- Update the following settings via Azure portal configuration:
- Update AppID using the AppID from Step 5 above
- Update AppCertificateThumbprint using the certificate thumbprint from Step 9 above
- Ensure EmailProviderUrl is set to https://graph.microsoft.com
- Navigate to https://<yoursafesendhost>/manifest to download the manifest file
Step 3: Web Server Setup
Click here for Azure-specific instructions
- If you're not still logged in to http://portal.azure.com, please navigate back to it and login with your credentials
- Go to the web app you created above
- Click Go to resource
- On the left-side menu, under Settings, select Environment Variables
- Under App Settings, select +Add, enter the names and values below - do not click Deployment Slot Setting, leave that blank - then click Apply at the bottom
- Name = WEBSITE_RUN_FROM_PACKAGE; Value = 1
- Name = AppID (NOTE: The AppID value should have been obtained during the Graph API setup. If that has not been done, you should complete this now before proceeding.)
- Name = AppIdUri (NOTE: The AppIdUri value should have been obtained during the Graph API setup. If that has not been done, you should complete this now before proceeding.)
- Name = AppTenantId (NOTE: The AppTenantId value should have been obtained during the Graph API setup, called the Directory tenant ID. If that has not been done, you should complete this now before proceeding.)
- Name = AppCertificateThumbprint (NOTE: The AppCertificateThumbprint value should have been obtained during the Graph API setup. If that has not been done, you should complete this now before proceeding.)
- Name = Website_Load_Certificates (NOTE: The Website_Load_Certificates value should have been obtained during the Graph API setup. If that has not been done, you should complete this now before proceeding.)
- Name = LicenseKey; Value = license key obtained when you purchased SafeSend

- Click Apply at the bottom of the Environment Variables screen
- Still under Settings, select Configuration
- Set Always on to On
- Change SCM Basic Auth Publishing to On
- Change FTP Basic Auth Publishing Credentials to On
- Click Save at the top
Upload the Private Key Certificate
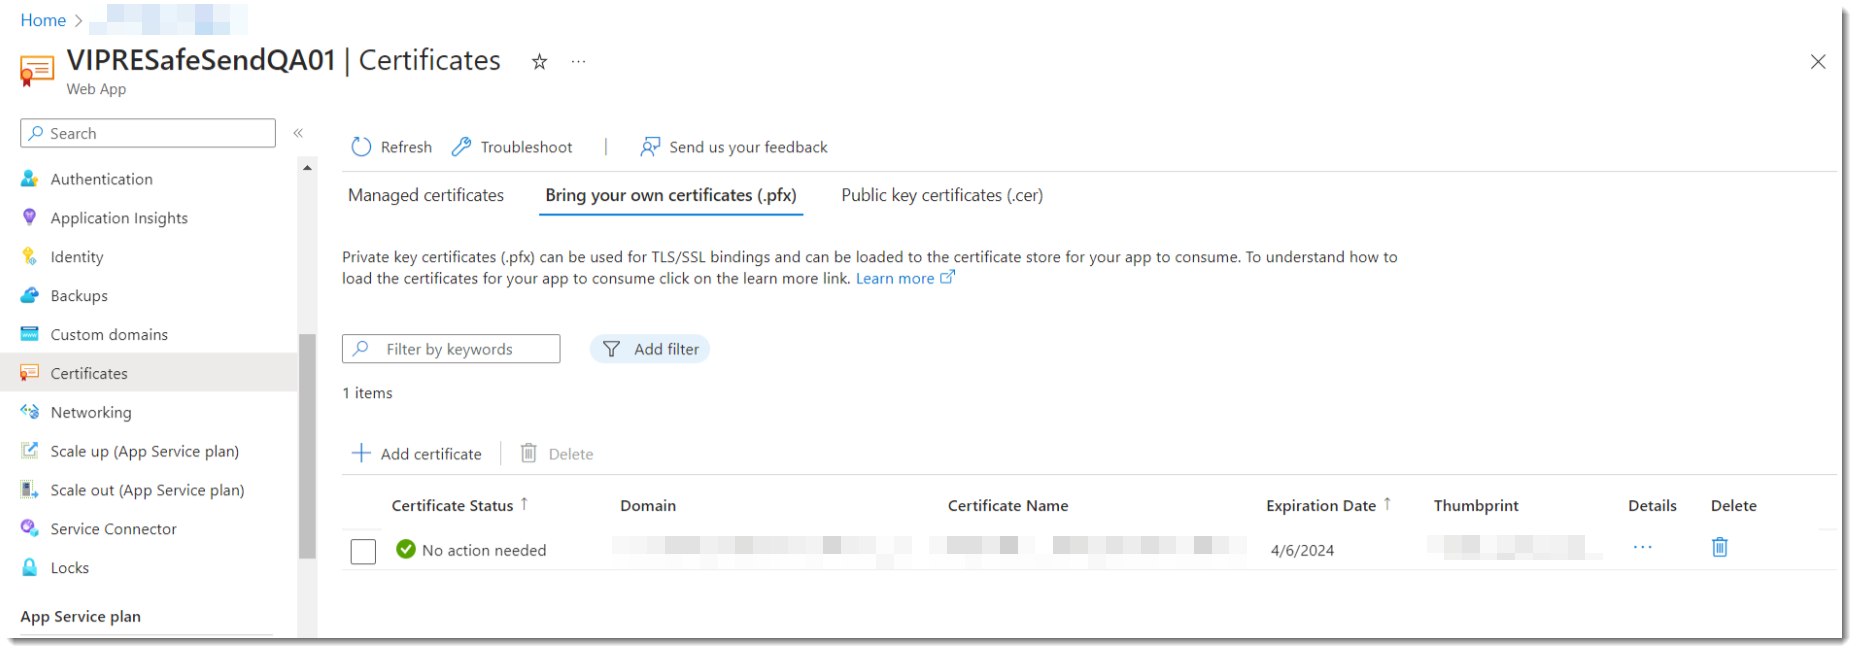
- On the left-side menu, under Settings, select Certificates
- Click the Bring your own certificates tab
- Choose Add certificate
- Select Upload certificate (.pfx)
- Browse to the directory where you saved the .pfx file and upload it here
- Enter your Certificate password
- Fill in the Certificate friendly name - this can be whatever you want
- Click Add
You'll need an FTP Client (like Filezilla) for the next part
- On the left-side menu, under Deployment, select Deployment Center
- Select FTPS Credentials at the top
- Copy the value in the FTPS endpoint field and paste it into the Host address field of your FTP Client
- Under Application scope, copy the value in the Username field to the Username field of your FTP Client
- Copy the value of the Password field to the Password field of your FTP Client
- On your FTP Client, click Connect
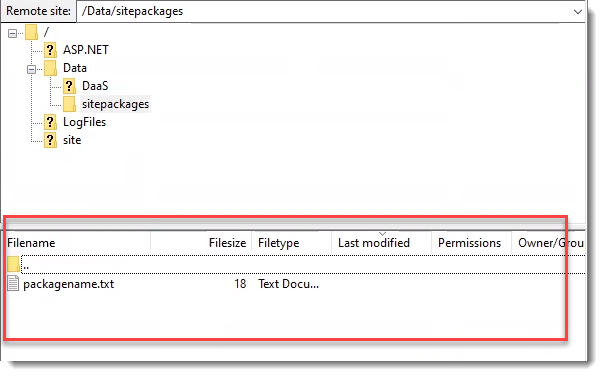
- After you're connected, under Remote site, create the following directories based on your operating system
- Windows based App Service = C:\home\Data\sitepackages
- Linux based App Service = /data/sitepackages
- Upload the SafeSendWebPackagev.r.m.b.zip and packagename.txt files found in SafeSendArchive-v.r.m.b.zip\SafeSendWeb_v.r.m.b.zip to the sitepackages folder
Optional: Go back to the browser screen that has Azure open
This section is optional and can be completed at anytime. Refer to the Web Add-in Settings Reference for the following section:
- Configure additional settings as desired:
- On the left-side menu, under Settings, select Environment Variables
- Under App Settings, select +Add
- Take the name of the setting from Web Add-in Settings Reference and add it to the Name field
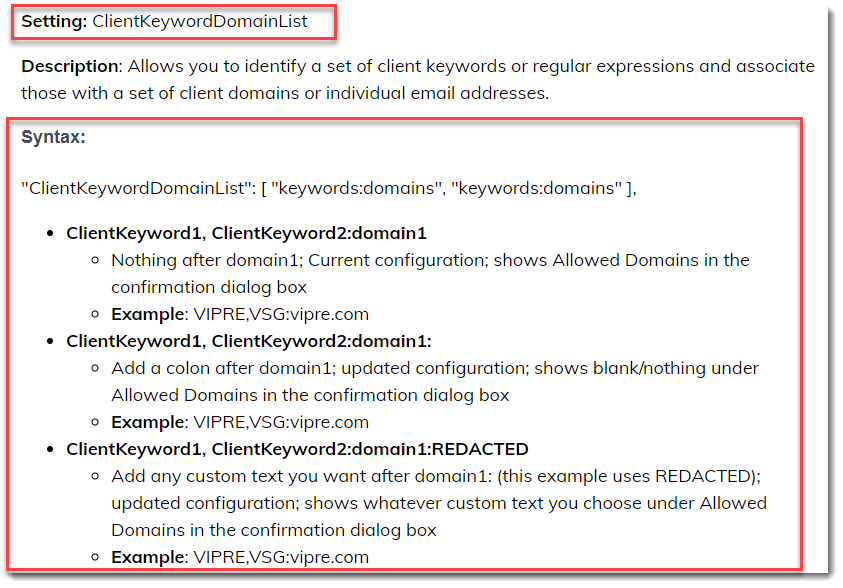
- For example, to enable the client keyword domain list setting, you could copy ClientKeywordDomainList from Web Add-in Settings Reference into the Name field of Azure
- Determine the appropriate values for each setting using the Web Add-in Settings Reference
- Click OK then select Apply
- Click Continue to save changes
- On the left-side menu, select Overview, then select Restart at the top
- Azure will confirm you are sure you want to restart SafeSend - click Yes
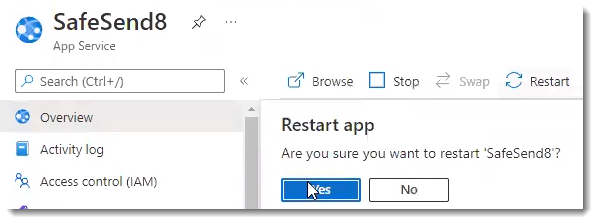
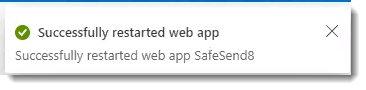
- In the top-right corner, you should see a notification showing the web app has been successfully restarted
These steps will complete the SafeSend deployment
- You'll see a URL somewhat close to the top-right portion of the screen labeled Default Domain; clicking that URL should open a browser window and take you immediately to the SafeSend website to verify your installation and license status
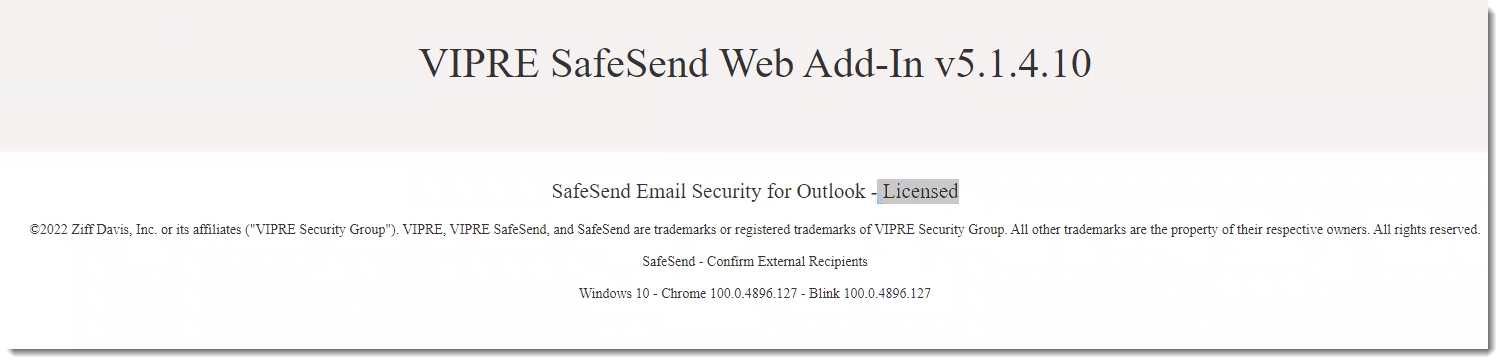
- Append /manifest to the URL to download the manifest.xml file; you will need this manifest or the URL to it when sideloading or deploying the add-in to users
If you see a 504.0 GatewayTimeout error in your browser, please refresh the browser window. This error can happen when Microsoft Azure takes too long to load and start up.
Click here for IIS-specific instructions
Please note if you are using IIS, you'll need to download and install the .NET Core Hosting Bundle found here.
Configure IIS
- After you have downloaded and extracted the SafeSend Web add-in .zip files, create a folder called SafeSend in the c:\ directory of the server hosting IIS
- Copy the contents from the extracted folder to your new c:\SafeSend
- Open Internet Information Services (IIS) Manager
- Right-click on Sites
- Select Add Website and complete the following properties:
- Site Name: SafeSend
- Physical Path: c:\SafeSend
- In the Binding section:
- Type: https
- Add the SSL certificate
-
IP address and port should be according to your needs
- Click OK
- Select Default Website, then click on Stop in the right panel
- In the left panel, click Application Pools
- Right-click SafeSend
- Select Basic Settings
- .NET CLR version: No Managed Code
- Click OK
Edit the settings.json file
- Open the folder called SafeSend that you created in the c:\ directory of the server hosting IIS
- Look for the file called settings.json and right-click on the file and open it with Notepad
- Adjust the following settings:
-
IsOffice365
- Default value is true
- If you are using Microsoft 365, IsOffice365 should be true
- If you are using an Exchange Server, IsOffice365 should be false and update the EmailProviderUrl below
-
EmailProviderURL
- If you are using Microsoft 365, the EmailProviderURL should already be correct
- The AppID and AppSecret values should have been obtained during the Graph API setup. If that has not been done, you should complete this now before proceeding.)
- If you are using an Exchange Server, you will need to update that setting as appropriate
- Set LicenseKey
- Set SafeDomains
- Set EnablePlatform to True if you will be using Web, PC, or Mac and False for the platforms you will not be using
- If you are using Microsoft 365, Web Add-in works for all 3 available platforms
- If you are using Exchange Server, Web Add-in does not work for Outlook for Mac or OWA in Safari
- For full details, the latest release notes
- If you intend to use both the PC add-in and the Web add-in, set the PC platform to False to avoid double prompts
-
IsOffice365
- Append /manifest to the URL to download the manifest.xml file; you will need this manifest or the URL to it when sideloading or deploying the add-in to users
Using SafeSend Web Add-in with a Different Tenant than the one you Registered the Application with
To use the SafeSend Web Add-in with a different tenant than the one you registered with, you will need access to a tenant administrator account to perform consent for all of your Microsoft 365 users.
- Browse to `https://login.microsoftonline.com/common/adminconsent?client_id={AppId}&state=12345`, where `{AppId}` is the application ID shown in your app registration
- Sign in with your administrator account, then review the permissions and click Accept
- The browser will attempt to redirect back to your app, which may not be running
- You might see a This Site cannot be Reached error after clicking Accept; this is okay as the consent was still recorded
When you are ready, move on to the next step below.
Add your Logo
SafeSend for Web - Add your Logo
...
You can customize the look and feel of the VIPRE SafeSend web add-in by uploading your organization's personalized logo. This optional step is a great way to integrate SafeSend with your organization seamlessly.
Web Add-in v6.0 and above
Image Requirements
- Image size must be no larger than 155x40
- Maximum file size must be no bigger than 5KB
- Image type must be .png file type
- Images with transparent backgrounds are recommended so that your logo matches the rest of SafeSend
Now that you have an image that meets the above requirements, let's upload it.
- Under Settings, click Edit Logo
- Upload your logo
- Click Apply
Congratulations! Your logo is now part of SafeSend.
Web Add-in v5.5 and below
Image Requirements
Before uploading your logo, make sure it meets the following requirements:
- Image size must be no larger than 155x40
- Image type must be .png file type
- Images with transparent backgrounds are recommended so that your logo matches the rest of SafeSend
Now that you have an image that meets the above requirements, let's upload it.
Add Logo
Change the following setting to change your logo in Azure or IIS:
| Setting | Description |
|---|---|
| LogoFilePath |
File path of .png file to use for confirmation logo. Overrides Logo setting if defined. This may be an absolute or relative path. The path must be accessible from within the context that the web addin is running and should be json escaped if it contains json characters. I.E. "C:\\logo.png"
"LogoFilePath": "logo.png", |
Click here for Azure instructions
When using the LogoFilePath setting, please note the path must be accessible from within the context of the Web Add-in.
- Upload your logo to your SafeSend site by completing the following:
- Copy your logo to a local copy of the SafeSend Web Add-in package directory and create a new .zip package
- Use the FTP client of your choosing to upload your logo to the SafeSend Web Add-in package directory on your SafeSend site
- In Azure, go to the SafeSend web app you previously created
- On the left-side menu, under Settings, click Configuration
- Select +New Application
- Add new setting LogoFilePath using the following syntax: "LogoFilePath": "logo.png", with logo.png as the image name and extension of the logo image you uploaded in Step 1
- Click OK
- Click Save
- Click Continue
Allow a few minutes after the service restarts for the changes to appear.
Click here for IIS instructions
When using the LogoFilePath setting, please note the path must be accessible from within the context of the Web Add-in.
- Open settings.json with administrative privileges using the text editor of your choosing
- Locate //"LogoFilePath": "",
- Remove the // at the beginning of the line and add the image name and extension of your logo image
- Example: "LogoFilePath": "logo.png",
- Save your changes and restart the SafeSend site
Allow a few minutes after the service restarts for the changes to appear.
Congratulations! Now, your logo is part of SafeSend.
When you are ready, move on to the next step below.
Deploy SafeSend Web Add-in
Deploy SafeSend Web Add-in
When using the SafeSend web add-in, there are two ways to deploy this to your org...
When using the SafeSend web add-in, there are two ways to deploy this to your organization:
- Microsoft 365
- Exchange 2019
Refer to the latest release notes for full system requirements.
Centralized Deployment via Microsoft 365 Admin Center
For full, up-to-date, details on deploying add-ins in Microsoft 365, visit https://docs.microsoft.com/en-us/microsoft-365/admin/manage/manage-deployment-of-add-ins?view=o365-worldwide.
Deployment via Exchange 2019
For full, up-to-date, details on deploying add-ins for Outlook in Exchange, visit https://docs.microsoft.com/en-us/exchange/clients-and-mobile-in-exchange-online/add-ins-for-outlook/add-ins-for-outlook
Congratulations! VIPRE's SafeSend web add-in has now been successfully deployed to the end-users in your organization.