
This guide will assist you with the migration of your FuseMail Hosted Email and/or Messaging Central (if applicable to you) account to VIPRE Email Security Cloud.
In the new Email Security Cloud portal there are certain services that the new system handles a little differently. This article walks Admins through the required actions to migrate to the new console thoroughly and successfully.
What is VIPRE Email Security Cloud?
VIPRE Email Security Cloud provides simple, secure, and scalable technology that blocks spam, phishing, and malware before it even reaches your system.
With VIPRE Email Security Cloud, you have the option to include individual add-ons like Attachment Sandboxing, Encryption, and Link Isolation, or you can upgrade to VIPRE Email Advanced Threat Protection which comes with VIPRE Email Cloud, Attachment Sandboxing, Link Isolation, Email Analytics, and Remote Browser Isolation.
Product Documentation
- VIPRE Email Security Cloud Onboarding Guide
- VIPRE Email Security Cloud Basics
- VIPRE Email Security Cloud Add-ons
- VIPRE Email Security Cloud Release Notes
- VIPRE Email Advanced Threat Protection
Migration Sequence of Events
- You will receive emails from no-reply@myvipre.com notifying and reminding you of this migration
- Pre-Migration Actions you must perform
- Review the information provided below regarding features no longer supported. Then complete the Steps provided under Pre-Migration Actions.
- On the date provided below under Migration Schedule, we will start the migration process; once this happens, you will no longer have access to the Messaging Central console
- Please note that administrative changes you make in the portal on the day of migration may not migrate to VIPRE Email Security Cloud, so please avoid any changes until after your migration
- You will receive an email confirmation from no-reply@myvipre.com that the migration was completed
- Once you receive the migration completion email, navigate to https://portal.mailanyone.net to access the VIPRE Email Security Cloud console
- After you log in to the new portal, the Day of Migration section of this guide will help you to finish getting set up
Migration Schedule
This migration schedule shows the current dates for each migration group. You will receive your assigned migration group via email. Please check back often, as these dates could change.
| Migration Group | Migration Date (Subject to Change) |
|---|---|
| Group 1.a through 1.c | Migration completed April 11 - 26, 2023 |
| Group 2.a through 2.c | Migration completed June 14 - 20, 2023 |
| Group 2.d | Migration completed August 8 - 9, 2023 |
| Group 2.e | Migration completed week of September 25, 2023 |
| Group 3.a through 3.p | Migration completed July 25 - August 24, 2023 |
| Group 4.a & 4.b | Migration completed week of September 25, 2023 |
| Group 4.a.1, 4.b.1, 4.b.2, 4.c & 4.d | Migration completed week of October 16, 2023 |
| Group 4.e, 4.f, 4.g & 4.h | Migration completed week of October 23, 2023 |
| Group 4.i, 4.j, 4.k, 4.m, 4.n, & 4.s | Migration completed week of November 6 & 20, 2023 |
| Group 4.i.1, 4.j.1, 4.j.2, 4.k.1, 4.k.2, 4.m.1, 4.n.1 & 4.n.2 | Migration completed week of January 8, 15, & 22, 2024 |
| Group 4.i.2 & 4.m.2 | Migration completed week of February 5, 12, & 19, 2024 |
| Group 4.p, 4.r, 4.t & 4.u | Migration completed week of February 5, 12, & 19, 2024 |
| Group 4.q, 4.v, & 4.z | Migration completed week of February 5, 12, & 19, 2024 |
Migration Information and Required Actions
This section contains information on unsupported features from Fusemail Hosted Email and Messaging Central and the replacement feature in VIPRE Email Security. You will also find a list of actions you need to perform detailed in the tabbed section labeled Pre-Migration Actions.
Features no longer supported
Review the list below of features/settings that are no longer supported in the new portal and familiarize yourself with the replacement feature. We will migrate most settings for you, but for a few of the ones that are no longer supported, you may need to copy or take screenshots of the settings as appropriate.
| Unsupported Messaging Central Feature | Replacement Email Security Feature |
|---|---|
| Domain Administrator | Account Administrator. Sub-customers can have dedicated administrators. |
| Domain Policies | Policies per account as well as global reseller policy |
| Domain level auto-whitelisting |
Customer Allow/Deny Lists Existing Domain level Allow/Deny lists will be consolidated into the Customer Allow//Deny Lists |
| TrackSMART | Message Logs |
|
Service: Auto-Responder |
Auto-Responder Advanced Policy (see below) |
| Email Continuity | Email Replay and Continuity (see below) |
| VaultSMART | Add-on: VaultSMART and VIPRE Email Archiving (see below) |
| CypherSMART | Add-on: VIPRE Email Encryption (see below) |
| Unsupported FuseMail Hosted Email Feature | Replacement Email Security Feature |
| Identities for third-party domains | Not supported. The identities will be removed during migration. |
| Global mail rules | Advanced policies (see below) |
Pre-Migration Actions
To ensure we have all the information needed to migrate your account successfully, complete the steps in this section.
Step 1
This section describes how your FuseMail Hosted Email account will change during the migration process.
The structure of accounts in the new portal differs from your current portal. During the migration process, we will migrate your account to be compatible with the required structure of VIPRE Email Security.
-
Domains will be migrated one per account. This means sub-customers will be created for each domain if multiple domains exist.
- A Domain used by more than one account will not be supported. During migration, a shared domain will be assigned to a single, default sub-account under the partner account.
- Existing sub-customer accounts will be moved as-is under the partner account
- New sub-customer accounts will be created using the original account name + domain naming convention. For example, let's assume the partner's account name is Best Partner. After migration, in Email Security Cloud, we will have these accounts:
- Sub-customer Admin accounts will be created for each new sub-customer, and a default email address will be created for those sub-customers. The naming convention for auto-created Admin accounts is admin_username@domain.com. Using the example sub-customer accounts above, the new Admin account names are shown here:
- Group Admins will be created as an admin for the assigned sub-customer account with the corresponding domain
- Hosted Mail usernames will be converted into an email address format if the username was not in that format before migration
-
User accounts will be assigned to the corresponding sub-account based on their @domain name
- User accounts for a domain that are directly under a reseller account, as opposed to under a sub-account's domain, will be placed under a sub-customer account named “Unsorted Users”
- Aliases for a domain that does not match the source account, including third-party domains, cannot be migrated as-is. Instead, we will create forwarders for each alias of this type. Any related identity cannot be migrated.
- Mailbox size limit will be set to the largest package size linked to the parent account if the pre-migration mailbox size limit is set to zero
Continue to the next step by clicking on the Step 2 tab above.
Step 2
This section describes how your Messaging Central account will change during the migration process.
The structure of accounts in the new portal differs from your current portal. During the migration process, we will migrate your account to be compatible with the required structure of VIPRE Email Security.
-
Domains will be migrated one per account. This means sub-customers will be created for each domain if multiple domains exist.
- Existing sub-customer accounts will be moved as-is under the partner account
- New sub-customer accounts will be created using the original account name + domain naming convention. For example, let's assume the partner's account name is Best Partner. After migration, in Email Security Cloud, we will have these accounts:
- Sub-customer Admin accounts will be created for each new sub-customer, and a default email address will be created for those sub-customers. The naming convention for auto-created Admin accounts is domain_name_admin@domain.com. Using the example sub-customer accounts above, the new Admin account names are shown here:
- Admin accounts will be auto-generated for any account that is using only a root@customer# or root@domain.com (root accounts). The naming convention for the Admin account is the same as above. The MC root accounts will not be accessible after migration.
- Services are linked to a domain in Messaging Central and subsequently linked to the newly created sub-customer associated with that domain.
- Archiving will also be linked to a domain and subsequently linked to the newly created sub-customer associated with that domain. Each domain/sub-customer will get its own archive.
Continue to the next step by clicking on the Step 3 tab above.
Step 3
Step 3: Capture your auto-responder configuration
The auto-responder service is replaced with Advanced Policy rules in VIPRE Email Security Cloud.
- Before migration, screenshot or note down any domain-level auto-whitelisting rules that will be needed after migration
- After migration, you must create an auto-responder using an Advanced Policy
Continue to the next step by clicking on the Step 4 tab.
Step 4
Step 4: Inform end users
Provide your users this link to our VIPRE Email Security End User Guide for information on accessing the user portal for their quarantine and recent email history (Continuity feature). Let them know of the planned migration date.
Continue to the next step by clicking on the Step 5 tab.
Step 5
Step 5: Download CypherSMART emails
CypherSMART is replaced with the Encryption add-on in VIPRE Email Security Cloud. Before your migration date, download any emails within CypherSMART that you want to keep. These emails are not compatible with the Encryption add-on.
If you have not used CypherSMART to encrypt emails, no action is needed.
Continue to the next step by clicking on the Step 6 tab.
Step 6
Global mail rules
These global rules are no longer supported
- Flag email
- Mark as read
- Send SMS/Email alert
All other global rules can be defined through an advanced policy. For example the ability to mark a message for deletion can be set up through an advanced policy that quarantines a message based on the filter criteria in the policy rule.
Before migration:
- Screenshot or note down your global mail rules
- After migration, review the Advanced Policy rules for your account. Define rules for any global mail rules that were not carried over.
Identities
Identities that contain a domain name not belonging to your account will be deleted during the migration. For example, an identity of name@gmail.com or name@thirdpartydomain.com would be deleted.
Thank you for completing all of the pre-migration actions. Once we have completed the migration of your account on your assigned migration date, we will send you a confirmation email. At that time, you may proceed to the next section of this guide to complete the post-migration steps.
Day of Migration - What to Expect and Actions to Take
On the day of your migration, you will receive an email letting you know your migration has been completed. If you visit the old portal, you will see a message with a link to the new portal. You may access the new portal using this link: https://portal.mailanyone.net/

After your account has been successfully migrated, you may see multiple entries in Message Logs for some messages. This is only for messages processed during the migration time frame. (The exact time will depend on your account size, but it should not take longer than a few minutes.) The log entries may look like duplicate/looping messages, but they do not result in multiple deliveries of the messages; only one message is delivered. You may also notice that you can no longer access historical message log data after migration. This logging behavior is expected.
Complete the steps in this section to wrap up the successful migration of your account.
Step 1
Administrator access to VIPRE Email Security Cloud
You may need assistance to access your account. If you do not have an existing administrator account that was migrated and instead are relying on the auto-generated Admin account, you will need to contact Support for assistance with gaining access. For partners, once your account is migrated, you have the ability to reset your sub-customer Admin passwords. However, we strongly recommend creating a new sub-customer Admin account and deleting the auto-generated account for best security practices.
Continue to Step 2.
Step 2
Review and adjust services assigned to sub-customers
As the migration process creates sub-accounts and assigns services, we could inadvertently assign services, such as archiving or hosted mail, to sub-customers that do not need the services. Review the services enabled for your sub-customers and adjust as needed.
Continue to Step 3.
Step 3
Learn about Email Replay and Continuity
In Messaging Central, emails were kept for a default period of 14 days with the option to replay/redeliver them, and this option could be configured on a per-person basis. Continuity gets an upgrade in VIPRE Email Security, with emails being kept for a period of 90 days for all of your users at no additional cost. Continuity is accessible to all users, so there is no configuration needed.
- Learn about how to replay emails individually or in bulk as an administrator
- Learn about how end-users can access Email Continuity
Share portal information with end-users
After your migration, provide the following important information to your end-users:
- URL to log in to the new console: https://portal.mailanyone.net
- The quarantine report will come from: noreply@mailanyone.net
- Provide your users with this link to our VIPRE Email Security End User Guide
Continue to Step 4.
Step 4
Add any needed Auto-Responders
The auto-responder service is replaced with Advanced Policy rules in VIPRE Email Security Cloud.
Before migration, you may have taken a screenshot or noted down any domain-level auto-whitelisting rules that will be needed after migration. You may reference those notes now while creating a new auto-responder using the instructions below.
Create an Auto-Responder
Auto-responders are helpful when you need your email to automatically reply to emails, like if you're out of the office for example. This is accomplished by creating an Advanced Policy.
Create an Auto-Responder Advanced Policy
In the process below, we'll work with the example of creating an Out of Office auto-response.
Step 1 - Create a Template
- After you are logged in to VIPRE Email Security Cloud, click Policies, then select Templates
- Name your template in the text box and click the plus sign
- Add the Sender's Name (the account sending the auto-response)
- Add the Sender's Email address
- Under Recipient, add %sender% to fill in the name and email address of the original sender being auto-replied to
- Subject can be anything you want (e.g.; Out of Office)
- Template is the body of the email (e.g.; Thank you for your email. I am currently out of the office.)
- Click Save

Step 2 - Create an Advanced Policy
- Under Policies, select Advanced Policies
- Click the Create Policy button in the top right
- Create your Policy Name (e.g.; Out of Office)
- Next to Applies to, select Incoming Messages from the drop-down menu
- Next to Enable, click the checkmark
- Next to Enabled for, select Specified Mailboxes from the drop-down menu
- A text box will appear underneath it allowing you to specify which mailbox you want this policy enabled for (e.g.; type in the specific email address sending the Out of Office auto-responder message)
- Click Add
- Under Rules, select Match all Messages from the drop-down menu
- Under Actions, select Auto-Reply using Template from the drop-down menu
- Select the template you created above from the drop-down menu
- Under Auto-reply only once, select your desired amount of time; the default is once every 24 hours
- Click Add
- Click Create Policy
Your auto-responder has now been created.

Continue to Step 5.
Step 5
Add-on: VaultSMART and VIPRE Email Archiving
If your account currently has VaultSMART, your migration to VIPRE Email Security Cloud includes a version of VaultSMART that works with the new email console. Any new data will automatically start archiving to that version of VaultSMART, and your existing data will remain in the prior VaultSMART system.
We have a new and improved VIPRE Email Archiving solution which you will be migrated to in the near future, including data from both previous versions of VaultSMART. Watch for additional details on Email Archiving in a separate email over the next few months.
Add-on: VIPRE Email Encryption
CypherSMART is being retired on the day of your migration. While we are proud of what we’ve accomplished with CypherSMART, we are committed to providing you with the best. In keeping with this commitment, we are excited to introduce you to the best we have to offer - VIPRE Email Encryption.
VIPRE Email Encryption is an add-on to VIPRE Email Security Cloud that allows you to ensure data is securely transmitted while enabling you to stay in regulatory compliance.
If you currently subscribe to CypherSMART, continue reading for important post-migration details about encryption setup. If you do not currently subscribe to our encryption services but would like to learn more, contact our Sales team.
Configure Encryption
VIPRE Email Security Encryption enables your system administrators to encrypt emails automatically.
Encryption Settings
To get to the Encryption settings:
- Click on Service Settings
- Select Encryption
Settings

- General - This is enabled by default; click the checkbox to disable or reenable the encryption of replies sent from the encryption portal
-
Policy Description- All of the following policies are disabled by default; includes four pre-defined policies that will trigger encryption under the following circumstances:
- The email body contains any of the following information:
- Credit card number
- US Social Security Number
- Canadian Social Insurance Number
- Danish Personal Number
- Swedish Personal Number
- Norwegian Personal Number
- The sensitivity of an Outlook email is sent to confidential
- The subject line of an email is pre-pended with "[encrypt]" (not case-sensitive)
- An outgoing email sent to a self-created list of addresses or domains
- To add email addresses or domains for outgoing encryption, enter the address in the text field and select the + plus sign
- The email body contains any of the following information:
Click Save at the bottom to commit all changes.
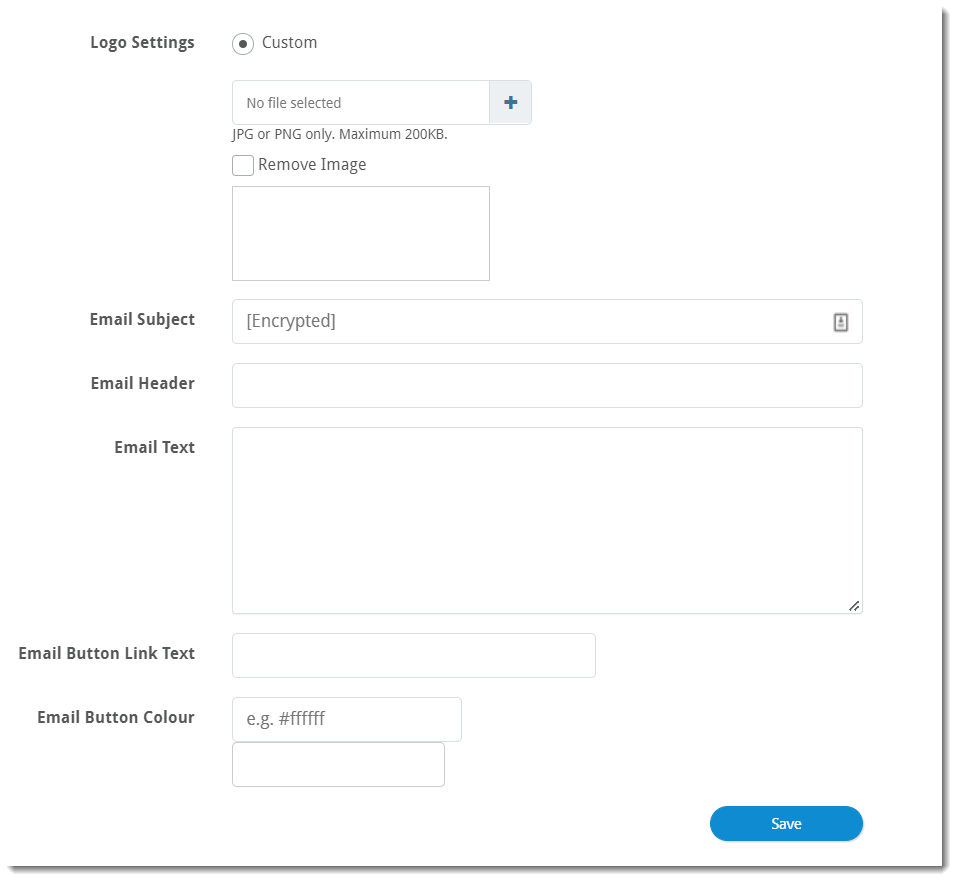
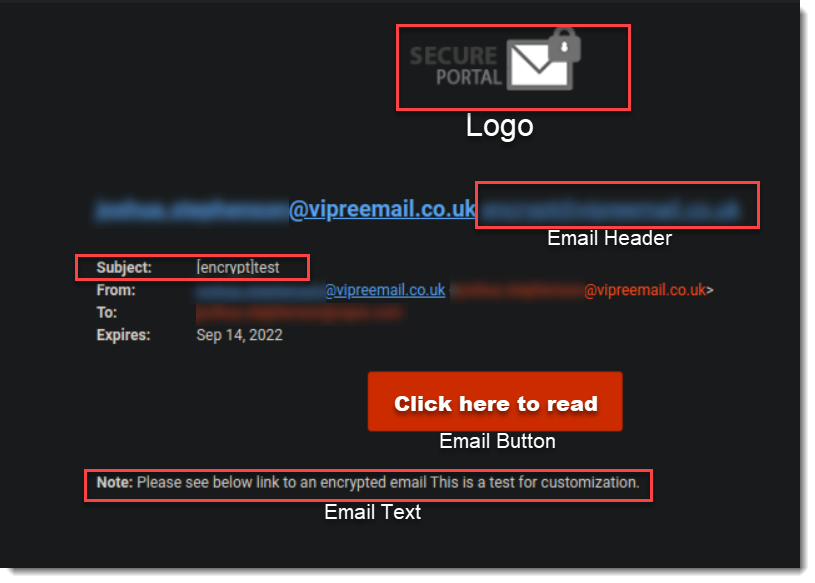
Branding
The Branding tab allows you to add your organization's identity to outgoing Encryption notifications.
-
Logo Settings- Upload your organization's custom logo by clicking the blue plus sign; supported file types are .jpg and .png, and the maximum file size is 200KB
- You can also remove your logo by placing a checkmark next to Remove Image
- Email Subject - By default, emails that start with the subject line "[Encrypt]" will be encrypted automatically
- Email Header - Customize text included after the Sender's email address
- Email Text - Customize any text you want to add to the email body below the Email Button
- Email Button Link Text - Customize the text of the button
- Email Button Colour - Customize the color of the aforementioned button
Continue to Step 6.
Step 6
This change does not impact your MX record. Do not change where your MX record points to.
DNS Management
This step applies to you only if your DNS is hosted by VIPRE. If you currently do not point to the name server, or IP address, listed below - do not make this change.
If your name servers currently point to fusemail.net or mailanyone.net, or points to/resolves to the IP addresses listed below, you must replace those with the new name servers listed under New Name Servers.
Caution! Do not change your MX record. If you change your MX record, your mail flow will stop.
Old Name Servers
Current (old) name servers
ns.fusemail.net
ns2.fusemail.net
ns3.fusemail.net
ns4.fusemail.net

or

ns.mailanyone.net
ns2.mailanyone.net
ns3.mailanyone.net
ns4.mailanyone.net
New name servers
ns1.electric.net
ns2.electric.net
ns3.electric.net
ns4.electric.net
If you are unclear what this change is, please reach out to our VIPRE Support team or contact your Domain Registrar before making any changes.
This completes the post-migration actions. Thank you for following the steps we outlined for you.
You can find more information on all VIPRE business products by visiting our VIPRE Success Center.
Frequently Asked Questions
What is a sub-customer and what are the benefits?
In VIPRE Email Security, our partners have their account (aka main or parent account) and set their customers up with dedicated sub-accounts (aka sub-customer). This keeps each customer's data physically separated from other customers. Policies can be defined at the partner (parent) level account and within each sub-account. Administrators can be defined for each sub-account enabling each sub-customer to manage their own account and access only their company's data.
How will my billing change after migration?
The amount you pay will not change. If you are a partner and the migration results in sub-accounts for your customers, your invoice will show your new sub-accounts, but the charges remain the same. You will not be charged differently for sub-accounts.
Must each domain be assigned to a different sub-account?
Not necessarily. If you manage two or more domains for a single customer, those domains should be assigned to the same sub-account. When the domains belong to different customers, there should be a sub-account per customer with the appropriate domain assigned to each. This is very important for proper data separation.
I am a user, not an administrator, of FuseMail Hosted Mail. Will I be directed to my new account? Do I need to update my mail client?
You will not need to make any changes to your mail client settings. After migration, you can still access your mailbox through https://wm.mailanyone.net/. If you use a mail client, such as Microsoft Outlook, you will not need to make any configuration changes to it. Your mail client will continue to receive your mail.