
VIPRE Email Advanced Threat Protection (ATP) brings the latest and best protection technology to the Email Security platform to protect against modern targeted zero-hour attacks.
With new malware strains now being designed to bypass traditional signature-based protection, this additional layer is needed to block advanced threats in malicious attachments, links, and other content that can get past those traditional defenses. The solution leverages the latest machine learning technology in secure cloud sandboxes to provide intelligent real-time layered protection for your email, blocking discovered threats before users can accidentally click on them. Even the most advanced modern attacks will be stopped by this solution. Best of all, the solution is affordable and works out of the box with minimal management required, giving you the resources and visibility you need to protect your employees and keep your data safe.
The ATP solution is built on the foundation of VIPRE Email Security and contains functionality from the following platform components (click a topic to learn more):
VIPRE Email Security Cloud
- For the basics on how to use VIPRE Email Security Cloud, visit our Basics guide
- For details on the different sections of Email Cloud (e.g.; domains, reporting, policies, etc), visit the Administrator guide
- For the latest release notes, visit What's New
- For instructions on how to set up VIPRE Email Security Cloud, continue reading below
Guided Setup of VIPRE Email Security Cloud
Guided Setup of VIPRE Email Security Cloud
The setup of VIPRE Email Security Cloud requires fundamental changes that need to be completed in a specific order. We’ve outlined these changes in the guided path below.
Set Password and Login
Important
You should have received an email that includes a variation of your email address, provided by VIPRE. Please have this email available when going through the steps below.
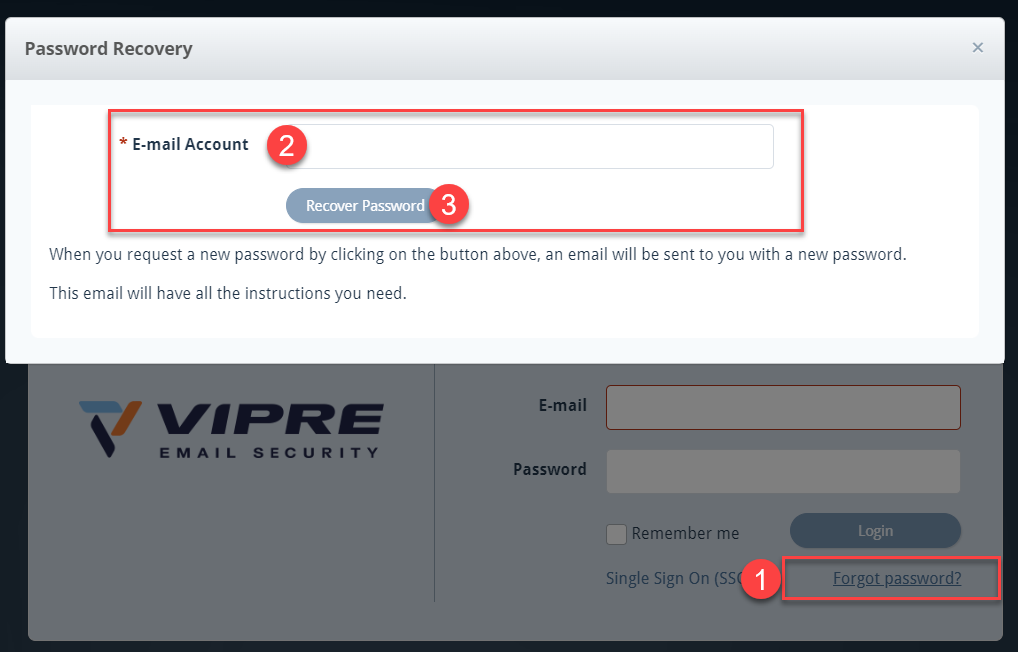
- Navigate to https://email.myvipre.com
- Click Forgot password? on the bottom-right
- Enter the above-mentioned email address provided by VIPRE and click Recover Password
- Check your email for an email from VIPRE
When ready, click the next step below
Add and Verify Domains
Add and Verify Domains
To further the amount of protection we provide, domain ownership is verified via ...
To further the amount of protection we provide, domain ownership is verified via DNS lookup tools. VIPRE will provide a verification code that the domain owner or administrator will need to add to the TXT section. Email Cloud will then verify the DNS records to ensure the code we provided is in the TXT section.
- Select Domains on the left-side menu
- Click the plus sign on the top-right
- Fill in the appropriate required fields and click Save & Continue
- Ensure DNS TXT Record is selected and add the provided TXT values to your DNS records
- Select one of the following:
- Verify Later - this option is best if the required changes cannot be made right away
-
Verify Now - use this option if you have already made the required changes
- Please note, in some circumstances, it may take up to 72 hours for changes to your DNS record to propagate across the Internet

- Please note, in some circumstances, it may take up to 72 hours for changes to your DNS record to propagate across the Internet
To verify domains at a later time:
- From the Domain Listing screen, select the appropriate domain under the Domains Pending Verification section at the top
- Click Verify Now; the Edit Domain window will appear showing the DNS TXT Record verification method
- When ready, click Verify Now

When ready, click the next step below.
Add Users
Within VIPRE Email Security – Cloud Edition, a user is defined as a single actual email address. Aliases and distribution lists do not count against the allowed number of users. This article explains the different ways you can create or import users into the system.
Using any of the methods below enables you to add users to VIPRE.
Log in as an administrator
- Login to https://email.myvipre.com/ using your Administrator credentials
Navigate to the desired customer
If you are logging in as the administrator, you will be presented with your customer list.
- From the displayed Customer List, select the Customer which you are adding users to
Choose one of the following methods for adding users below:
Directory Services
VIPRE Recommends
Adding users via directory services like LDAP or Entra ID, is recommended due to its ease of use.
LDAP
This article explains the benefits of using LDAP sync for user management and how to enable in Email Security.
What is LDAP sync?
For ease of user management with Email Security, use Lightweight Directory Access Protocol (LDAP) Sync. User information that updates in LDAP will automatically replicate to VIPRE Email Security. This lets you continue to use the LDAP system as a single point of user management.
When LDAP Sync is enabled, Email Security considers LDAP the system of truth. Thus, new users in LDAP are automatically added to Email Security. Disabled or deleted users are automatically deleted from Email Security once the deletion delay interval expires. Email aliases are automatically mapped from LDAP secondary email address data.
The sync process can be scheduled to run every 6, 12, or 24 hours, every three days, or weekly. If immediate sync is needed, such as in the case of offboarding an employee, the Email Security administrator can use the Sync Now action to immediately sync the LDAP changes over to Email Security. Network traffic for the sync process is minimized by Email Security, which places a directory service sync agent local to the LDAP directory service. The data that is transmitted back to Email Security is a subset of the LDAP data.
Summary of benefits
Use LDAP sync to enjoy these benefits
- Quickly add users to a new (or existing) Email Security account
- Keep users' account details updated (e.g., name, phone, notes)
- Easily add email aliases to users' accounts
- Ensure disabled, or deleted users cannot access Email Security
Supported directory services
The Email Security LDAP sync feature has been certified with Microsoft Active Directory Services. Since LDAP is a standard protocol, the feature should work with any standard directory that supports LDAP. However, not all directory implementations use the same attributes to store the same types of information; in some cases, this may cause mismatches in data interpretation. If you are attempting to connect Email Security to some other directory, let us know of any issues so that we can account for different schema mappings.
LDAP sync and manual account management
If desired, user management through LDAP sync can be used in conjunction with manual account management. When used in this manner, the LDAP sync process uses a supplemental approach to reconcile user accounts. For example, an email address that has been manually added to Email Security will have its name, phone number, and notes updated from the directory service data. This also means when the user is disabled or deleted in LDAP, that action will not be recognized in Email Security.
LDAP sync processing considerations
Review the information in this section for an understanding of how LDAP sync works with user management in Email Security.
Synchronization rules
The synchronization process uses these rules when scanning LDAP for updates to make in Email Security. If the rules are not met, then the user is not added to the Email Security account.
- System of truth - when LDAP sync is enabled, it is the system of truth for user management within Email Security
- Primary email address - the domain of the primary email address must match a domain that is managed by the Email Security account
-
Secondary email address (aliases)- the domains of secondary email addresses must match a domain that is managed by Email Security AND the primary email address domain is managed by the same Email Security account.
- list of users - when viewing the list of users, you will see secondary email addresses grouped under the users' account for the primary address
-
Domain changes in Email Security- if a domain is removed from management under Email Security, this results in:
- when the removed domain matches a Primary email domain - the user is immediately removed from Email Security and will not appear under LDAP -> Conflicts
- when the removed domain matches a Secondary email domain - the secondary email address is removed from the primary user, as long as Email Security still manages the primary domain
- LDAP attributes - these attributes sync to Email Security: mail, proxyAddresses, member, givenName, sn (Surname), homePhone, mobile, company, department, and notes
Enabling / Disabling of LDAP sync
Take note of the following points when enabling or disabling LDAP sync. The information in this section assumes the synchronization rules (above) are met.
- Single LDAP source - at this time, LDAP sync supports connecting to just one LDAP source
- Enable for new Email Security account - set up LDAP sync connection and use the Sync Now action to quickly add users
-
Enable for existing Email Security account - upon for the first sync event; Email Security will
- Add users - LDAP users that are not found in Email Security will be added
- Update users - user metadata from LDAP will be added to existing users. Qualifying secondary email addresses will be added.
- Delete users -Unless managed manually or by SMTP, Email Security users that are not found in LDAP are flagged for deletion and will be listed under LDAP -> Conflicts
-
Disable LDAP sync - users will stay in Email Security, and you must now manage manually
- User conflicts - no further action will occur for users identified as conflicts at the time of disabling LDAP sync. However, users flagged for deletion will be automatically deleted when the delay interval expires.
Synchronization frequency
The Email Security Administrator controls the frequency at which the LDAP process runs.
- Frequency - Email Security polls LDAP for changes as frequently as every 6, 12, or 24 hours; every three days, or weekly
- Adjusting frequency - polling interval is adjusted through the Poll LDAP Every setting that is located on the Connect tab under Service Settings -> LDAP
- On-demand synchronization - use the Sync Now action to force immediate sync from LDAP to Email Security. This is especially useful when there is an urgent need to add or remove a user.
User Deletion
- Users deleted from LDAP - upon the next sync polling event, newly deleted users will be flagged for deletion in Email Security
- Users disabled in LDAP - are flagged for deletion in Email Security
- Deletion delay interval - LDAP connection setting Delete Users After controls the delay interval, which can be set to 7, 14, or 30 days; or never
-
Physical deletion- users deleted from LDAP are delayed by a minimum of 7 days before Email Security automatically deletes them
- Accidental deletion - the delay interval protects against unintentional removal, or temporary disablement, of accounts that sync over from LDAP
-
When a user is flagged for deletion
- User access disabled - during the delayed deletion interval, users registered for deletion can no longer access Email Security
- User-level rules - user-specific Email Security rules, such as Allow & Deny, are retained during the delete delay interval. Once the user is automatically deleted when the interval expires, the related user rules are deleted.
- User's Archived emails - for a user that is automatically deleted after the delete interval and later activated in LDAP, they will be automatically synced to Email Security. At that time, the user's email archive will be restored.
- Immediate deletion - during the delete delay interval, a user can be manually deleted from Email Security through the User Conflicts tab within the LDAP section of Service Settings
- Ignore deletion - users deleted from LDAP can be retained in Email Security by using the Ignore action (User Conflicts tab) during the deletion delay interval
- Manual deletion - A user that is manually deleted in Email Security will be added back upon the next sync event with LDAP. The user must be deleted from LDAP for them to be permanently deleted in Email Security.
How to enable LDAP sync for user management
LDAP discovery allows VIPRE to scan your network directory for users and automatically add them to the user list.
Step 1. Prerequisite - Firewall permissions for LDAP
To use LDAP sync, you will need to ensure your firewall permits access from the Email Security data centers to your LDAP server.
- Open one of these LDAP ports, based on your use of SSL (recommended) or non-SSL
- SSL: 636
- Non-SSL: 389
- Permit these server IP addresses
Email Security Data Center Network Ranges
192.162.216.0/22 (192.162.216.0-192.162.219.255)
208.70.128.0/21 (208.70.128.0-208.70.135.255)
72.35.12.0/24 (72.35.12.0 - 72.35.12.255)
72.35.23.0/24 (72.35.23.0 - 72.35.23.255)
Step 2. Set up the LDAP connection
- Login to https://email.myvipre.com/ using your Administrator credentials
If you have multiple accounts to administer, you will be presented with your list of accounts.
- From the Administrator Dashboard, expand the Customers menu, then select Customer List
- From the displayed Customer List, select the Customer to which you are adding users
- From the customer dashboard, expand the Service Settings menu. Then, select LDAP
- On the Connect tab of the LDAP Configuration screen, click the Enable LDAP box
- In the Host field, enter the IP address of the LDAP server
- Ensure the SSL option is selected (highly recommended). Deselect if your environment does not support SSL.
- In the Username and Password fields, enter the user account credentials to be used for the sync process
- Enter the Base DN (Domain Name) information using standard LDAP notation, e.g.; ou=myOU,dc=example,dc=com
- In the Poll LDAP Every drop-down, select the frequency at which you would like the sync process to run
- In the Delete Users After drop-down, select the number of days for the deletion delay interval
- Click Show advanced options to specify the LDAP port (if not using the default 389/636)
- Click Test to verify the connection settings
- Click Save to store the configuration changes
If the connection test has failed, double-check the setting provided, revise as necessary and test again
Step 3. Add users
- To immediately discover and add users, select Sync Now. Otherwise, users will sync at the next polling cycle.
The initial sync may take up to an hour, depending on the number of users to be created.
Important Information
Sync: Disabled/deactivated users and public folders are not synced by default in LDAP. Enable the checkboxes to sync disabled/deactivated users and/or public folders.
Custom Filter: Filters are applied to user and group syncs; LDAP search filters are supported
How to disable LDAP Sync
Email Security retains all users when LDAP Sync is disabled. If any users are flagged for deletion, they will still be deleted at the expiration of the deletion delay interval.
Disable LDAP sync
- Login to https://email.myvipre.com/ using your Administrator credentials
If you have multiple accounts to administer, you will be presented with your list of accounts.
- From the Administrator Dashboard, expand the Customers menu, then select Customer List
- From the displayed Customer List, select the Customer to which you are adding users
- From the customer dashboard, expand the Service Settings menu. Then, select LDAP
- On the Connect tab of the LDAP Configuration screen, uncheck the Enable LDAP box
- Click Save to store the configuration changes
LDAP sync is now disabled.
Managing LDAP in Email Cloud
Exceptions
The Exceptions tab is where you can select any name from the User List that you want to exclude from the LDAP sync with VIPRE Email Cloud. This means any exceptions will also be excluded from any custom filters you set up on the Connect tab.
 VIPRE Email Security Cloud - LDAP Sync Exceptions
To exclude a user, group, or alias from the LDAP sync:
- In the User List column, which shows a complete view of your directory server, locate the row with the name of the user, group, or alias you want to exclude
- Click the blue arrow in the same row as the name to add that name to the Exception List
- Click Save
Additions
The Additions tab allows you to manually add users to include in the LDAP sync. For example, this would be useful for adding any new employees that may need to be added in between syncs.
 VIPRE Email Security Cloud - LDAP Sync Additions
To include an additional user to your LDAP sync:
- Type the email address of the user you want to include
- Click Add
Users added to your LDAP sync via this method will be listed on this tab. They will also show up in the list under Users in the left-side menu with the source as LDAP.
User Conflicts
The User Conflicts tab will show users that previously synced in the portal but are no longer in the directory server.
 VIPRE Email Security Cloud - LDAP Sync User Conflicts
Example Use-Case
You notice there are two users showing in User Conflicts. Let's say that when you were first setting up LDAP sync, under the Connect tab, you set Delete Users After to 7 days. You're fine with one of the users being deleted because the employee no longer works for your company. The other user, however, is on maternity leave and will be coming back in 12 weeks.
- Click the checkbox next to the user and select your desired action.
In the example above, you could use Ignore so that the user will not be deleted after 7 days.
Troubleshooting
Firewall settings - Verify the Email Security IP addresses have been allowed through the network and domain controller firewall. Verify that your Directory Service is reachable through your firewall.
Account credentials - Confirm the correct user account credentials for Username and Password have been provided and are accurate.
Connection successful but users not populating
When the sync process runs, users will begin to appear in the Users view of the Admin portal. Follow the suggestions below if you do not see the users populating in this view as the sync process runs. After allowing up to 30 minutes for the initial sync process to complete, if many users are missing, then please reach out to our Support team for assistance.
Sync Now - Click the Sync Now button on the Connect tab of the LDAP Configuration screen. You should receive a notification message indicating the sync process has been started.
Managed domain - Verify domain is a managed domain for this Email Security account. From the Email Admin portal, navigate to Domains. The domain(s) shown here must match the domain of the LDAP users' primary email addresses.
Entra ID
Microsoft Entra ID (Active Directory) is a cloud-based identity and access management service that we've integrated with VIPRE Email Security Cloud allowing Email Cloud to sync user and group accounts that belong to your managed domain.
Important
Only one directory service can be active and enabled at a time. For example, you can use either Azure or LDAP but not both. Enabling one directory service will disable the other. You will be prompted before saving the new configuration.
When switching from one directory service to the other, previously synced users no longer in the current directory service sync will be considered user conflicts. These users can be found in the User Conflict Tab and are marked for deletion as directed in the Delete User After setting.
There are two main parts to set up the Entra ID integration with Email Security Cloud.
Part 1 - Configure Entra ID Integration
Follow the steps below to configure Entra ID to integrate with VIPRE Email Security Cloud. These steps all take place in Entra ID and assume you already have a Microsoft Azure account.
Step 1 - New App Registration
- Navigate to portal.azure.com and log in with your Microsoft Azure account credentials
- On the left-side menu, under Manage, select App registrations
- Click New Registration and name your registration
- Any name will work but it's recommended to use a name that identifies what app you're registering (e.g., in this case, VIPRE Email Cloud)
- Click Single tenant
- Skip the redirect URI and click Register
Step 2 - API Permissions
- On the left-side menu, under Manage, select API Permissions
- Select Add a permission
- Select Microsoft Graph
- This is the API that the Email Cloud portal uses to communicate with Azure
- Select API Permission type Application
- Select the following Application Permissions
- Directory > Directory.Read.All
- Group > Group.Read.All
- GroupMember > GroupMember.Read.All
- User > User.Read.All
- Click Add Permissions
- Look for the row that shows User.Read, click the ellipses (...) on the right, and select Remove Permission
- Click Grant admin consent for <your.tenant.name.here>

Step 3 - Certificates & Secrets
- In the breadcrumb trail, select the API name
 Example showing where to locate the tenant and API names. Your tenant name, and API name, won't match this image.
- On the left-side menu, select Certificates & secrets
- Under Client secrets, click New client secret and fill in the following information:
- Description - This can be whatever you want
- Expires - No matter which timeframe you choose, it's important to set a reminder for yourself to both create a new client secret, and save the new client secret into the Azure Connect tab (step 5 below), before expiry. Failure to do so could break the sync between Email Cloud and Entra ID.
- Click Add
Step 4 - Gather Necessary Info for VIPRE Email Cloud
- Open a new text file on your computer and copy/paste the following information from the Microsoft Entra ID portal into the blank text file:
- Under Client secrets, copy the Value and paste it into your blank text file

- In the breadcrumb trail, select the API, copy the Application (client) ID and paste it into your text file
- From the same page, copy the Directory (tenant) ID and paste it into your text file

- Under Client secrets, copy the Value and paste it into your blank text file
Part 2 - Enable and Sync Entra ID
In part two, we'll take what we did in the Entra ID portal and configure it to sync with VIPRE Email Security Cloud.
Step 5 - Connect
- In a separate browser tab, navigate to your Email Cloud admin portal and log in
- On the left-side menu, click Service Settings, then select Directory Services
- On the main page, select Entra ID

- Place checkmark next to Enable Azure Sync
- Copy the Directory (tenant) ID) from your text file and paste it into the Tenant Domain field
- Copy the Application (client) ID from your text file and paste it into the Client ID field
- Copy the Client secret from your text file and paste it into the Client Secret field
- Select a Sync Frequency from the dropdown menu
- The default sync frequency is 6 hours
- Select an amount of time to Delete Users After from the dropdown menu; see the User Conflicts section below for more details
- The default is 7 days
- Click the checkbox if you want to include disabled/deactivated user accounts in your sync
- This is unchecked by default
- If you want to include Custom Filters, enter those in the text field here
- Custom Filters are only applied to syncs of users. Groups are not included.
- For full details, including supported custom filters and examples of queries, visit Custom Filters for use with Entra ID Sync to open a new browser tab
- Click Save in the bottom right
- Click Test in the bottom left to verify the connection
- If successful, a green message will appear in the top-right "Azure Connection test was passed"
- If unsuccessful, a red message will appear in the top-right "Azure Connection test failed"
- Verify the Tenant Domain, Client ID, and Client Secret were copied correctly from the Azure portal
- Click Sync Now
- A green message will appear in the top-right "Azure sync has successfully started"
Once the sync has completed, you will be able to see all of your users by clicking Users in the left-side menu. Looking in the Source column, you will be able to tell which users were added via Azure.
 VIPRE Email Security Cloud - Users
Congratulations! You have successfully configured Entra ID to sync with VIPRE Email Security Cloud! Continue reading below to learn how to further manage your Entra ID integration
Managing Entra ID in Email Cloud
Exceptions
The Exceptions tab is where you can select any name from the User List that you want to exclude from the Entra ID sync with VIPRE Email Cloud. This means any exceptions will also be excluded from any custom filters you set up on the Connect tab.
VIPRE Email Security Cloud - Entra ID Sync Exceptions
To exclude a user, group, or alias from the Entra ID sync:
- In the User List column, which shows a complete view of your directory server, locate the row with the name of the user, group, or alias you want to exclude
- Click the blue arrow in the same row as the name to add that name to the Exception List
- Click Save
Additions
The Additions tab allows you to manually add users to include in the Entra ID sync. For example, this would be useful for adding any new employees that may need to be added in between syncs.
VIPRE Email Security Cloud - Entra ID Sync Additions
To include an additional user to your Entra ID sync:
- Type the email address of the user you want to include
- Click Add
Users added to your Entra ID sync via this method will be listed on this tab. They will also show up in the list under Users in the left-side menu with the source as Azure.
User Conflicts
The User Conflicts tab will show users that previously synced in the portal but are no longer in the directory server.
VIPRE Email Security Cloud - Entra ID Sync User Conflicts
Possible actions within this tab are: Delete, Ignore, Export, Deactivate
Example Use-Case
You notice there two users showing in User Conflicts. Let's say that when you were first setting up Entra ID sync, under the Connect tab, you set Delete Users After to 7 days. You're fine with one of the users being deleted because the employee no longer works for your company. The other user, however, is on maternity leave and will be coming back in 12 weeks.
- Click the checkbox next to the user and select your desired action.
In the example above, you could use Ignore so that the user will not be deleted after 7 days.
Manual
When adding users manually, you can either use a .csv file to create many users at once or adding users one at a time in the portal. Click on your chosen method below.
Import from .csv File
Importing users from a Comma-Separated Values (CSV) file allows you to create many users at once.
Sample CSV and XLS files
Located on the Import Users tab in the product, VIPRE provides sample files so that you may use the correct format for exporting your existing user list. If you are using an Excel file to export from, you must save it as a CSV file in order to import it into VIPRE.
To import users from a CSV file
- From the customer dashboard, expand the Users menu. Then, select Import Users
- Perform one of the following:
- Use the file browser to select a CSV file, or...
- Drag and drop a CSV file onto the Upload CSV file area, or...
- In your CSV file editor (such as Excel), highlight user data and copy it, then paste it into the Paste CSV data section
- At the bottom of the screen, select Review Import
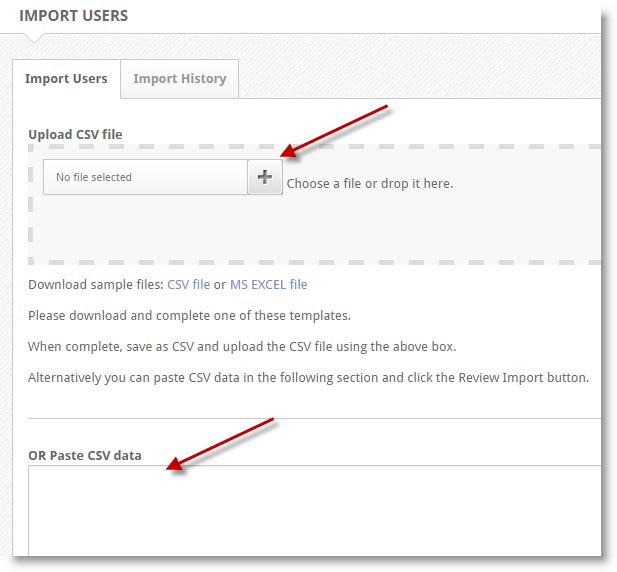
- When finished, select Save
Add via Online Portal
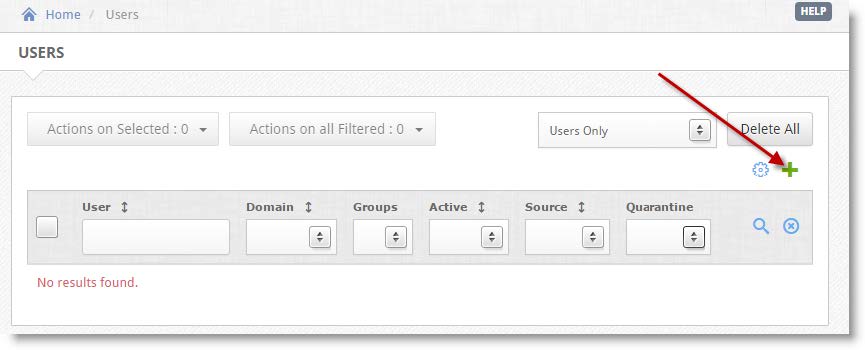
- In the navigation pane, expand the Users menu, then select Users.
- On the right side of the Users panel, select the green + plus sign.
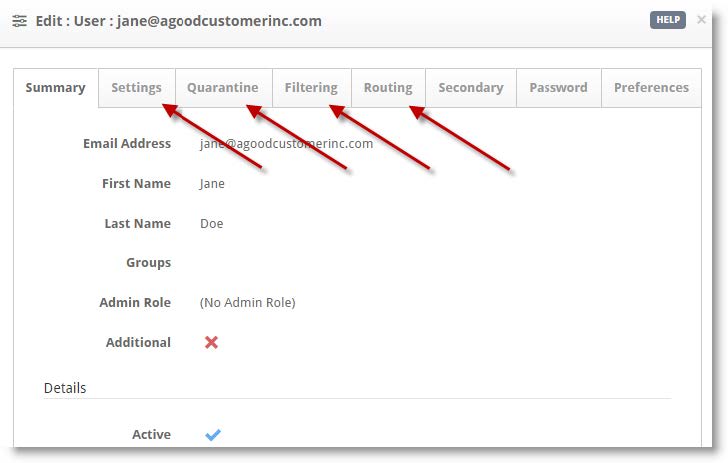
- In the Add:User panel, fill out the information in all required fields.
- (Optional) You can add additional information (phone numbers, notes, etc.) by selecting the Additional checkbox.
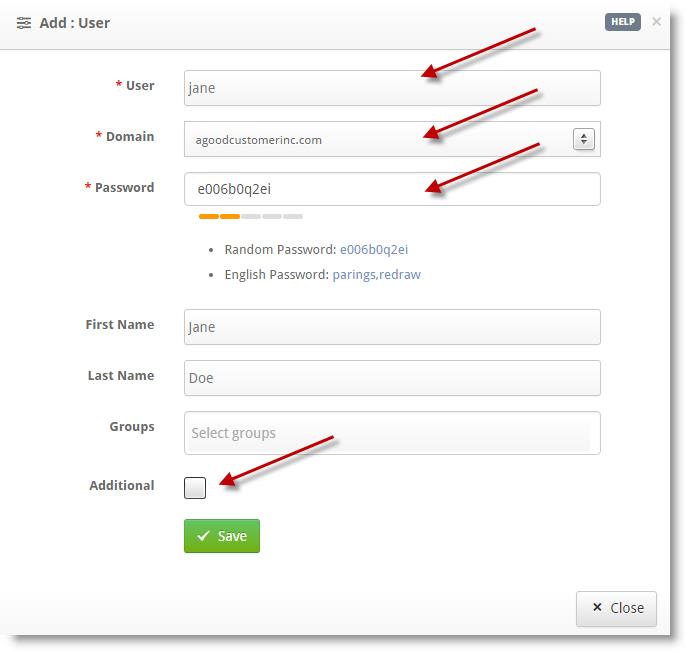
- Once completed, select Save
- (Optional) You can edit Settings, Quarantine, Filtering, and Routing information on a per-user basis.
- Confirm the user information is correct, then select Close
Repeat steps 2–5 to add additional users.
When ready, click the next step below.
When ready, click the next step below.
Allow VIPRE IP Ranges Through Your Firewall (On Prem)
Now that you've updated your MX records, you should reconfigure your firewall(s) ...
For VIPRE Email Security to work for you, all of your inbound email must be routed through the service, then VIPRE must be able to deliver your email to the place where you will read it.
Test Inbound Routing
- From within the VIPRE Email Cloud portal, navigate to Service Settings on the left-side menu
- Select Inbound Routing
- Click the refresh icon in the right

Click here if the SMTP connectivity test fails (Status: Error)
Configure your Firewall
- Reconfigure your firewall(s) to block email from all other possible sources (i.e. you can restrict access to only VIPRE Email Security servers)
- Accept the server IP addresses below
North America
| Subnet IP | Subnet Mask | Net Mask | IP Range |
| 208.70.128.0 | 255.255.248.0 | /21 | 208.70.128.0–208.70.135.255 |
| 72.35.12.0 | 255.255.255.0 | /24 | 72.35.12.0–72.35.12.255 |
| 72.35.23.0 | 255.255.255.0 | /24 | 72.35.23.0–72.35.23.255 |
UK
| Subnet IP | Subnet Mask | Net Mask | IP Range |
| 192.162.216.0 | 255.255.252.0 | /22 | 192.162.216.0–192.162.219.255 |
| 208.70.128.0 | 255.255.248.0 | /21 | 208.70.128.0–208.70.135.255 |
| 72.35.12.0 | 255.255.255.0 | /24 | 72.35.12.0–72.35.12.255 |
| 72.35.23.0 | 255.255.255.0 | /24 | 72.35.23.0–72.35.23.255 |
Denmark
| Subnet IP | Subnet Mask | IP Range | |
| 185.38.180.0 | 255.255.252.0 | /22 | 185.38.180.0–185.38.183.255 |
| 2a01:77c0:1180:: | ffff:ffff:fffc:: | /46 | 2a01:77c0:1180::–2a01:77c0:1183:ffff:ffff:ffff: |
| 89.104.206.0 | 255.255.254.0 | /23 | 89.104.206.0–89.104.207.255 |
| 2a01:77c0:0006:: | ffff:ffff:fffe:: | /47 | 2a01:77c0:0006::–2a01:77c0:0007:ffff:ffff:ffff: |
| 192.162.216.0 | 255.255.252.0 | /22 | 192.162.216.0–192.162.219.255 |
Sweden
| Subnet IP | Subnet Mask | Net Mask | IP Range |
| 185.38.180.0 | 255.255.252.0 | /22 | 185.38.180.0–185.38.183.255 |
| 2a01:77c0:1180:: | ffff:ffff:fffc:: | /46 | 2a01:77c0:1180::–2a01:77c0:1183:ffff:ffff:ffff: |
| 89.104.206.0 | 255.255.254.0 | /23 | 89.104.206.0–89.104.207.255 |
| 2a01:77c0:0006:: | ffff:ffff:fffe:: | /47 | 2a01:77c0:0006::–2a01:77c0:0007:ffff:ffff:ffff: |
| 192.162.216.0 | 255.255.252.0 | /22 | 192.162.216.0–192.162.219.255 |
The network addresses above will attempt to deliver email to your servers on the standard SMTP port (25).
By allowing the IP addresses above, mail coming from both VIPRE's primary and secondary data centers will be able to reach your network.
vc m,vc c
When ready, click the next step below.
Update Your MX Records
This article explains the MX (Mail eXchange) record settings you will need to red...
Redirect Inbound Mail to VIPRE
After your account is provisioned and you've allowed VIPRE IP ranges to connect to your internal mail server (if required), you will need to redirect all inbound emails to VIPRE Email Security for processing. VIPRE is configured to accept all mail for the client domain and relay that mail to the IP/FQDN for your mail server (listed in the Inbound Routing section of the dashboard).
.png)
The Internet Domain Name Service (DNS) helps mail senders determine where to deliver email destined for a particular domain. For example, which servers to send email to when sending to john.doe@vipre.com. In this example, the MX (Mail eXchange) records related to 'vipre.com' are looked up in the DNS system, and the sender then delivers the email to the servers listed in those MX records.
Update your MX records
MX records are typically maintained by your DNS registrar, and you will have to log in to your provider's management console or contact them to update your records.
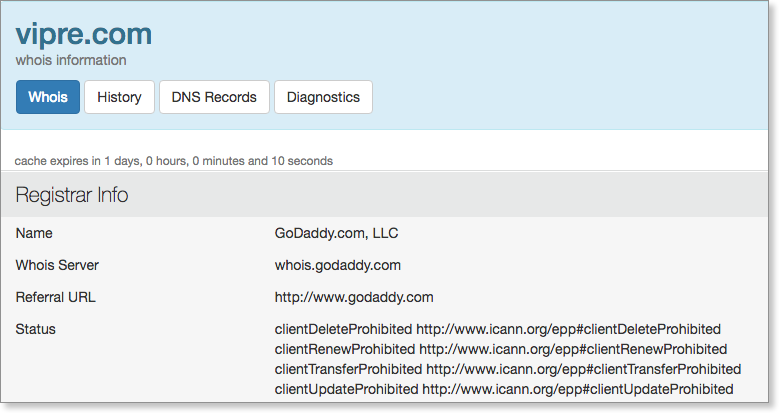
Determine your DNS registrar using Who.Is
If you forget who your DNS registrar is, you can easily find out.
- Visit Who.Is - https://who.is/
- Enter your domain name into the form
- Record your registrar information
VIPRE Email MX records
You can locate the VIPRE EMail MX records within the Email Cloud portal by clicking on the Getting Started button in the top right-hand corner. Provide your DNS registrar with that information, based on your location.

When ready, click the next step below.
Block Other Email Sources
This article serves as a final step in the allow/block workflow, reminding admins...
Table of Contents
Block non-VIPRE Email SourcesOn-PremisesMicrosoft 365Google Workspace (formerly G Suite)Block non-VIPRE Email Sources
Blocking additional sources of email allows the VIPRE product to protect you as intended; if other sources of email are allowed into your network, that defeats the purpose of protecting your email with VIPRE.
Select the appropriate option below for details on how to block non-VIPRE sources.
On-Premises
After email is flowing through VIPRE and no other solution, we highly recommend locking down your mail server to only accept mail from VIPRE.
By locking down your server to accept only port 25 connections from the VIPRE IP range, you ensure all inbound mail must be filtered through VIPRE before reaching your server. Blocking additional sources of email allows the VIPRE product to protect you as intended; if other sources of email are allowed into your network, that defeats the purpose of protecting your email with VIPRE.
Allowed VIPRE IP ranges can be found here.
Microsoft 365
To ensure the deliverability of your filtered mail from the VIPRE platform, it is recommended that a receive connector is created on your Microsoft 365 account.
- In the Microsoft 365 Admin Center, find Mail Flow, then select Connectors
- Click the + icon
- Select Partner Organization in the From: dropdown menu
- Select Office 365 or Microsoft 365 in the To: downdrop menu
- Name your connector and click Next
- Select Use the sender's IP address and click Next
- VIPRE IP ranges can be found here
- Select whether or not to enforce TLS
- Click Save
Google Workspace (formerly G Suite)
- From your Google Admin console, select Apps, then Google Workspace, and Gmail
- Scroll down and select Advanced Settings
- Scroll down to Inbound Gateway
- Hover the cursor to the right of Inbound Gateway
- To create a new Inbound Gateway setting, select Configure
- To edit an existing setting, select Edit
- Under Gateway IPs,enter the information for each gateway and select Add
- VIPRE IP ranges can be found here
When ready, click the next step below.
Click this arrow to return to the previous step.
Add or Edit a Mail Server Address
You may have already provided your mail server address during the purchase process. If not, you can check or update your mail server address by following these steps.
Add a Mail Server IP Address or Domain
As a reminder, this is the destination mail server IP address where you want email to be delivered. VIPRE needs this address in order to deliver mail to your server.
- From the Customer Dashboard, expand the Service Settings menu
- Select Inbound Routing.
- Select Add Site, at the bottom of the page
- A box will open called Site Information; enter a description for the mail server you are configuring, e.g. “Hosted Server” or “Clearwater Office”
- Select the Default Site checkbox if this entry is going to be the primary delivery point
- Click the plus sign (+) to enter the mail server IP address (preferred) or customer domain
- Confirm the Port and Priority are correct and select the blue checkmark to confirm
- When done, select Save
Important
You can create Multiple Sites with multiple server entries if you have a client with multiple domains, each having a different Server Delivery point. For assistance setting up multiple sites, contact Support.

Edit an Existing Mail Server Address
- From the Customer Dashboard, expand the Service Settings menu
- Select Inbound Routing
- You'll see a list of all mail servers currently set up and you can verify the IP address or domain, port, and priority

- You'll see a list of all mail servers currently set up and you can verify the IP address or domain, port, and priority
- If you need to make any changes:
- Click the pencil/edit icon
- The Site Information box will appear
- Select the pencil/edit icon again to make changes, or...
- Select the trashcan icon to delete the existing mail server, then...
- Click the plus sign + to add a new mail server
- Click Save
When ready, click the next step below.
Click this arrow to return to the previous step.
Allow VIPRE IP Ranges
For VIPRE Email Security to work for you, all of your inbound email must be routed through the service, then VIPRE must be able to deliver your email to the place where you will read it.
Test Inbound Routing
- From within the VIPRE Email Cloud portal, navigate to Service Settings on the left-side menu
- Select Inbound Routing
- Click the refresh icon in the right
Click here if the SMTP connectivity test fails (Status: Error)
Configure your Firewall
- Reconfigure your firewall(s) to block email from all other possible sources (i.e. you can restrict access to only VIPRE Email Security servers)
- Accept the server IP addresses below
North America
| Subnet IP | Subnet Mask | Net Mask | IP Range |
| 208.70.128.0 | 255.255.248.0 | /21 | 208.70.128.0–208.70.135.255 |
| 72.35.12.0 | 255.255.255.0 | /24 | 72.35.12.0–72.35.12.255 |
| 72.35.23.0 | 255.255.255.0 | /24 | 72.35.23.0–72.35.23.255 |
UK
| Subnet IP | Subnet Mask | Net Mask | IP Range |
|---|---|---|---|
| 192.162.216.0 | 255.255.252.0 | /22 | 192.162.216.0–192.162.219.255 |
| 208.70.128.0 | 255.255.248.0 | /21 | 208.70.128.0–208.70.135.255 |
| 72.35.12.0 | 255.255.255.0 | /24 | 72.35.12.0–72.35.12.255 |
| 72.35.23.0 | 255.255.255.0 | /24 | 72.35.23.0–72.35.23.255 |
Denmark
| Subnet IP | Subnet Mask | IP Range | |
|---|---|---|---|
| 185.38.180.0 | 255.255.252.0 | /22 | 185.38.180.0–185.38.183.255 |
| 2a01:77c0:1180:: | ffff:ffff:fffc:: | /46 | 2a01:77c0:1180::–2a01:77c0:1183:ffff:ffff:ffff: |
| 89.104.206.0 | 255.255.254.0 | /23 | 89.104.206.0–89.104.207.255 |
| 2a01:77c0:0006:: | ffff:ffff:fffe:: | /47 | 2a01:77c0:0006::–2a01:77c0:0007:ffff:ffff:ffff: |
| 192.162.216.0 | 255.255.252.0 | /22 | 192.162.216.0–192.162.219.255 |
Sweden
| Subnet IP | Subnet Mask | Net Mask | IP Range |
|---|---|---|---|
| 185.38.180.0 | 255.255.252.0 | /22 | 185.38.180.0–185.38.183.255 |
| 2a01:77c0:1180:: | ffff:ffff:fffc:: | /46 | 2a01:77c0:1180::–2a01:77c0:1183:ffff:ffff:ffff: |
| 89.104.206.0 | 255.255.254.0 | /23 | 89.104.206.0–89.104.207.255 |
| 2a01:77c0:0006:: | ffff:ffff:fffe:: | /47 | 2a01:77c0:0006::–2a01:77c0:0007:ffff:ffff:ffff: |
| 192.162.216.0 | 255.255.252.0 | /22 | 192.162.216.0–192.162.219.255 |
The network addresses above will attempt to deliver email to your servers on the standard SMTP port (25).
By allowing the IP addresses above, mail coming from both VIPRE's primary and secondary data centers will be able to reach your network.
When ready, click the next step below.
Redirect Inbound Mail to VIPRE
After your account is provisioned and you've allowed VIPRE IP ranges to connect to your internal mail server (if required), you will need to redirect all inbound emails to VIPRE Email Security for processing. VIPRE is configured to accept all mail for the client domain and relay that mail to the IP/FQDN for your mail server (listed in the Inbound Routing section of the dashboard).
The Internet Domain Name Service (DNS) helps mail senders determine where to deliver email destined for a particular domain. For example, which servers to send email to when sending to john.doe@vipre.com. In this example, the MX (Mail eXchange) records related to 'vipre.com' are looked up in the DNS system, and the sender then delivers the email to the servers listed in those MX records.
Update your MX records
MX records are typically maintained by your DNS registrar, and you will have to log in to your provider's management console or contact them to update your records.
Determine your DNS registrar using Who.Is
If you forget who your DNS registrar is, you can easily find out.
- Visit Who.Is - https://who.is/
- Enter your domain name into the form
- Record your registrar information
VIPRE Email MX records
You can locate the VIPRE EMail MX records within the Email Cloud portal by clicking on the Getting Started button in the top right-hand corner. Provide your DNS registrar with that information, based on your location.
When ready, click the next step below.
Block non-VIPRE Email Sources
Blocking additional sources of email allows the VIPRE product to protect you as intended; if other sources of email are allowed into your network, that defeats the purpose of protecting your email with VIPRE.
Select the appropriate option below for details on how to block non-VIPRE sources.
On-Premises
After email is flowing through VIPRE and no other solution, we highly recommend locking down your mail server to only accept mail from VIPRE.
By locking down your server to accept only port 25 connections from the VIPRE IP range, you ensure all inbound mail must be filtered through VIPRE before reaching your server. Blocking additional sources of email allows the VIPRE product to protect you as intended; if other sources of email are allowed into your network, that defeats the purpose of protecting your email with VIPRE.
Allowed VIPRE IP ranges can be found here.
Microsoft 365
To ensure the deliverability of your filtered mail from the VIPRE platform, it is recommended that a receive connector is created on your Microsoft 365 account.
- In the Microsoft 365 Admin Center, find Mail Flow, then select Connectors
- Click the + icon
- Select Partner Organization in the From: dropdown menu
- Select Office 365 or Microsoft 365 in the To: downdrop menu
- Name your connector and click Next
- Select Use the sender's IP address and click Next
- VIPRE IP ranges can be found here
- Select whether or not to enforce TLS
- Click Save
Google Workspace (formerly G Suite)
- From your Google Admin console, select Apps, then Google Workspace, and Gmail
- Scroll down and select Advanced Settings
- Scroll down to Inbound Gateway
- Hover the cursor to the right of Inbound Gateway
- To create a new Inbound Gateway setting, select Configure
- To edit an existing setting, select Edit
- Under Gateway IPs,enter the information for each gateway and select Add
- VIPRE IP ranges can be found here
When ready, click the next step below.
Configure Outbound Mail Flow
By configuring outbound mail flow with VIPRE, any mail you send will be scanned and filtered per your policies and will be sent from a safe and reputable IP address which will help you avoid being blacklisted.
After you've configured inbound email so that it is secured by VIPRE Email Security, you may also configure outbound filtering to provide the same protections for outbound email that people in your organization are sending. Outbound filtering provides many of the same security and policy protections as inbound filtering and more. Plus, by sending your email through VIPRE, your mail will appear to come from a safe and reputable IP source that recipients will trust.
Routing of outbound email is similar to routing of inbound email:
.png)
In most scenarios, email authored by members of your organization will first be sent to your primary email host/provider (this could be an on-premises Exchange server, or it could be a hosted service), then it is forwarded to VIPRE Email Security. In this paradigm, VIPRE Email Security is acting as the smart relay that will deliver the email to the recipient, a so-called SmartHost. VIPRE will perform a number of filtering and policy matching steps on the email (for example, adding standard disclaimers) and then deliver the email to the ultimate recipient(s).
Configure VIPRE to accept email from your email service/provider
The first step in configuring outbound filtering is to set VIPRE Email Security so that it will accept email from your primary email service or provider. It is important to do this carefully, as a misconfiguration could result in exposing your domain for use by spammers. Essentially, we want to inform VIPRE that it should only accept email sent from specific senders, identified by IP addresses (the hosts that will send email) and domains (the people who will send email).
Important Information
VIPRE Email Security is already pre-provisioned to accept mail from services such as Microsoft 365 or Google Workspace for any mail sent from a domain provisioned on the VIPRE portal,
Select the appropriate option below:
On-Premises
- Login to https://email.myvipre.com/ using your Administrator credentials.
- Expand the Service Settings menu. Then, select Outbound Relay
- Click on the green plus sign (+), which will open a pop-up window

- Enter a descriptive name for the server that will be sending email, e.g. “Exchange Server” or “Clearwater Office”
- Enter the IP address of the server that will be sending email and select Save
- You can add additional mail server IPs by clicking the green plus sign (+) and following the above steps
- Confirm the Port number and Priority are correct and press the blue check to confirm
- When finished, select Save
Microsoft 365
In order for outbound email from Microsoft 365 to be routed through VIPRE, we need to create a new send connector in Microsoft 365 and point it to VIPRE.
Create a new send connector in Office365
- Log in to the Microsoft 365 Exchange Admin Center (EAC)
- Select the Admin > Exchange menu
- Select the Mail Flow > Connectors menu. Then, select Create a new Connector
- Set the mail flow scenario
- Select Office 365 from the From: drop-down
- Select Partner Organization from the To: drop-down
- Select Next
- Enter a name and description for the connector. You may also select the checkbox to make the connector active immediately
- Select Next
- Select the Only when email messages are sent to these domains option
- Select the plus (+) to add domains that should use this connector
- Enter a value of * (asterisk). This is a wildcard that will route all outbound emails through VIPRE
- Select Next
- Select the Route email through these smart hosts option
- Select the plus (+) to add your smart host
- You can find your smart host by clicking Get Started within the VIPRE Email Security portal

- You can find your smart host by clicking Get Started within the VIPRE Email Security portal
- Click the Save button
- Select the plus (+) to add your smart host
- Select Next
- Select the checkbox for Always use Transport Layer Security (TLS) to Secure the Connection (recommended)
- Select Issued by a trusted certificate authority (CA) from the list
- Select Next
- Add an email address of a recipient for a domain external to your organization, and select Validateto test
- If you did not choose to turn the connector on in Step 6, validation of the connector will fail. If your validation results show that the connection was successful, but the email failed to send because "The domain of the recipient is not configured as part of connector" - this may be due to the connector being disabled. Try enabling the connector and re-attempting the validation.
- Once Microsoft 365 has been successfully validated, select Save
- Once you are happy with mail flow, you may remove the old inbound route from VIPRE that points to the old on-site server if no other domains still use the old route
Google Workspace (formerly G Suite)
In order for outbound email from Google Workspace to be routed through VIPRE, we need to add an outbound gateway to Google and point it to VIPRE.
- Log into your Google Admin account
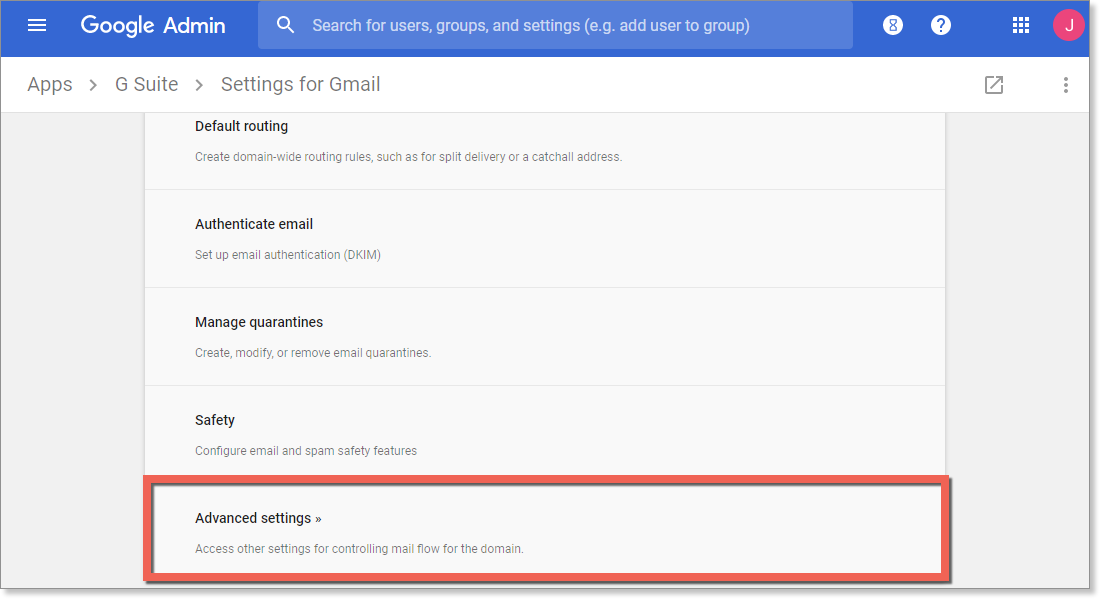
- Select Apps > Google Workspace > Gmail
- Scroll down and select Advanced Settings
- In Advanced Settings, scroll down to Outbound gateway and type in your outbound gateway name
- You can find your smart host by clicking Get Started within the email portal

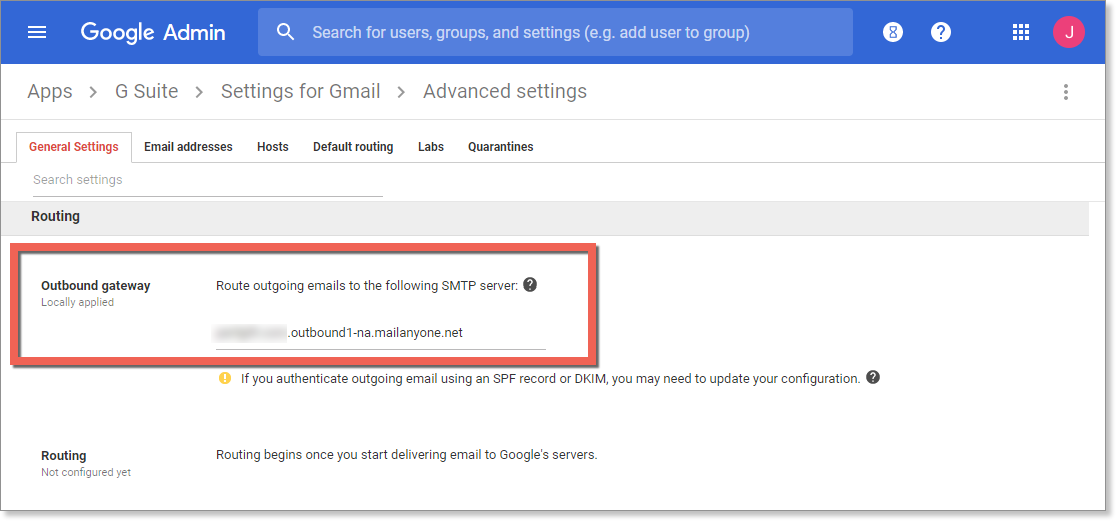
- You can find your smart host by clicking Get Started within the email portal
- In the bottom right of the screen, select Save
Important Information
These changes may take up to 1 hour to propagate to all users.
When ready, click the next step below.
Set up or Modify the Sender Policy Framework (SPF)
VIPRE recommends setting up SPF for your domain to help reduce spam and ensure that your domain reputation is maintained.
Introduction to the Sender Policy Framework
The Sender Policy Framework, or SPF, is a mechanism used to help reduce spam sent to or from your domain. Effectively what the SPF does is it allows you to declare which internet hosts are allowed to send an email purporting to be from your domain. This means that spammers can't "hijack" your domain and pretend to be you while sending out their nefarious messages. Similarly, other organizations that have set up SPF can't be spoofed, so you won't get spam that appears to come from their domains.
Follow the steps below to set up or modify SPF to work with VIPRE.
Set up SPF to work with VIPRE Email Security
When you introduce VIPRE Email Security into your environment as part of a holistic security solution, you will need to account for it when you configure your SPF records. If you are not currently using SPF, this should be relatively easy to set up and you can just follow the instructions below. If you already have SPF set up for your domain, you may need to reconcile your existing SPF records with the suggestions below, adding and removing tokens as appropriate. An example is provided.
SPF is set up by using a TXT type of DNS record, which means you will have to work with your DNS registrar to create or modify these records. If you don't know who your DNS registrar is, refer to Related Articles for more information on updating MX Records.
The following example will simply authorize VIPRE Email Security to send email on behalf of your domain.
v=spf1 include:spf.mailanyone.net -allIf you already have an SPF record setup for your domain, you can just usually add the following statement to the end of the SPF record, before the “all” token:
include:spf.mailanyone.netNote, however, that if VIPRE Email Security is taking over email delivery for your domain, you may want to remove some or all of your pre-existing authorized senders.
For example; if your current SPF record is:
v=spf1 include:spf.protection.outlook.com -allYou will need to add the new statement to update it to the following:
v=spf1 include:spf.protection.outlook.com include:spf.mailanyone.net -all
When ready, click the next step below.
Congratulations!
You have completed the foundational configuration of Email Security Cloud.
Now, depending on the package you purchased, you may or may not have some of our add-ons.
- If you do not have any of our add-ons, then you are done!
- If you do have some of our add-ons, check out the following:
Attachment Sandboxing Add-on
Configure Attachment Sandboxing
Attachment Sandboxing uses advanced sandbox technology to quarantine harmful email attachments that can evade other antivirus or anti-spam software.
Attachment Sandboxing Settings
To get to Attachment Sandboxing settings:
- Click on Service Settings
- Select Sandboxing

-
Use Attachment Sandboxing default policy - If enabled, this default policy sandboxes all of the following attachment types:
- .com, .doc, .docm, .docx, .dot, .dotm, .dotx, .exe, .htm, .html, .pot, .potx, .pps, .ppsx, .ppt, .pptx, .rar, .rtf, .xls, .xlsb, .xlsm, .xlsx, .xlt, .xltm, .xltx, .zip
- .jpeg, .jpg, .pdf, .png (which are also scanned for QR codes that are converted to a URL, which is then checked for malicious behaviors)
Important
If you prefer to use a custom policy, this default policy must be disabled. Refer to Related Articles for details on how to create and enable custom Sandboxing policies.
-
Allow users to release emails - If enabled, messages to the end user also contain a link to the release delayed emails before the result from the sandbox is known; copies of attachments will still be analyzed; if the sandbox finds malicious attachments before this release link is used, the email cannot be released
- If disabled, messages to the end user will not contain a release link
- Send delay notifications - If enabled, notifications about delayed mail will be sent
Link Isolation Add-on
Configure Link Isolation
To configure the VIPRE Email Security Cloud Link Isolation add-on, complete the following steps:
- From your Email Security Cloud admin portal, click on Service Settings in the left-side menu
- Select Link Isolation,action plan then select a tab below to learn about the settings for that option
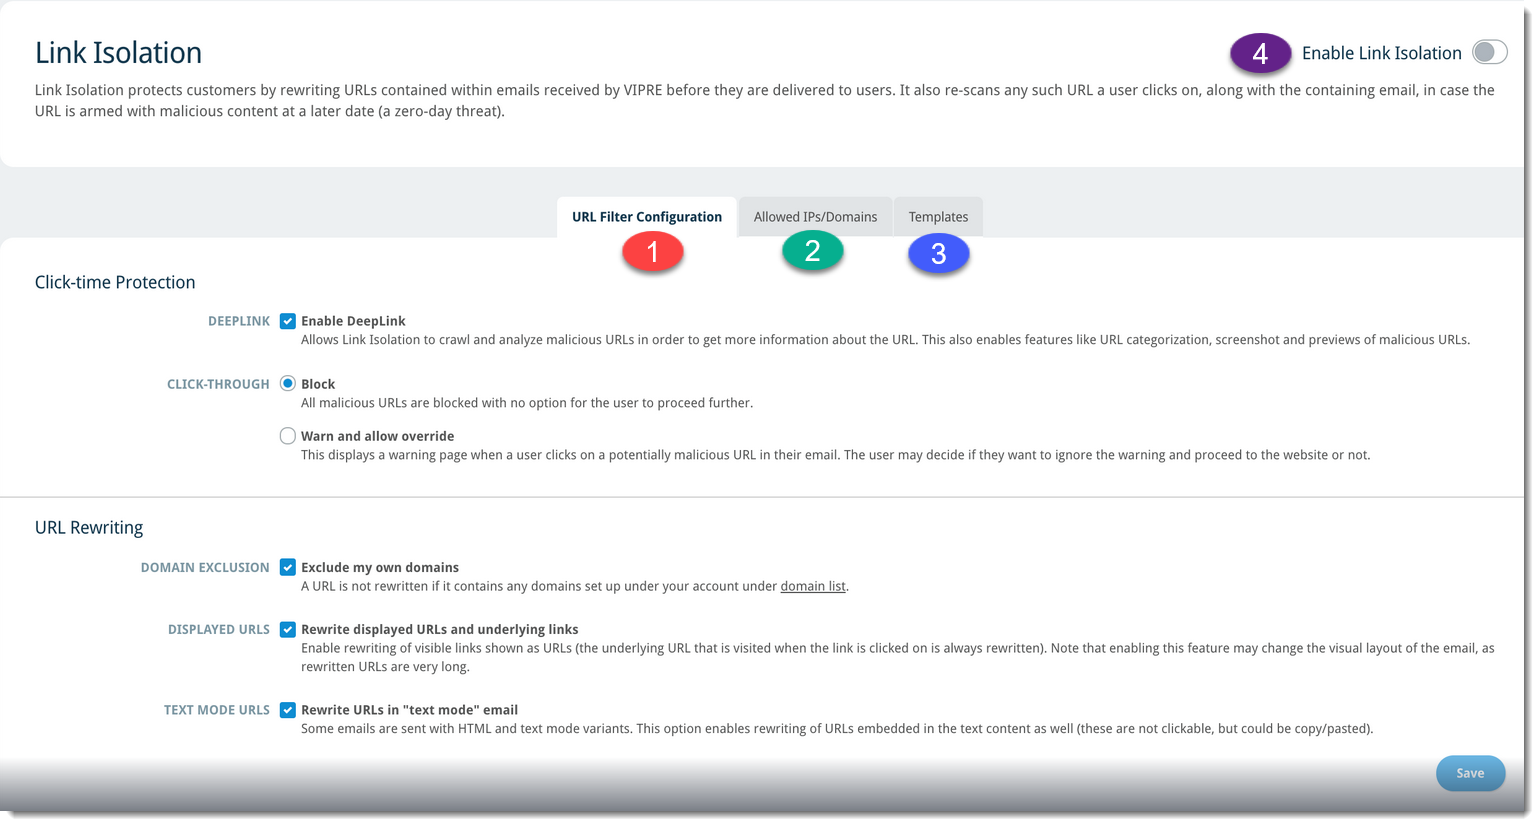
URL Filter Configuration
- On the URL Filter Configuration tab, select from the following options:
- Click-time Protection
- Enable Deeplink: This option allows Link Isolation to perform deep, cloud-based scanning in order to analyze malicious URLs and obtain more information; ; also enables URL categorization and screenshots/previews of malicious URLs
- Click-Through > Block: Blocks all potentially malicious URLs that have been clicked in the email; unable to proceed
- Click-Through > Warn and allow override: Displays a warning when potentially malicious URLs have been clicked in the email; gives the option to ignore the warning and proceed to the website
- URL Rewriting
- Exclude my own domains: URLs containing any of the domains you've added to your account will not be rewritten
- Rewrite displayed URLs and underlying links: Visible links shown as URLs will be rewritten; this may alter the appearance of the email as rewritten URLs can be quite long
- Rewrite URLs in text mode email: Rewrites URLs both in HTML and text mode; this may alter the appearance of the email as rewritten URLs can be quite long
- Click-time Protection
- Click Save
Allowed IPs/Domains
- Click on the + plus sign on the left side of the screen
- Type the IP address or domain in the text box - when adding multiples, supported separators are commas, semicolons, and space
- Any trusted IP address or domain can be added to this list as Link Isolation does not rewrite IP addresses or Domains on this list
- VIPRE recommends only adding trusted domains, like domains associated with your organization, to the Allowed IPs/Domains list
- Click Save

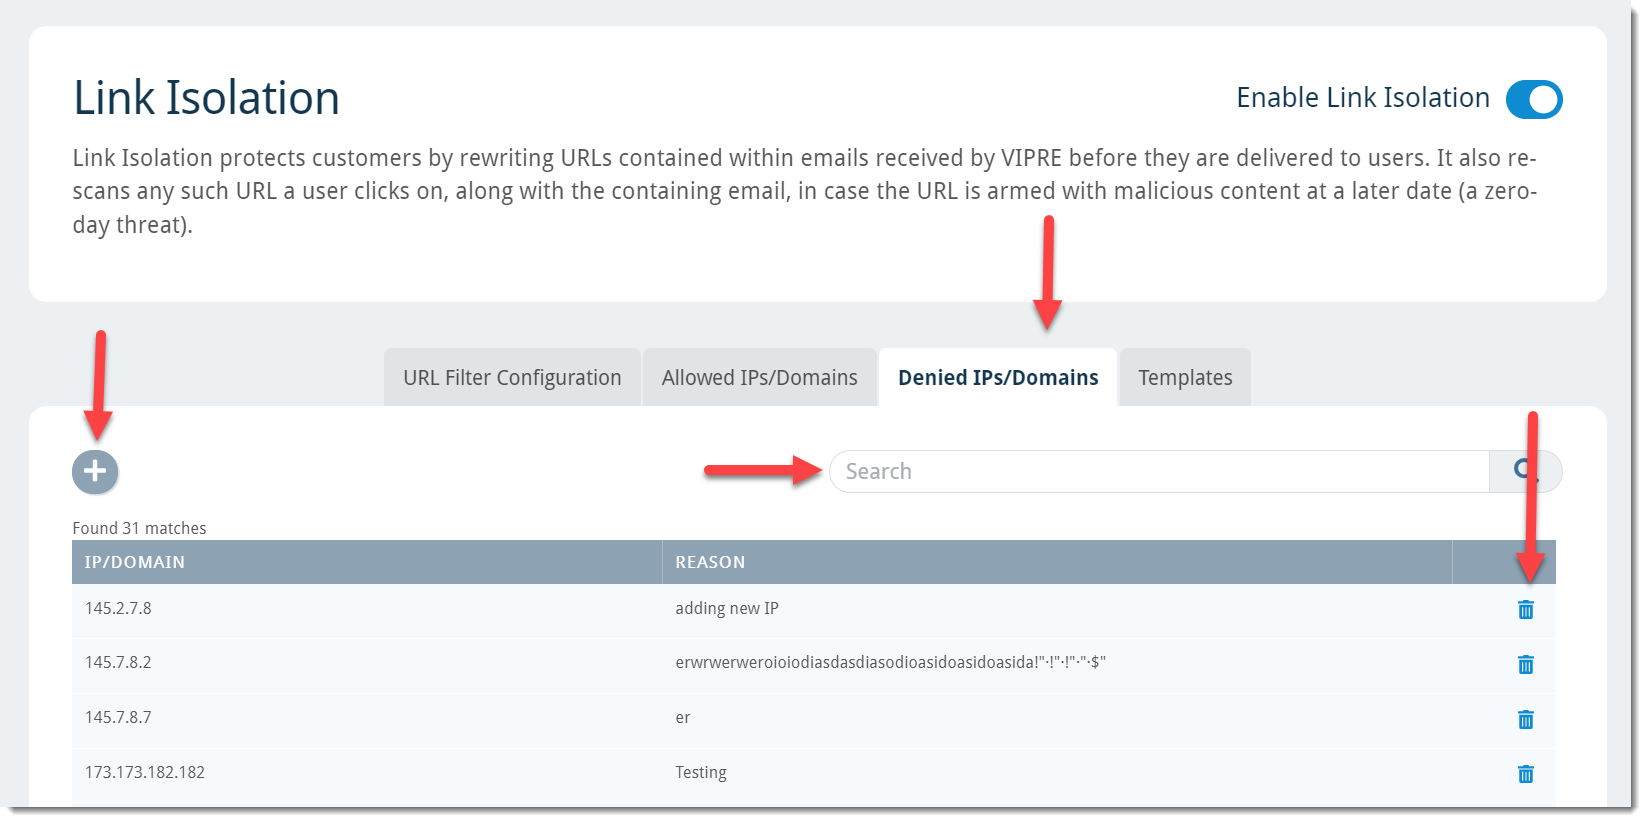
Denied IPs/Domains
To add an IP address or domain that you want to deny:
- Click on the + plus sign on the left side of the screen
- Type the IP address or domain in the text box
- Any untrusted IP address or domain can be added to this list
- Click Save
To search for a previously denied IP address or domain:
- Type the IP address or domain in the search box and press Enter
To delete a previously denied IP address or domain:
- Locate the desired IP address or domain and click the trash icon on the right side of the screen
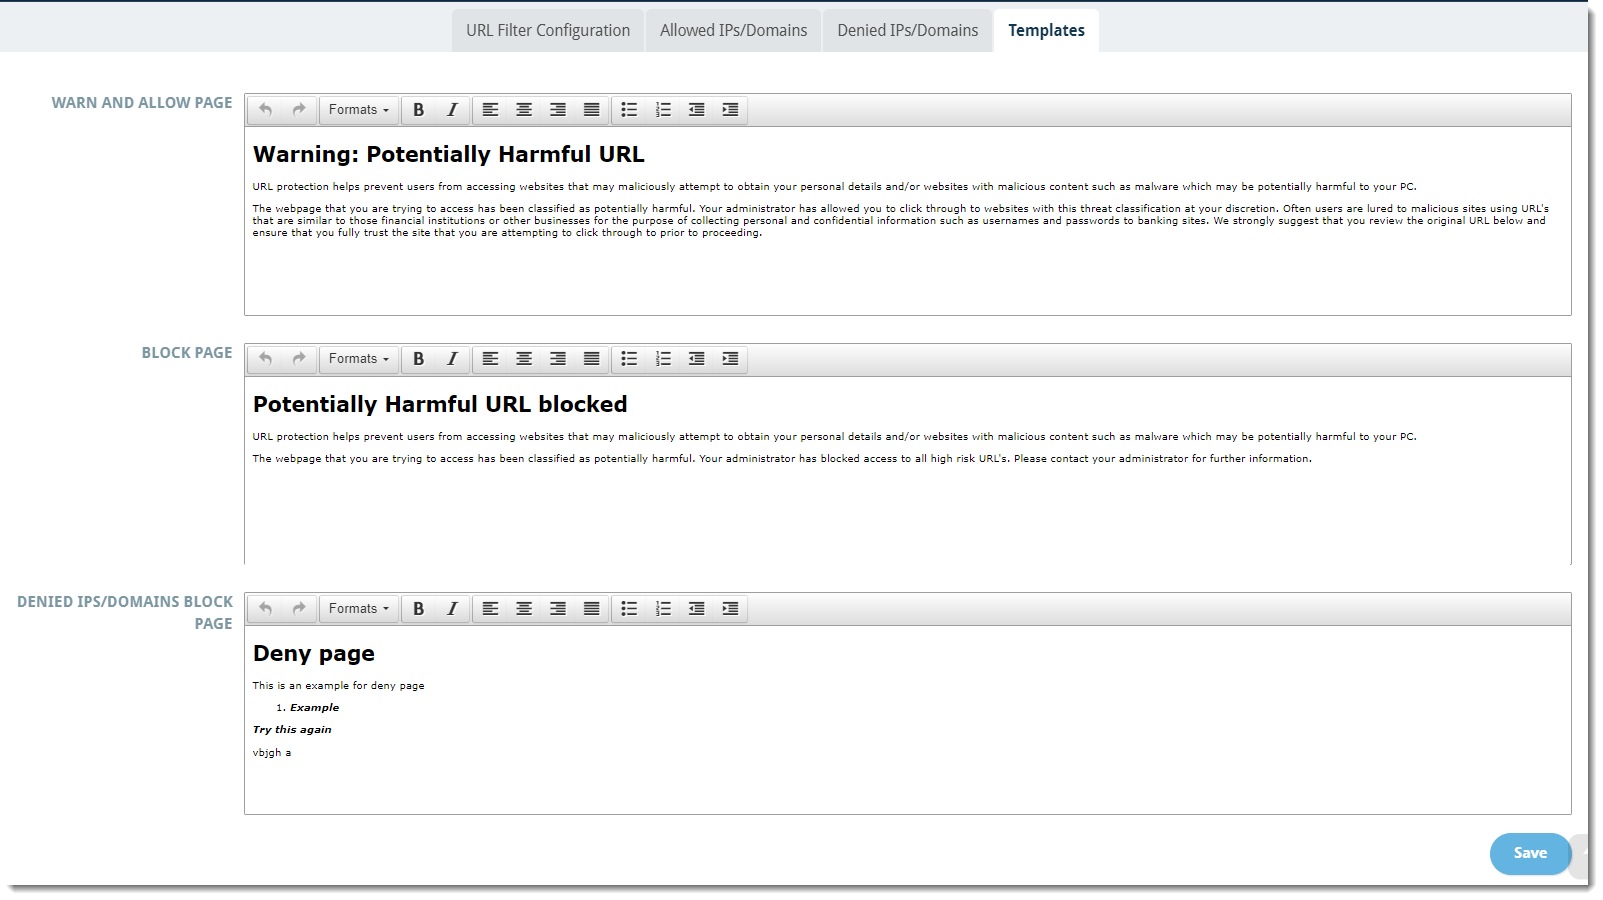
Templates
- This allows you to customize the message that your users see:
- When they click on the malicious URL based on whether you chose to Warn and Allow or Block Page under URL Filter Configuration
- When attempting to access an IP address or domain that has been denied
- Click Save
Enable Link Isolation
Once you've gone through the configuration options detailed in the tabs above, you're ready to enable Link Isolation.
- Scroll to the top of the screen and click the toggle next to Enable Link Isolation in the top-left corner
Congratulations! Link Isolation is now configured and enabled.
Email Analytics
Email Analytics
Email Analytics includes Link Click Analysis, Threat Explorer, Policy Explorer, and Reports.
Important
- Link Click Analysis requires the Link Isolation add-on or the Advanced Threat Protection package
- Threat Explorer requires the Attachment Sandboxing add-on or the Advanced Threat Protection package
- Policy Explorer is only available for customers who subscribe to the Email Advanced Threat Protection (ATP) package
Select a topic below to learn more!
Link Click Analysis
Link Click Analysis provides details relating to links within received emails that users in your organization clicked. This content explains the data presented in this view.
Important
Link Click Analysis is only available for VIPRE Email Security Cloud customers with the Link Isolation add-on or the Advanced Threat Protection (ATP) package.
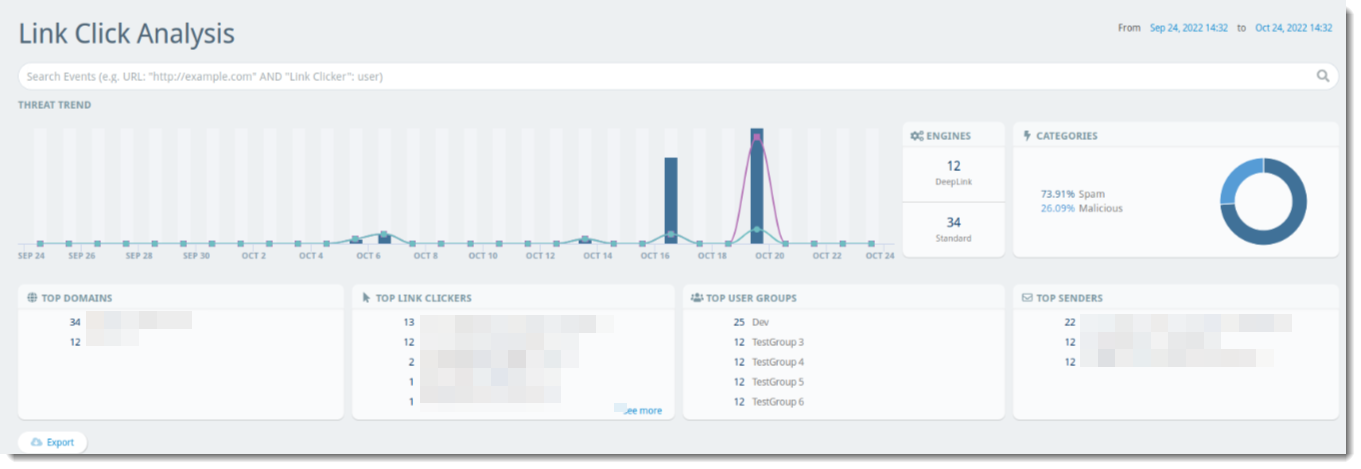
Threat Trend
The Threat Trend bar graph shows dates and times when users within your organization may have clicked potentially harmful links. You can filter the table by clicking on a specific point on the bar graph to show only that date/time based on the Time column.
Engines (TDE)
- DeepLink - Items in the threat table labeled with DeepLink should be given special consideration as these could potentially indicate a new, unknown threat or a targeted attack
- Standard - Items found with the Standard Threat Detection Engine are known to be malicious
You can filter the table by clicking on the desired engine (Standard or DeepLink) in the widget to show only that category.
Categories
Links that are clicked are categorized in one of the following ways:
- Malicious - Items categorized as Malicious are known malicious sites
- Suspect - Items that have been identified as suspicious sites, possibly unknown threats
- Spam - Items that have been identified as spam based on your configured policies
In cases of items marked as Malicious, Suspect, or Spam, you can select that line item for more details such as the affected URL, the user who clicked the link, their IP and browser version, as well as the sending email address and when the email was received. You can filter the table by clicking on the desired category (Malicious or Suspect) in the donut chart to show only that category.
Top Domains
A list of the top 5 domains with suspicious or known malicious URLs sent to emails within your organization. You can filter the table by clicking on the desired domain in the Top Domains list to show only that domain under the URL column.
Top Link Clickers
A list of the top 5 users who click suspicious or known malicious URLs within their email. You can filter the table by clicking on the desired user in the Top Link Clickers list to show only that user under the Link Clicker column. Clicking "See More" expands the list of Top Link Clickers in a drill down report.
Top User Groups
A list of the top 5 user groups who click suspicious or known malicious URLs within their email. You can filter the table by clicking on the desired user group in the Top User Groups list to show data specifically for that group.
Top Senders
A list of the top 5 email addresses that send suspicious or known malicious URLs via email to your organization. You can filter the table by clicking on the desired email address in the Top Senders list to show only that address under the Sender column. Clicking "See More" expands the list of Top Senders in a drill down report.
Threat Explorer
Threat Explorer provides details about all types of threats within emails that users in your organization received. This content explains the data presented in this view.
Important
Threat Explorer is only available for VIPRE Email Security Cloud customers who have the Attachment Sandboxing add-on or the Advanced Threat Protection (ATP) package.
You can choose date ranges by clicking on the dates in the top-right corner.
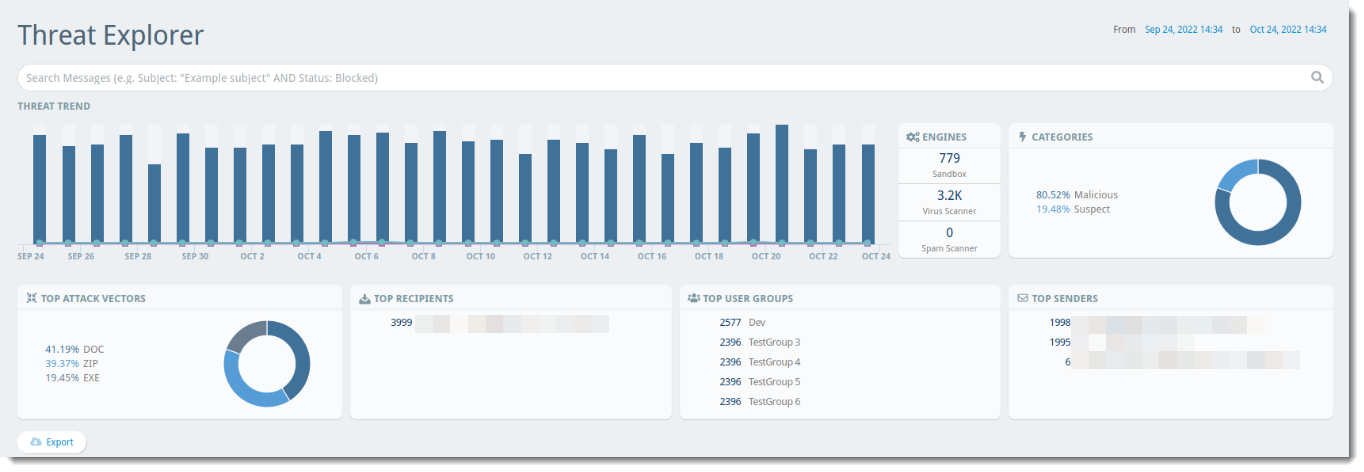
Threat Trend
The Threat Trend bar graph shows dates when potentially threatening mail was received within your organization. You can filter the table by clicking on a specific point on the bar graph to show only that date/time based on the Time column.
Engines
- Sandbox - Attachment Sandboxing Add-on is required for this; indicates the percentage of potentially harmful attachments that were caught and quarantined
- Virus Scanner - Indicates the percentage of emails with potential viruses caught and quarantined
- Spam Scanner - Indicates the percentage of spam emails caught and quarantined
You can filter the table by clicking on the desired engine (Sandbox, Virus Scanner, or Spam Scanner) in the widget to show only that category.
Categories
Emails that are received are categorized in one of the following ways:
- Suspect - Items categorized as Suspect are suspicious but not confirmed threats
- Malicious - Items categorized as Malicious are known threats
- Spam - Items categorized as Spam are based on your configured policies
- Bulk - Items categorized as Bulk are based on the bulk email filter and are generally “newsletter” type messages
- Phishing - Items categorized as Phishing are based on the Spam scanner and your configured policies
In all cases, you can select that line item for more details such as the sending email address and when the email was received, and more. You can filter the table by clicking on the desired category in the donut chart to show only that category.
Top Attack Vectors
A list of the top 5 types of attacks sent via email. (For example, 29.74% EXE, 24.03% ZIP, 13.04% URL would indicate 29.74% of the attacks were in the form of an executable file, 24.03% were in the form of a .zip file, and 13.04% were in the form of a malicious link.) You can filter the table by clicking on the desired vector in the Top Attack Vectors list to show only that category.
Top Recipients
A list of the top 5 email addresses in your organization that receive suspicious or known malicious messages. You can filter the table by clicking on the desired email address in the Top Recipients list to show only that address under the Recipient column.
Click on “See More” to expand the list of Top Link Clickers.
Top User Groups
A list of the top 5 user groups in your organization that receive suspicious or known malicious messages. You can filter by clicking on the desired group in the Top User Groups list to show data for that specific group.
Top Senders
A list of the top 5 email addresses that send suspicious or known malicious messages to your organization. You can filter the table by clicking on the desired email address in the Top Senders list to show only that address under the Sender column.
Clicking "See More" expands the list of Top Senders in a drill-down report.
Policy Explorer
Policy Explorer provides details relating to traffic, received or sent, that has been stopped due to custom policy blocks. This content explains the data presented in this view.
Important
Policy Explorer is only available for customers who subscribe to the Email Advanced Threat Protection (ATP) package.
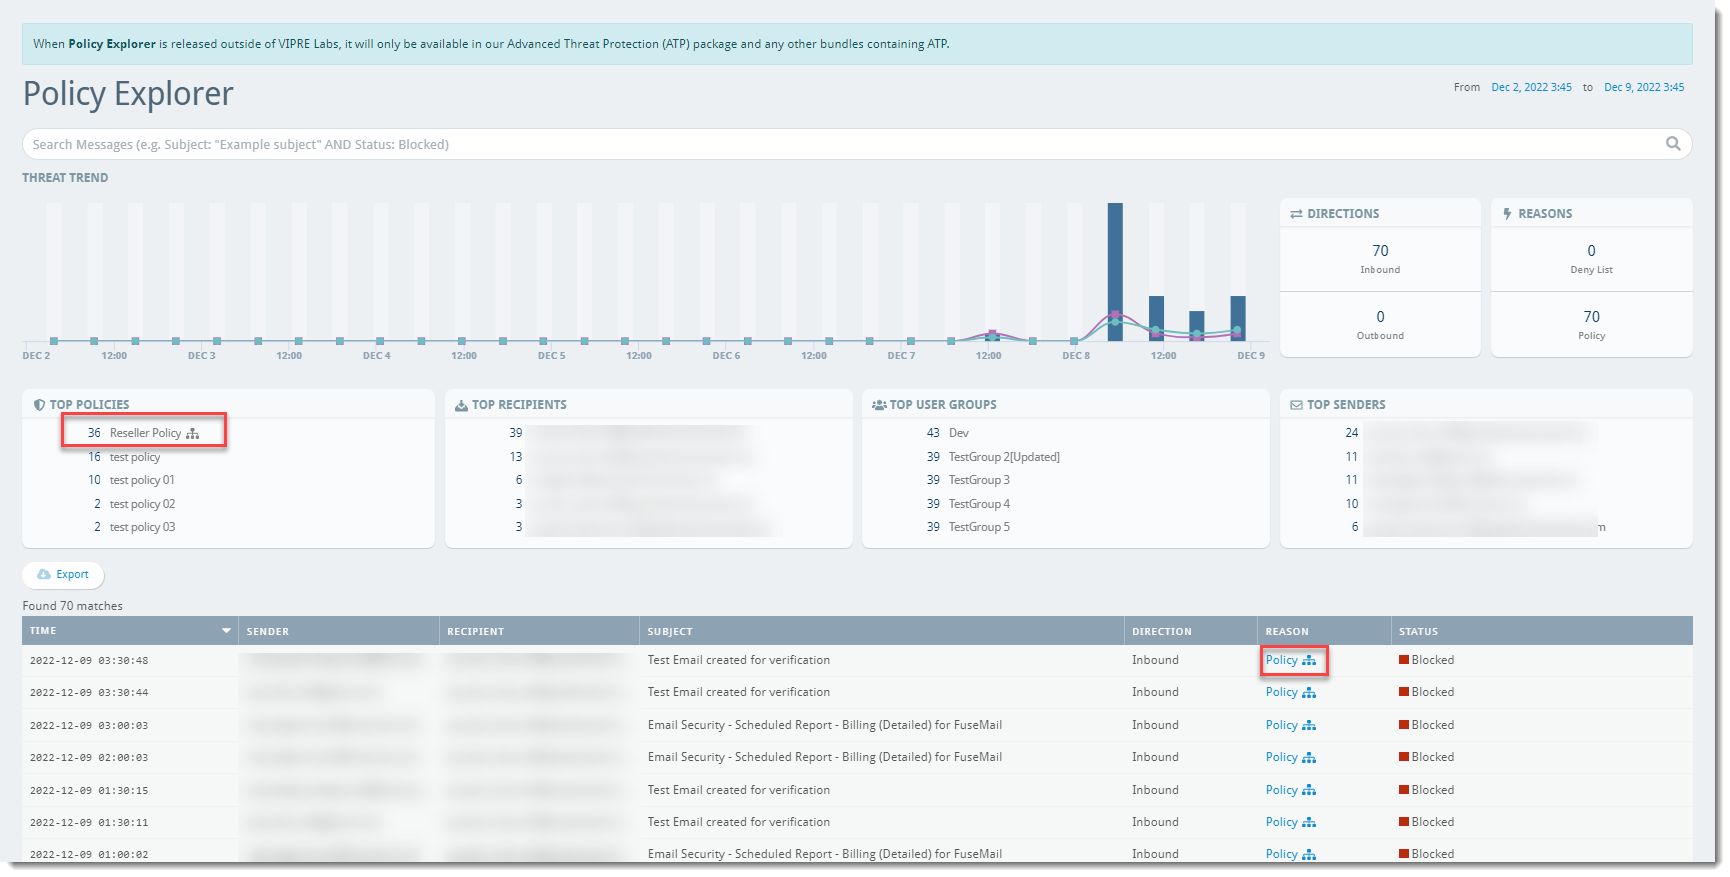
Threat Trend
The Threat Trend bar graph shows the dates when incoming or outgoing messages were blocked within your organization. You can filter the table by clicking on a specific point on the bar graph to show only that date/time based on the Time column.
Directions
- Inbound - Indicates the number of incoming messages blocked by a configured policy or deny list
- Outbound - Indicates the number of outgoing messages blocked by a configured policy
Reasons
Emails that are received are categorized in one of the following ways:
- Deny List - Indicates the number of messages blocked by a deny list
- Policy - Indicates the number of messages blocked by a policy
You can filter the table by clicking on the desired Reason (Deny List or Policy) in the counters widget to show only that reason.
Top Policies
A list of the top 5 policies applied. You can filter the table by clicking on the desired policy in the list widget to show only messages that are blocked by that policy.
For Partners: This will also include an icon (see: screenshot example above in the red boxes) that indicates whether any of those top policies are Advanced Policies that you have created/enabled.
Top Recipients
A list of the top 5 email addresses in your organization that receive blocked messages. You can filter the table by clicking on the desired email address in the list widget to show only that address under the Recipient column.
Top User Groups
A list of the top 5 user groups in your organization that receive blocked messages or send messages that are blocked by your organization. You can filter the table by clicking on the desired user group in the list widget to show only the recipients that belong to that user group.
Top Senders
A list of the top 5 email addresses that send messages that are blocked by your organization. You can filter the table by clicking on the desired email address in the list widget to show only that address under the Sender column.
Reports
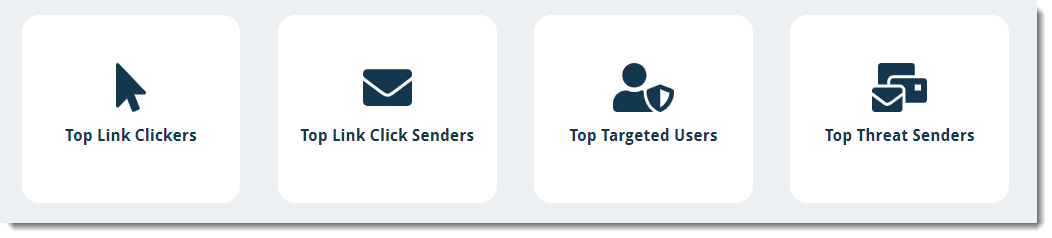
- Top Link Clickers shows you the users who most often click suspicious or known malicious URLs within their email
- Top Link Click Senders shows you the email addresses that send the most suspicious or known malicious URLs via email to your organization
- Top Targeted Users shows you the email addresses in your organization that most often receive suspicious or known malicious messages
- Top Threat Senders shows you the email addresses that send the most suspicious or known malicious messages to your organization
Remote Browser Isolation (RBI)
Remote Browser Isolation
Remote Browser Isolation (RBI) allows users to review a potentially malicious link in a safe environment without the risk of exposing the user's computer or network.
Important
Remote Browser Isolation requires the Advanced Threat Protection package. If you do not already subscribe to VIPRE Email ATP, contact your account manager or our Sales team.
Meet Remote Browser Isolation
The following video introduces Remote Browser Isolation and demonstrates how it works.
Now that we've seen what RBI looks like and what it does, continue reading to learn about how to use it.
Step 1: Accessing Remote Browser Isolation
There are several ways to access RBI, which we'll detail here:
- Email Security Cloud Tools
- Analytics > Link Click Analysis
- Analytics > Threat Explorer
Email Security Cloud Tools
Scenario: You have a list of URLs that you obtained outside of Email Security Cloud and would like to review them in the safe environment of a remote browser.
- Navigate to Tools within the Email Security Cloud web console and select Remote Browser Isolation
- Enter a URL in the text box and press the blue arrow

Analytics > Link Click Analysis
Scenario: You're already working in the Link Click Analysis dashboard to determine which email address sends your organization the highest number of malicious links. You see one URL you aren't sure about and would like to review it without risking the safety of the computer you're using.
- Select the specific threat to open details and click Launch Remote Browser
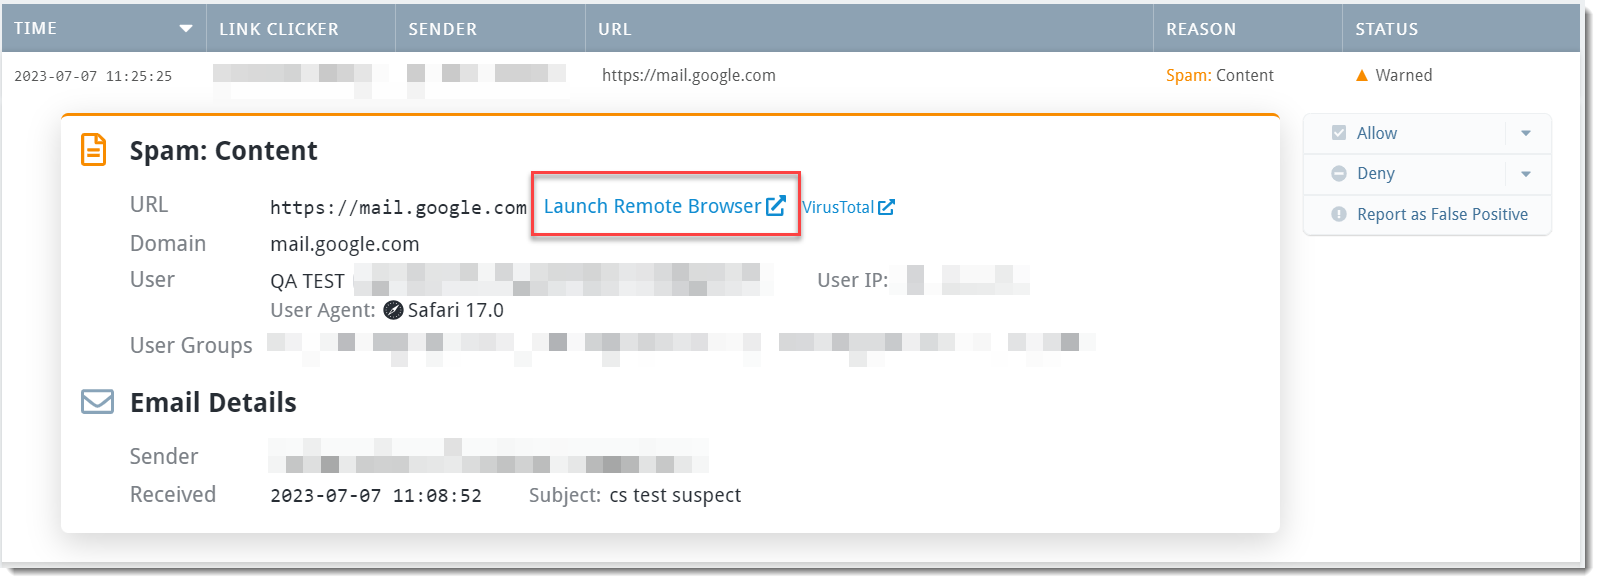
See Email Analytics for more details on what Link Click Analysis is and how to use it.
Analytics > Threat Explorer
Scenario: You're already working within the Threat Explorer tool to determine which user groups receive the most spam emails and want to investigate one particular email a little closer.
- Select the specific threat to open details and click Launch Remote Browser
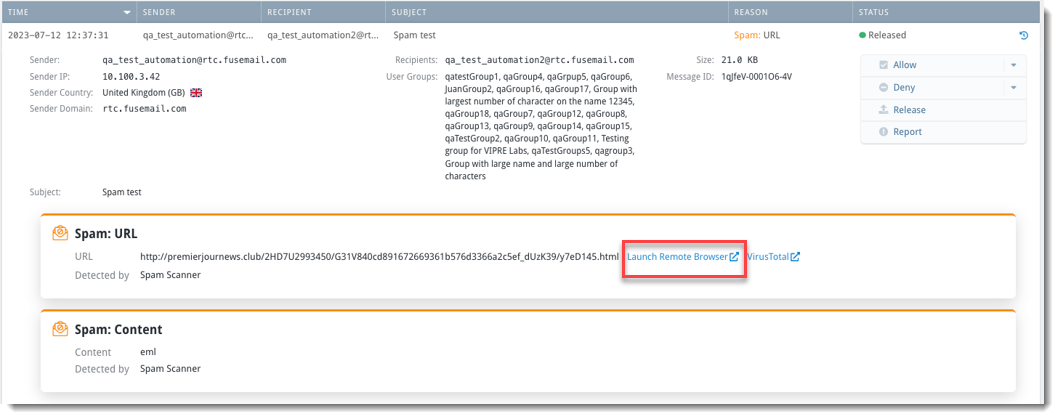
See Email Analytics for more details on Threat Explorer and how to use it.
Step 2: Reviewing the URL within a Remote Browser
Regardless of your path, all of the above RBI access points will lead you to the same place. The website you have chosen will open in a new browser tab, and you should see a page that looks similar to this:
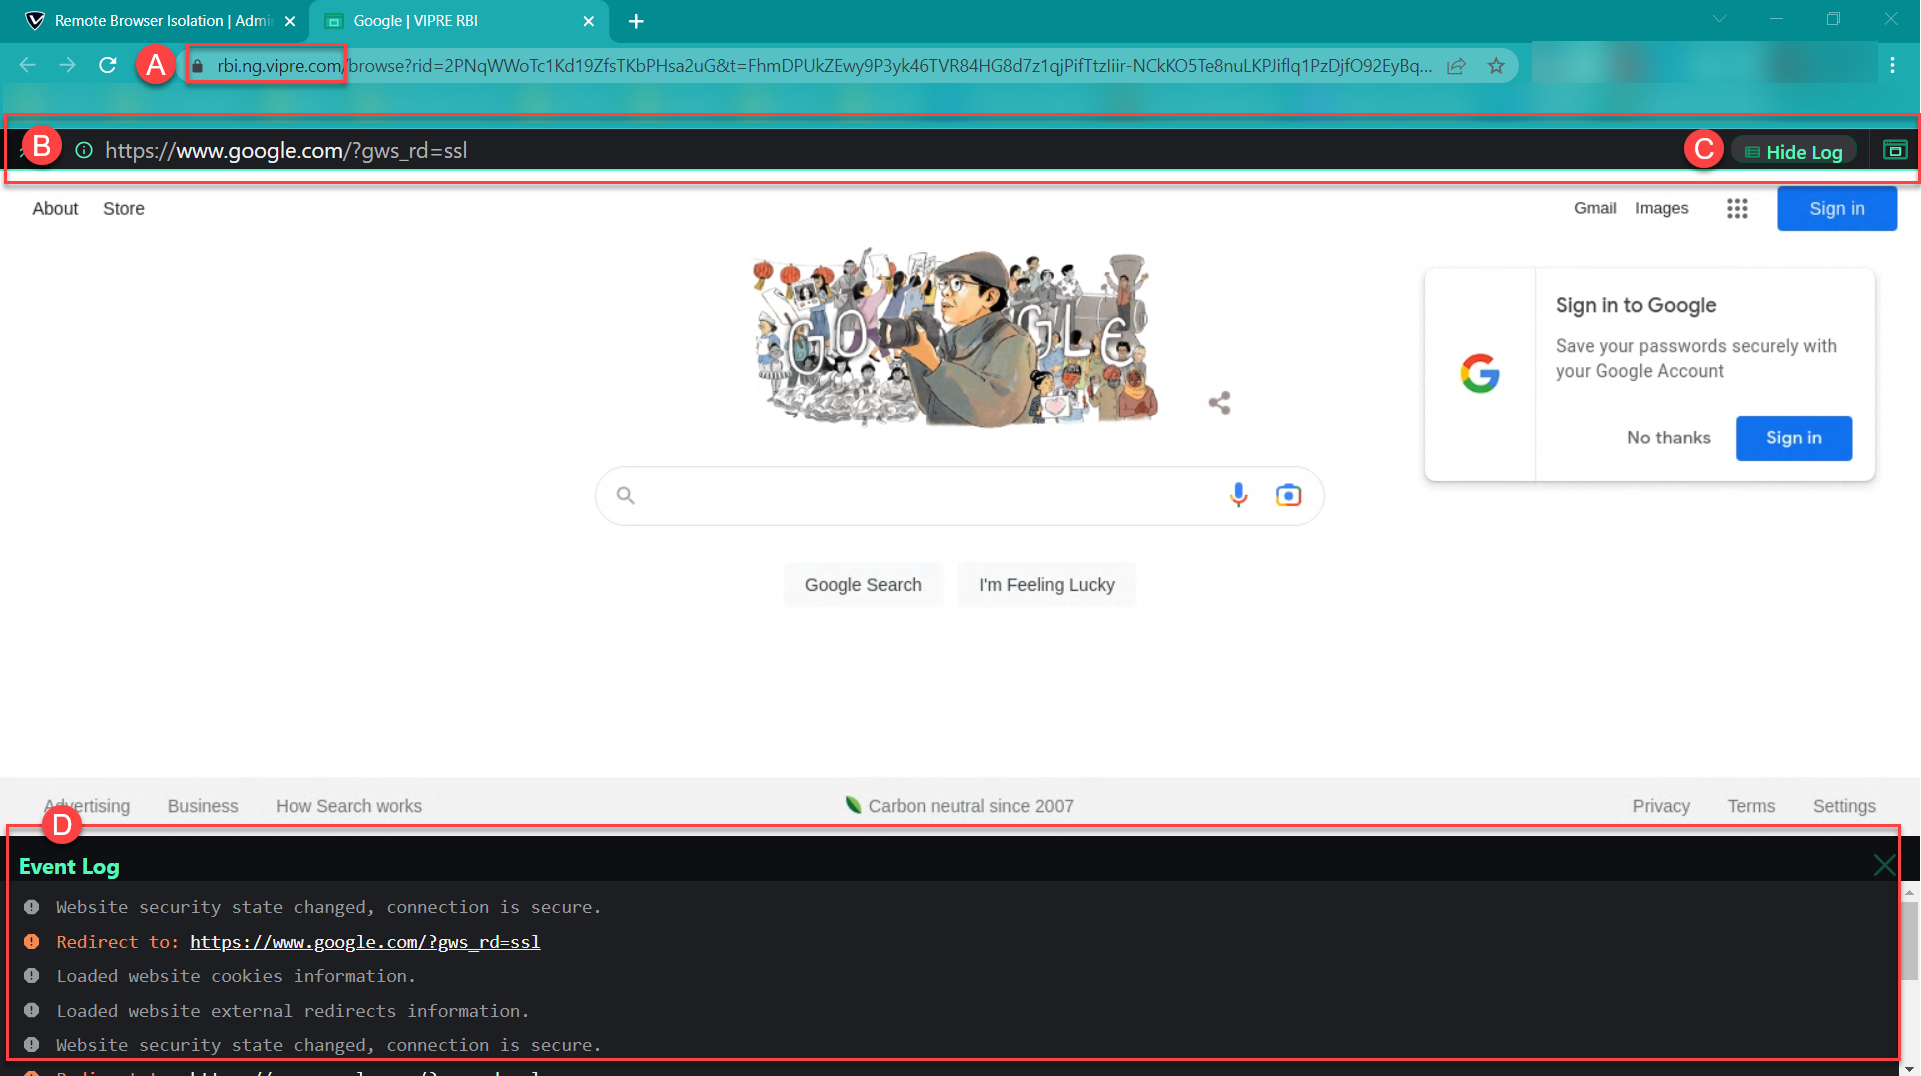
- You will notice the URL in the browser’s address bar indicates it is part of VIPRE’s RBI feature
- Here, you will see the original URL that you put into the RBI field within the Email Security web console
- To show the event log click Show Log; when the event log is visible, it will say Hide Log
- At the bottom of your browser window is the Event Log
- The Event Log provides details such as what was loaded along with the webpage being viewed (e.g., cookies, scripts, redirects, etc.), which can be extremely helpful in determining the potential threat level.
Once you’ve finished reviewing the website remotely, you can close the browser tab or window to close the RBI session; otherwise, the RBI session is terminated automatically after 30 seconds of inactivity.
If you do not already subscribe to VIPRE Email ATP, contact your account manager or our Sales team.
Microsoft 365 Integration & Remediation
Microsoft 365 Integration and Remediation allows administrators to remediate any email suspected of being malicious or undesirable directly from a user's Microsoft 365 mailbox.
M365 Integration
To configure your Microsoft 365 integration:
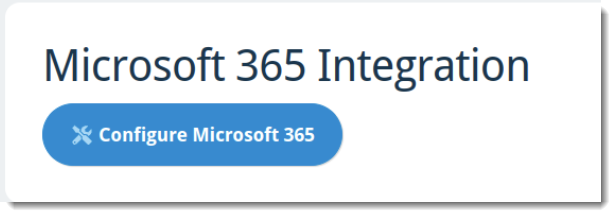
- In Email Cloud, under Service Settings on the left side navigation bar, select M365 Integration
- Click Configure Microsoft 365 to log in to your Microsoft 365 account
- Please note that you must have administrator access to your organization's Microsoft 365 Tenant to ensure a successful integration
- Microsoft will ask you to accept all permissions VIPRE is requesting - click Accept
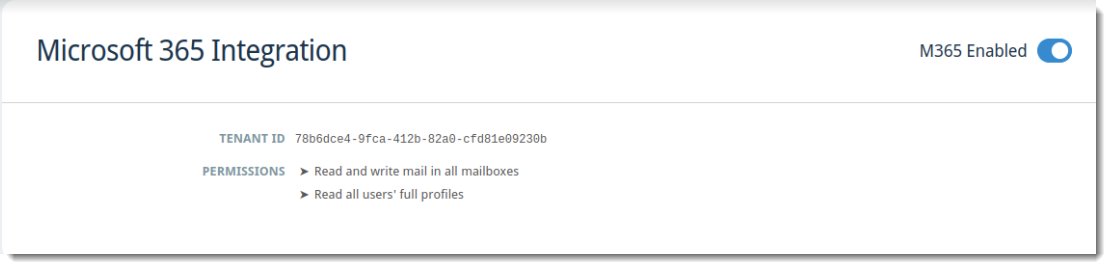
When successfully configured/enabled, the Microsoft 365 Integration screen will look like this:
My Microsoft 365 Integration failed. What do I do?
When the Microsoft 365 Integration is not successful, the screen will look like this:
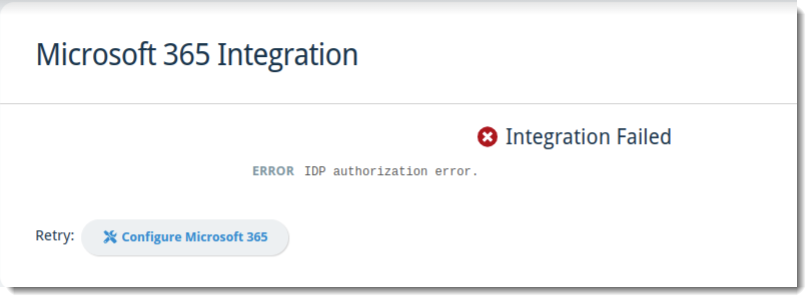
If your integration fails, ensure you have administrative access to your Microsoft 365 tenant and verify your credentials before clicking Configure Microsoft 365 next to Retry.
Remediation
After enabling M365 Integration, there are four places within Email Security where you can remediate email messages:
Message Logs
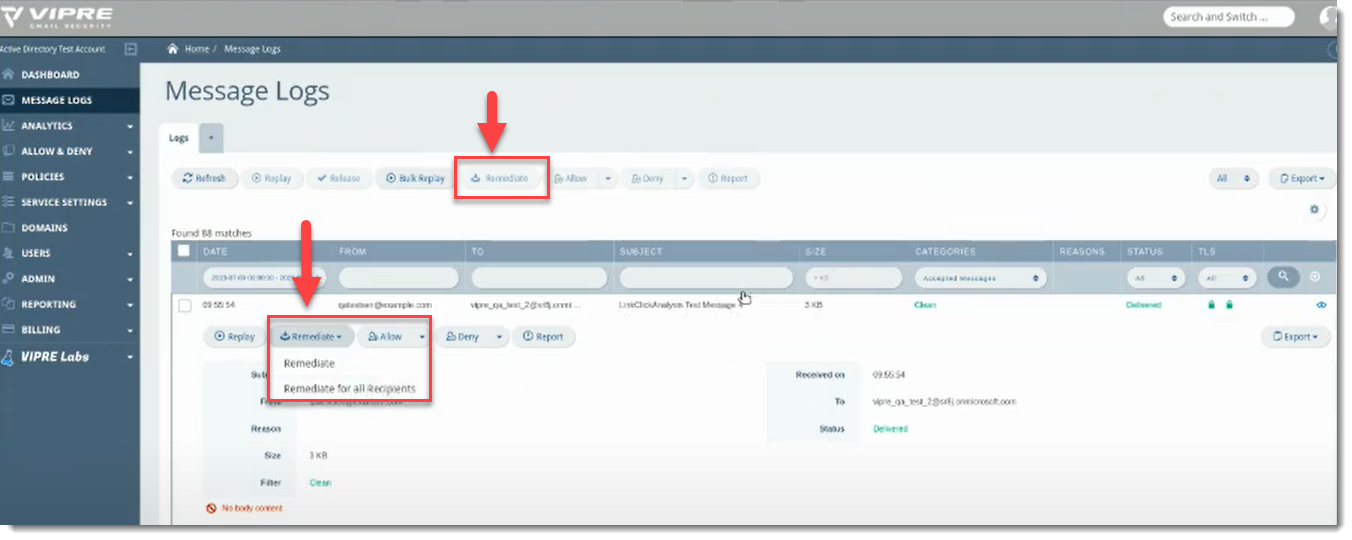
- Select Message Logs on the left side menu
- You will notice the Remediate action at the top; if you expand the details of a specific message, you will have the option to choose Remediate or Remediate for all Recipients
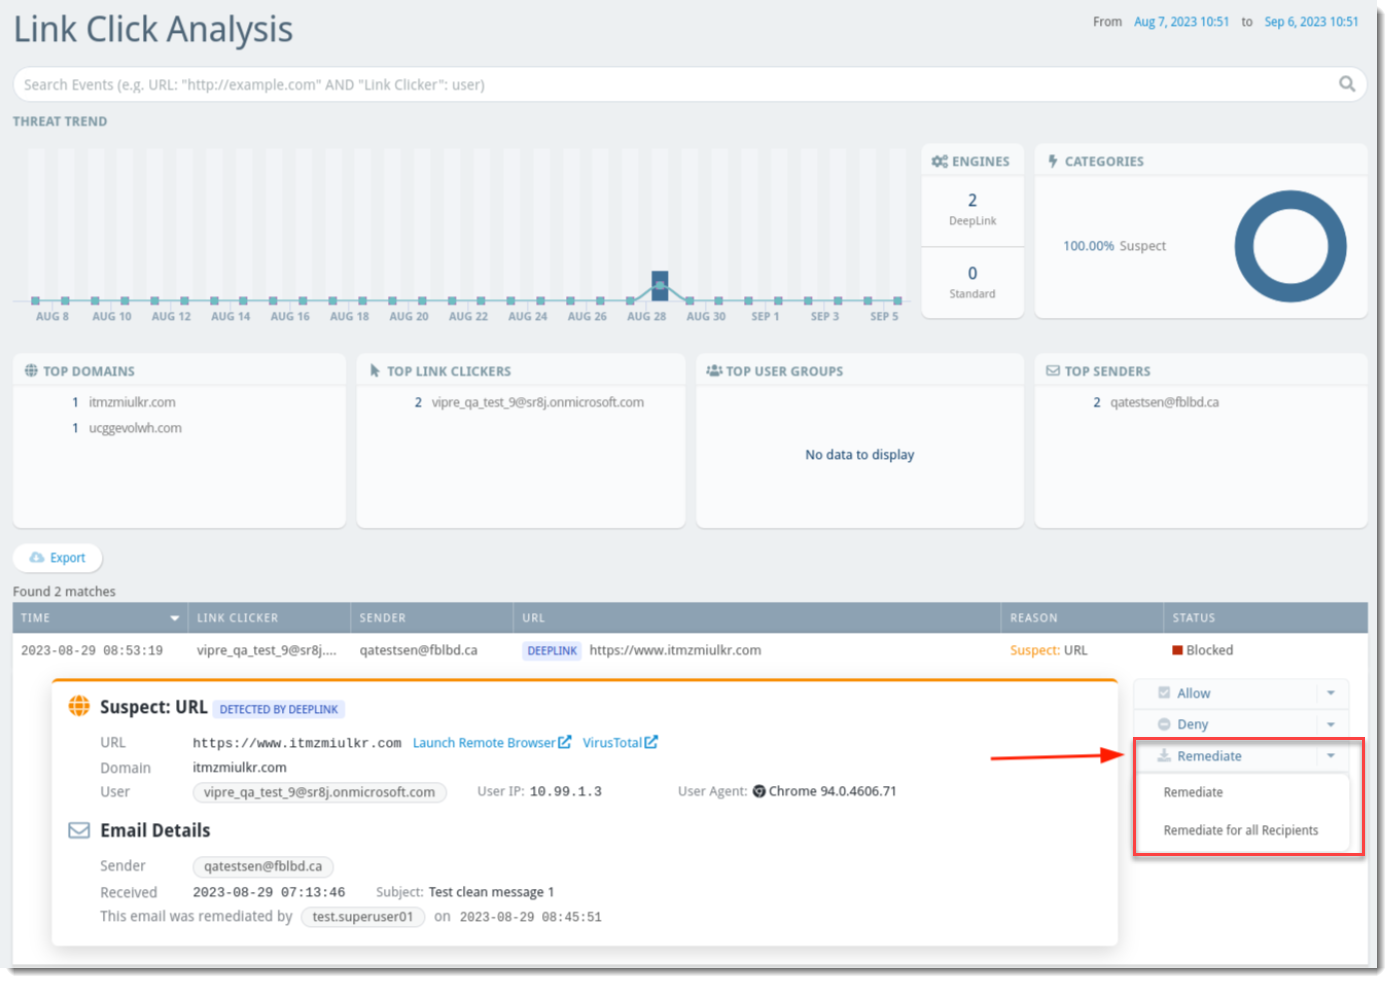
Analytics
- Select Analytics on the left side menu
- Choose Link Click Analysis, Threat Explorer, or Policy Explorer as desired
- Within the data table towards the bottom of the page, you will have the option to choose Remediate or Remediate for all Recipients if you expand the details of a specific message
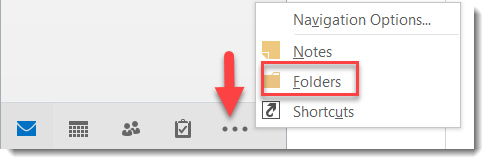
Once a message has been remediated, it will be removed from the Inbox and moved to a hidden folder. To see all folders in Microsoft Outlook, click Inbox, then the 3 dots in the navigation bar at the bottom. Select Folders; from there, you will see a list of all folders.
VIPRE Recommends
If you are a VIPRE Partner, we recommend also reviewing the following VIPRE documentation links:
-
Email Security Cloud for VIPRE Partners
- This guide includes all documentation for our partners selling VIPRE Email Security products
-
Add Packages to Customers
- This article will walk you through how to add/remove/update Email-related packages to your customers' accounts.