
Welcome! Thank you for installing VIPRE Advanced Security for Home - Mac.
If you're new to VIPRE, follow the Guided Welcome Path below to step through our "Get started" topics in order.
Step 1: Install VIPRE on your Mac
Installing VIPRE is quick and easy. Just follow the steps below to install on your Mac.
Important
After VIPRE is installed, you must allow VIPRE in your Mac Security Preferences so that it can run.
Please note that this is for macOS devices (Laptop and Desktop computers running macOS) only and does not apply to iOS devices (iPad and iPhones). For full details on the system requirements, please refer to the System Requirements.
Install the VIPRE application
- Download the VIPRE installer to your Mac
- Double-click the downloaded .pkg file to begin the installation
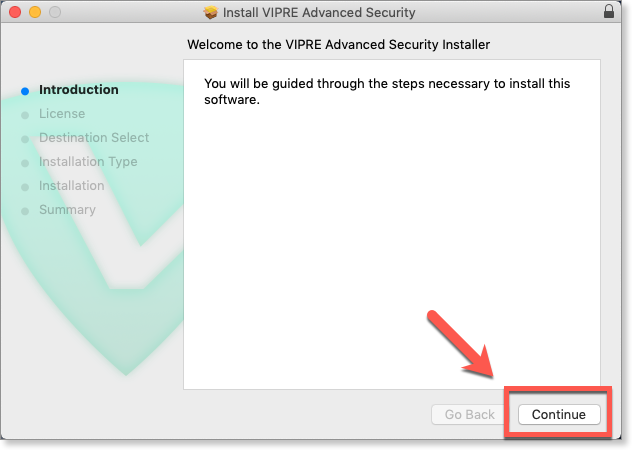
- On the Introduction screen, click Continue
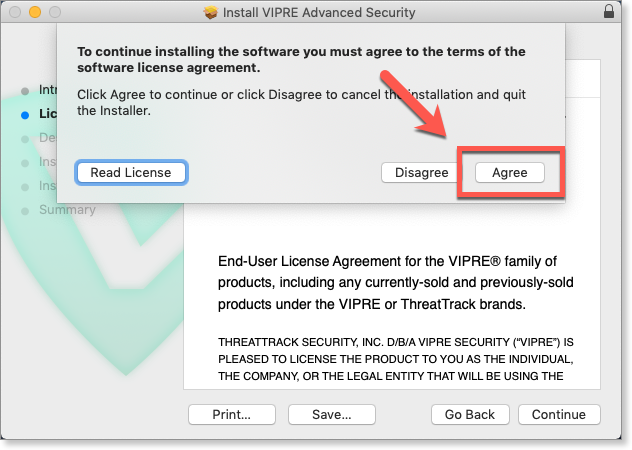
- On the License screen, you’re presented with the End-User License Agreement. Click Continue
- Review the license agreement. If you agree with the terms, click Agree
.png)
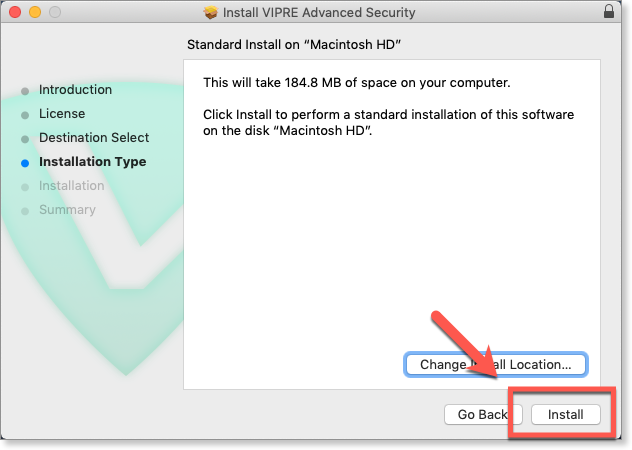
- On the Installation Type screen, choose an install location, or click Install to use the default
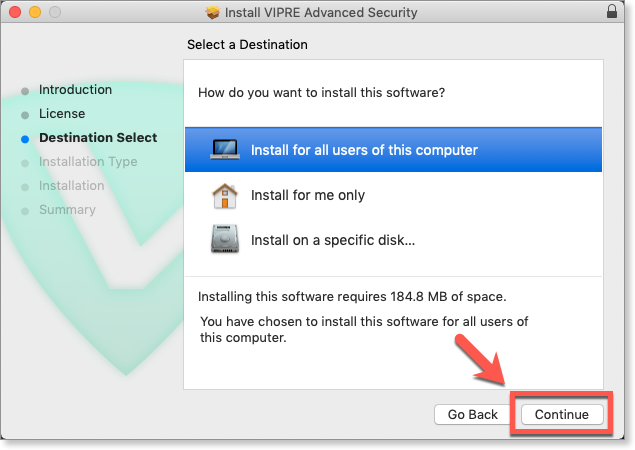
- On the Destination Select screen, click Continue
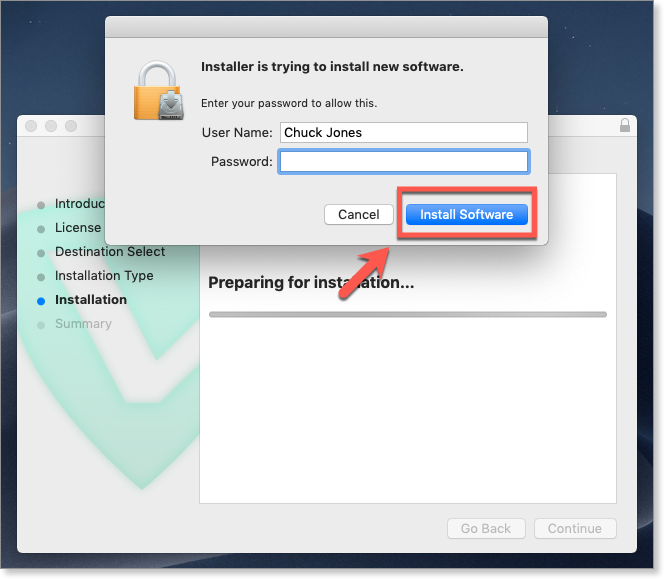
- The installer will ask for an admin User Name and Password to continue. Enter your User Name and Password and click Install Software
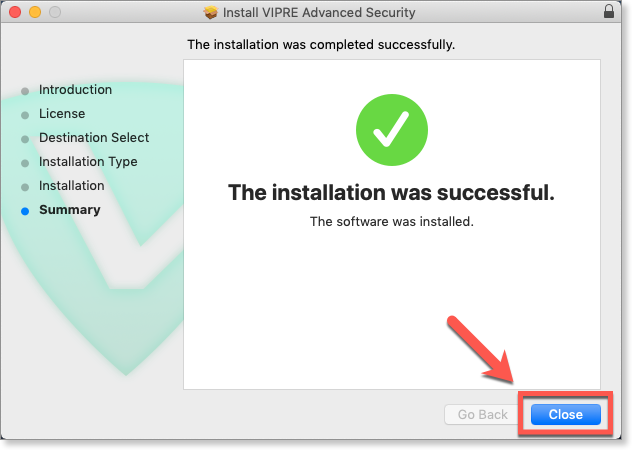
- The installer will copy the application to your hard disk. When you see “The installation was successful,” click Close to finish
Adjust your Security Preferences
Next, you must allow VIPRE in your Security Preferences so that VIPRE can properly run.
- If you're following our Guided Welcome Path, proceed to the next page.
- Otherwise, see this article to edit your Mac's Security Preferences.
-
Next Step
- Add Button
Step 2: Allow VIPRE System Extension on your Mac
The first time you run VIPRE, you will need to adjust your Mac's Security Preferences to ensure the VIPRE system extension is allowed to load properly.
How to allow VIPRE system extension in macOS
When you first run VIPRE, you may experience one of the following issues:
| Issue | What is shown on Mac |
| A "System Extension Blocked" message is displayed, similar to the one on the right. | 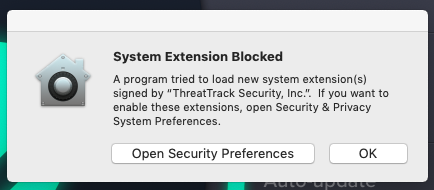 |
| Active Protection is blinking red, and VIPRE's status is red = AT RISK. | .png) |
To resolve these issues, users running macOS High Sierra (10.13) or later will need to ensure macOS is not blocking VIPRE from loading. Proceed with the steps below to enable macOS to successfully load the VIPRE system extension.
Steps to allow VIPRE system extension in macOS
- In the top left corner of the screen, choose Apple menu > System Preferences
- Click Security & Privacy, then click General
- Click lock (to make changes) and enter administrator credentials for User Name and Password, and then click Unlock
- At the bottom of the Security & Privacy screen, you should see a message about software being blocked. Depending on which message is displayed, there are slightly different steps to follow. See the table below for the next steps.
| Option | If the message says... | Then perform these steps... |
| Option A | "System software from developer 'ThreatTrack Security, Inc.' was blocked from loading"...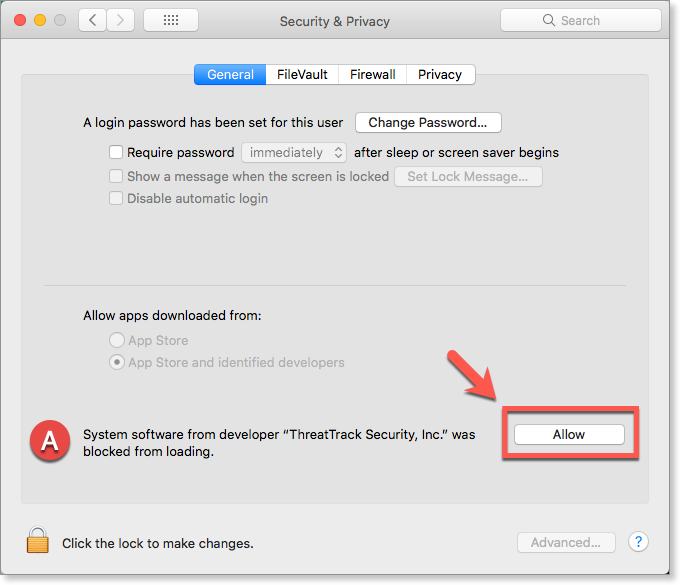
|
Note: There is a known issue with some software stopping the Allow button from being clicked. Apple's support articles below may help if you are having this issue. |
| Option B |
"Some system software was blocked from loading"...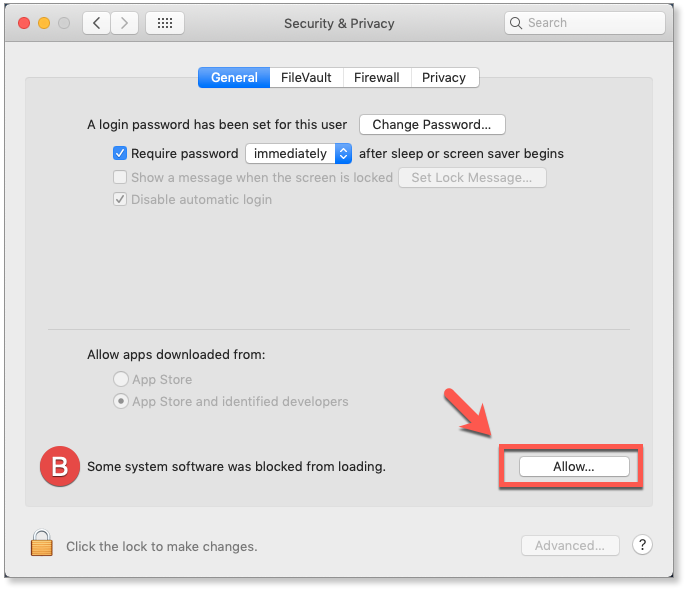
|
Note: There is a known issue with some software stopping the Allow button from being clicked. The Apple articles below may help if you are having this issue. 1. System Extension Blocked - but can't allow extension 2. "Allow" Button in System Preferences for Blocked System Software Doesn't Work |
Next steps
Now that you have completed the steps above, review this article to make sure VIPRE has full disk access, which is required to keep your Mac properly protected by VIPRE.
-
Next Step
- Add Button
Step 3: Allow VIPRE Full Disk Access in macOS
To keep your macOS system properly protected, Full Disk Access must be granted to VIPRE.
Why VIPRE needs Full Disk Access
As of macOS 10.14 Mojave, applications no longer have full access to all disk locations by default. Instead, Apple has given users the ability to decide if an application should have that access. For VIPRE, full disk access is needed to be able to scan all disk locations. Without this access, VIPRE cannot scan all disk locations, including Home and Time Machine backups and thus may not detect threats in those areas.
How to grant full disk access to VIPRE
VIPRE needs full disk access to thoroughly scan for, quarantine, and report threats. To grant full disk access, follow the steps listed in the table below. If you are not comfortable with granting this access, please contact us.
Note: Administrator privileges are required to perform these steps.
| Steps | Screen Displayed |
| 1. Open System Preferences and then click Privacy and Security | 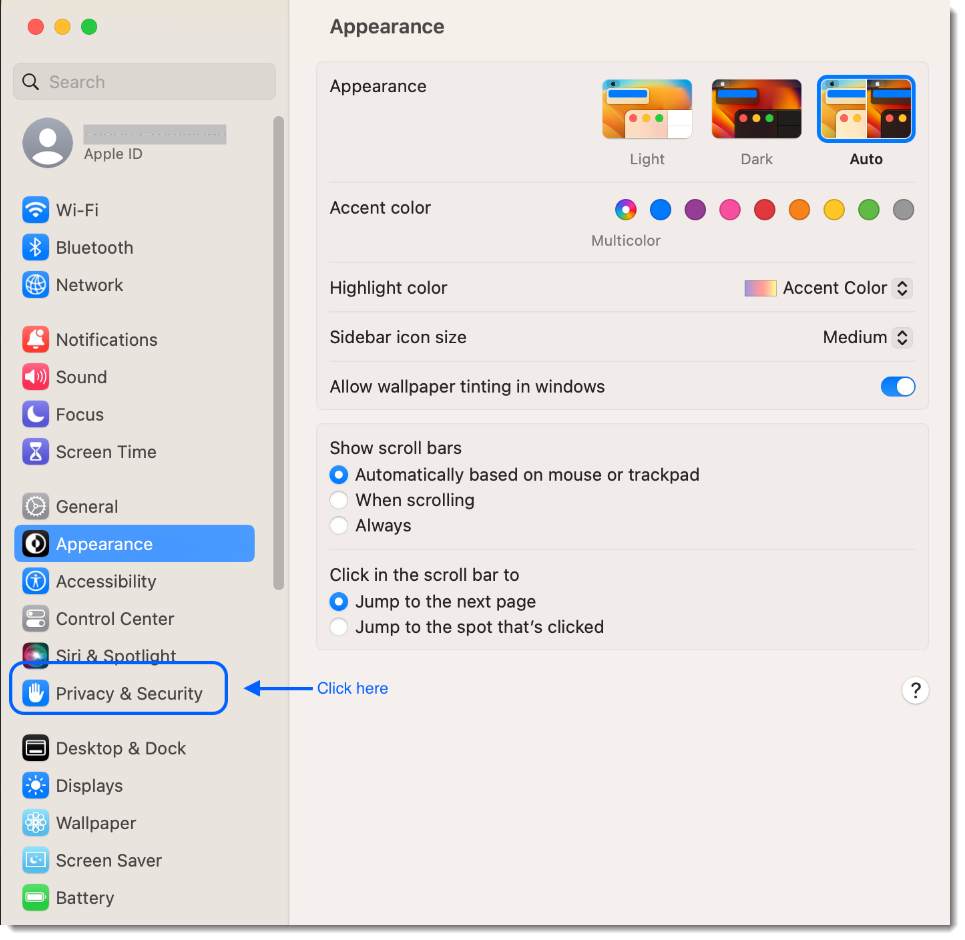 |
| 2. Click Full Disk Access, then Click the lock to make changes | 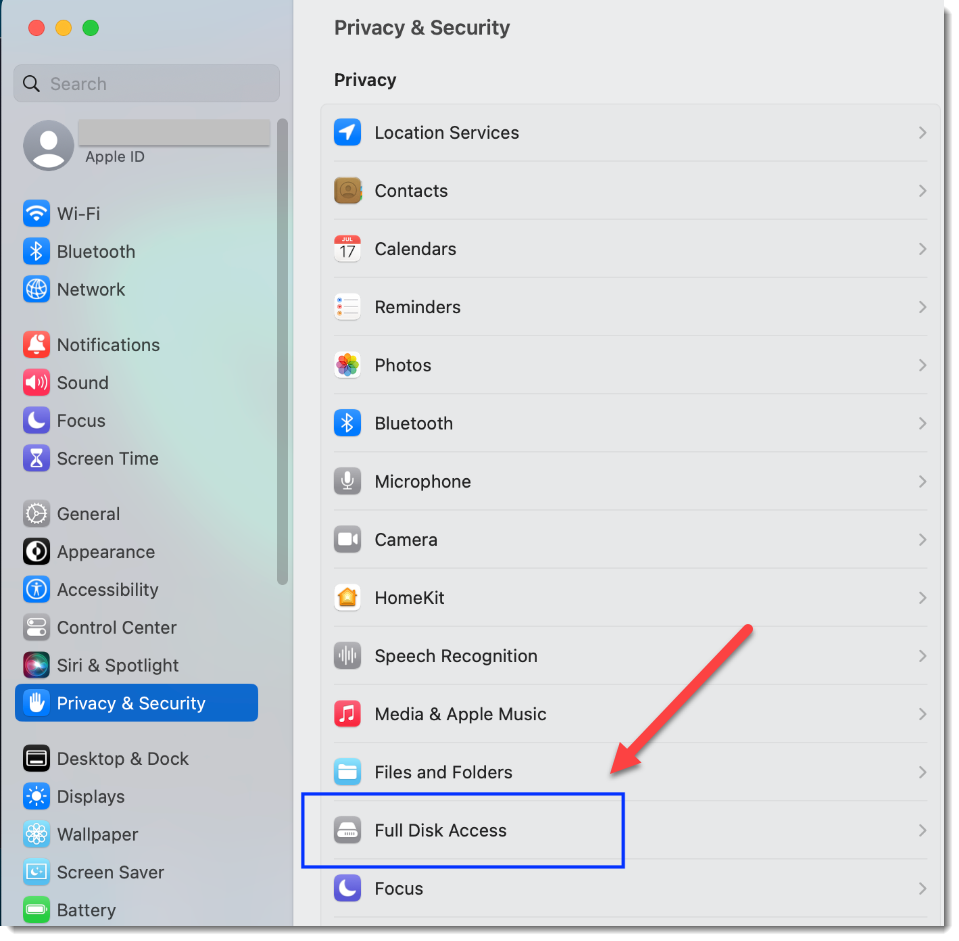 |
| 3. In the right column, look for the VIPRE logo and the word agent, then toggle the switch to blue to allow the VIPRE agent to have full desk access | 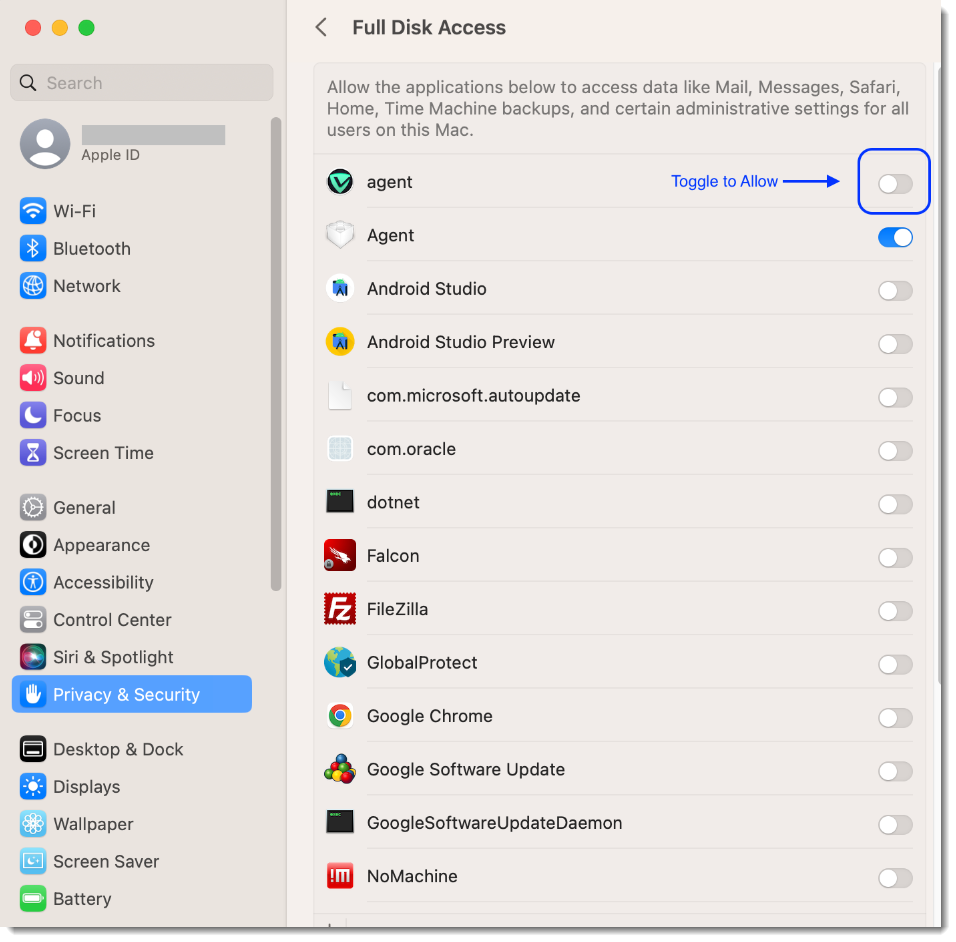 |
| 4. Enter administrator credentials then click Modify Settings | 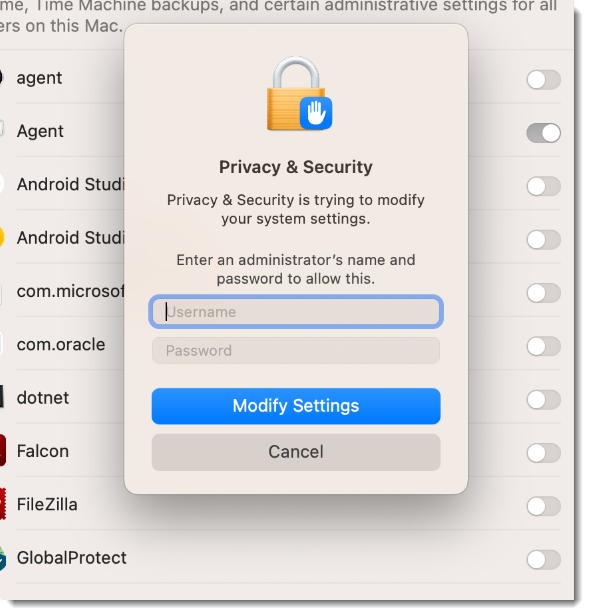 |
That's it! Verify that the VIPRE agent is toggled on to allow/blue then close the Settings dialog box. VIPRE now has Full Disk Access.
-
Next Step
- Add Button
Step 4: Allow Notifications in macOS Catalina (10.15)
When you use VIPRE and macOS Catalina (10.15), you can see notification popups only if you allow them.
Once the installation is complete, you’ll see the following prompt:

VIPRE still protects you even if you don’t allow notifications but you could miss valuable information. To make sure you don’t miss out on anything important, including alerts, sounds, and icon badges, select Allow.
To configure this option later:
- Go to the Apple Menu
 , select System Preferences, then click Notifications.
 Select VIPRE Endpoint Security on the left, then view or change settings on the right.
For full details on changing notification preferences on macOS, visit the macOS User Guide on Apple’s website.
-
Next Step
- Add Button
Step 5: What to Expect the First time you run VIPRE
What VIPRE looks like, and how it downloads data the first time you launch it.
Automatic Threat Definitions Download
The first time VIPRE starts, it will download and install Threat Definitions to protect you from the latest threats. This process is automatic and usually takes a minute or two, depending on your connection speed.
After this first download, VIPRE will download and update Threat Definitions as needed. This happens a few times per hour in the background.
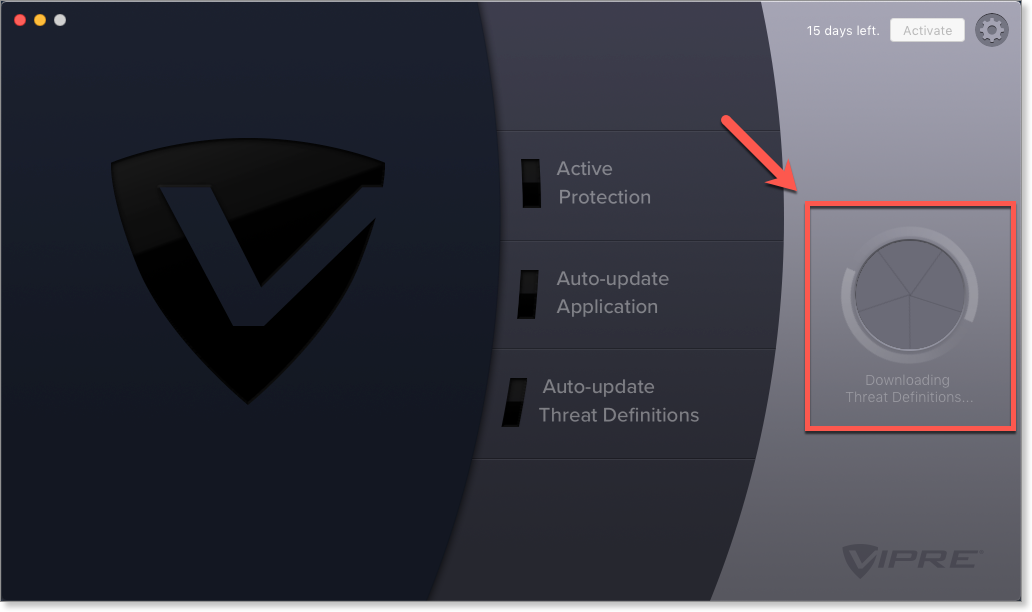
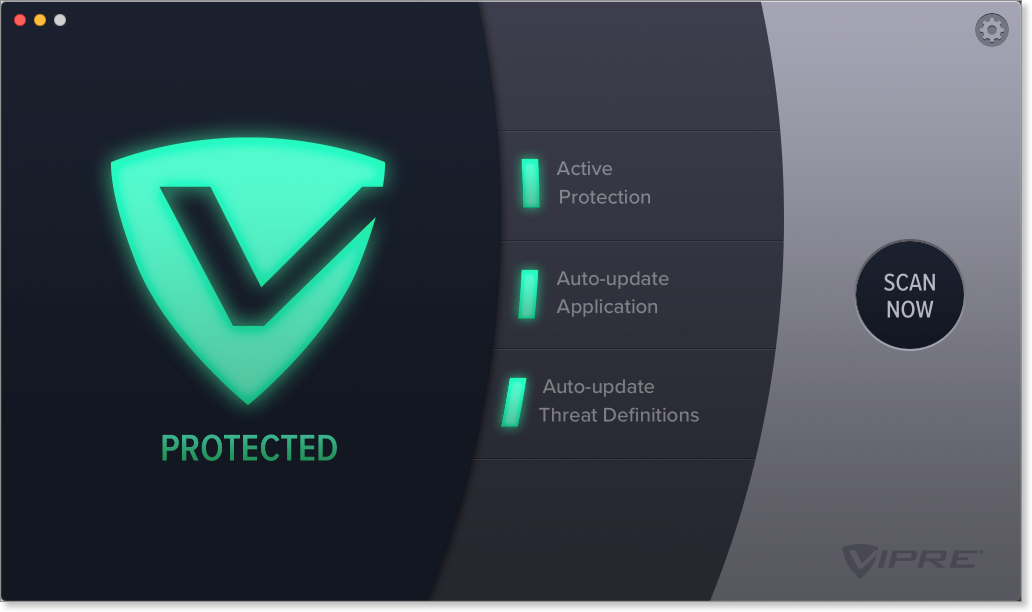
When VIPRE is done updating, it will display "PROTECTED" and turn green. You're now ready to run your first scan and start using VIPRE!
-
Next Step
- Add Button
Step 6: Run your First Scan
Once VIPRE is installed, you'll want to run an initial scan to ensure your Mac is free from viruses and malware.
Why run a Quick Scan?
A manual Quick Scan is the fastest and easiest way to check your Mac for potentially dangerous apps and malicious content.
Run a manual Quick Scan
- Click Scan Now, then click Quick Scan
VIPRE will scan your Mac for potential threats. The amount of time the scan takes depends on how many files you have on your Mac.
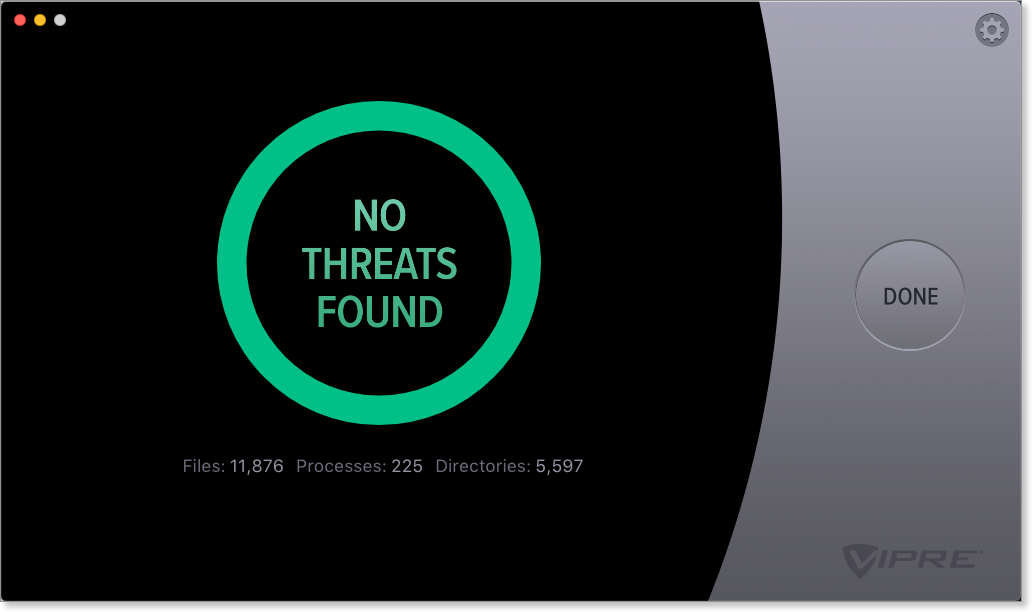
At the end of the scan, you will be presented with either a Scan Report or a No Threats Found screen.
Next, we can review the results of your first scan.
.gif)
-
Next Step
- Add Button
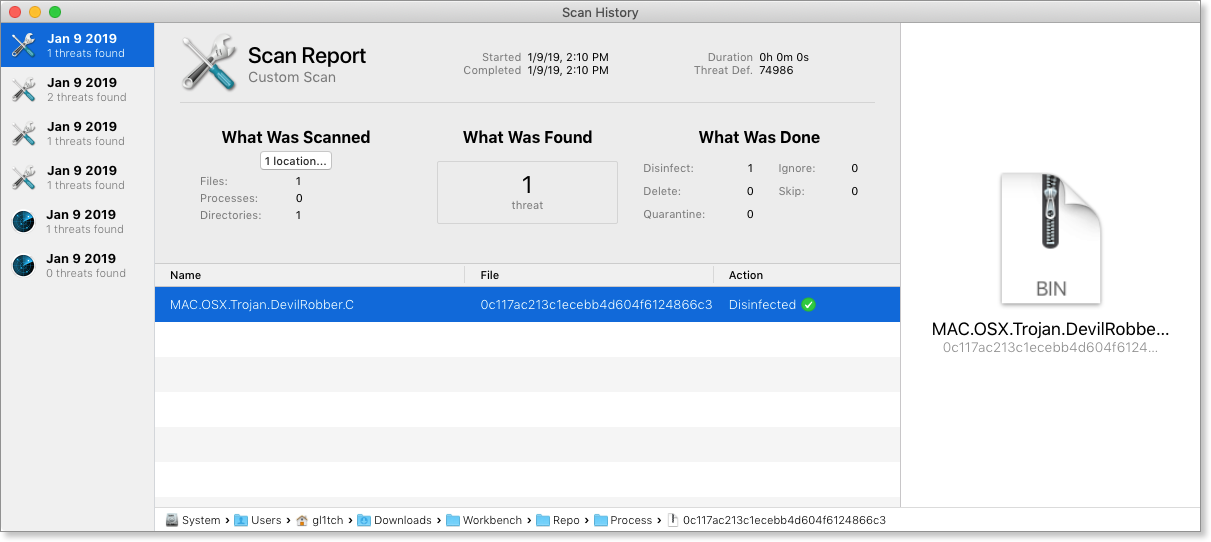
Step 7: Review the Results of your First Scan
When VIPRE completes a manual scan, it displays a manual Scan Report – a summary of the threats found, and information on each threat. Here you can choose how to handle each potential threat that was found.
What do the Scan Report actions do?
After you click Quick Scan, Full Scan, or Custom Scan, VIPRE will display a Scan Report if it finds any threats.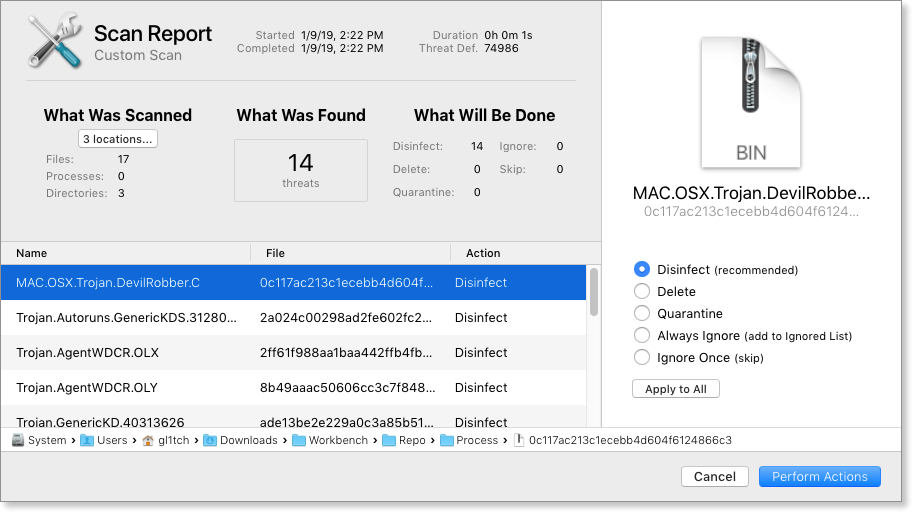
To take action on found threats
You may select individual actions for each file, or choose one action and click Apply to All.
The action column on the right of the file list displays what VIPRE will do to that file.
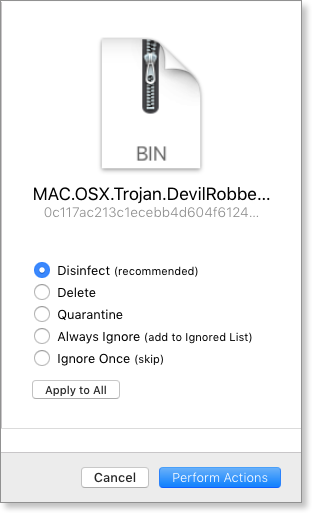
Your choices are
- Disinfect (recommended) - Disinfect will attempt to recover an infected file by removing malware embedded within it. If the disinfect process is unable to remove the infection, you may choose another action.
- Delete - Removes the file entirely; ideal for malicious apps and infected files. Be careful when deleting a file with VIPRE; it will immediately be removed from your Mac with no option to restore it
- Quarantine - This moves the threat into quarantine: a contained, protected area. Quarantining an item isolates the file. It will not be able to do any damage, and it is not immediately destroyed
- Always Ignore - Ignoring a scanned item will let the files remain on your Mac indefinitely. This should only be selected if you know the file is safe
- Ignore Once - This will ignore a file for this scan; it can still be flagged as potentially harmful during your next scan or when accessing the file later
When you're ready to proceed, click Perform Actions. Some actions (such as Disinfect) may take longer than others.
When done, VIPRE will tell you the results of the actions performed.
Which action should I choose?
Choose Disinfect first. If VIPRE can clean the file, it will — and the problem is solved. Disinfected files are restored to their original location on your Mac as if nothing happened.
If VIPRE cannot clean the file, choose Quarantine. That way the file is removed from your Mac and placed in quarantine. Items in quarantine are isolated and cannot harm your Mac. You can later decide to delete them (or restore them if they're not a threat).
Quarantined files will eventually be deleted if you don't take any other action.
No Threats Found
If your scan completes and VIPRE displays "No Threats Found," this is a good thing! It means your Mac is free from viruses, malware, and infected files.
-
Next Step
- Add Button
Step 8: Activate your VIPRE License
To keep VIPRE fully functional, you must activate it with a purchased License Key.
How to Activate your License Key
- On the main VIPRE screen, click the Activate button to display the Activation screen. (If your trial has expired, the button will display "Re-enable" instead.)

- Enter your License Key and click Activate
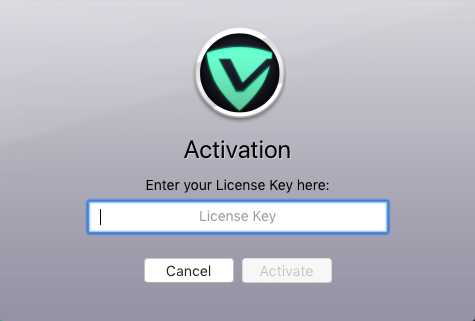
- VIPRE will display a Success message. Click Done to finish

Once activated, VIPRE will no longer expire and will be fully functional. For reference, your activated License Key is also displayed in the About screen.
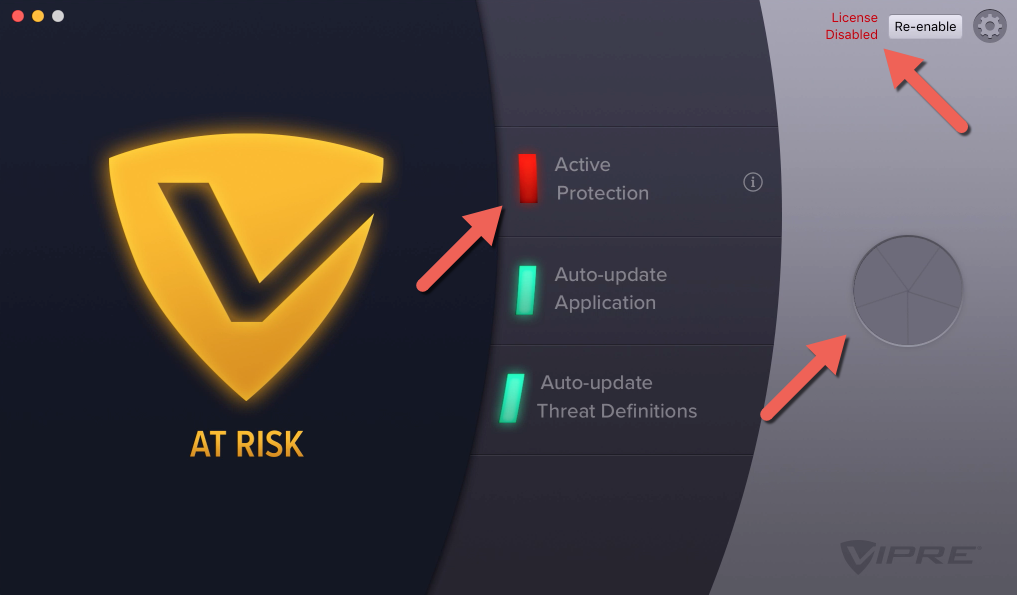
Trial expiration
If your trial period ends without activation, VIPRE enters a License Disabled state.
When VIPRE is disabled, all scans and Active Protection will be temporarily turned off. You can still manage items in quarantine and review your Scan History and Active Protection History. The main VIPRE window will also turn yellow and change to "At Risk".
When VIPRE is disabled, you can click Re-enable to enter your License Key and activate your license. This restores full functionality.
If you have trouble activating VIPRE or need to purchase a License Key, please contact Support.
-
Next Step
- Add Button
Step 9: Recommended Next Steps
VIPRE can be tailored to your personal tastes, depending on your security needs. We recommend stepping through VIPRE's Preferences and reviewing some options, especially if this is your first time using a VIPRE product.
Below, we walk you through reviewing the VIPRE settings and help you confirm that VIPRE is set up as you like.
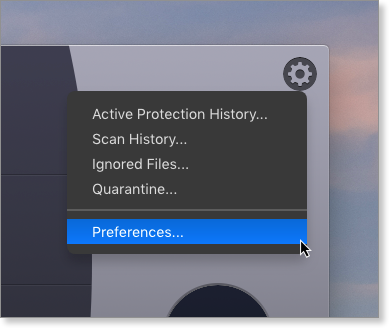
How do I access Preferences?
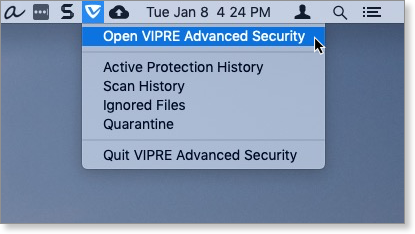
VIPRE's Preferences can be accessed a few different ways. Use whichever you're comfortable with.
- In the menu rar, click VIPRE Advanced Security > Preferences
- On the VIPRE main screen, click the Quick Menu (gear button) > Preferences
- If you're familiar with Mac apps, you can also use the standard macOS keyboard shortcut (⌘,)
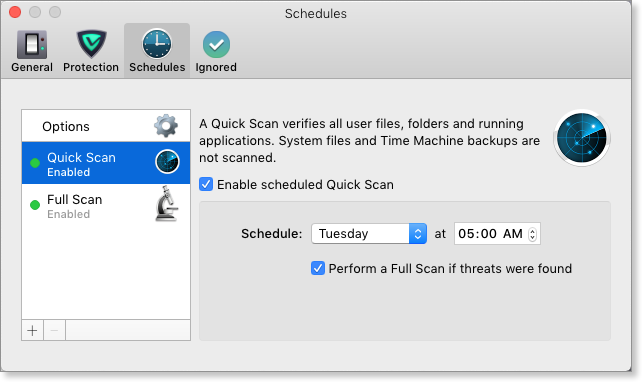
Review your scheduled scan settings
Navigate to Preferences > Schedules > Quick Scan.
By default, VIPRE enables two scheduled scans to automatically scan and protect your Mac.
- The default Quick Scan runs every day at 12:00 AM
- The default Full Scan runs once a week on Sunday at 12:00 AM
You can adjust when these scans happen to make them run on your schedule. For best results, pick a time when no one will be using your Mac.
Review how scheduled scans handle threats
Navigate to Preferences > Schedules > Options.
These options determine how VIPRE reacts to threats it finds during any scheduled scans. Scheduled scans are automated, and generally happen when you're not around. So telling VIPRE what to do here will ensure that threats are handled as you like while you're away.
The default option is to quarantine a threat, and delete it if that fails.
Choose how VIPRE handles threats during scheduled scans.

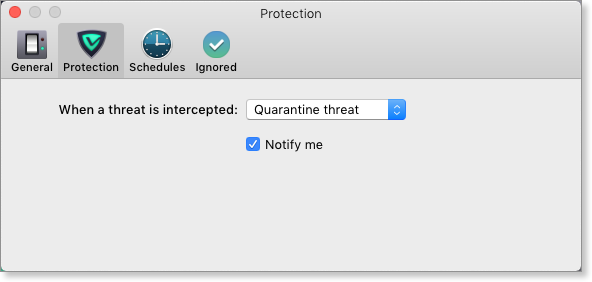
Review how Active Protection handles threats
Navigate to Preferences > Protection.
The Protection preferences here tell VIPRE how to act when it detects threats with Active Protection technology.
Active Protection is what VIPRE uses to protect your Mac from running apps, threats in memory, or files that are moved to or from your Mac. It's a different protection mechanism from when VIPRE scans the file content of your drives.
The default option is to quarantine threats, and send you a Mac OS notification.
Review how Active Protection handles threats.
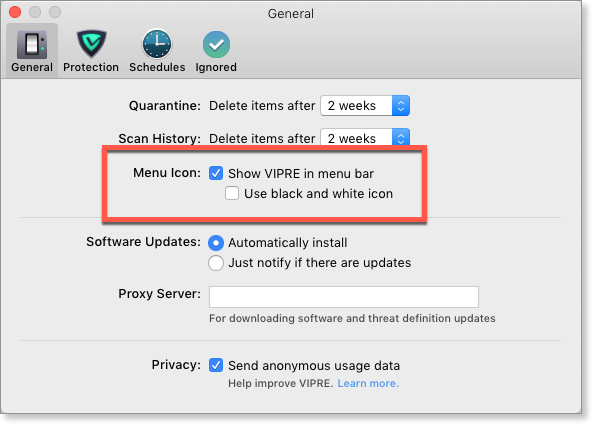
Check the menu bar icon
Navigate to Preferences > General.
Not only are we proud to see our little logo in your menu bar (thanks!), but the menu icon makes it easy to see at a glance that VIPRE is protecting you. You can also quickly select most actions right from the icon.
Here you can enable or disable the icon, or turn it black and white (if that's your thing).
Congratulations! You have successfully setup VIPRE Advanced Security for Mac.