
Now it's time to execute your migration to one of our VIPRE Cloud products.
Download the VIPRE Endpoint Migrator Tool
When migrating to VIPRE Endpoint Security Cloud, you have several different options. Download the Migrator Tool, then choose the option below that best describes your organization.
Getting Started with VIPRE Endpoint Migrator
To assist in your migration from Endpoint Security Server to VIPRE Cloud, we have developed VIPRE Endpoint Migrator.
This migration tool migrates your existing policies, exclusions, and agents. When running the tool, you can first migrate policies and exclusions, review the migration results, and then move your agents. Or, you can simply choose to move your agents first, and the migrator will automatically rehome the related policy and exclusions used by those agents at the same time.
Continue reading this article to learn more about the migrator's actions and flow. Then, for guidance on actually executing the migration, continue through the migration articles.
Important
VIPRE Endpoint Migrator is currently optimized for Windows-based agents. Agents for Mac OS are not supported by the tool.
Frequently Asked Questions
Do I need to prepare my agents for migration?
No. VIPRE Endpoint Migrator is intelligent enough to convert your existing content (policies, exclusions, and agents) without any changes being made in advance.
Therefore, you do not need to take any preparatory action on your existing VIPRE Server deployment before running the migrator.
Does Endpoint Migrator support Site Manager or EDR?
Yes. Endpoint Migrator supports migration from Endpoint Server (on-prem) sites to:
- Individual Endpoint Cloud sites
- VIPRE Site Manager (site groups)*
- Endpoint Detection & Response
*When migrating to Site Manager, each site is processed individually.
What does the Migrator move?
You can choose to migrate only policies and exclusions or to migrate agents (which also migrates the appropriate policies and exclusions if they have not been handled separately).
Regardless of which path you select within the Migrator, the simplified order of operations is
- Policy conversion
- Exclusion conversion
- Agent conversion
The agent migration path process is a little more in-depth, as it also does a policy migration if needed.
| Path | What's Migrated | Steps |
| Policies |
Policies Exclusions
|
Select the policies to migrate; policies and exclusions are converted from VSS to VIPRE Cloud.
|
| Agents |
Policies Exclusions Agents
|
Select agents to migrate. If an entire policy is selected, this includes all their agents.
|
How long does the actual endpoint migration take?
This depends on a few factors but is largely environmental. We recommend you perform a test migration on a few agents and monitor the process.
Factors to consider:
- Network throughput could affect how quickly VSS is able to transfer data to each agent and how quickly the agent can communicate with both VSS and Endpoint Cloud
- Agent machine performance could affect how quickly the agent is able to process the installation
That being said, it is reasonable to assume that agents on the same network, with similar CPU/RAM resources, and that belong to the same policy will be roughly processed in a similar timeframe.
So, if a single agent takes one minute to migrate, and there are 100 total agents with similar resources on the same network, the total time might be around 100 minutes.
Migrator Process Details
This section takes an in-depth look at what actions Endpoint Migrator performs "behind the scenes."
| Action | Description |
|---|---|
| Establish a connection | The Migrator begins by connecting to VSS and VIPRE Cloud (EDR, Endpoint Cloud, or Site Manager) |
| Convert policies and exclusions |
Once connected, policy and agent information is retrieved from both VSS and VIPRE Cloud. The migrator compares policies between VSS and VIPRE Cloud to determine if there is a policy overlap.
The Migrator checks if a selected policy exists in VIPRE Cloud. If so, it skips policy and exclusion conversion – and moves on to the agent conversion process. If the policy does not exist in VIPRE Cloud, the Migrator:
If a failure occurs during any step, the corresponding policy is marked as failed in the Migrator and skipped in the steps that follow. The Finish screen provides a list of failed policies if any exist. |
| Policy Mapping |
For each policy, settings are mapped one-to-one between the VSS version and the VIPRE Cloud version. Due to differences between environments, some policy settings may not exist on either side. The bullets below describe the actions taken in these situations.
|
| Exclusion Conversion |
Exclusions are converted by considering all exclusions associated with selected policies. The conversion is a multiple-pass operation intended to keep groups simple while minimizing the number of groups created in VIPRE Cloud. The process is outlined below.
Note: Exclusions are set up differently in VIPRE Cloud from VSS. If you are not yet familiar with how VIPRE Cloud differs, read these articles to learn about exclusions: ESC - Exclusions | EDR - Exclusions |
| Agent Conversion |
The agent selection screen displays VSS policies and the agents that belong to those policies. Because of this, it only shows policies that have agents currently assigned to them. Policies with no active agents will not be listed; these 'empty' policies must be migrated using the policies migration function of the Migrator if you plan to use these policies in VIPRE Cloud.
When agents are moved from VSS to VIPRE Cloud, they will no longer show as protected in the VSS console. Therefore, by choosing to migrate agents from your VSS, you are, in effect indicating that you have no intention of deploying any new agents from that VSS. On an agent-by-agent basis, the Migrator checks if the agent's policy exists in VIPRE Cloud. If it does not, it migrates the policy first. Once the policy and exclusions are in place, the Migrator proceeds to the agent migration.
Once all agents are processed, the Migrator displays a summary screen with the successfully copied agents. If any agents did not succeed, they will also be listed here with details as to why. |
Prerequisites for using VIPRE Endpoint Migrator
System requirements and other items to consider before migrating to one of our VIPRE Cloud products
Supported Environments
This section lists the VIPRE environments that are compatible with VIPRE Migrator.
| Migration from the following VIPRE Server products | Migration to one of the following VIPRE Cloud products |
|---|---|
|
|
Important
The VIPRE Endpoint Migrator works exclusively with Windows-based agents. To migrate agents on a macOS system, you will need to uninstall the old agent then deploy the VIPRE Agent for macOS from the VIPRE Endpoint Cloud console.
Migrator Requirements
The Migrator must be installed on a Windows PC with:
- Network access to:
- Each agent you wish to migrate
- Your VIPRE Site Service (VSS)
- The internet (for access to VIPRE Cloud)
- .NET Framework 4.6.1 or above
User Privileges
The user account under which the Migrator is run must have domain administrator privileges.
Environment Prerequisites
The steps within this section must be completed before running the Migrator.
-
Create a VIPRE Cloud Site
- Prior to running the Migrator, you must have a VIPRE Cloud site created; if using Site Manager, at least one VIPRE Cloud site must be created within Site Manager
- If you have not set up your VIPRE Cloud site, navigate to one of the following articles (clicking the links will open up a new tab):
- Return to this article to complete the migration
- Review the current state of your agents in VSS to ensure there are no pending reboots or uninstalls as the Migrator will not be able to migrate that device
- Make a list of agents/devices that have pending reboots or uninstalls
- Perform one of the following:
- Reboot each device now, or
- Add a step to your execution plan to perform a reboot prior to running the Migrator
- Before using the VIPRE Migrator, you must perform some firewall configuration changes within both the VIPRE Server firewall and your Windows Firewall to allow traffic to pass through
-
Turn off the VIPRE Server firewall
- Login to your VIPRE Server console as a domain administrator
- From the console, disable the Firewall
-
Enable Windows firewall rules
- The "WMI in" and "File and Printer Sharing" rules must be enabled in the Windows Firewall to allow traffic
- Perform one of the following in the Windows Firewall
- Enable the rules for both “WMI in” and “File and Printer Sharing”
- Add exceptions for ports 135, 139, and 445
-
Turn off the VIPRE Server firewall
- Ensure that both Network Discovery and File and Printer Sharing are enabled
Other things to consider
A non-local roaming agent that is not currently connected to the same network as your VSS cannot be migrated using VIPRE Endpoint Migrator.
In this scenario, manual migration is necessary. One solution is presented below.
To manually migrate a roaming agent
- From the VIPRE Server console, remove the roaming agent device
- Using VIPRE Cloud, email the VIPRE Cloud agent installer to an administrator or user of that device
What's next?
When using the Migrator to migrate, the next step in the process is to download and install the VIPRE migrator tool. Refer to Related Articles for details.
Run VIPRE Endpoint Migrator
How to use VIPRE Endpoint Migrator tool to seamlessly convert policies, exclusions, and agents from VIPRE Server editions to VIPRE Cloud.
How to use Endpoint Migrator
As we step through how to run the Migrator, we use an example system. In the example, we are using VIPRE Business Premium 9.6.021 to migrate to Endpoint Cloud. We will be migrating our Florida Workstations policy that contains one agent and one custom exclusion.
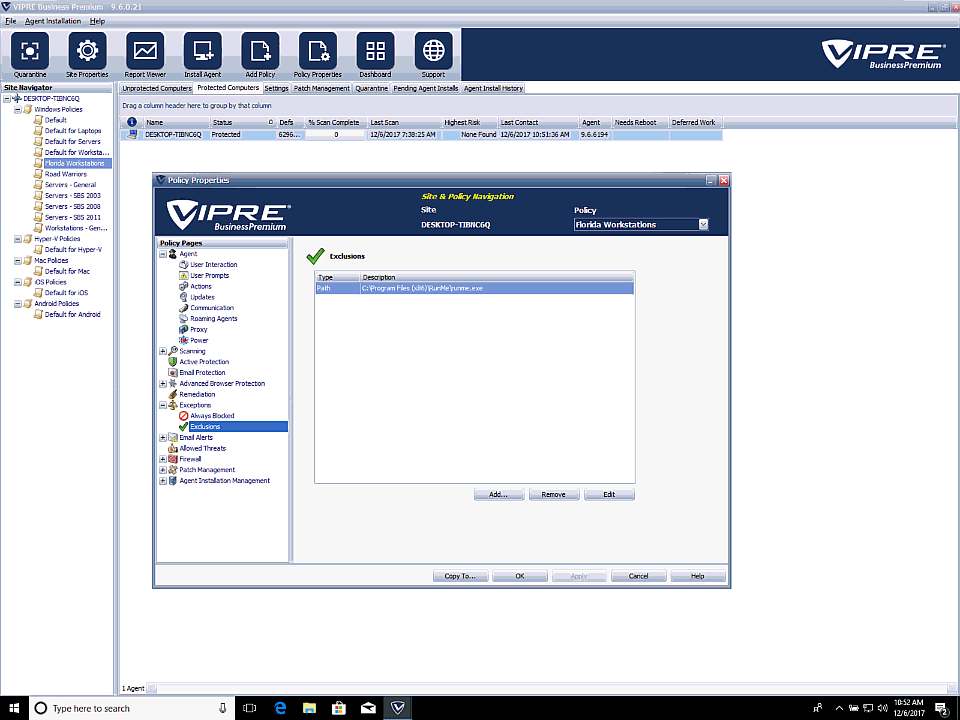
Source
VIPRE Business Premium Server (9.6.0.21)
Policy: Florida Workstations
Agent: DESKTOP-TIBNC6Q
Exclusion: Path - C:\Program Files (x86)\RunMe\runme.exe
To migrate from VIPRE Server
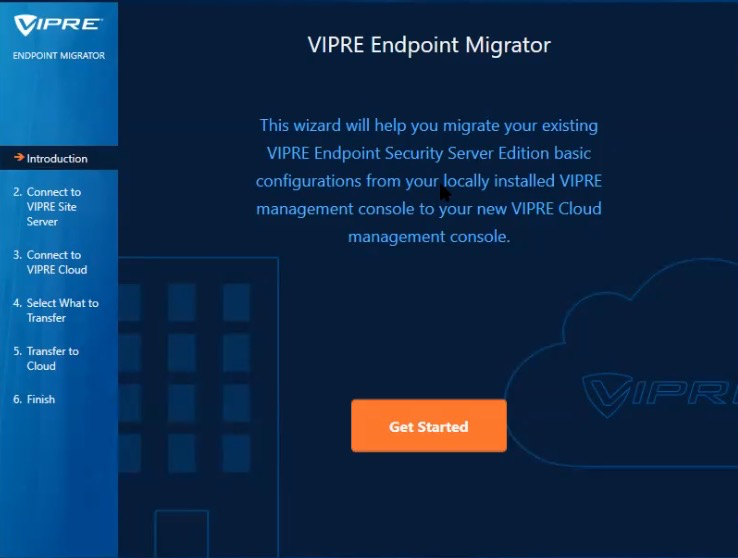
- Launch VIPRE Endpoint Migrator and select Get Started
- Enter your VIPRE Site Server Name or IP address and necessary credentials. If the VIPRE Endpoint Migrator is installed on the same endpoint as your VIPRE Site Server, this information will automatically be populated.
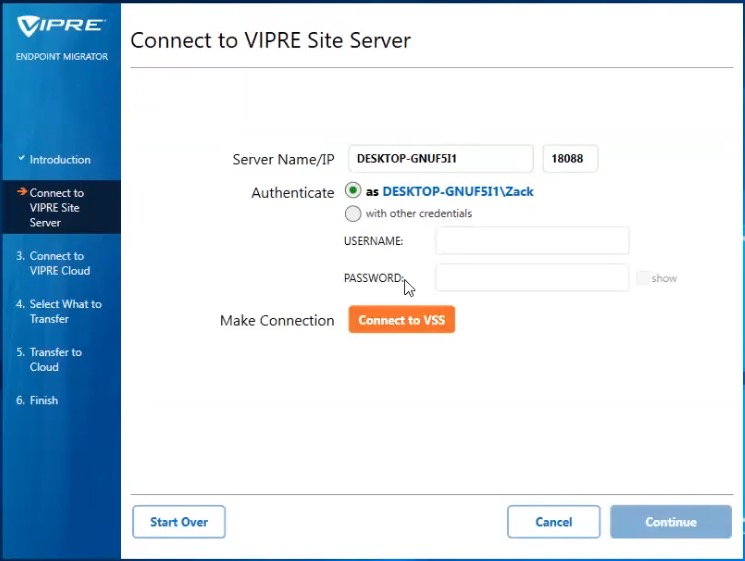
- Click Connect to VSS to verify connectivity. SUCCESSFUL should display on the screen. Once the connection displays Successful, select Continue
.png)
- Enter your Endpoint Cloud Site Name, Administrator Email, and Password, then click Connect to VIPRE Cloud to verify connectivity
For Site Manager, provide the site manager name. You will then be presented the option to specify which managed site to work with.
.png)
- Once the connection is Successful, click Continue
- You are now presented with the option to select what to transfer. Click Policies to migrate policy and exclusion definitions or click Agents to select the agents to migrate.
.png)
- Depending on whether you selected Policies or Agents, you will be presented a corresponding list of policies or agents to select for migration
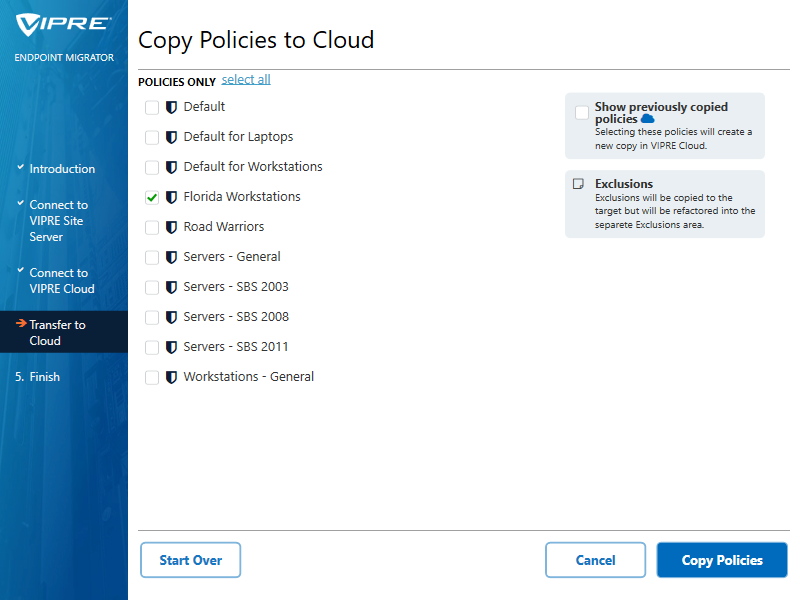
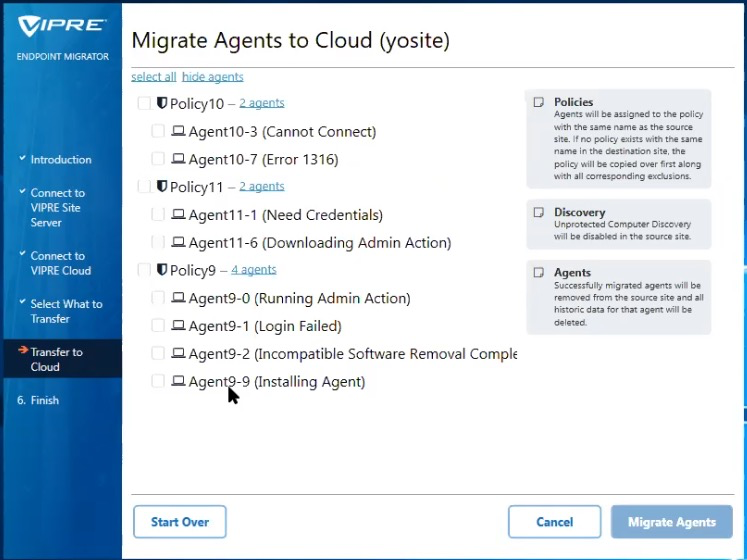
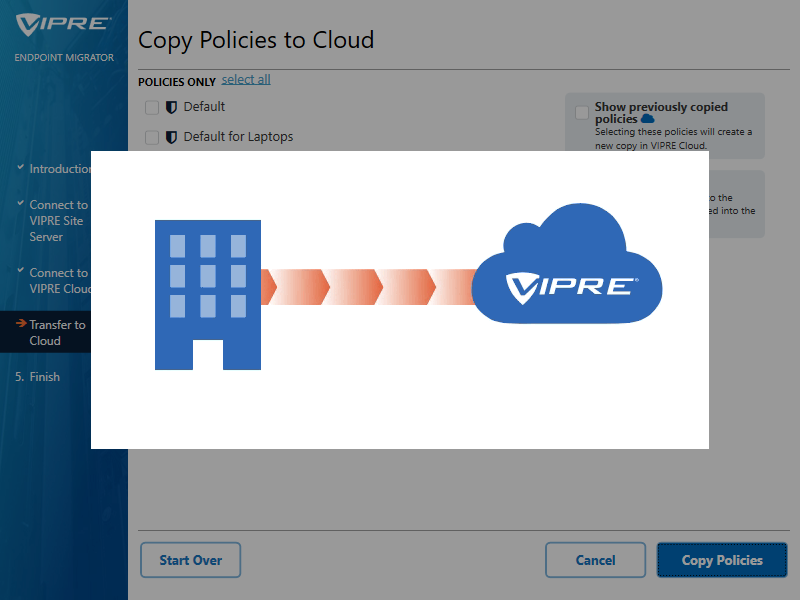
- VIPRE Endpoint Migrator copies your desired policies and the exclusions they contain to your Endpoint Cloud instance. If you selected agents, the agents are moved to Endpoint Cloud.
- Transfer Successful! Click Done

Review
VIPRE Endpoint Migrator has now copied the desired VIPRE Server Policy (along with the exclusions contained) to your VIPRE Cloud instance. If you selected agents, they have been moved as well. You can verify this by logging in to your Endpoint Cloud site and reviewing your policies and exclusions. The agents will display under the devices view.
To review your migrated policies
- Log in to Endpoint Cloud
- Select Policies. A list of policies displays
- Next to each policy name, select View. The full details of the policy display

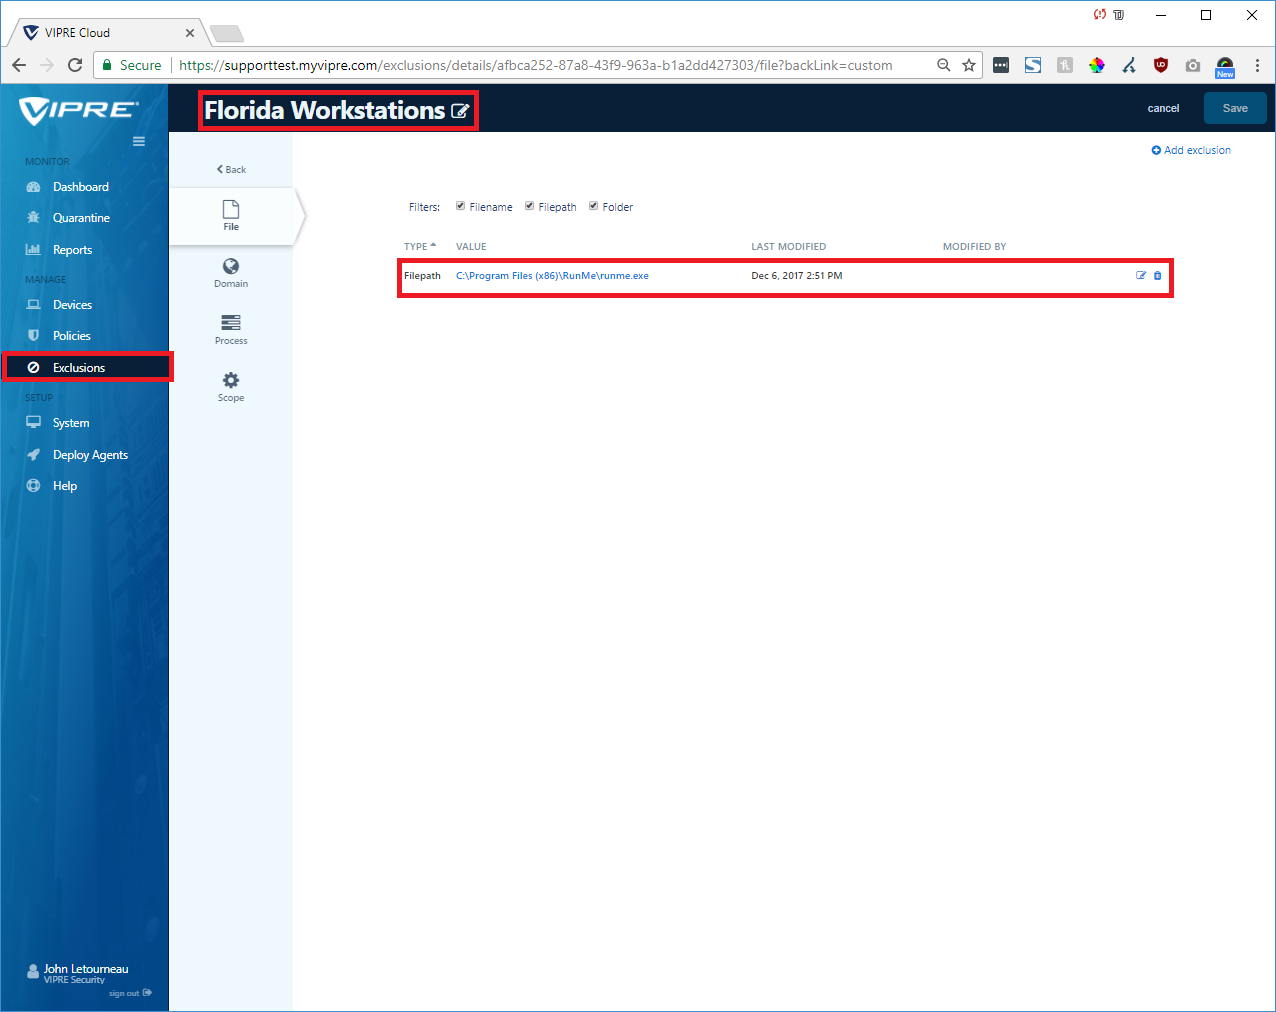
To review your migrated exclusions
- Log in to Endpoint Cloud
- Select Exclusions, and then Custom. A list of your custom exclusions displays.
- Select any custom exclusion name to display the full details of the exclusion
To review your migrated agents
- Log in to Endpoint Cloud
- Select Devices. A list of the migrated agents displays.
- Select any device name to display the full details
As we can see, our desired source policy and exclusion have been migrated to the Endpoint Cloud instance. If you have not migrated the agents yet, you can now do so.
Verify your Migration
Post-Migration, these are all the steps you can take to verify that your endpoints, settings, policies, and exclusions have all properly been migrated to VIPRE Cloud.
At this point in the migration process, you have
- Set up VIPRE Cloud
- Migrated your policies, exclusions, and other settings
- Deployed VIPRE Cloud agents to your endpoint devices
The migration process likely went smoothly, but it's always a good idea to double-check your settings and confirm – especially if you have a large or more complex deployment.
The items in this article will help you review common checklist items and verify the migration is complete.
Goal
This article can serve as a "verify checklist", or a jumping-off point for minimum post-migration steps that you should follow. Ideally, you'll have already generated your own checklist during the preparation phase of your migration; in lieu of that, below are our recommended items.
There may be more steps here than necessary. Ultimately, the decision to review or follow up on these items is up to you.
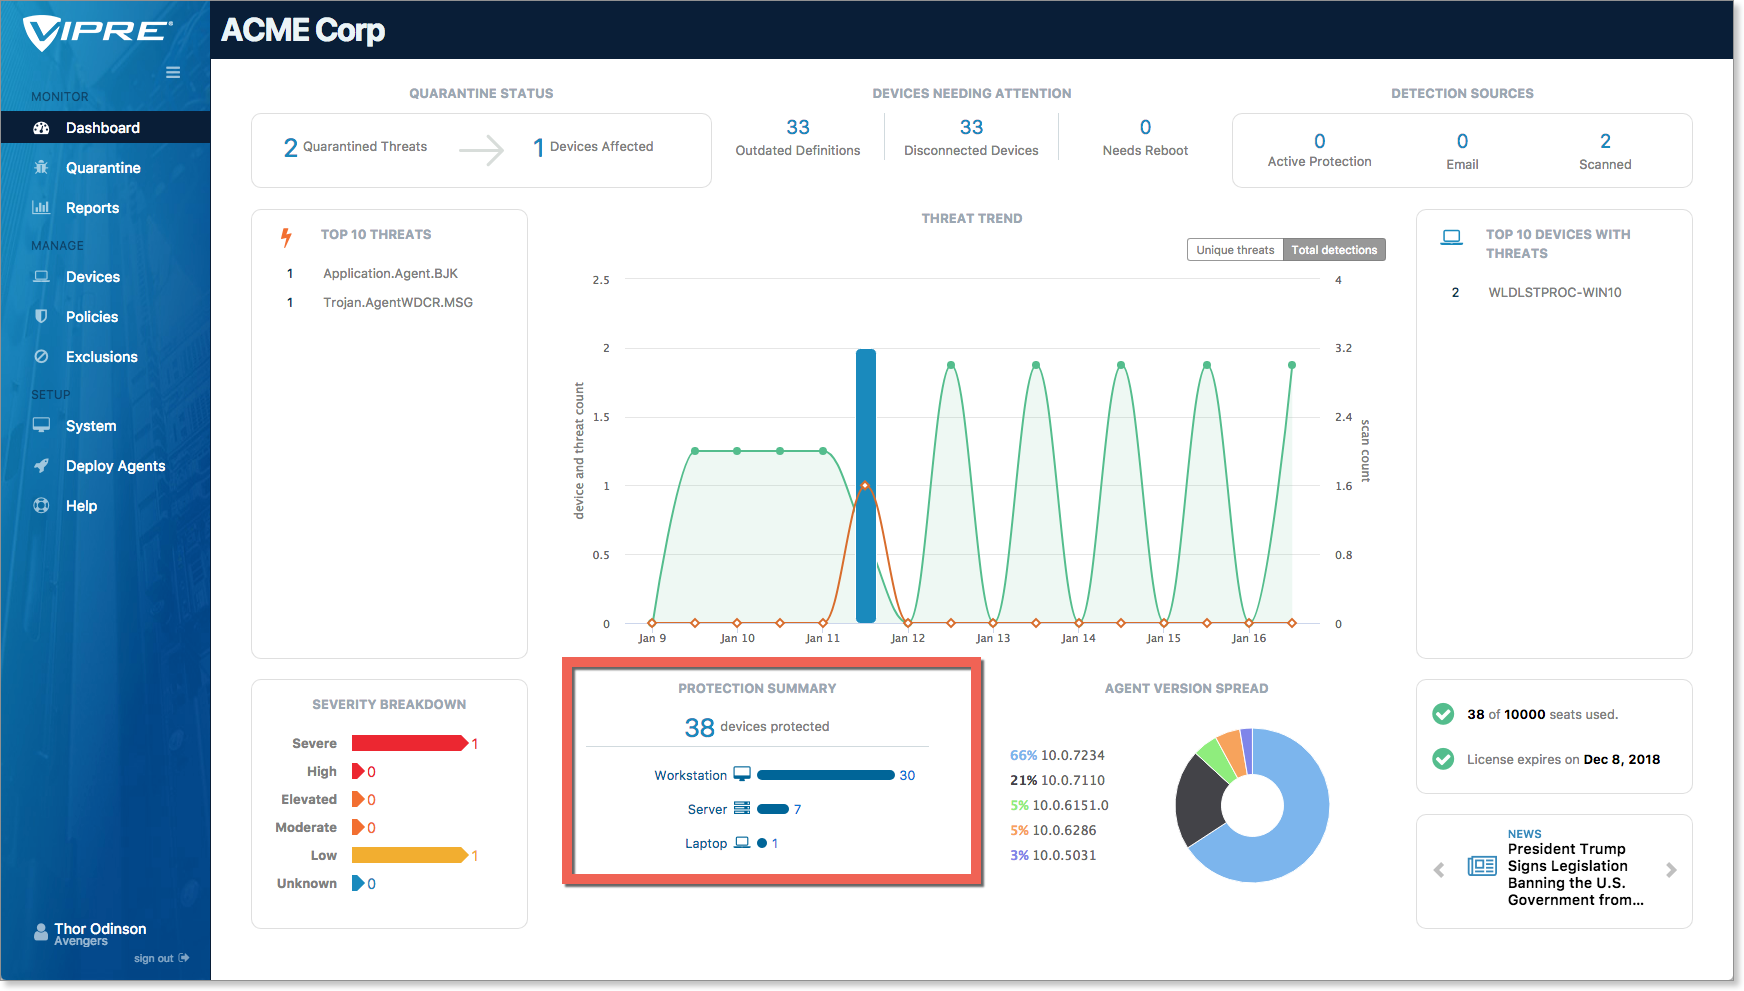
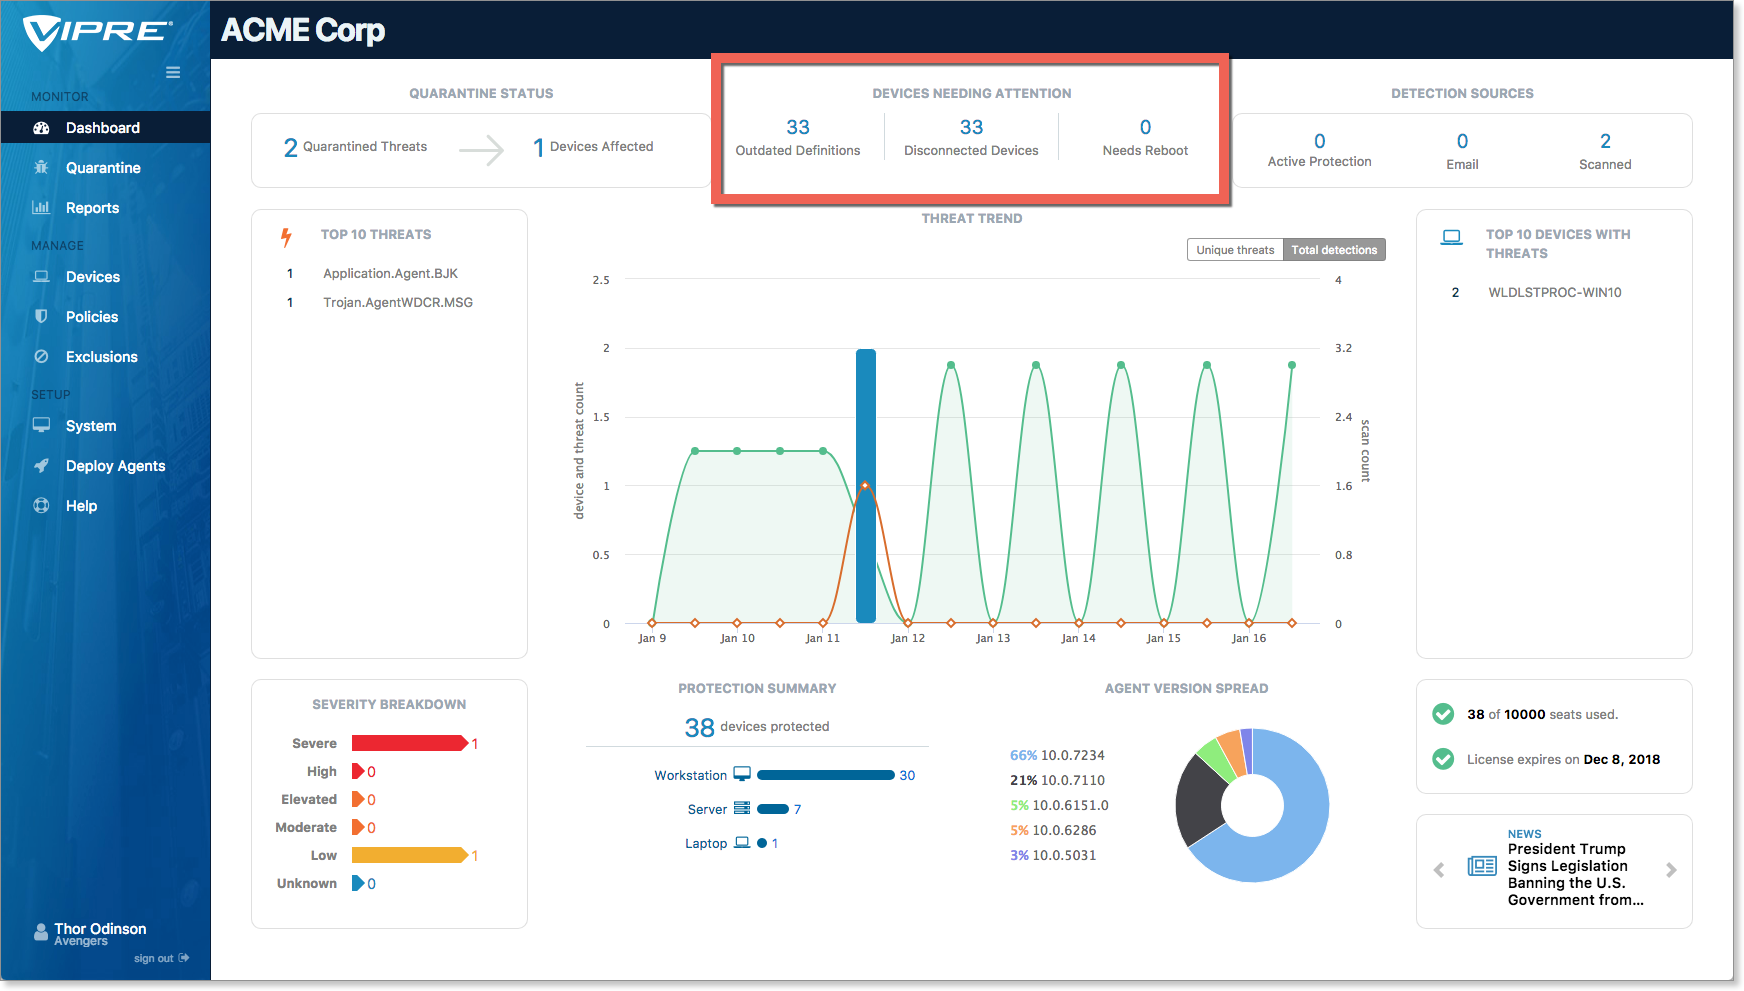
Verify all Endpoint Devices are Active
From the dashboard, check your Protection Summary
This confirms that all endpoints are now running Endpoint Cloud agent software, and are communicating with Endpoint Cloud.
- Ensure all of your machines (known in Endpoint Cloud as devices) from your pre-migration list are showing as protected.
- Select the devices number to display all the devices in detail. The devices number should match the number of machines that you have migrated.
From the dashboard, check Devices Needing Attention
- Select the devices number to review details for any devices that are highlighted here.
Additional information
- Refer to Related Articles for more information on viewing device details and what to look for.
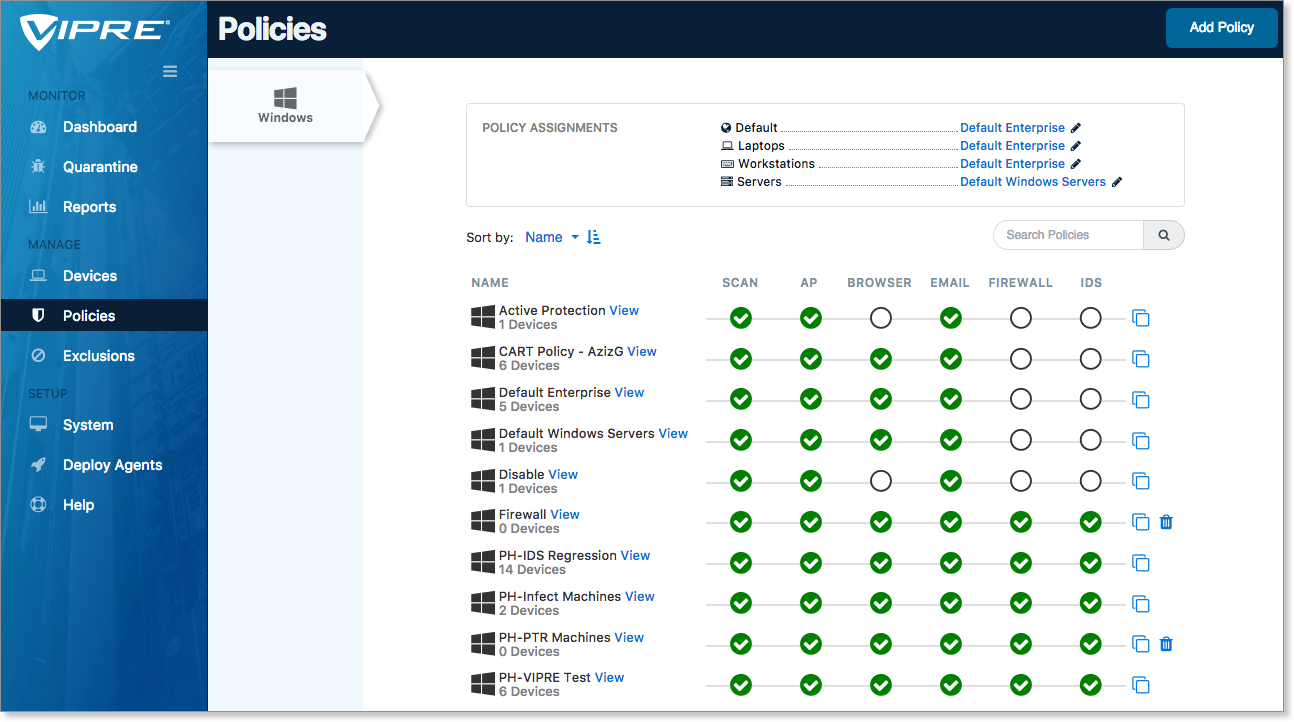
Verify your policies and exclusions
Check the details of each policy and associated exclusions
- Check to ensure the settings match up against your pre-migration settings
- You don't need to review every policy, but might want to check a few of your key policies to confirm the correct devices are listed
To view your policies, select Policies > Policy Name > View
Confirm your default policy assignments
- Check to ensure that the correct policies are set as the default for your defined device types: Policies > Policy Assignments.
- In the Policy Assignments section, select the pencil next to a Policy Name to choose a different default policy for the device type listed. New devices will use the Default policy if they are not detected as one of the other device types.
.png)
Additional information
Refer to Related Articles learn more about policies and choosing policy defaults.
Check each of your custom exclusions
Exclusions are no longer tied to policies; you can view exclusions from within a policy, or look at the exclusions on their own.
- To view exclusions assigned to a policy, select Policies > Policy Name > Associated Exclusions
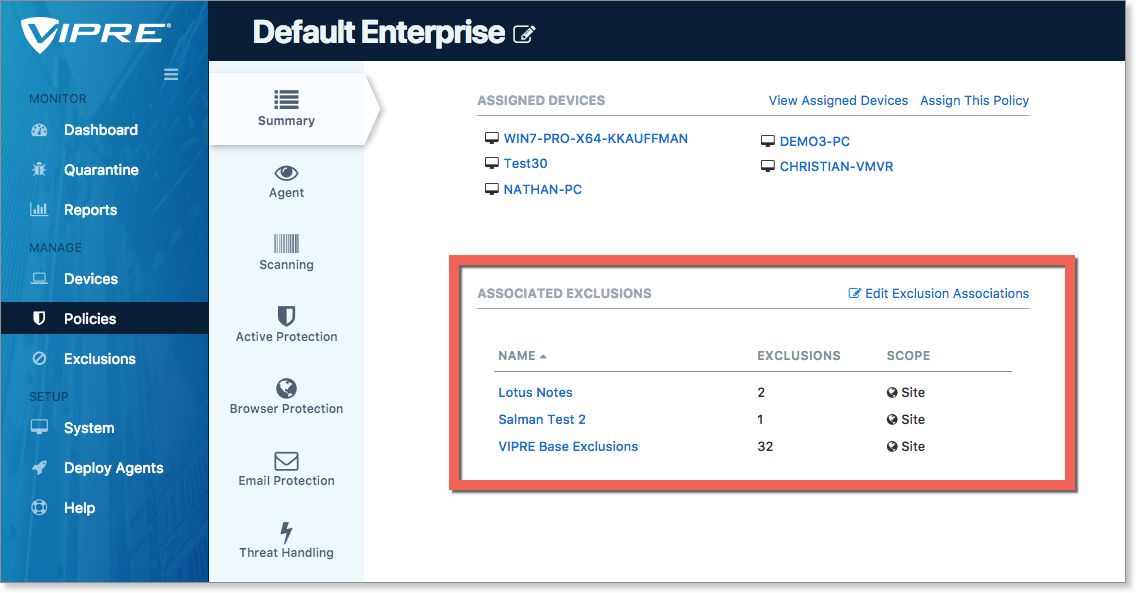
- To view exclusion settings by themselves, select Exclusions > Custom > Exclusion name
Refer to Related Articles to learn more about exclusions.
Check your System Settings
If you have not already done so, review your System settings
- Notifications - Set email alerts for specific detections, or schedule health and threat digests
- Users - Add/Remove/Edit your VIPRE Cloud users
- Settings - Set your timezone, length of time before devices are considered disconnected or outdated, or how agent updates are handled
- Site Name - Change the name of your VIPRE Cloud site
Additional information
- More information on Notifications is in Add an immediate notification for threat found
- More information on Users is in Add and edit users
- The System Settings options are in Overview of system settings
- The agent update process can be adjusted on a few levels. Review Manage agent software updates for more information
- Changing your site name is detailed in Change your site name
Create additional Endpoint Cloud logins
If you have not already, now is a good time to create user accounts for others on your team.
- To create additional user accounts - see Add and edit users.
Test agent functionality with device actions
Now that you have your devices connected to Endpoint Cloud, you may wish to test VIPRE functionality. A quick way to perform multiple actions on your deployed devices is through the Devices screen.
- Navigate to VIPRE Cloud > Devices
- Select some or all of your devices
- In the top-right, choose an action from the Actions menu
- Monitor for completion via the Devices screen or the Dashboard
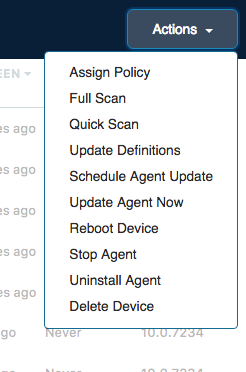
The action menu is one of Endpoint Cloud's more powerful features; you can send commands to many or all devices in just a few clicks.
Verify your custom software
Review the software running on your devices that you identified in the Take inventory of software step. Test as needed.
What Next?
If you're new to Endpoint Cloud, we recommend browsing the Basics guides to become more familiar with the product.
Create a Custom Installer
Once you have set up your policies and exclusions in Endpoint Cloud, the next step is to create a custom installer to use in deploying your agents.
How to Create a Custom Policy-based Installer
By creating a custom installer, any endpoint devices which use this installer will belong to the selected policy when they connect.
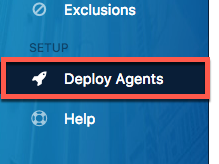
- Log in to VIPRE Cloud
- Select Deploy Agents
- For the specific agent OS that you're deploying to, select Create Policy Installer
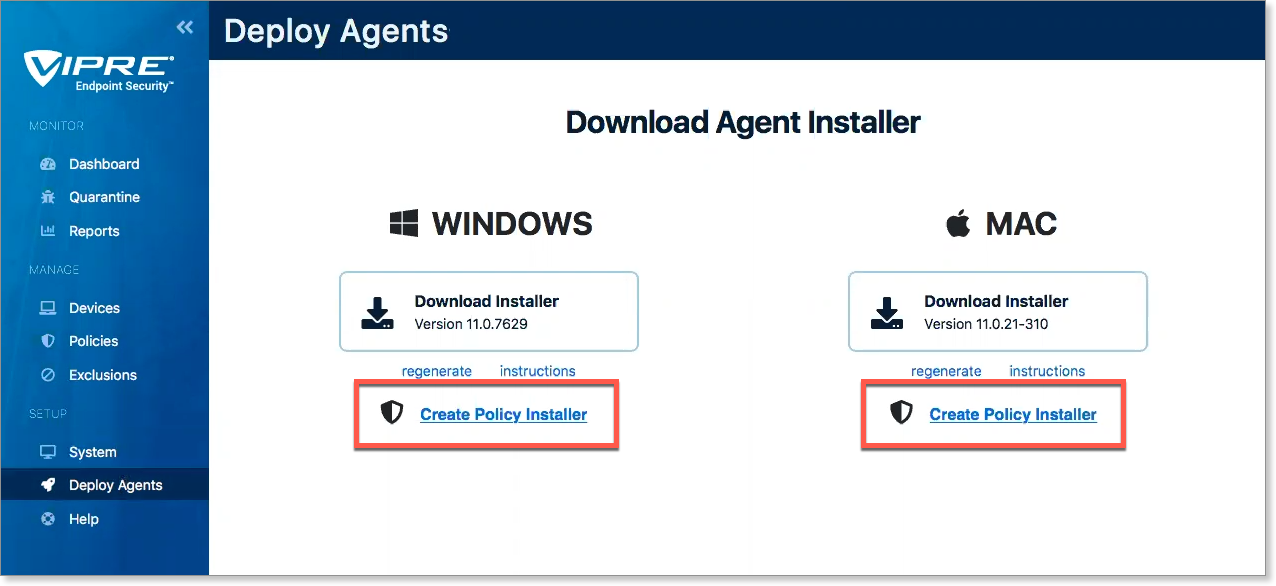
- Select the policy you want your devices to belong to. In this example, we use the custom Windows Florida Workstations policy
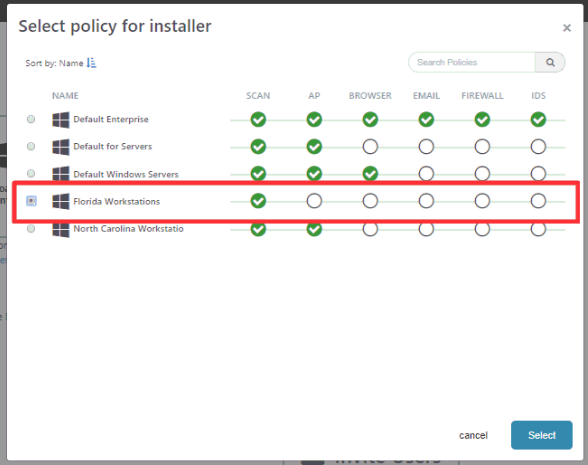
- The Endpoint Cloud Agent installer application for this policy is generated
- On the Policy Specific Agent Installer screen, select Download Agent Installer. Note the Policy name underneath, reminding you which policy this installer is for
- You'll also see the policy in the filename
It's that easy! You now have an agent installer to use locally or push to other devices and run
Additional Mac Installation details
For additional information on the Mac agent install process, refer to Related Articles for the VIPRE Home Mac startup guide.
Deploy the Custom Agent Installer
After creating a custom installer, you then deploy VIPRE Cloud agents to your endpoint devices, overwriting your existing VIPRE Server agents.
Now that we have created a custom agent installer, we're ready to deploy the installer to our endpoint devices.
Step 1: Distribute the custom installer to your endpoints
To continue with deployment, distribute this policy-based installer to your endpoints however you'd like. Some suggestions:
- Use a USB drive to copy the installer to each computer
- Leverage GPO technologies to mass-deploy the installer to multiple endpoints
- ... or any other method you prefer
Nobody knows your environment better than you, so how you choose to distribute the installer is up to you.
Step 2: Execute the agent installer on the endpoint
Once the installer is on the endpoint device, you'll need to run it to kick off the install and have it connect to VIPRE Cloud.
- From the remote device, locate the recently transferred MSI file
- Run the downloaded MSI file to start the VIPRE Cloud agent install on the endpoint device
- When the installation is complete, the agent will automatically register with VIPRE Cloud as part of the previously selected policy
Verify your Migration
Post-Migration, these are all the steps you can take to verify that your endpoints, settings, policies, and exclusions have all properly been migrated to VIPRE Cloud.
At this point in the migration process, you have
- Set up VIPRE Cloud
- Migrated your policies, exclusions, and other settings
- Deployed VIPRE Cloud agents to your endpoint devices
The migration process likely went smoothly, but it's always a good idea to double-check your settings and confirm – especially if you have a large or more complex deployment.
The items in this article will help you review common checklist items and verify the migration is complete.
Goal
This article can serve as a "verify checklist", or a jumping-off point for minimum post-migration steps that you should follow. Ideally, you'll have already generated your own checklist during the preparation phase of your migration; in lieu of that, below are our recommended items.
There may be more steps here than necessary. Ultimately, the decision to review or follow up on these items is up to you.
Verify all Endpoint Devices are Active
From the dashboard, check your Protection Summary
This confirms that all endpoints are now running Endpoint Cloud agent software, and are communicating with Endpoint Cloud.
- Ensure all of your machines (known in Endpoint Cloud as devices) from your pre-migration list are showing as protected.
- Select the devices number to display all the devices in detail. The devices number should match the number of machines that you have migrated.
From the dashboard, check Devices Needing Attention
- Select the devices number to review details for any devices that are highlighted here.
Additional information
- Refer to Related Articles for more information on viewing device details and what to look for.
Verify your policies and exclusions
Check the details of each policy and associated exclusions
- Check to ensure the settings match up against your pre-migration settings
- You don't need to review every policy, but might want to check a few of your key policies to confirm the correct devices are listed
To view your policies, select Policies > Policy Name > View
Confirm your default policy assignments
- Check to ensure that the correct policies are set as the default for your defined device types: Policies > Policy Assignments.
- In the Policy Assignments section, select the pencil next to a Policy Name to choose a different default policy for the device type listed. New devices will use the Default policy if they are not detected as one of the other device types.
Additional information
Refer to Related Articles learn more about policies and choosing policy defaults.
Check each of your custom exclusions
Exclusions are no longer tied to policies; you can view exclusions from within a policy, or look at the exclusions on their own.
- To view exclusions assigned to a policy, select Policies > Policy Name > Associated Exclusions
- To view exclusion settings by themselves, select Exclusions > Custom > Exclusion name
Refer to Related Articles to learn more about exclusions.
Check your System Settings
If you have not already done so, review your System settings
- Notifications - Set email alerts for specific detections, or schedule health and threat digests
- Users - Add/Remove/Edit your VIPRE Cloud users
- Settings - Set your timezone, length of time before devices are considered disconnected or outdated, or how agent updates are handled
- Site Name - Change the name of your VIPRE Cloud site
Additional information
- More information on Notifications is in Add an immediate notification for threat found
- More information on Users is in Add and edit users
- The System Settings options are in Overview of system settings
- The agent update process can be adjusted on a few levels. Review Manage agent software updates for more information
- Changing your site name is detailed in Change your site name
Create additional Endpoint Cloud logins
If you have not already, now is a good time to create user accounts for others on your team.
- To create additional user accounts - see Add and edit users.
Test agent functionality with device actions
Now that you have your devices connected to Endpoint Cloud, you may wish to test VIPRE functionality. A quick way to perform multiple actions on your deployed devices is through the Devices screen.
- Navigate to VIPRE Cloud > Devices
- Select some or all of your devices
- In the top-right, choose an action from the Actions menu
- Monitor for completion via the Devices screen or the Dashboard
The action menu is one of Endpoint Cloud's more powerful features; you can send commands to many or all devices in just a few clicks.
Verify your custom software
Review the software running on your devices that you identified in the Take inventory of software step. Test as needed.
What Next?
If you're new to Endpoint Cloud, we recommend browsing the Basics guides to become more familiar with the product.