
Guided Setup of VIPRE Edge Defense. Included in this solution is VIPRE Email Security Cloud Advanced Threat Protection with Encryption add-on, SafeSend with Data Loss Prevention add-on, and Security Awareness Training for Edge.
Select a topic below for step-by-step instructions:
Email Security Cloud
The setup of VIPRE Email Security Cloud requires fundamental changes that need to be completed in a specific order. We’ve outlined these changes in the guided path below.
Set Password and Login
Important
You should have received an email that includes a variation of your email address, provided by VIPRE. Please have this email available when going through the steps below.
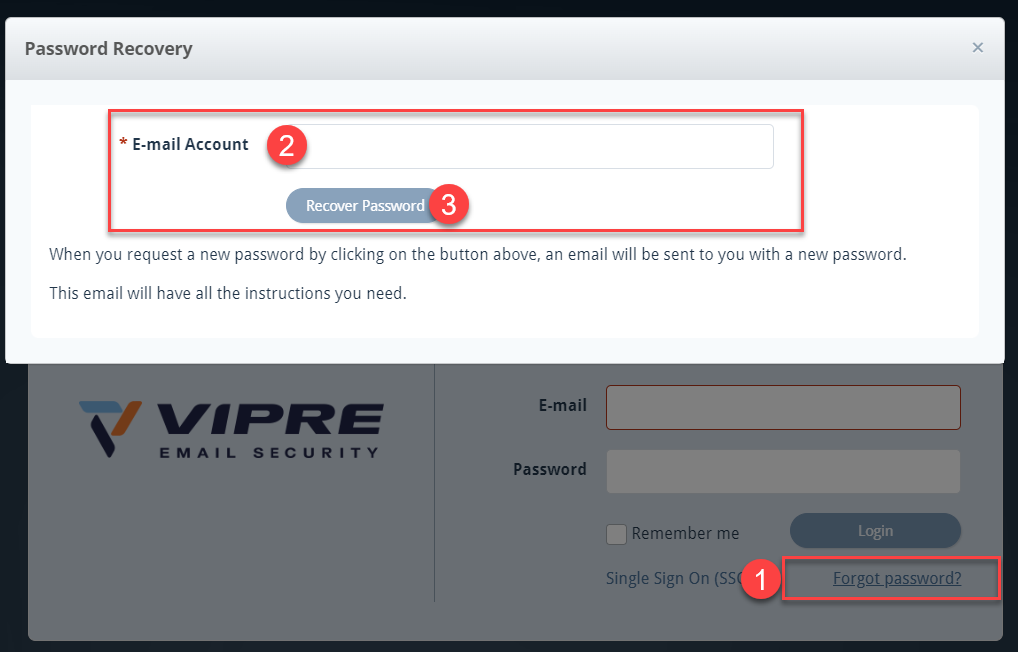
- Navigate to https://email.myvipre.com
- Click Forgot password? on the bottom-right
- Enter the above-mentioned email address provided by VIPRE and click Recover Password
- Check your email for an email from VIPRE
When ready, click the next step below
Add and Verify Domains
Add and Verify Domains
To further the amount of protection we provide, domain ownership is verified via ...
To further the amount of protection we provide, domain ownership is verified via DNS lookup tools. VIPRE will provide a verification code that the domain owner or administrator will need to add to the TXT section. Email Cloud will then verify the DNS records to ensure the code we provided is in the TXT section.
- Select Domains on the left-side menu
- Click the plus sign on the top-right
- Fill in the appropriate required fields and click Save & Continue
- Ensure DNS TXT Record is selected and add the provided TXT values to your DNS records
- Select one of the following:
- Verify Later - this option is best if the required changes cannot be made right away
-
Verify Now - use this option if you have already made the required changes
- Please note, in some circumstances, it may take up to 72 hours for changes to your DNS record to propagate across the Internet

- Please note, in some circumstances, it may take up to 72 hours for changes to your DNS record to propagate across the Internet
To verify domains at a later time:
- From the Domain Listing screen, select the appropriate domain under the Domains Pending Verification section at the top
- Click Verify Now; the Edit Domain window will appear showing the DNS TXT Record verification method
- When ready, click Verify Now

When ready, click the next step below.
Add Users
Within VIPRE Email Security – Cloud Edition, a user is defined as a single actual email address. Aliases and distribution lists do not count against the allowed number of users. This article explains the different ways you can create or import users into the system.
Using any of the methods below enables you to add users to VIPRE.
Log in as an administrator
- Login to https://email.myvipre.com/ using your Administrator credentials
Navigate to the desired customer
If you are logging in as the administrator, you will be presented with your customer list.
- From the displayed Customer List, select the Customer which you are adding users to
Choose one of the following methods for adding users below:
Directory Services
VIPRE Recommends
Adding users via directory services like LDAP or Entra ID, is recommended due to its ease of use.
LDAP
This article explains the benefits of using LDAP sync for user management and how to enable in Email Security.
What is LDAP sync?
For ease of user management with Email Security, use Lightweight Directory Access Protocol (LDAP) Sync. User information that updates in LDAP will automatically replicate to VIPRE Email Security. This lets you continue to use the LDAP system as a single point of user management.
When LDAP Sync is enabled, Email Security considers LDAP the system of truth. Thus, new users in LDAP are automatically added to Email Security. Disabled or deleted users are automatically deleted from Email Security once the deletion delay interval expires. Email aliases are automatically mapped from LDAP secondary email address data.
The sync process can be scheduled to run every 6, 12, or 24 hours, every three days, or weekly. If immediate sync is needed, such as in the case of offboarding an employee, the Email Security administrator can use the Sync Now action to immediately sync the LDAP changes over to Email Security. Network traffic for the sync process is minimized by Email Security, which places a directory service sync agent local to the LDAP directory service. The data that is transmitted back to Email Security is a subset of the LDAP data.
Summary of benefits
Use LDAP sync to enjoy these benefits
- Quickly add users to a new (or existing) Email Security account
- Keep users' account details updated (e.g., name, phone, notes)
- Easily add email aliases to users' accounts
- Ensure disabled, or deleted users cannot access Email Security
Supported directory services
The Email Security LDAP sync feature has been certified with Microsoft Active Directory Services. Since LDAP is a standard protocol, the feature should work with any standard directory that supports LDAP. However, not all directory implementations use the same attributes to store the same types of information; in some cases, this may cause mismatches in data interpretation. If you are attempting to connect Email Security to some other directory, let us know of any issues so that we can account for different schema mappings.
LDAP sync and manual account management
If desired, user management through LDAP sync can be used in conjunction with manual account management. When used in this manner, the LDAP sync process uses a supplemental approach to reconcile user accounts. For example, an email address that has been manually added to Email Security will have its name, phone number, and notes updated from the directory service data. This also means when the user is disabled or deleted in LDAP, that action will not be recognized in Email Security.
LDAP sync processing considerations
Review the information in this section for an understanding of how LDAP sync works with user management in Email Security.
Synchronization rules
The synchronization process uses these rules when scanning LDAP for updates to make in Email Security. If the rules are not met, then the user is not added to the Email Security account.
- System of truth - when LDAP sync is enabled, it is the system of truth for user management within Email Security
- Primary email address - the domain of the primary email address must match a domain that is managed by the Email Security account
-
Secondary email address (aliases)- the domains of secondary email addresses must match a domain that is managed by Email Security AND the primary email address domain is managed by the same Email Security account.
- list of users - when viewing the list of users, you will see secondary email addresses grouped under the users' account for the primary address
-
Domain changes in Email Security- if a domain is removed from management under Email Security, this results in:
- when the removed domain matches a Primary email domain - the user is immediately removed from Email Security and will not appear under LDAP -> Conflicts
- when the removed domain matches a Secondary email domain - the secondary email address is removed from the primary user, as long as Email Security still manages the primary domain
- LDAP attributes - these attributes sync to Email Security: mail, proxyAddresses, member, givenName, sn (Surname), homePhone, mobile, company, department, and notes
Enabling / Disabling of LDAP sync
Take note of the following points when enabling or disabling LDAP sync. The information in this section assumes the synchronization rules (above) are met.
- Single LDAP source - at this time, LDAP sync supports connecting to just one LDAP source
- Enable for new Email Security account - set up LDAP sync connection and use the Sync Now action to quickly add users
-
Enable for existing Email Security account - upon for the first sync event; Email Security will
- Add users - LDAP users that are not found in Email Security will be added
- Update users - user metadata from LDAP will be added to existing users. Qualifying secondary email addresses will be added.
- Delete users -Unless managed manually or by SMTP, Email Security users that are not found in LDAP are flagged for deletion and will be listed under LDAP -> Conflicts
-
Disable LDAP sync - users will stay in Email Security, and you must now manage manually
- User conflicts - no further action will occur for users identified as conflicts at the time of disabling LDAP sync. However, users flagged for deletion will be automatically deleted when the delay interval expires.
Synchronization frequency
The Email Security Administrator controls the frequency at which the LDAP process runs.
- Frequency - Email Security polls LDAP for changes as frequently as every 6, 12, or 24 hours; every three days, or weekly
- Adjusting frequency - polling interval is adjusted through the Poll LDAP Every setting that is located on the Connect tab under Service Settings -> LDAP
- On-demand synchronization - use the Sync Now action to force immediate sync from LDAP to Email Security. This is especially useful when there is an urgent need to add or remove a user.
User Deletion
- Users deleted from LDAP - upon the next sync polling event, newly deleted users will be flagged for deletion in Email Security
- Users disabled in LDAP - are flagged for deletion in Email Security
- Deletion delay interval - LDAP connection setting Delete Users After controls the delay interval, which can be set to 7, 14, or 30 days; or never
-
Physical deletion- users deleted from LDAP are delayed by a minimum of 7 days before Email Security automatically deletes them
- Accidental deletion - the delay interval protects against unintentional removal, or temporary disablement, of accounts that sync over from LDAP
-
When a user is flagged for deletion
- User access disabled - during the delayed deletion interval, users registered for deletion can no longer access Email Security
- User-level rules - user-specific Email Security rules, such as Allow & Deny, are retained during the delete delay interval. Once the user is automatically deleted when the interval expires, the related user rules are deleted.
- User's Archived emails - for a user that is automatically deleted after the delete interval and later activated in LDAP, they will be automatically synced to Email Security. At that time, the user's email archive will be restored.
- Immediate deletion - during the delete delay interval, a user can be manually deleted from Email Security through the User Conflicts tab within the LDAP section of Service Settings
- Ignore deletion - users deleted from LDAP can be retained in Email Security by using the Ignore action (User Conflicts tab) during the deletion delay interval
- Manual deletion - A user that is manually deleted in Email Security will be added back upon the next sync event with LDAP. The user must be deleted from LDAP for them to be permanently deleted in Email Security.
How to enable LDAP sync for user management
LDAP discovery allows VIPRE to scan your network directory for users and automatically add them to the user list.
Step 1. Prerequisite - Firewall permissions for LDAP
To use LDAP sync, you will need to ensure your firewall permits access from the Email Security data centers to your LDAP server.
- Open one of these LDAP ports, based on your use of SSL (recommended) or non-SSL
- SSL: 636
- Non-SSL: 389
- Permit these server IP addresses
Email Security Data Center Network Ranges
192.162.216.0/22 (192.162.216.0-192.162.219.255)
208.70.128.0/21 (208.70.128.0-208.70.135.255)
72.35.12.0/24 (72.35.12.0 - 72.35.12.255)
72.35.23.0/24 (72.35.23.0 - 72.35.23.255)
Step 2. Set up the LDAP connection
- Login to https://email.myvipre.com/ using your Administrator credentials
If you have multiple accounts to administer, you will be presented with your list of accounts.
- From the Administrator Dashboard, expand the Customers menu, then select Customer List
- From the displayed Customer List, select the Customer to which you are adding users
- From the customer dashboard, expand the Service Settings menu. Then, select LDAP
- On the Connect tab of the LDAP Configuration screen, click the Enable LDAP box
- In the Host field, enter the IP address of the LDAP server
- Ensure the SSL option is selected (highly recommended). Deselect if your environment does not support SSL.
- In the Username and Password fields, enter the user account credentials to be used for the sync process
- Enter the Base DN (Domain Name) information using standard LDAP notation, e.g.; ou=myOU,dc=example,dc=com
- In the Poll LDAP Every drop-down, select the frequency at which you would like the sync process to run
- In the Delete Users After drop-down, select the number of days for the deletion delay interval
- Click Show advanced options to specify the LDAP port (if not using the default 389/636)
- Click Test to verify the connection settings
- Click Save to store the configuration changes
If the connection test has failed, double-check the setting provided, revise as necessary and test again
Step 3. Add users
- To immediately discover and add users, select Sync Now. Otherwise, users will sync at the next polling cycle.
The initial sync may take up to an hour, depending on the number of users to be created.
Important Information
Sync: Disabled/deactivated users and public folders are not synced by default in LDAP. Enable the checkboxes to sync disabled/deactivated users and/or public folders.
Custom Filter: Filters are applied to user and group syncs; LDAP search filters are supported
How to disable LDAP Sync
Email Security retains all users when LDAP Sync is disabled. If any users are flagged for deletion, they will still be deleted at the expiration of the deletion delay interval.
Disable LDAP sync
- Login to https://email.myvipre.com/ using your Administrator credentials
If you have multiple accounts to administer, you will be presented with your list of accounts.
- From the Administrator Dashboard, expand the Customers menu, then select Customer List
- From the displayed Customer List, select the Customer to which you are adding users
- From the customer dashboard, expand the Service Settings menu. Then, select LDAP
- On the Connect tab of the LDAP Configuration screen, uncheck the Enable LDAP box
- Click Save to store the configuration changes
LDAP sync is now disabled.
Managing LDAP in Email Cloud
Exceptions
The Exceptions tab is where you can select any name from the User List that you want to exclude from the LDAP sync with VIPRE Email Cloud. This means any exceptions will also be excluded from any custom filters you set up on the Connect tab.
 VIPRE Email Security Cloud - LDAP Sync Exceptions
To exclude a user, group, or alias from the LDAP sync:
- In the User List column, which shows a complete view of your directory server, locate the row with the name of the user, group, or alias you want to exclude
- Click the blue arrow in the same row as the name to add that name to the Exception List
- Click Save
Additions
The Additions tab allows you to manually add users to include in the LDAP sync. For example, this would be useful for adding any new employees that may need to be added in between syncs.
 VIPRE Email Security Cloud - LDAP Sync Additions
To include an additional user to your LDAP sync:
- Type the email address of the user you want to include
- Click Add
Users added to your LDAP sync via this method will be listed on this tab. They will also show up in the list under Users in the left-side menu with the source as LDAP.
User Conflicts
The User Conflicts tab will show users that previously synced in the portal but are no longer in the directory server.
 VIPRE Email Security Cloud - LDAP Sync User Conflicts
Example Use-Case
You notice there are two users showing in User Conflicts. Let's say that when you were first setting up LDAP sync, under the Connect tab, you set Delete Users After to 7 days. You're fine with one of the users being deleted because the employee no longer works for your company. The other user, however, is on maternity leave and will be coming back in 12 weeks.
- Click the checkbox next to the user and select your desired action.
In the example above, you could use Ignore so that the user will not be deleted after 7 days.
Troubleshooting
Firewall settings - Verify the Email Security IP addresses have been allowed through the network and domain controller firewall. Verify that your Directory Service is reachable through your firewall.
Account credentials - Confirm the correct user account credentials for Username and Password have been provided and are accurate.
Connection successful but users not populating
When the sync process runs, users will begin to appear in the Users view of the Admin portal. Follow the suggestions below if you do not see the users populating in this view as the sync process runs. After allowing up to 30 minutes for the initial sync process to complete, if many users are missing, then please reach out to our Support team for assistance.
Sync Now - Click the Sync Now button on the Connect tab of the LDAP Configuration screen. You should receive a notification message indicating the sync process has been started.
Managed domain - Verify domain is a managed domain for this Email Security account. From the Email Admin portal, navigate to Domains. The domain(s) shown here must match the domain of the LDAP users' primary email addresses.
Entra ID
Microsoft Entra ID (Active Directory) is a cloud-based identity and access management service that we've integrated with VIPRE Email Security Cloud allowing Email Cloud to sync user and group accounts that belong to your managed domain.
Important
Only one directory service can be active and enabled at a time. For example, you can use either Azure or LDAP but not both. Enabling one directory service will disable the other. You will be prompted before saving the new configuration.
When switching from one directory service to the other, previously synced users no longer in the current directory service sync will be considered user conflicts. These users can be found in the User Conflict Tab and are marked for deletion as directed in the Delete User After setting.
There are two main parts to set up the Entra ID integration with Email Security Cloud.
Part 1 - Configure Entra ID Integration
Follow the steps below to configure Entra ID to integrate with VIPRE Email Security Cloud. These steps all take place in Entra ID and assume you already have a Microsoft Azure account.
Step 1 - New App Registration
- Navigate to portal.azure.com and log in with your Microsoft Azure account credentials
- On the left-side menu, under Manage, select App registrations
- Click New Registration and name your registration
- Any name will work but it's recommended to use a name that identifies what app you're registering (e.g., in this case, VIPRE Email Cloud)
- Click Single tenant
- Skip the redirect URI and click Register
Step 2 - API Permissions
- On the left-side menu, under Manage, select API Permissions
- Select Add a permission
- Select Microsoft Graph
- This is the API that the Email Cloud portal uses to communicate with Azure
- Select Application Permissions
- Select the following Application Permissions
- Directory > Directory.Read.All
- Group > Group.Read.All
- GroupMember > GroupMember.Read.All
- User > User.Read.All
- Click Add Permissions
- Look for the row that shows User.Read, click the ellipses (...) on the right, and select Remove Permission
- Click Grant admin consent for <your.tenant.name.here>

Step 3 - Certificates & Secrets
- In the breadcrumb trail, select the API name
 Example showing where to locate the tenant and API names. Your tenant name, and API name, won't match this image.
- On the left-side menu, select Certificates & secrets
- Under Client secrets, click New client secret and fill in the following information:
- Description - This can be whatever you want
- Expires - No matter which timeframe you choose, it's important to set a reminder for yourself to both create a new client secret, and save the new client secret into the Azure Connect tab (step 5 below), before expiry. Failure to do so could break the sync between Email Cloud and Entra ID.
- Click Add
Step 4 - Gather Necessary Info for VIPRE Email Cloud
- Open a new text file on your computer and copy/paste the following information from the Microsoft Entra ID portal into the blank text file:
- Under Client secrets, copy the Value and paste it into your blank text file

- In the breadcrumb trail, select the API, copy the Application (client) ID and paste it into your text file
- From the same page, copy the Directory (tenant) ID and paste it into your text file

- Under Client secrets, copy the Value and paste it into your blank text file
Part 2 - Enable and Sync Entra ID
In part two, we'll take what we did in the Entra ID portal and configure it to sync with VIPRE Email Security Cloud.
Step 5 - Connect
- In a separate browser tab, navigate to your Email Cloud admin portal and log in
- On the left-side menu, click Service Settings, then select Directory Services
- On the main page, select Entra ID

- Place checkmark next to Enable Azure Sync
- Copy the Directory (tenant) ID) from your text file and paste it into the Tenant Domain field
- Copy the Application (client) ID from your text file and paste it into the Client ID field
- Copy the Client secret from your text file and paste it into the Client Secret field
- Select a Sync Frequency from the dropdown menu
- The default sync frequency is 6 hours
- Select an amount of time to Delete Users After from the dropdown menu; see the User Conflicts section below for more details
- The default is 7 days
- Click the checkbox if you want to include disabled/deactivated user accounts in your sync
- This is unchecked by default
- If you want to include Custom Filters, enter those in the text field here
- Custom Filters are only applied to syncs of users. Groups are not included.
- For full details, including supported custom filters and examples of queries, visit Custom Filters for use with Entra ID Sync to open a new browser tab
- Click Save in the bottom right
- Click Test in the bottom left to verify the connection
- If successful, a green message will appear in the top-right "Azure Connection test was passed"
- If unsuccessful, a red message will appear in the top-right "Azure Connection test failed"
- Verify the Tenant Domain, Client ID, and Client Secret were copied correctly from the Azure portal
- Click Sync Now
- A green message will appear in the top-right "Azure sync has successfully started"
Once the sync has completed, you will be able to see all of your users by clicking Users in the left-side menu. Looking in the Source column, you will be able to tell which users were added via Azure.
 VIPRE Email Security Cloud - Users
Congratulations! You have successfully configured Entra ID to sync with VIPRE Email Security Cloud! Continue reading below to learn how to further manage your Entra ID integration
Managing Entra ID in Email Cloud
Exceptions
The Exceptions tab is where you can select any name from the User List that you want to exclude from the Entra ID sync with VIPRE Email Cloud. This means any exceptions will also be excluded from any custom filters you set up on the Connect tab.
VIPRE Email Security Cloud - Entra ID Sync Exceptions
To exclude a user, group, or alias from the Entra ID sync:
- In the User List column, which shows a complete view of your directory server, locate the row with the name of the user, group, or alias you want to exclude
- Click the blue arrow in the same row as the name to add that name to the Exception List
- Click Save
Additions
The Additions tab allows you to manually add users to include in the Entra ID sync. For example, this would be useful for adding any new employees that may need to be added in between syncs.
VIPRE Email Security Cloud - Entra ID Sync Additions
To include an additional user to your Entra ID sync:
- Type the email address of the user you want to include
- Click Add
Users added to your Entra ID sync via this method will be listed on this tab. They will also show up in the list under Users in the left-side menu with the source as Azure.
User Conflicts
The User Conflicts tab will show users that previously synced in the portal but are no longer in the directory server.
VIPRE Email Security Cloud - Entra ID Sync User Conflicts
Possible actions within this tab are: Delete, Ignore, Export, Deactivate
Example Use-Case
You notice there two users showing in User Conflicts. Let's say that when you were first setting up Entra ID sync, under the Connect tab, you set Delete Users After to 7 days. You're fine with one of the users being deleted because the employee no longer works for your company. The other user, however, is on maternity leave and will be coming back in 12 weeks.
- Click the checkbox next to the user and select your desired action.
In the example above, you could use Ignore so that the user will not be deleted after 7 days.
Manual
When adding users manually, you can either use a .csv file to create many users at once or adding users one at a time in the portal. Click on your chosen method below.
Import from .csv File
Importing users from a Comma-Separated Values (CSV) file allows you to create many users at once.
Sample CSV and XLS files
Located on the Import Users tab in the product, VIPRE provides sample files so that you may use the correct format for exporting your existing user list. If you are using an Excel file to export from, you must save it as a CSV file in order to import it into VIPRE.
To import users from a CSV file
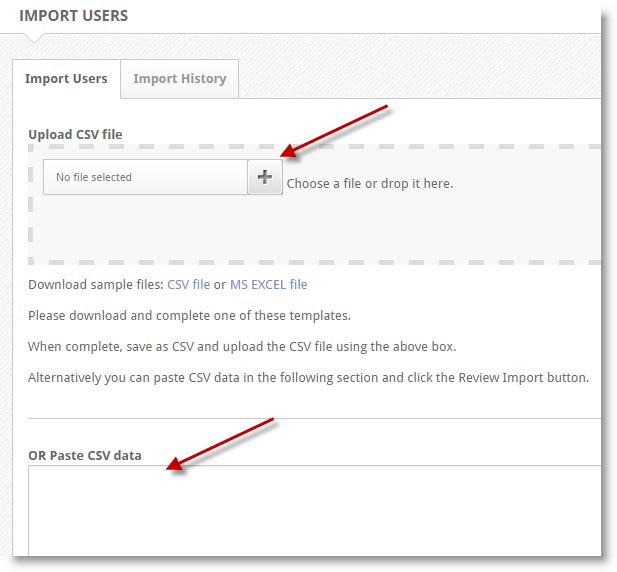
- From the customer dashboard, expand the Users menu. Then, select Import Users
- Perform one of the following:
- Use the file browser to select a CSV file, or...
- Drag and drop a CSV file onto the Upload CSV file area, or...
- In your CSV file editor (such as Excel), highlight user data and copy it, then paste it into the Paste CSV data section
- At the bottom of the screen, select Review Import
- When finished, select Save
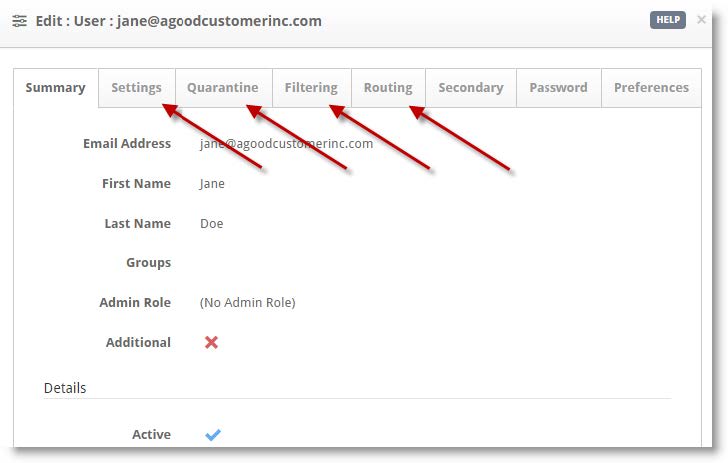
Add via Online Portal
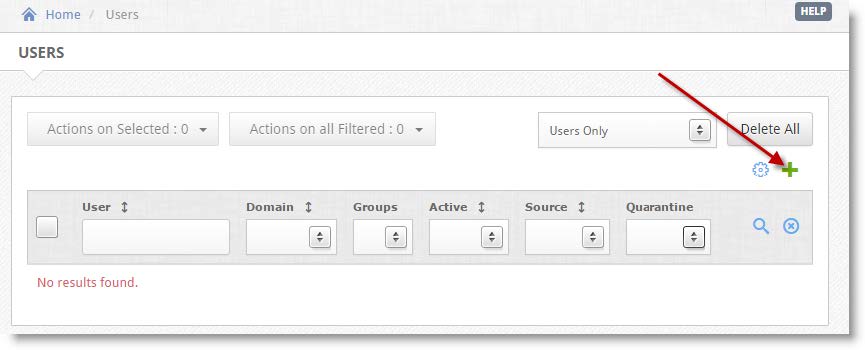
- In the navigation pane, expand the Users menu, then select Users.
- On the right side of the Users panel, select the green + plus sign.
- In the Add:User panel, fill out the information in all required fields.
- (Optional) You can add additional information (phone numbers, notes, etc.) by selecting the Additional checkbox.
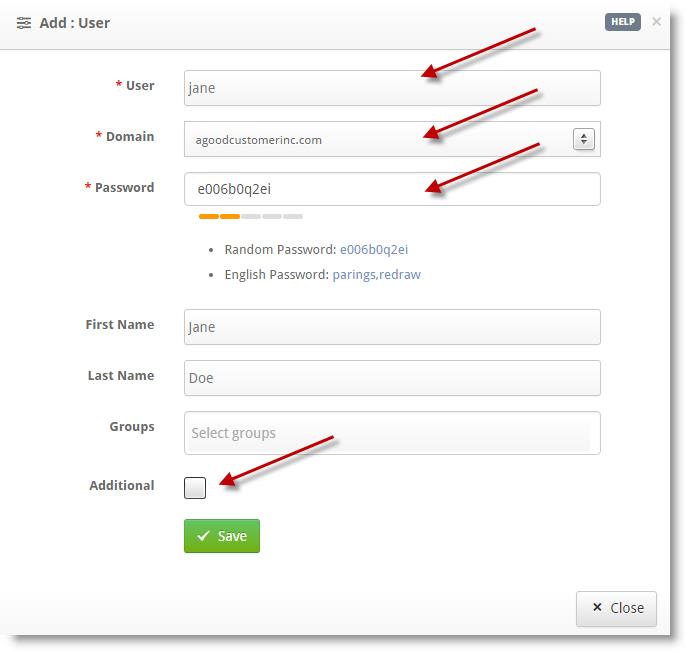
- Once completed, select Save
- (Optional) You can edit Settings, Quarantine, Filtering, and Routing information on a per-user basis.
- Confirm the user information is correct, then select Close
Repeat steps 2–5 to add additional users.
When ready, click the next step below.
When ready, click the next step below.
Allow VIPRE IP Ranges Through Your Firewall (On Prem)
Now that you've updated your MX records, you should reconfigure your firewall(s) ...
For VIPRE Email Security to work, all of your inbound emails must be routed through the service, and VIPRE must be able to deliver your email to the place where you will read it.
Test Inbound Routing
- From within the VIPRE Email Cloud portal, navigate to Service Settings on the left-side menu
- Select Inbound Routing
- Click the refresh icon on the right

Configure your Firewall
Important
Follow the instructions below if the SMTP connectivity test fails (Status: Error)
- Reconfigure your firewall(s) to block email from all other possible sources (i.e. you can restrict access to only VIPRE Email Security servers)
- Accept the server IP addresses below
North America
| Subnet IP | Subnet Mask | Net Mask | IP Range |
| 208.70.128.0 | 255.255.248.0 | /21 | 208.70.128.0–208.70.135.255 |
| 72.35.12.0 | 255.255.255.0 | /24 | 72.35.12.0–72.35.12.255 |
| 72.35.23.0 | 255.255.255.0 | /24 | 72.35.23.0–72.35.23.255 |
United Kingdom
| Subnet IP | Subnet Mask | Net Mask | IP Range |
|---|---|---|---|
| 192.162.216.0 | 255.255.252.0 | /22 | 192.162.216.0–192.162.219.255 |
| 208.70.128.0 | 255.255.248.0 | /21 | 208.70.128.0–208.70.135.255 |
| 72.35.12.0 | 255.255.255.0 | /24 | 72.35.12.0–72.35.12.255 |
| 72.35.23.0 | 255.255.255.0 | /24 | 72.35.23.0–72.35.23.255 |
| 2a01:77c0:1619::0 | ffff:ffff:ffff:: | /48 | 2a01:77c0:1619::0 - 2a01:77c0:1619:ffff:ffff:ffff:ffff |
Nordics
| Subnet IP | Subnet Mask | IP Range | |
|---|---|---|---|
| 185.38.180.0 | 255.255.252.0 | /22 | 185.38.180.0–185.38.183.255 |
| 2a01:77c0:1180:: | ffff:ffff:fffc:: | /46 | 2a01:77c0:1180::–2a01:77c0:1183:ffff:ffff:ffff: |
| 89.104.206.0 | 255.255.254.0 | /23 | 89.104.206.0–89.104.207.255 |
| 2a01:77c0:0006:: | ffff:ffff:fffe:: | /47 | 2a01:77c0:0006::–2a01:77c0:0007:ffff:ffff:ffff: |
| 192.162.216.0 | 255.255.252.0 | /22 | 192.162.216.0–192.162.219.255 |
| 2a01:77c0:1619::0 | ffff:ffff:ffff:: | /48 | 2a01:77c0:1619::0 - 2a01:77c0:1619:ffff:ffff:ffff:ffff |
The network addresses above will attempt to deliver email to your servers on the standard SMTP port (25).
By allowing the IP addresses above, mail coming from both VIPRE's primary and secondary data centers will be able to reach your network.
When ready, click the next step below.
Update Your MX Records
This article explains the MX (Mail eXchange) record settings you will need to red...
Redirect Inbound Mail to VIPRE
After your account is provisioned and you've allowed VIPRE IP ranges to connect to your internal mail server (if required), you will need to redirect all inbound emails to VIPRE Email Security for processing. VIPRE is configured to accept all mail for the client domain and relay that mail to the IP/FQDN for your mail server (listed in the Inbound Routing section of the dashboard).
.png)
The Internet Domain Name Service (DNS) helps mail senders determine where to deliver email destined for a particular domain. For example, which servers to send email to when sending to john.doe@vipre.com. In this example, the MX (Mail eXchange) records related to 'vipre.com' are looked up in the DNS system, and the sender then delivers the email to the servers listed in those MX records.
Update your MX records
MX records are typically maintained by your DNS registrar, and you will have to log in to your provider's management console or contact them to update your records.
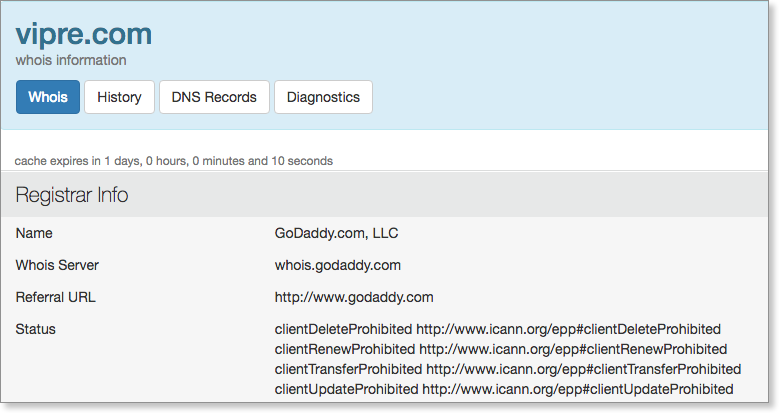
Determine your DNS registrar using Who.Is
If you forget who your DNS registrar is, you can easily find out.
- Visit Who.Is - https://who.is/
- Enter your domain name into the form
- Record your registrar information
VIPRE Email MX records
You can locate the VIPRE EMail MX records within the Email Cloud portal by clicking on the Getting Started button in the top right-hand corner. Provide your DNS registrar with that information, based on your location.

When ready, click the next step below.
Block Other Email Sources
This article serves as a final step in the allow/block workflow, reminding admins...
Table of Contents
Block non-VIPRE Email SourcesOn-PremisesMicrosoft 365Google Workspace (formerly G Suite)Block non-VIPRE Email Sources
Blocking additional sources of email allows the VIPRE product to protect you as intended; if other sources of email are allowed into your network, that defeats the purpose of protecting your email with VIPRE.
Select the appropriate option below for details on how to block non-VIPRE sources.
On-Premises
After email is flowing through VIPRE and no other solution, we highly recommend locking down your mail server to only accept mail from VIPRE.
By locking down your server to accept only port 25 connections from the VIPRE IP range, you ensure all inbound mail must be filtered through VIPRE before reaching your server. Blocking additional sources of email allows the VIPRE product to protect you as intended; if other sources of email are allowed into your network, that defeats the purpose of protecting your email with VIPRE.
Allowed VIPRE IP ranges can be found here.
Microsoft 365
To ensure the deliverability of your filtered mail from the VIPRE platform, it is recommended that a receive connector is created on your Microsoft 365 account.
- In the Microsoft 365 Admin Center, find Mail Flow, then select Connectors
- Click the + icon
- Select Partner Organization in the From: dropdown menu
- Select Office 365 or Microsoft 365 in the To: downdrop menu
- Name your connector and click Next
- Select Use the sender's IP address and click Next
- VIPRE IP ranges can be found here
- Select whether or not to enforce TLS
- Click Save
Google Workspace (formerly G Suite)
- From your Google Admin console, select Apps, then Google Workspace, and Gmail
- Scroll down and select Advanced Settings
- Scroll down to Inbound Gateway
- Hover the cursor to the right of Inbound Gateway
- To create a new Inbound Gateway setting, select Configure
- To edit an existing setting, select Edit
- Under Gateway IPs,enter the information for each gateway and select Add
- VIPRE IP ranges can be found here
When ready, click the next step below.
Click this arrow to return to the previous step.
Add or Edit a Mail Server Address
You may have already provided your mail server address during the purchase process. If not, you can check or update your mail server address by following these steps.
Add a Mail Server IP Address or Domain
As a reminder, this is the destination mail server IP address where you want email to be delivered. VIPRE needs this address in order to deliver mail to your server.
- From the Customer Dashboard, expand the Service Settings menu
- Select Inbound Routing.
- Select Add Site, at the bottom of the page
- A box will open called Site Information; enter a description for the mail server you are configuring, e.g. “Hosted Server” or “Clearwater Office”
- Select the Default Site checkbox if this entry is going to be the primary delivery point
- Click the plus sign (+) to enter the mail server IP address (preferred) or customer domain
- Confirm the Port and Priority are correct and select the blue checkmark to confirm
- When done, select Save
Important
You can create Multiple Sites with multiple server entries if you have a client with multiple domains, each having a different Server Delivery point. For assistance setting up multiple sites, contact Support.

Edit an Existing Mail Server Address
- From the Customer Dashboard, expand the Service Settings menu
- Select Inbound Routing
- You'll see a list of all mail servers currently set up and you can verify the IP address or domain, port, and priority

- You'll see a list of all mail servers currently set up and you can verify the IP address or domain, port, and priority
- If you need to make any changes:
- Click the pencil/edit icon
- The Site Information box will appear
- Select the pencil/edit icon again to make changes, or...
- Select the trashcan icon to delete the existing mail server, then...
- Click the plus sign + to add a new mail server
- Click Save
When ready, click the next step below.
Click this arrow to return to the previous step.
Allow VIPRE IP Ranges
For VIPRE Email Security to work, all of your inbound emails must be routed through the service, and VIPRE must be able to deliver your email to the place where you will read it.
Test Inbound Routing
- From within the VIPRE Email Cloud portal, navigate to Service Settings on the left-side menu
- Select Inbound Routing
- Click the refresh icon on the right
Configure your Firewall
Important
Follow the instructions below if the SMTP connectivity test fails (Status: Error)
- Reconfigure your firewall(s) to block email from all other possible sources (i.e. you can restrict access to only VIPRE Email Security servers)
- Accept the server IP addresses below
North America
| Subnet IP | Subnet Mask | Net Mask | IP Range |
| 208.70.128.0 | 255.255.248.0 | /21 | 208.70.128.0–208.70.135.255 |
| 72.35.12.0 | 255.255.255.0 | /24 | 72.35.12.0–72.35.12.255 |
| 72.35.23.0 | 255.255.255.0 | /24 | 72.35.23.0–72.35.23.255 |
United Kingdom
| Subnet IP | Subnet Mask | Net Mask | IP Range |
|---|---|---|---|
| 192.162.216.0 | 255.255.252.0 | /22 | 192.162.216.0–192.162.219.255 |
| 208.70.128.0 | 255.255.248.0 | /21 | 208.70.128.0–208.70.135.255 |
| 72.35.12.0 | 255.255.255.0 | /24 | 72.35.12.0–72.35.12.255 |
| 72.35.23.0 | 255.255.255.0 | /24 | 72.35.23.0–72.35.23.255 |
| 2a01:77c0:1619::0 | ffff:ffff:ffff:: | /48 | 2a01:77c0:1619::0 - 2a01:77c0:1619:ffff:ffff:ffff:ffff |
Nordics
| Subnet IP | Subnet Mask | IP Range | |
|---|---|---|---|
| 185.38.180.0 | 255.255.252.0 | /22 | 185.38.180.0–185.38.183.255 |
| 2a01:77c0:1180:: | ffff:ffff:fffc:: | /46 | 2a01:77c0:1180::–2a01:77c0:1183:ffff:ffff:ffff: |
| 89.104.206.0 | 255.255.254.0 | /23 | 89.104.206.0–89.104.207.255 |
| 2a01:77c0:0006:: | ffff:ffff:fffe:: | /47 | 2a01:77c0:0006::–2a01:77c0:0007:ffff:ffff:ffff: |
| 192.162.216.0 | 255.255.252.0 | /22 | 192.162.216.0–192.162.219.255 |
| 2a01:77c0:1619::0 | ffff:ffff:ffff:: | /48 | 2a01:77c0:1619::0 - 2a01:77c0:1619:ffff:ffff:ffff:ffff |
The network addresses above will attempt to deliver email to your servers on the standard SMTP port (25).
By allowing the IP addresses above, mail coming from both VIPRE's primary and secondary data centers will be able to reach your network.
When ready, click the next step below.
Redirect Inbound Mail to VIPRE
After your account is provisioned and you've allowed VIPRE IP ranges to connect to your internal mail server (if required), you will need to redirect all inbound emails to VIPRE Email Security for processing. VIPRE is configured to accept all mail for the client domain and relay that mail to the IP/FQDN for your mail server (listed in the Inbound Routing section of the dashboard).
The Internet Domain Name Service (DNS) helps mail senders determine where to deliver email destined for a particular domain. For example, which servers to send email to when sending to john.doe@vipre.com. In this example, the MX (Mail eXchange) records related to 'vipre.com' are looked up in the DNS system, and the sender then delivers the email to the servers listed in those MX records.
Update your MX records
MX records are typically maintained by your DNS registrar, and you will have to log in to your provider's management console or contact them to update your records.
Determine your DNS registrar using Who.Is
If you forget who your DNS registrar is, you can easily find out.
- Visit Who.Is - https://who.is/
- Enter your domain name into the form
- Record your registrar information
VIPRE Email MX records
You can locate the VIPRE EMail MX records within the Email Cloud portal by clicking on the Getting Started button in the top right-hand corner. Provide your DNS registrar with that information, based on your location.
When ready, click the next step below.
Block non-VIPRE Email Sources
Blocking additional sources of email allows the VIPRE product to protect you as intended; if other sources of email are allowed into your network, that defeats the purpose of protecting your email with VIPRE.
Select the appropriate option below for details on how to block non-VIPRE sources.
On-Premises
After email is flowing through VIPRE and no other solution, we highly recommend locking down your mail server to only accept mail from VIPRE.
By locking down your server to accept only port 25 connections from the VIPRE IP range, you ensure all inbound mail must be filtered through VIPRE before reaching your server. Blocking additional sources of email allows the VIPRE product to protect you as intended; if other sources of email are allowed into your network, that defeats the purpose of protecting your email with VIPRE.
Allowed VIPRE IP ranges can be found here.
Microsoft 365
To ensure the deliverability of your filtered mail from the VIPRE platform, it is recommended that a receive connector is created on your Microsoft 365 account.
- In the Microsoft 365 Admin Center, find Mail Flow, then select Connectors
- Click the + icon
- Select Partner Organization in the From: dropdown menu
- Select Office 365 or Microsoft 365 in the To: downdrop menu
- Name your connector and click Next
- Select Use the sender's IP address and click Next
- VIPRE IP ranges can be found here
- Select whether or not to enforce TLS
- Click Save
Google Workspace (formerly G Suite)
- From your Google Admin console, select Apps, then Google Workspace, and Gmail
- Scroll down and select Advanced Settings
- Scroll down to Inbound Gateway
- Hover the cursor to the right of Inbound Gateway
- To create a new Inbound Gateway setting, select Configure
- To edit an existing setting, select Edit
- Under Gateway IPs,enter the information for each gateway and select Add
- VIPRE IP ranges can be found here
When ready, click the next step below.
Configure Outbound Mail Flow
By configuring outbound mail flow with VIPRE, any mail you send will be scanned and filtered per your policies and will be sent from a safe and reputable IP address which will help you avoid being blacklisted.
After you've configured inbound email so that it is secured by VIPRE Email Security, you may also configure outbound filtering to provide the same protections for outbound email that people in your organization are sending. Outbound filtering provides many of the same security and policy protections as inbound filtering and more. Plus, by sending your email through VIPRE, your mail will appear to come from a safe and reputable IP source that recipients will trust.
Routing of outbound email is similar to routing of inbound email:
.png)
In most scenarios, email authored by members of your organization will first be sent to your primary email host/provider (this could be an on-premises Exchange server, or it could be a hosted service), then it is forwarded to VIPRE Email Security. In this paradigm, VIPRE Email Security is acting as the smart relay that will deliver the email to the recipient, a so-called SmartHost. VIPRE will perform a number of filtering and policy matching steps on the email (for example, adding standard disclaimers) and then deliver the email to the ultimate recipient(s).
Configure VIPRE to accept email from your email service/provider
The first step in configuring outbound filtering is to set VIPRE Email Security so that it will accept email from your primary email service or provider. It is important to do this carefully, as a misconfiguration could result in exposing your domain for use by spammers. Essentially, we want to inform VIPRE that it should only accept email sent from specific senders, identified by IP addresses (the hosts that will send email) and domains (the people who will send email).
Important Information
VIPRE Email Security is already pre-provisioned to accept mail from services such as Microsoft 365 or Google Workspace for any mail sent from a domain provisioned on the VIPRE portal,
Select the appropriate option below:
On-Premises
- Login to https://email.myvipre.com/ using your Administrator credentials.
- Expand the Service Settings menu. Then, select Outbound Relay
- Click on the green plus sign (+), which will open a pop-up window

- Enter a descriptive name for the server that will be sending email, e.g. “Exchange Server” or “Clearwater Office”
- Enter the IP address of the server that will be sending email and select Save
- You can add additional mail server IPs by clicking the green plus sign (+) and following the above steps
- Confirm the Port number and Priority are correct and press the blue check to confirm
- When finished, select Save
Microsoft 365
In order for outbound email from Microsoft 365 to be routed through VIPRE, we need to create a new send connector in Microsoft 365 and point it to VIPRE.
Create a new send connector in Office365
- Log in to the Microsoft 365 Exchange Admin Center (EAC)
- Select the Admin > Exchange menu
- Select the Mail Flow > Connectors menu. Then, select Create a new Connector
- Set the mail flow scenario
- Select Office 365 from the From: drop-down
- Select Partner Organization from the To: drop-down
- Select Next
- Enter a name and description for the connector. You may also select the checkbox to make the connector active immediately
- Select Next
- Select the Only when email messages are sent to these domains option
- Select the plus (+) to add domains that should use this connector
- Enter a value of * (asterisk). This is a wildcard that will route all outbound emails through VIPRE
- Select Next
- Select the Route email through these smart hosts option
- Select the plus (+) to add your smart host
- You can find your smart host by clicking Get Started within the VIPRE Email Security portal

- You can find your smart host by clicking Get Started within the VIPRE Email Security portal
- Click the Save button
- Select the plus (+) to add your smart host
- Select Next
- Select the checkbox for Always use Transport Layer Security (TLS) to Secure the Connection (recommended)
- Select Issued by a trusted certificate authority (CA) from the list
- Select Next
- Add an email address of a recipient for a domain external to your organization, and select Validateto test
- If you did not choose to turn the connector on in Step 6, validation of the connector will fail. If your validation results show that the connection was successful, but the email failed to send because "The domain of the recipient is not configured as part of connector" - this may be due to the connector being disabled. Try enabling the connector and re-attempting the validation.
- Once Microsoft 365 has been successfully validated, select Save
- Once you are happy with mail flow, you may remove the old inbound route from VIPRE that points to the old on-site server if no other domains still use the old route
Google Workspace (formerly G Suite)
In order for outbound email from Google Workspace to be routed through VIPRE, we need to add an outbound gateway to Google and point it to VIPRE.
- Log into your Google Admin account
- Select Apps > Google Workspace > Gmail
- Scroll down and select Advanced Settings
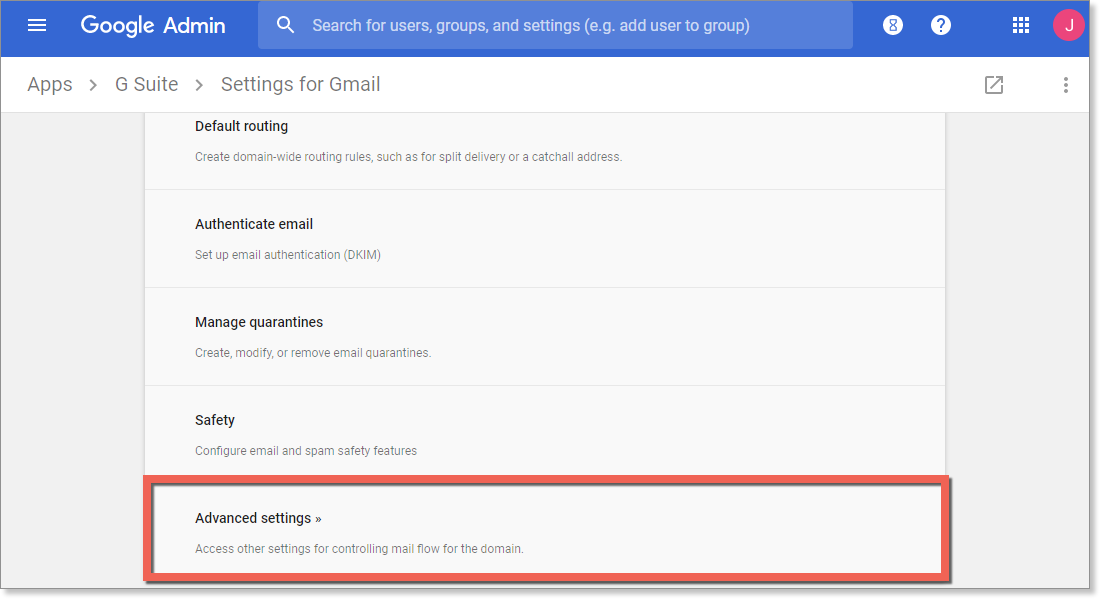
- In Advanced Settings, scroll down to Outbound gateway and type in your outbound gateway name
- You can find your smart host by clicking Get Started within the email portal

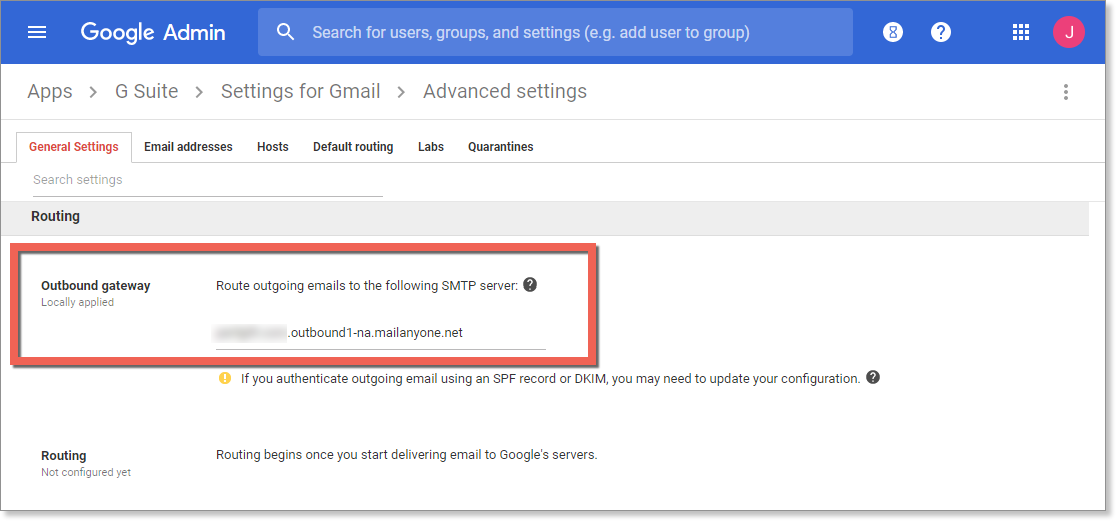
- You can find your smart host by clicking Get Started within the email portal
- In the bottom right of the screen, select Save
Important Information
These changes may take up to 1 hour to propagate to all users.
When ready, click the next step below.
Set up or Modify the Sender Policy Framework (SPF)
VIPRE recommends setting up SPF for your domain to help reduce spam and ensure that your domain reputation is maintained.
Introduction to the Sender Policy Framework
The Sender Policy Framework, or SPF, is a mechanism used to help reduce spam sent to or from your domain. Effectively what the SPF does is it allows you to declare which internet hosts are allowed to send an email purporting to be from your domain. This means that spammers can't "hijack" your domain and pretend to be you while sending out their nefarious messages. Similarly, other organizations that have set up SPF can't be spoofed, so you won't get spam that appears to come from their domains.
Follow the steps below to set up or modify SPF to work with VIPRE.
Set up SPF to work with VIPRE Email Security
When you introduce VIPRE Email Security into your environment as part of a holistic security solution, you will need to account for it when you configure your SPF records. If you are not currently using SPF, this should be relatively easy to set up and you can just follow the instructions below. If you already have SPF set up for your domain, you may need to reconcile your existing SPF records with the suggestions below, adding and removing tokens as appropriate. An example is provided.
SPF is set up by using a TXT type of DNS record, which means you will have to work with your DNS registrar to create or modify these records. If you don't know who your DNS registrar is, refer to Related Articles for more information on updating MX Records.
The following example will simply authorize VIPRE Email Security to send email on behalf of your domain.
v=spf1 include:spf.mailanyone.net -allIf you already have an SPF record setup for your domain, you can just usually add the following statement to the end of the SPF record, before the “all” token:
include:spf.mailanyone.netNote, however, that if VIPRE Email Security is taking over email delivery for your domain, you may want to remove some or all of your pre-existing authorized senders.
For example; if your current SPF record is:
v=spf1 include:spf.protection.outlook.com -allYou will need to add the new statement to update it to the following:
v=spf1 include:spf.protection.outlook.com include:spf.mailanyone.net -all
When ready, click the next step below.
Congratulations!
You have completed the foundational configuration of Email Security Cloud.
Now, depending on the package you purchased, you may or may not have some of our add-ons.
- If you do not have any of our add-ons, then you are done!
- If you do have some of our add-ons, check out the following:
Email Advanced Threat Protection + Encryption
Configure Encryption
VIPRE Email Security Encryption enables your system administrators to encrypt emails automatically.
Encryption Settings
To get to the Encryption settings:
- Click on Service Settings
- Select Encryption
Settings

- General - This is enabled by default; click the checkbox to disable or reenable the encryption of replies sent from the encryption portal
-
Policy Description- All of the following policies are disabled by default; includes four pre-defined policies that will trigger encryption under the following circumstances:
- The email body contains any of the following information:
- Credit card number
- US Social Security Number
- Canadian Social Insurance Number
- Danish Personal Number
- Swedish Personal Number
- Norwegian Personal Number
- The sensitivity of an Outlook email is sent to confidential
- The subject line of an email is pre-pended with "[encrypt]" (not case-sensitive)
- An outgoing email sent to a self-created list of addresses or domains
- To add email addresses or domains for outgoing encryption, enter the address in the text field and select the + plus sign
- The email body contains any of the following information:
Click Save at the bottom to commit all changes.
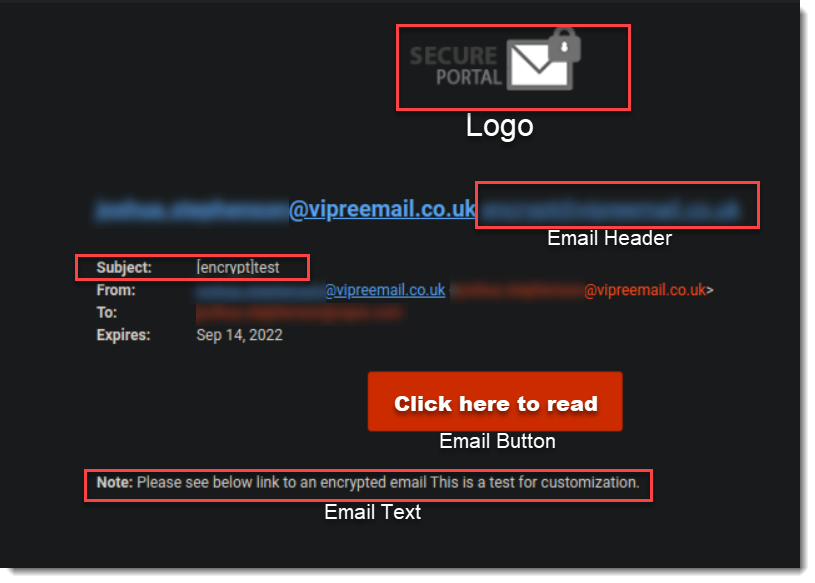
Branding
The Branding tab allows you to add your organization's identity to outgoing Encryption notifications.
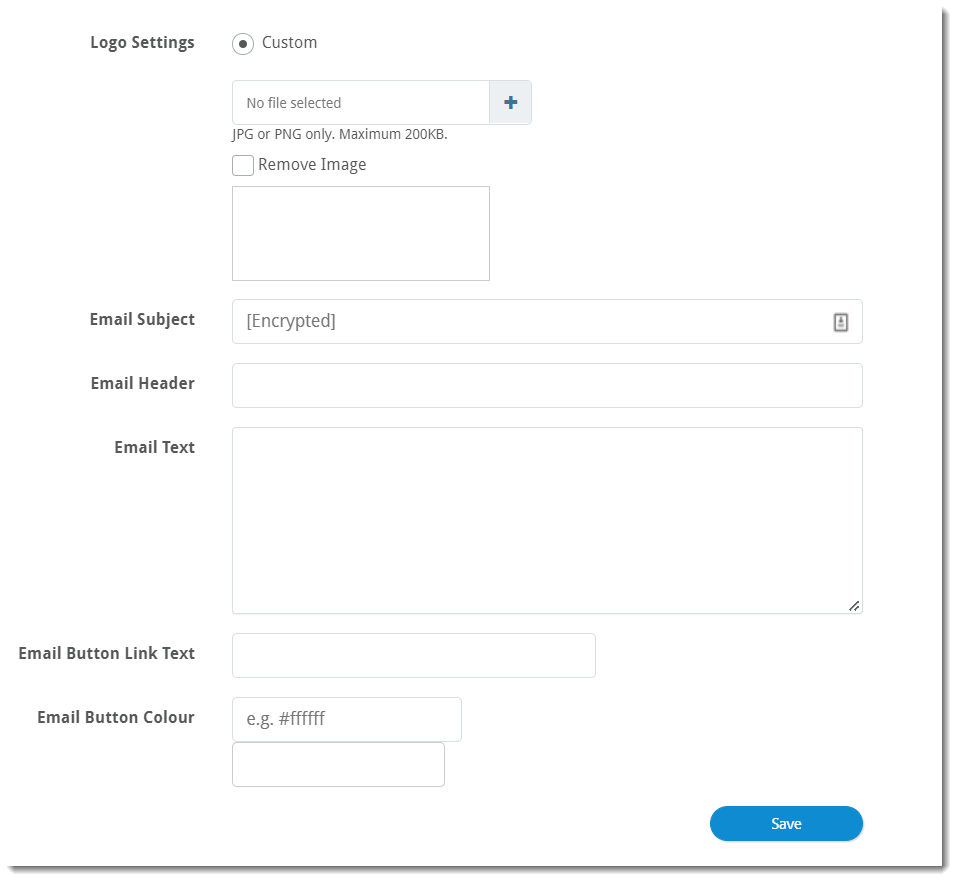
-
Logo Settings- Upload your organization's custom logo by clicking the blue plus sign; supported file types are .jpg and .png, and the maximum file size is 200KB
- You can also remove your logo by placing a checkmark next to Remove Image
- Email Subject - By default, emails that start with the subject line "[Encrypt]" will be encrypted automatically
- Email Header - Customize text included after the Sender's email address
- Email Text - Customize any text you want to add to the email body below the Email Button
- Email Button Link Text - Customize the text of the button
- Email Button Colour - Customize the color of the aforementioned button
When ready, click the next step below.
-
Next Step - Link Isolation
- Add Button
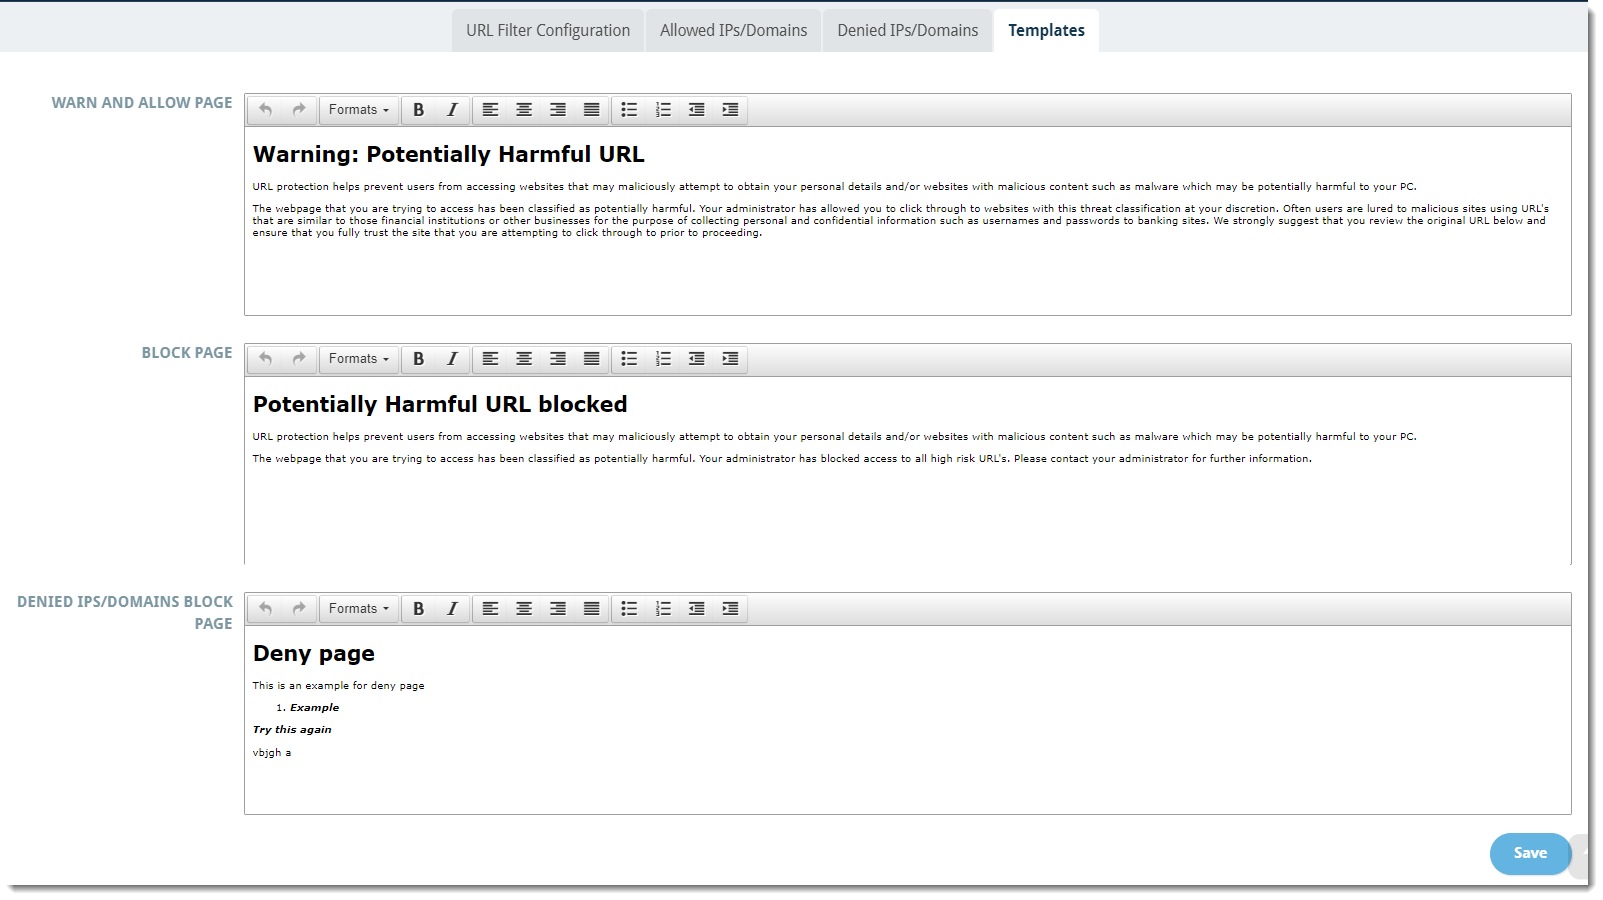
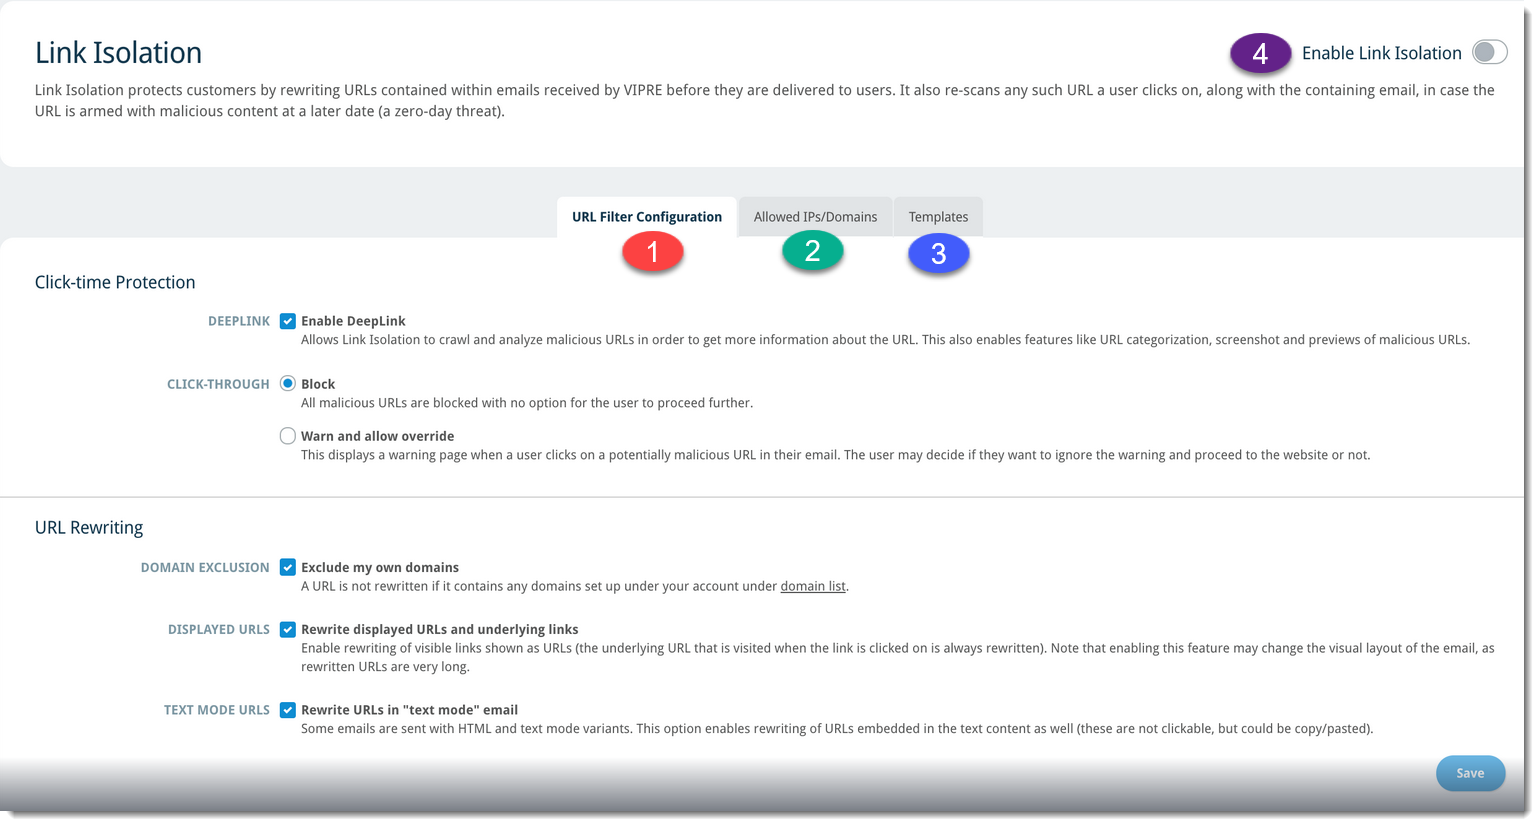
Configure Link Isolation
To configure the VIPRE Email Security Cloud Link Isolation add-on, complete the following steps: To add an IP address or domain that you want to deny: To search for a previously denied IP address or domain: To delete a previously denied IP address or domain: Once you've gone through the configuration options detailed in the tabs above, you're ready to enable Link Isolation. Congratulations! Link Isolation is now configured and enabled.
URL Filter Configuration
Allowed IPs/Domains

Denied IPs/Domains
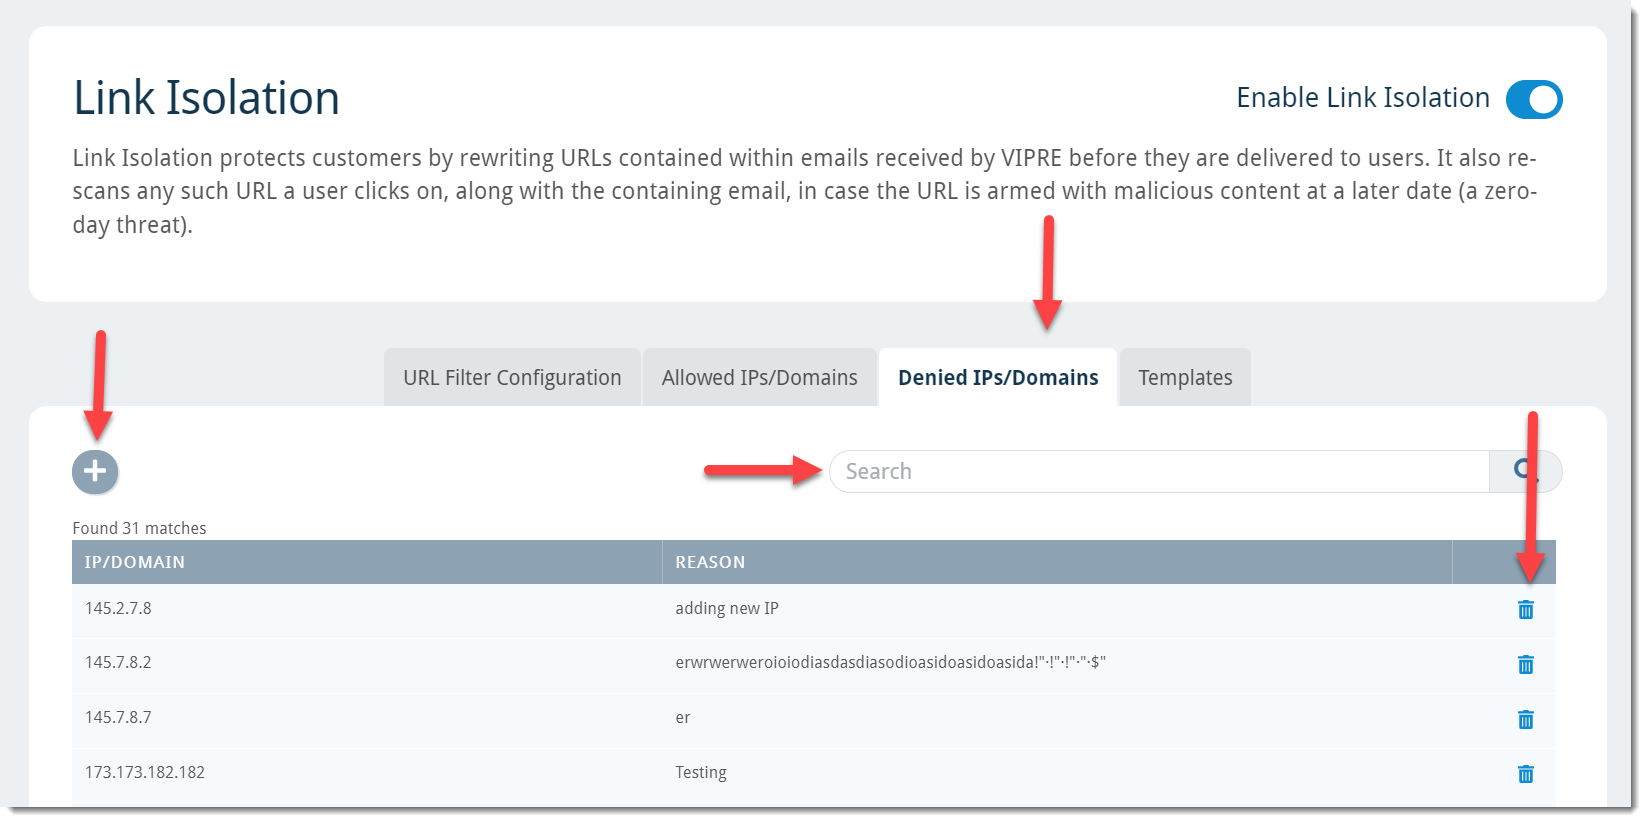
Templates
Enable Link Isolation
When ready, click the next step below.
-
Next Step - Attachment Sandboxing
- Add Button
Attachment Sandboxing uses advanced sandbox technology to quarantine harmful email attachments that can evade other antivirus or anti-spam software.
Attachment Sandboxing Settings
To get to Attachment Sandboxing settings:
- Click on Service Settings
- Select Sandboxing

-
Use Attachment Sandboxing default policy - If enabled, this default policy sandboxes all of the following attachment types:
- .com, .doc, .docm, .docx, .dot, .dotm, .dotx, .exe, .htm, .html, .pot, .potx, .pps, .ppsx, .ppt, .pptx, .rar, .rtf, .xls, .xlsb, .xlsm, .xlsx, .xlt, .xltm, .xltx, .zip
- .jpeg, .jpg, .pdf, .png (which are also scanned for QR codes that are converted to a URL, which is then checked for malicious behaviors)
Important
If you prefer to use a custom policy, this default policy must be disabled. Refer to Related Articles for details on how to create and enable custom Sandboxing policies.
-
Allow users to release emails - If enabled, messages to the end user also contain a link to the release delayed emails before the result from the sandbox is known; copies of attachments will still be analyzed; if the sandbox finds malicious attachments before this release link is used, the email cannot be released
- If disabled, messages to the end user will not contain a release link
- Send delay notifications - If enabled, notifications about delayed mail will be sent
All of the features associated with Email Security Advanced Threat Protection + Encryption have now successfully been configured.
SafeSend with Data Loss Prevention Add-on
Before you get started, you should have received a Welcome email that contains important information you'll need to proceed with this guide. If you haven't received this email, please check your spam folder or contact Support.
Click on the desired add-in below.
PC Add-in with Data Loss Prevention
Have you ever mistakenly sent an email to the wrong person? Accidentally forwarded attachments with sensitive data? The VIPRE SafeSend PC Add-in is an Outlook add-in that works to prevent those types of mistakes within your organization by requesting manual confirmation from the user when sending emails to recipients outside of your organization.
If you're new to VIPRE SafeSend, this is the place to start. We're here to walk you through deployment with this guided setup. If you haven't seen our product overview and comparison chart though, please visit there first.
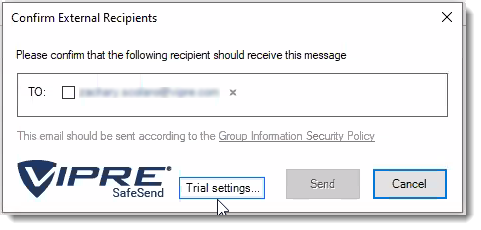
How SafeSend Works
When installed, SafeSend requires validation each time you send an email to an external recipient. You will need to confirm all external recipients of an email before it leaves the network. Upon hitting “Send” or “Send Secure,” the SafeSend pop-up window will appear. To confirm the recipients or any attached file, click on the checkbox beside each of the external recipients (and file if applicable) and hit the Send button.
What's Included
When you receive your SafeSendArchive-v.r.zip file, it will include the following files:
-
Get_Started_With_SafeSend
- Helpful information and links to help you get started
-
SafeSendArchive-v.r.m.b.zip(SafeSend PC add-in)
-
Administrative Templates
- For use with Group Policy to manage settings when the SafeSend PC add-in has already been deployed
-
Admin Password
- Administrative credentials for local access to SafeSend settings
- Not applicable for Trial licenses
-
SafeSendSetup
- Installer package (.MSI) for the SafeSend PC/COM add-in
-
Administrative Templates
-
SafeSendWebAddinWeb_v.r.m.b (SafeSend Web add-in)
-
SafeSendWebAddinWeb
- Web server folder
- End-user License Agreement (EULA)
-
safesend-manifest.XML
- Editable file where you add your web server domain
-
SafeSendWebAddinWeb
For these instructions, you will need everything within the SafeSendArchive-v.r.m.b.zip file mentioned above.
Important Terminology
Before we begin, let's define some terms that will show up often within our content.
Initial Install
The local installation of SafeSend that allows you to apply configurations and customizations before deployment to the end-users
Deploy / Deployment
The distribution of SafeSend after all configurations and customizations have been applied to a newly generated MSI (Microsoft Installer)
Customize / Customization
The modification of specific SafeSend features
Configure / Configuration
The use of settings within SafeSend to change its behavior
Complete Setup Checklist
To get you started with VIPRE SafeSend, we've created a checklist to get you from the initial install to configuration and customization, and finally end-user deployment.
| Step | How to accomplish (with links to the respective articles) |
|---|---|
| 1. Initial Install | Initial Install of VIPRE SafeSend |
| 2. Customize |
|
| 3. Configure |
|
| 4. Create a Custom Installer (MSI) | Generate a Custom Installer |
| 5. End-User Deploy |
|
When you are ready, move on to the next step below.
Initial Installation
If you are new to SafeSend and setting it up for the first time, please stop here and navigate to our complete deployment guide.
SafeSend PC add-in can be deployed to end-user PCs individually or using Group Policy, but whether you are planning to use SafeSend on just a couple of computers or in an Enterprise-wide deployment, the first step remains the same: install VIPRE SafeSend locally.
Install Locally
Follow these steps to install SafeSend locally, on an individual PC.
- Double-click on the installer package
- Accept the End-user License Agreement
- Click Install
Now that VIPRE SafeSend is installed on your local PC, it's time to make it work specifically for your needs!
The first thing you'll want to do is customize VIPRE SafeSend to your organization. You can do things like setting the Administrative password and adding your organization's logo for a personalized look and feel. Once you've got it customized, then you'll want to take a look at the settings and really configure how you want SafeSend to behave.
We've already discussed the differences between customizing and configuring, so let's get started.
Add your Organization's Logo
You can customize the look and feel of VIPRE SafeSend by uploading a personalized logo. This optional step is a great way to integrate SafeSend with your organization seamlessly.
Important
This article is part of the SafeSend PC Add-in Deployment Guide, which includes all successive steps needed for a successful deployment. Please refer to Related Articles for direct links to the deployment guide and other processes pertinent to the one detailed in this article.
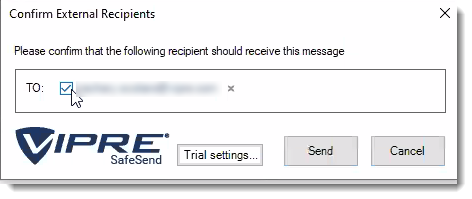
Image Requirements
Before uploading your logo, make sure it meets the following requirements:
- Image size must be no larger than 50x180
- Image type must be .png
Images with transparent backgrounds are recommended so that your logo matches the rest of SafeSend.
Now that you have an image that meets the above requirements, let's move on to uploading it.
Add Logo
- In Outlook, on the top left, click File
- Go down to Outlook Options and select Add-Ins
- Select Add-in Options
- Locate and click Change Logo
- Browse to the image you want to use and click Open
- Click OK at the bottom
Now, your logo is part of SafeSend!
If you are following the guided setup, click Next Step below to continue to the next part of the SafeSend PC Add-in Deployment Guide. Otherwise, see Related Articles below to learn how to store settings.
Prevent End-users from Disabling VIPRE SafeSend
Let's walk through how you can prevent users from disabling the SafeSend PC add-in.
Outlook 2007-2010
It is possible to prevent users from disabling the SafeSend Add-in in Outlook 2007 or 2010 using the registry key DontDisplayHKLMAddin.
The image below shows how it looks after the registry key DontDisplayHKLMAddins has been set. As can be seen, SafeSend is not visible even though it is loaded. This registry key DontDisplayHKLMAddins can also be set using GPO.
Setting this key will affect all HKLM type of add-ins, in that none of them can be disabled by the end-user anymore. This potential issue is solved in Outlook 2013 or later.
- Log in to a normal user account
- Using Regedit, open HKEY_CURRENT_USER\Software\Microsoft\Office\14.0\Outlook
- If the current user does not have a key for "Security", add it
- Add the DontDisplayHKLMAddinsDWORDValue in the Security key. Set the value to 1
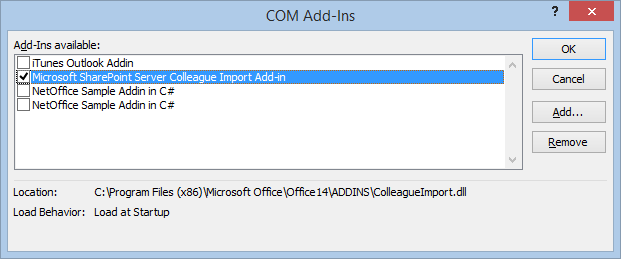
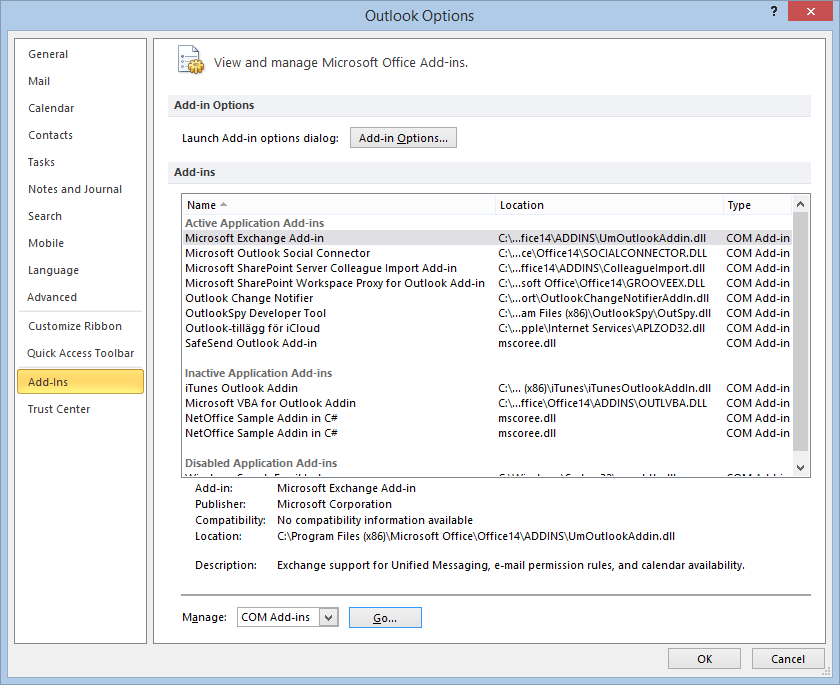
- In the Manage COM Add-ins dialog, click Go. SafeSend is not visible, even though it is loaded.
There is no need to restart Outlook, since Outlook reads this registry entry when you click the Go button.
Outlook 2013 or Outlook 2016
It is possible to prevent users from disabling the SafeSend Add-in in Outlook 2013 or Outlook 2016 using group policy.
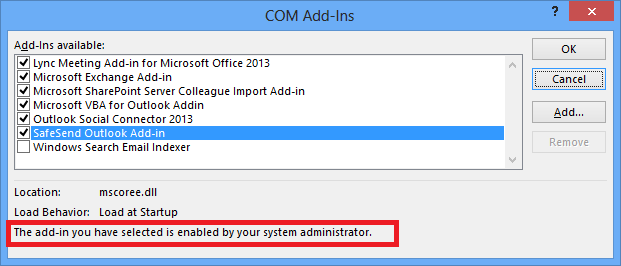
The image below shows how it looks after the group policy setting is enabled. A user cannot uncheck the “SafeSend Outlook Add-in” checkbox as can be seen in the text marked in red.
- Open Group Policy and check that the Office 2013/2016 Administrative Templates are installed
- If the templates are installed, you will see the “Microsoft Outlook 2013/2016” in the User Configuration > Administrative Templates > Microsoft Outlook 2013> Miscellaneous path
- If the templates are not installed, you can download the templates from Microsoft. View this Microsoft article for help installing the template
.png)
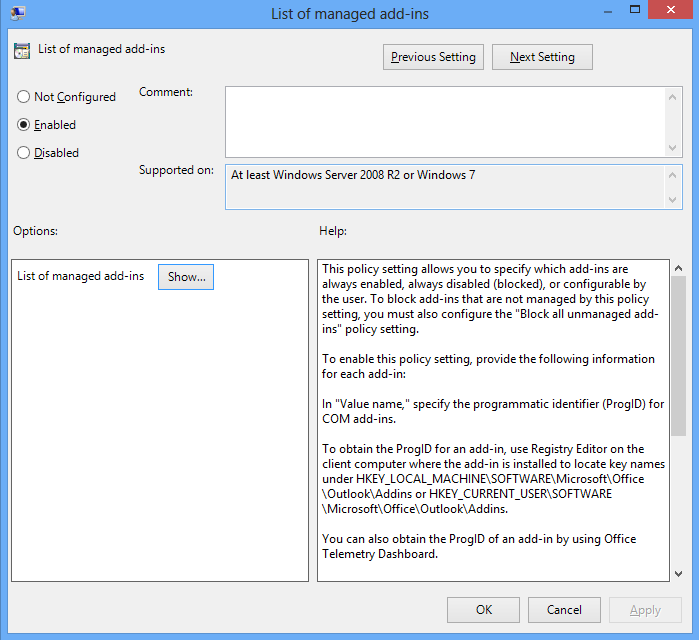
- Enable the “List of managed add-ins” policy setting
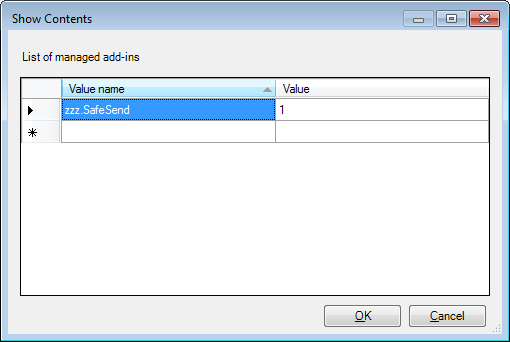
- Write “zzz.SafeSend” (the add-ins progId) and 1 for the Value in this setting. Can also click the “Show” button above to get the dialog below. The value 1 means that SafeSend cannot be disabled by users.
An alternative way to achieve this is to push a registry key manually using GPO; see below for the path.
For Outlook 2013 the “16.0” part should be replaced a “15.0” part. Please note that the registry type should be REG_SZ. This can also be tested on a single machine by creating the registry key in regedit. If GPO is being used then please make sure there is no conflict with another GPO that is configuring the same setting using administrator templates.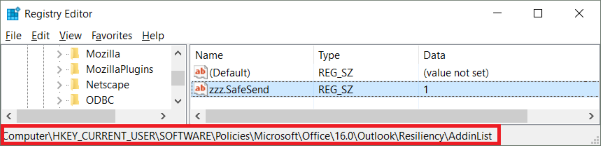
Configure VIPRE SafeSend
If you want to get started using SafeSend with the default configuration, you can skip this step.
Important Information
This article is part of the SafeSend PC Add-in Deployment Guide, which includes all successive steps needed for a successful deployment. Please refer to Related Articles for direct links to the deployment guide and other processes pertinent to the one detailed in this article.
VIPRE SafeSend Settings
There are two ways to get to VIPRE SafeSend's settings, depending on if you are using a trial or have purchased a full license.
Click here if using a trial license
- Select Trial Settings in the Confirmation window pop-up
- In the Logic tab, click on the arrows next to Advanced, Commonly used, and Special cases to see options available to you
- Refer to our settings reference for full details on how to use all settings
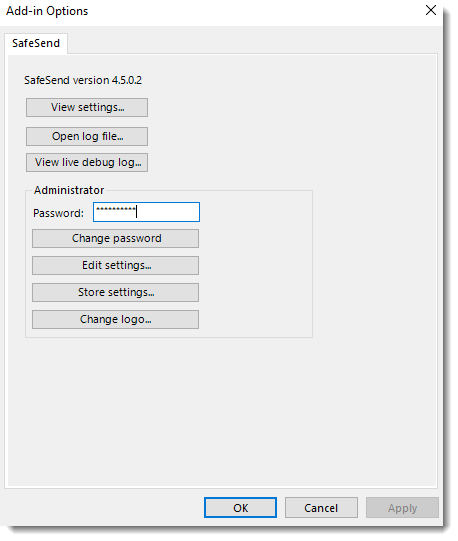
Click here if using a full license
- In Outlook, on the top left, click File
- Go down to Outlook Options and select Add-Ins
- Select Add-in Options
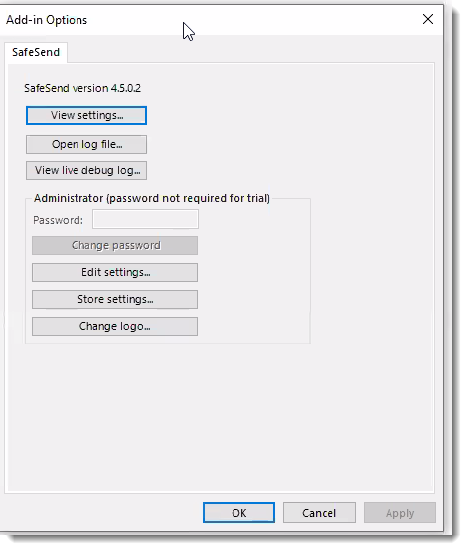
- Click Edit Settings, which allows you to customize the behavior of VIPRE SafeSend
- In the Logic tab, click on the arrows next to Advanced, Commonly used, and Special cases to see options available to you
- Refer to our settings reference for full details on how to use all settings
Helpful Information
While we do provide a comprehensive settings reference to help determine what makes the most sense for your organization, we understand that it can be a little overwhelming. To help make things a little easier for you, VIPRE SafeSend ships with the settings we recommend already configured by default. However, because each organization has unique needs, we suggest going through the settings reference, specifically the Commonly Used and Advanced sections, to ensure SafeSend is set up appropriately for your organization.
If you'll be deploying VIPRE SafeSend via Group Policy and will be moving forward with the default configuration, we've included ADMX/ADML files (administrative templates) in the SafeSendArchive-v.r.m.b.zip file you downloaded that will allow you to push changes to your organization after it's been deployed.
Configure Data Loss Prevention
VIPRE SafeSend can prevent sensitive information from being sent out to the wrong client.
Important Information
This article is part of the SafeSend PC Add-in Deployment Guide, which includes all successive steps needed for a successful deployment. Please refer to Related Articles for direct links to the deployment guide and other processes pertinent to the one detailed in this article.
Within VIPRE SafeSend, DLP (Data Loss Prevention) has three important features:
- Client Keyword/Domain Scanning allows you to identify a set of client keywords or regular expressions and associate those with a set of client domains or individual email addresses
- DLP Content Scanning presents sensitive content to the user, allowing the user to determine if the email should be blocked or sent with additional confirmation
- DLP Scan Password-Protected Attachments allows SafeSend to detect password-protected .zip files and prompt the user to add the password and decrypt the file so it can scan the attachment
It can scan emails and attachments for specific client keywords or regular expressions and require agent confirmation.
Client Keyword and Domain Scanning
Define Client Data
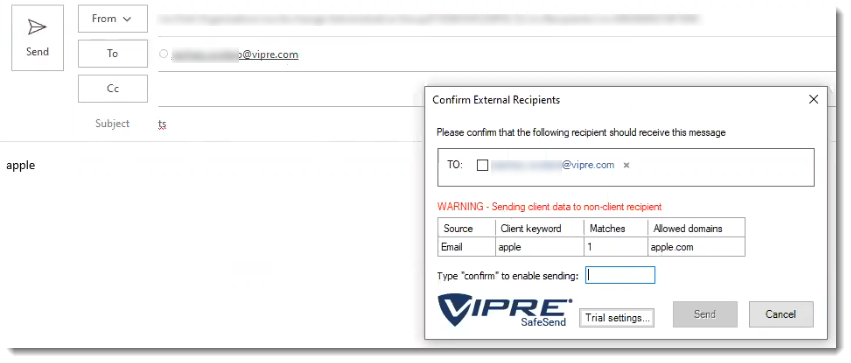
The client keyword/domain data is configured in Edit Settings, under the Data Loss Prevention (DLP) tab, and stored in the setting SS_ClientKeywordDomainList; it can contain thousands of lines of client/customer data. The principle is that you can identify a set of client keywords or regular expressions and associate those with a set of client domains. Instead of domains, it is also possible to specify individual email addresses as approved recipients.
Syntax: Client1Keyword1,Client1Keyword2,…:Client1Domain1,Client1Domain2,… Client2Keyword1,Client2Keyword2,…:Client2Domain1,Client2Domain2,…
Example: Apple,AAPL:apple.com Microsoft,MSFT:microsoft.com
Display Popup only when Client Data is Found
It is possible to use the setting OnlyPopupForDLPMatch to configure SafeSend to display its confirmation window only when client data has been found in the email.
Supported Attachment File Types
- Text: csv, txt
- PDF: pdf
- HTML: html, xhtml
- Word: doc, docx
- PowerPoint: pptx, ppsx, pptm, ppt, pot, pps
- Excel: xls, xlsx, xlsm, xlt, xltx, xltm
- RTF: rtf
- ZIP: zip (recursively)
Sending to Non-client Recipients
The user is required to type “CONFIRM” in order to send client data to a non-client external domain.
Sending to Approved Recipients
No additional confirmation is required except confirming the external recipient.
Sending Non-client Data Externally
What happens, in this case, depends on the OnlyPopupForDLPMatch setting. If it is enabled then the SafeSend confirmation window will not be displayed. If it is disabled, which is the default behavior, then SafeSend will still show its normal confirmation window. The below screenshot is thus displayed only if OnlyPopupForDLPMatch = 0.
Password Protected Files or Invalid Files
SafeSend displays password-protected files or invalid files in the DLP output table. Password protection is detected on Word, Excel, PowerPoint, PDF, and ZIP files.
Scanning Email Notification
The Scanning Email notification is displayed when OnlyPopupForDLPMatch is enabled, and SafeSend is busy scanning large files. The default time-out for large files is 10 seconds (see ContentScanningTimeoutMS), whereby SafeSend will post an error message in the dialog, saying that the content scan timed out.
DLP Content Scanning
Sensitive content is presented to the user, and you can define if the email should be blocked, or if the user can send the email after an additional confirmation.
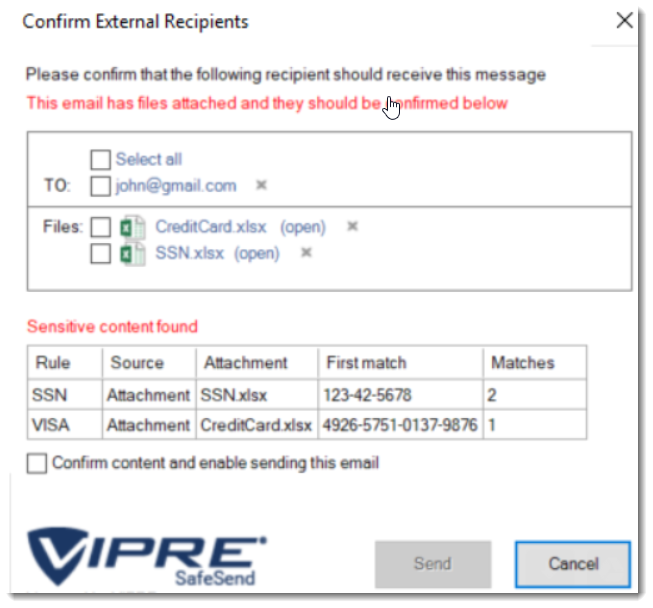
Here you can see that SafeSend scanned an email's content and attachments finding potential Social Security and Credit Card numbers.
Sensitive Content
When you use DLP with VIPRE SafeSend, this is the type of content it looks for within your emails:
- Strings such as ‘Confidential’, ‘Internal’, ‘Restricted’ and ‘Sensitive’.
- US Social Security Number (SSN)
- Credit Card number (VISA, MasterCard, American Express, Diners Club, …)
- Standard health identification card number (NPI)
- Vehicle Identification Number (VIN)
- UK health identification number (NHS, CHI)
- UK national insurance number (NINO)
SafeSend Actions
Once VIPRE SafeSend finds what it's looking for, it performs the following actions:
- Inform the user
- Require confirmation from the user in the form of a checkbox
- Require confirmation from the user by the text “CONFIRM”
- Deny sending the email
Supported Content Types
VIPRE SafeSend supports the following types of documents and attachments:
- Email content (body)
- Email subject
- Attachment filename
- Attachment file types (scans inside attachments)
- Text: csv, txt
- PDF: pdf
- HTML: html, hxtml
- Word: doc, docx
- PowerPoint: pptx, ppsx, pptm, ppt, pot, pps
- Excel: xls, xlsx, xlsm, xlt, xltx, xltm
- RTF: rtf
- ZIP: zip (fully recursive)
- MSG: msg (fully recursive)
DLP Policy
Policy Syntax
The DLP policies are defined using the following syntax:
[policy_name]:[file_types_to_scan]:[action_upon_match]:[regular_expression]
Options for ‘file_types_to_scan’:
- “all”
- “all_excl_pdf”
- “email_content”
- “email_subject”
- “file_name”
- “csv”, “txt”, “pdf”, “html”, “hxtml”, “doc”, “docx”, “rtf”, “xls”, “xlsx”, “xlsm”, “xlt”, “xltx”, “xltm”, “pptx”, “ppsx”, “pptm”, “ppt”, “pot”, “pps”
Options for ‘action_upon_match’:
- “inform”
- “confirm”
- “confirm_text”
- “deny”
If you'd like to skip the policy examples and get straight to the configuration of DLP, we can skip past it and come back if necessary.
Policy Examples
Case-insensitive detection of the string “confidential” in all content types that require user confirmation. The policy is named “Confidential”.
Confidential:all:confirm:(?i)confidentialCase-insensitive detection of the string “confidential” in specific content types. The results are displayed to the user and require no confirmation. The policy is named “Confidential”.
Confidential:email_subject,email_content,doc,docx:inform:(?i)confidentialVISA credit card rule that requires a user confirmation for all content types. The policy is named “VISA”.
VISA:all:confirm:4(?<=\b(?<!\.)4)\d{3}[\W\s]?\d{4}[\W\s]?\d{4}[\W\s]?\d{4}\b
Regular Expressions (regex)
Generic:
Confidential:all:confirm:(?i)confidential
Internal:all:confirm:(?i)internal
Restricted:all:confirm:(?i)restricted
Sensitive:all:confirm:(?i)sensitive
Credit cards:
Visa: 4(?<=\b(?<!\.)4)\d{3}[\W\s]?\d{4}[\W\s]?\d{4}[\W\s]?\d{4}\b
Mastercard 1: 5(?<=\b(?<!\.)5)[1-5]\d{2}[\W\s]?\d{4}[\W\s]?\d{4}[\W\s]?\d{4}\b
Mastercard 2: 5(?<=\b(?<!\.)5)([\W\s][1-5])([\W\s]\d){14}\b
American Express 1: 3(?<=\b(?<!\.)3)(4|7)\d{2}[\W\s]?\d{2}[\W\s]?\d{4}[\W\s]?\d{5}\b
American Express 2: 3(?<=\b(?<!\.)3)([\W\s](4|7))([\W\s]\d){13}\b
Diners Club 1: 3(?<=\b(?<!\.)3)(0[0-5]|[68]\d{1})\d{1}[\W\s]?\d{4}[\W\s]?\d{4}[\W\s]?\d{2}\b
Diners Club 2: 3(?<=\b(?<!\.)3)[\W\s](0[\W\s][0-5]|[68][\W\s]\d{1})([\W\s]\d){11}\b
Discover card 1: 6(?<=\b(?<!\.)6)(011|5[0-9]{2})[\W\s]?\d{4}[\W\s]?\d{4}[\W\s]?\d{4}[\W\s]?\b
Discover card 2: 6(?<=\b(?<!\.)6)[\W\s](0[\W\s](1[\W\s]){2}|5[\W\s](\d[\W\s]){2})(\d[\W\s]){11}\d\b
JCB cards 1: (?=[21|18])(2131|1800)[\W\s]?(\d{4}[\W\s]?){2}\d{3}\b
JCB cards 2: (?=[2|1])(2[\W\s]?1[\W\s]?3[\W\s]?1|1[\W\s]?8[\W\s]?0[\W\s]?0)([\W\s]?\d){10}\b
JCB cards 3: 35(?<=\b(?<!\.)35)\d{2}[\W\s]?(\d{4}[\W\s]?){3}\b
JCB cards 4: 3(?<=\b(?<!\.)3)[\W\s]?5[\W\s]?(\d[\W\s]?){13}\d\b
Standard health identification card number (NPI):
(?<!\\d)\\d{10}(?!\\d)|80840\\d{10}(?!\\d)
Vehicle Identification Number (VIN):
[0-9A-HJ-NPR-Z]{17}
US Social Security Number (SSN):
([^0-9-]|^)([0-9]{3}-[0-9]{2}-[0-9]{4})([^0-9-]|$)
UK health identification number (NHS, CHI):
b([1-9]{1}[0-9]{2}s?-?[0-9]{3}s?-?[0-9]{4})b
(([^wt]?s)?(-)?d){10}
(([^wt]?s)?(_)?d){10}
(([^wt]?s)?d){10}
UK national insurance number (NINO):
[A-CEGHJ-NOPR-TW-Z]{2}[0-9]{6}[ABCDs]{1}
Irish PPS number:
W?d{7}[a-zA-Z]{1,2}W
Other
SSNorHSA:all:confirm:([^0-9-]|^)([0-9]{3}[0-9]{2}[0-9]{4})([^0-9-]|$)
DDAorSAV7:all:confirm:([^0-9-]|^)([0-9]{7})([^0-9-]|$)
DDAorSAV8:all:confirm:([^0-9-]|^)([0-9]{8})([^0-9-]|$)
HSA:all:confirm:([^0-9-]|^)([0-9]{10})([^0-9-]|$)
Health
Birthday:all:confirm:((?i)Birth Date|DOB|Patient Date of Birth|Patient DOB|Patient_DOB)
RX:all:confirm:((?i)rx_number|RxNumber)
Patient Name:all:confirm:((?i)pa_first_name|pa_last_name|patient_first|patient_last|Patient First|Patient First Name|Patient Last|Patient Last Name|first_name|last_name|Patient Address|Patient Full Name|Patient Middle Name|Patient Middle Initial)
Patient Identifier:all:confirm:((?i)Patient Email|Patient experience on drug|patient experience on drug(DELETE)|Patient Gender|Patient height|Patient ID (Internal Reporting)|Patient interest|patient phone #|patient state|patient weight|patient work phone #|patient zip)
PHI:all:confirm:((?i)PHI Consent Date|PHI Consent signed|Prescription Sub-Status Code)
HUB ID:all:confirm:((?i)HUB Identifier|HUB Patient ID)
Identifiers:all:confirm:((?i)Patient_Genotype|Fibrosis Score|Patient Weight|Prescription Transfer|Product Form|Quality of Life Scale|Record Date/Timestamp|SPP Patient Identifier)
ICD:all:confirm((?i)ICD9|ICD-9|ICD10|ICD-10|ICD)
Configuring DLP Content Scanning
VIPRE recommends that you test your DLP rules before deployment using the live testing window. To do this, follow the steps below.
- Access the live testing window at File > Options > Add-ins > Add-In Options > SafeSend > Edit Settings
- Use the setting ContentScanningRules in the ADMX/ADML files for configuration via Group Policy; This setting can be used to push out new rules to all client machines. This setting is named SS_ContentScanningRules in the registry which can also be used for testing settings locally:
HKEY_LOCAL_MACHINE/SOFTWARE/{WOW6432Node}/SafeSend/SS_ContentScanningRules
The ContentScanningLicenseKey needs to be set to a valid license key in a production deployment (not in a trial or POC).
Important
Encrypted MS Office documents go through Office to decrypt - not SafeSend. Depending on your computer and network connection, this could potentially take longer than the default scan timeout. You’ll need to increase the content scanning timeout to allow enough time for the document to be opened, the password to be entered, and the scan to complete.
To increase the default scan timeout, update the following setting:
ContentScanningTimeoutMS
It’s set to 10000ms (10 seconds) by default.
This article is part of the SafeSend PC Add-in Deployment Guide, which includes all successive steps needed for a successful deployment. Please refer to Related Articles for direct links to the deployment guide and other processes pertinent to the one detailed in this article.
Store Settings
When you are deploying VIPRE SafeSend throughout your organization for the first time, this content walks you through the process of using the Store Settings option to permanently save your settings and build a new .msi installer that's been explicitly customized for the needs of your organization.
Helpful Information
Other occasions when you may need to generate a custom installer include:
- Making changes to the configuration on individual PCs
- Making changes to the configuration on roaming profiles in your Group Policy
- Updating the license key on individual PCs after initial purchase when your trial ends
- Updating the license key on individual PCs after extending your full license key for another year
Build .MSI
- In Outlook, on the top left, click File
- Go down to Outlook Options and select Add-Ins
- Select Add-in Options
- Click Store Settings
- Browse to the original .msi installer and click Open
- Browse to the location where you want to save the customized .msi installer
- Create a unique name, so you know the difference between the custom installer and the original installer
- Click Save
.png)
Now, we need to uninstall from the computer you're on so we can re-install your unique version of VIPRE SafeSend!
Uninstall SafeSend
- In Windows, open Control Panel. Under Programs, select Uninstall a program
- Locate SafeSend and select Uninstall
Deploy SafeSend using Group Policy
Here we'll walk you through the process of deploying VIPRE SafeSend to your organization via Group Policy.
Create a Distribution Point
The first step in deploying an MSI through Group Policy Objects (GPO) is to create a distribution point on the publishing server.
- Log on to the server as an Administrator
- Create a shared network folder to house the MSI installer package
- Set the folder permissions to allow access to the distribution package
- Copy the SafeSend MSI to the shared folder
Create a Group Policy Object
The SafeSend .MSI is a per-machine package and should, therefore, be assigned per-machine. SafeSend will then be installed silently for all computers when the machines start.
- Navigate to Start > Programs > Administrative Tools > Group Policy Management Console
- Locate the domain/OU you wish to link the new GPO
- Right-click on your selected domain/OU and select Create a GPO in this domain, and Link it here…
- Name of the new policy, e.g. “SafeSend DLP Outlook Add-In”
- On the left side of the screen, select the GPO
- Under Scope > Security Filtering, add the wanted groups, users and computers
- Right-click on the new GPO and select Edit
- Expand Computer Configuration > Policies > Software Settings > Software installation
- Right-click Software Installation, and select New > Package
- In the Open dialog, enter the full UNC path of the shared package you want to assign
- Be sure to use the UNC path, not not the Browse button
- Click Open
- Click Assigned > OK. The package will be added to the right pane of the Group Policy window
- When the client computers start-up, the assigned package will be installed automatically
Congratulations! VIPRE SafeSend PC add-in has now been successfully deployed to the end-users in your organization.
Deploy SafeSend on Individual PCs
Warning
SafeSend cannot be installed from a network share drive. You must copy and run the installer locally. On each PC you want to install VIPRE SafeSend on, double-click on the installer package
- Accept the End-user License Agreement
- Click Install
Congratulations! VIPRE SafeSend has now been successfully deployed to the end-users in your organization.
Add License Key
Once you have your license key, follow these instructions to apply it to the VIPRE SafeSend PC add-in.
Important
This article is part of the SafeSend PC Add-in Deployment Guide, which includes all successive steps needed for a successful deployment, including how to make changes to the settings and license key persistent. Please refer to that article or Related Articles below for direct links to the deployment guide and other processes pertinent to the one detailed in this article.
- In Outlook, on the top left, click File
- Go down to Outlook Options and select Add-Ins
- Select Add-in Options

- Select Edit settings...
- Under the Logic tab, click the arrow next to Commonly Used
- Look for the field called LicenseKey and paste your license key into the field
.png)
- Click Close Window at the bottom of the window
You have successfully added your license key!
Set Administrator Password
While you're in trial mode, there is no admin password required. Once you purchase a full license, however, you will need to set an admin password in order to view or change any settings.
To set the password:
- In Outlook, on the top left, click File
- Go down to Outlook Options and select Add-ins
- Select Add-in Options
.png)
Under Administrator, you'll notice that all options are grayed out.
- Locate the default password in the SafeSend_Admin_Password.PDF file that came in the SafeSendArchive.v.r.m.b.zip
- Enter the default password in the Password field
- Select Change password
- In the Change password window, enter and confirm your new password, then click OK
.png)
The password is now saved and will be required when viewing or changing SafeSend settings.
Add your Organization's Logo
You can customize the look and feel of VIPRE SafeSend by uploading a personalized logo. This optional step is a great way to integrate SafeSend with your organization seamlessly.
Important
This article is part of the SafeSend PC Add-in Deployment Guide, which includes all successive steps needed for a successful deployment. Please refer to Related Articles for direct links to the deployment guide and other processes pertinent to the one detailed in this article.
Image Requirements
Before uploading your logo, make sure it meets the following requirements:
- Image size must be no larger than 50x180
- Image type must be .png
Images with transparent backgrounds are recommended so that your logo matches the rest of SafeSend.
Now that you have an image that meets the above requirements, let's move on to uploading it.
Add Logo
- In Outlook, on the top left, click File
- Go down to Outlook Options and select Add-Ins
- Select Add-in Options
- Locate and click Change Logo
- Browse to the image you want to use and click Open
- Click OK at the bottom
Now, your logo is part of SafeSend!
If you are following the guided setup, click Next Step below to continue to the next part of the SafeSend PC Add-in Deployment Guide. Otherwise, see Related Articles below to learn how to store settings.
Prevent End-users from Disabling SafeSend
Let's walk through how you can prevent users from disabling the SafeSend PC add-in.
Outlook 2007-2010
It is possible to prevent users from disabling the SafeSend Add-in in Outlook 2007 or 2010 using the registry key DontDisplayHKLMAddin.
The image below shows how it looks after the registry key DontDisplayHKLMAddins has been set. As can be seen, SafeSend is not visible even though it is loaded. This registry key DontDisplayHKLMAddins can also be set using GPO.
Setting this key will affect all HKLM type of add-ins, in that none of them can be disabled by the end-user anymore. This potential issue is solved in Outlook 2013 or later.
- Log in to a normal user account
- Using Regedit, open HKEY_CURRENT_USER\Software\Microsoft\Office\14.0\Outlook
- If the current user does not have a key for "Security", add it
- Add the DontDisplayHKLMAddinsDWORDValue in the Security key. Set the value to 1
- In the Manage COM Add-ins dialog, click Go. SafeSend is not visible, even though it is loaded.
There is no need to restart Outlook, since Outlook reads this registry entry when you click the Go button.
Outlook 2013 or Outlook 2016
It is possible to prevent users from disabling the SafeSend Add-in in Outlook 2013 or Outlook 2016 using group policy.
The image below shows how it looks after the group policy setting is enabled. A user cannot uncheck the “SafeSend Outlook Add-in” checkbox as can be seen in the text marked in red.
- Open Group Policy and check that the Office 2013/2016 Administrative Templates are installed
- If the templates are installed, you will see the “Microsoft Outlook 2013/2016” in the User Configuration > Administrative Templates > Microsoft Outlook 2013> Miscellaneous path
- If the templates are not installed, you can download the templates from Microsoft. View this Microsoft article for help installing the template
- Enable the “List of managed add-ins” policy setting
- Write “zzz.SafeSend” (the add-ins progId) and 1 for the Value in this setting. Can also click the “Show” button above to get the dialog below. The value 1 means that SafeSend cannot be disabled by users.
An alternative way to achieve this is to push a registry key manually using GPO; see below for the path.
For Outlook 2013 the “16.0” part should be replaced a “15.0” part. Please note that the registry type should be REG_SZ. This can also be tested on a single machine by creating the registry key in regedit. If GPO is being used then please make sure there is no conflict with another GPO that is configuring the same setting using administrator templates.
Configure SafeSend
If you want to get started using SafeSend with the default configuration, you can skip this step.
Important Information
This article is part of the SafeSend PC Add-in Deployment Guide, which includes all successive steps needed for a successful deployment. Please refer to Related Articles for direct links to the deployment guide and other processes pertinent to the one detailed in this article.
VIPRE SafeSend Settings
There are two ways to get to VIPRE SafeSend's settings, depending on if you are using a trial or have purchased a full license.
Click here if using a trial license
- Select Trial Settings in the Confirmation window pop-up
- In the Logic tab, click on the arrows next to Advanced, Commonly used, and Special cases to see options available to you
- Refer to our settings reference for full details on how to use all settings
Click here if using a full license
- In Outlook, on the top left, click File
- Go down to Outlook Options and select Add-Ins
- Select Add-in Options
- Click Edit Settings, which allows you to customize the behavior of VIPRE SafeSend
- In the Logic tab, click on the arrows next to Advanced, Commonly used, and Special cases to see options available to you
- Refer to our settings reference for full details on how to use all settings
Helpful Information
While we do provide a comprehensive settings reference to help determine what makes the most sense for your organization, we understand that it can be a little overwhelming. To help make things a little easier for you, VIPRE SafeSend ships with the settings we recommend already configured by default. However, because each organization has unique needs, we suggest going through the settings reference, specifically the Commonly Used and Advanced sections, to ensure SafeSend is set up appropriately for your organization.
If you'll be deploying VIPRE SafeSend via Group Policy and will be moving forward with the default configuration, we've included ADMX/ADML files (administrative templates) in the SafeSendArchive-v.r.m.b.zip file you downloaded that will allow you to push changes to your organization after it's been deployed.
Generate a Custom Installer
When you are deploying VIPRE SafeSend throughout your organization for the first time, this content walks you through the process of using the Store Settings option to permanently save your settings and build a new .msi installer that's been explicitly customized for the needs of your organization.
Helpful Information
Other occasions when you may need to generate a custom installer include:
- Making changes to the configuration on individual PCs
- Making changes to the configuration on roaming profiles in your Group Policy
- Updating the license key on individual PCs after initial purchase when your trial ends
- Updating the license key on individual PCs after extending your full license key for another year
Build .MSI
- In Outlook, on the top left, click File
- Go down to Outlook Options and select Add-Ins
- Select Add-in Options
- Click Store Settings
- Browse to the original .msi installer and click Open
- Browse to the location where you want to save the customized .msi installer
- Create a unique name, so you know the difference between the custom installer and the original installer
- Click Save
Now, we need to uninstall from the computer you're on so we can re-install your unique version of VIPRE SafeSend!
Uninstall SafeSend
- In Windows, open Control Panel. Under Programs, select Uninstall a program
- Locate SafeSend and select Uninstall
Deploy SafeSend using Group Policy
Here we'll walk you through the process of deploying VIPRE SafeSend to your organization via Group Policy.
Create a Distribution Point
The first step in deploying an MSI through Group Policy Objects (GPO) is to create a distribution point on the publishing server.
- Log on to the server as an Administrator
- Create a shared network folder to house the MSI installer package
- Set the folder permissions to allow access to the distribution package
- Copy the SafeSend MSI to the shared folder
Create a Group Policy Object
The SafeSend .MSI is a per-machine package and should, therefore, be assigned per-machine. SafeSend will then be installed silently for all computers when the machines start.
- Navigate to Start > Programs > Administrative Tools > Group Policy Management Console
- Locate the domain/OU you wish to link the new GPO
- Right-click on your selected domain/OU and select Create a GPO in this domain, and Link it here…
- Name of the new policy, e.g. “SafeSend DLP Outlook Add-In”
- On the left side of the screen, select the GPO
- Under Scope > Security Filtering, add the wanted groups, users and computers
- Right-click on the new GPO and select Edit
- Expand Computer Configuration > Policies > Software Settings > Software installation
- Right-click Software Installation, and select New > Package
- In the Open dialog, enter the full UNC path of the shared package you want to assign
- Be sure to use the UNC path, not not the Browse button
- Click Open
- Click Assigned > OK. The package will be added to the right pane of the Group Policy window
- When the client computers start-up, the assigned package will be installed automatically
Congratulations! VIPRE SafeSend PC add-in has now been successfully deployed to the end-users in your organization.
Deploy SafeSend on Individual PCs
Warning
SafeSend cannot be installed from a network share drive. You must copy and run the installer locally. On each PC you want to install VIPRE SafeSend on, double-click on the installer package
- Accept the End-user License Agreement
- Click Install
Congratulations! VIPRE SafeSend has now been successfully deployed to the end-users in your organization.
Configure DLP (Data Loss Prevention)
VIPRE SafeSend can prevent sensitive information from being sent out to the wrong client.
Important Information
This article is part of the SafeSend PC Add-in Deployment Guide, which includes all successive steps needed for a successful deployment. Please refer to Related Articles for direct links to the deployment guide and other processes pertinent to the one detailed in this article.
Within VIPRE SafeSend, DLP (Data Loss Prevention) has three important features:
- Client Keyword/Domain Scanning allows you to identify a set of client keywords or regular expressions and associate those with a set of client domains or individual email addresses
- DLP Content Scanning presents sensitive content to the user, allowing the user to determine if the email should be blocked or sent with additional confirmation
- DLP Scan Password-Protected Attachments allows SafeSend to detect password-protected .zip files and prompt the user to add the password and decrypt the file so it can scan the attachment
It can scan emails and attachments for specific client keywords or regular expressions and require agent confirmation.
Client Keyword and Domain Scanning
Define Client Data
The client keyword/domain data is configured in Edit Settings, under the Data Loss Prevention (DLP) tab, and stored in the setting SS_ClientKeywordDomainList; it can contain thousands of lines of client/customer data. The principle is that you can identify a set of client keywords or regular expressions and associate those with a set of client domains. Instead of domains, it is also possible to specify individual email addresses as approved recipients.
Syntax: Client1Keyword1,Client1Keyword2,…:Client1Domain1,Client1Domain2,… Client2Keyword1,Client2Keyword2,…:Client2Domain1,Client2Domain2,…
Example: Apple,AAPL:apple.com Microsoft,MSFT:microsoft.com
Display Popup only when Client Data is Found
It is possible to use the setting OnlyPopupForDLPMatch to configure SafeSend to display its confirmation window only when client data has been found in the email.
Supported Attachment File Types
- Text: csv, txt
- PDF: pdf
- HTML: html, xhtml
- Word: doc, docx
- PowerPoint: pptx, ppsx, pptm, ppt, pot, pps
- Excel: xls, xlsx, xlsm, xlt, xltx, xltm
- RTF: rtf
- ZIP: zip (recursively)
Sending to Non-client Recipients
The user is required to type “CONFIRM” in order to send client data to a non-client external domain.
Sending to Approved Recipients
No additional confirmation is required except confirming the external recipient.
Sending Non-client Data Externally
What happens, in this case, depends on the OnlyPopupForDLPMatch setting. If it is enabled then the SafeSend confirmation window will not be displayed. If it is disabled, which is the default behavior, then SafeSend will still show its normal confirmation window. The below screenshot is thus displayed only if OnlyPopupForDLPMatch = 0.
Password Protected Files or Invalid Files
SafeSend displays password-protected files or invalid files in the DLP output table. Password protection is detected on Word, Excel, PowerPoint, PDF, and ZIP files.
Scanning Email Notification
The Scanning Email notification is displayed when OnlyPopupForDLPMatch is enabled, and SafeSend is busy scanning large files. The default time-out for large files is 10 seconds (see ContentScanningTimeoutMS), whereby SafeSend will post an error message in the dialog, saying that the content scan timed out.
DLP Content Scanning
Sensitive content is presented to the user, and you can define if the email should be blocked, or if the user can send the email after an additional confirmation.
Here you can see that SafeSend scanned an email's content and attachments finding potential Social Security and Credit Card numbers.
Sensitive Content
When you use DLP with VIPRE SafeSend, this is the type of content it looks for within your emails:
- Strings such as ‘Confidential’, ‘Internal’, ‘Restricted’ and ‘Sensitive’.
- US Social Security Number (SSN)
- Credit Card number (VISA, MasterCard, American Express, Diners Club, …)
- Standard health identification card number (NPI)
- Vehicle Identification Number (VIN)
- UK health identification number (NHS, CHI)
- UK national insurance number (NINO)
SafeSend Actions
Once VIPRE SafeSend finds what it's looking for, it performs the following actions:
- Inform the user
- Require confirmation from the user in the form of a checkbox
- Require confirmation from the user by the text “CONFIRM”
- Deny sending the email
Supported Content Types
VIPRE SafeSend supports the following types of documents and attachments:
- Email content (body)
- Email subject
- Attachment filename
- Attachment file types (scans inside attachments)
- Text: csv, txt
- PDF: pdf
- HTML: html, hxtml
- Word: doc, docx
- PowerPoint: pptx, ppsx, pptm, ppt, pot, pps
- Excel: xls, xlsx, xlsm, xlt, xltx, xltm
- RTF: rtf
- ZIP: zip (fully recursive)
- MSG: msg (fully recursive)
DLP Policy
Policy Syntax
The DLP policies are defined using the following syntax:
[policy_name]:[file_types_to_scan]:[action_upon_match]:[regular_expression]
Options for ‘file_types_to_scan’:
- “all”
- “all_excl_pdf”
- “email_content”
- “email_subject”
- “file_name”
- “csv”, “txt”, “pdf”, “html”, “hxtml”, “doc”, “docx”, “rtf”, “xls”, “xlsx”, “xlsm”, “xlt”, “xltx”, “xltm”, “pptx”, “ppsx”, “pptm”, “ppt”, “pot”, “pps”
Options for ‘action_upon_match’:
- “inform”
- “confirm”
- “confirm_text”
- “deny”
If you'd like to skip the policy examples and get straight to the configuration of DLP, we can skip past it and come back if necessary.
Policy Examples
Case-insensitive detection of the string “confidential” in all content types that require user confirmation. The policy is named “Confidential”.
Confidential:all:confirm:(?i)confidentialCase-insensitive detection of the string “confidential” in specific content types. The results are displayed to the user and require no confirmation. The policy is named “Confidential”.
Confidential:email_subject,email_content,doc,docx:inform:(?i)confidentialVISA credit card rule that requires a user confirmation for all content types. The policy is named “VISA”.
VISA:all:confirm:4(?<=\b(?<!\.)4)\d{3}[\W\s]?\d{4}[\W\s]?\d{4}[\W\s]?\d{4}\b
Regular Expressions (regex)
Generic:
Confidential:all:confirm:(?i)confidential
Internal:all:confirm:(?i)internal
Restricted:all:confirm:(?i)restricted
Sensitive:all:confirm:(?i)sensitive
Credit cards:
Visa: 4(?<=\b(?<!\.)4)\d{3}[\W\s]?\d{4}[\W\s]?\d{4}[\W\s]?\d{4}\b
Mastercard 1: 5(?<=\b(?<!\.)5)[1-5]\d{2}[\W\s]?\d{4}[\W\s]?\d{4}[\W\s]?\d{4}\b
Mastercard 2: 5(?<=\b(?<!\.)5)([\W\s][1-5])([\W\s]\d){14}\b
American Express 1: 3(?<=\b(?<!\.)3)(4|7)\d{2}[\W\s]?\d{2}[\W\s]?\d{4}[\W\s]?\d{5}\b
American Express 2: 3(?<=\b(?<!\.)3)([\W\s](4|7))([\W\s]\d){13}\b
Diners Club 1: 3(?<=\b(?<!\.)3)(0[0-5]|[68]\d{1})\d{1}[\W\s]?\d{4}[\W\s]?\d{4}[\W\s]?\d{2}\b
Diners Club 2: 3(?<=\b(?<!\.)3)[\W\s](0[\W\s][0-5]|[68][\W\s]\d{1})([\W\s]\d){11}\b
Discover card 1: 6(?<=\b(?<!\.)6)(011|5[0-9]{2})[\W\s]?\d{4}[\W\s]?\d{4}[\W\s]?\d{4}[\W\s]?\b
Discover card 2: 6(?<=\b(?<!\.)6)[\W\s](0[\W\s](1[\W\s]){2}|5[\W\s](\d[\W\s]){2})(\d[\W\s]){11}\d\b
JCB cards 1: (?=[21|18])(2131|1800)[\W\s]?(\d{4}[\W\s]?){2}\d{3}\b
JCB cards 2: (?=[2|1])(2[\W\s]?1[\W\s]?3[\W\s]?1|1[\W\s]?8[\W\s]?0[\W\s]?0)([\W\s]?\d){10}\b
JCB cards 3: 35(?<=\b(?<!\.)35)\d{2}[\W\s]?(\d{4}[\W\s]?){3}\b
JCB cards 4: 3(?<=\b(?<!\.)3)[\W\s]?5[\W\s]?(\d[\W\s]?){13}\d\b
Standard health identification card number (NPI):
(?<!\\d)\\d{10}(?!\\d)|80840\\d{10}(?!\\d)
Vehicle Identification Number (VIN):
[0-9A-HJ-NPR-Z]{17}
US Social Security Number (SSN):
([^0-9-]|^)([0-9]{3}-[0-9]{2}-[0-9]{4})([^0-9-]|$)
UK health identification number (NHS, CHI):
b([1-9]{1}[0-9]{2}s?-?[0-9]{3}s?-?[0-9]{4})b
(([^wt]?s)?(-)?d){10}
(([^wt]?s)?(_)?d){10}
(([^wt]?s)?d){10}
UK national insurance number (NINO):
[A-CEGHJ-NOPR-TW-Z]{2}[0-9]{6}[ABCDs]{1}
Irish PPS number:
W?d{7}[a-zA-Z]{1,2}W
Other
SSNorHSA:all:confirm:([^0-9-]|^)([0-9]{3}[0-9]{2}[0-9]{4})([^0-9-]|$)
DDAorSAV7:all:confirm:([^0-9-]|^)([0-9]{7})([^0-9-]|$)
DDAorSAV8:all:confirm:([^0-9-]|^)([0-9]{8})([^0-9-]|$)
HSA:all:confirm:([^0-9-]|^)([0-9]{10})([^0-9-]|$)
Health
Birthday:all:confirm:((?i)Birth Date|DOB|Patient Date of Birth|Patient DOB|Patient_DOB)
RX:all:confirm:((?i)rx_number|RxNumber)
Patient Name:all:confirm:((?i)pa_first_name|pa_last_name|patient_first|patient_last|Patient First|Patient First Name|Patient Last|Patient Last Name|first_name|last_name|Patient Address|Patient Full Name|Patient Middle Name|Patient Middle Initial)
Patient Identifier:all:confirm:((?i)Patient Email|Patient experience on drug|patient experience on drug(DELETE)|Patient Gender|Patient height|Patient ID (Internal Reporting)|Patient interest|patient phone #|patient state|patient weight|patient work phone #|patient zip)
PHI:all:confirm:((?i)PHI Consent Date|PHI Consent signed|Prescription Sub-Status Code)
HUB ID:all:confirm:((?i)HUB Identifier|HUB Patient ID)
Identifiers:all:confirm:((?i)Patient_Genotype|Fibrosis Score|Patient Weight|Prescription Transfer|Product Form|Quality of Life Scale|Record Date/Timestamp|SPP Patient Identifier)
ICD:all:confirm((?i)ICD9|ICD-9|ICD10|ICD-10|ICD)
Configuring DLP Content Scanning
VIPRE recommends that you test your DLP rules before deployment using the live testing window. To do this, follow the steps below.
- Access the live testing window at File > Options > Add-ins > Add-In Options > SafeSend > Edit Settings
- Use the setting ContentScanningRules in the ADMX/ADML files for configuration via Group Policy; This setting can be used to push out new rules to all client machines. This setting is named SS_ContentScanningRules in the registry which can also be used for testing settings locally:
HKEY_LOCAL_MACHINE/SOFTWARE/{WOW6432Node}/SafeSend/SS_ContentScanningRules
The ContentScanningLicenseKey needs to be set to a valid license key in a production deployment (not in a trial or POC).
Important
Encrypted MS Office documents go through Office to decrypt - not SafeSend. Depending on your computer and network connection, this could potentially take longer than the default scan timeout. You’ll need to increase the content scanning timeout to allow enough time for the document to be opened, the password to be entered, and the scan to complete.
To increase the default scan timeout, update the following setting:
ContentScanningTimeoutMS
It’s set to 10000ms (10 seconds) by default.
This article is part of the SafeSend PC Add-in Deployment Guide, which includes all successive steps needed for a successful deployment. Please refer to Related Articles for direct links to the deployment guide and other processes pertinent to the one detailed in this article.
Generate a Custom Installer
When you are deploying VIPRE SafeSend throughout your organization for the first time, this content walks you through the process of using the Store Settings option to permanently save your settings and build a new .msi installer that's been explicitly customized for the needs of your organization.
Helpful Information
Other occasions when you may need to generate a custom installer include:
- Making changes to the configuration on individual PCs
- Making changes to the configuration on roaming profiles in your Group Policy
- Updating the license key on individual PCs after initial purchase when your trial ends
- Updating the license key on individual PCs after extending your full license key for another year
Build .MSI
- In Outlook, on the top left, click File
- Go down to Outlook Options and select Add-Ins
- Select Add-in Options
- Click Store Settings
- Browse to the original .msi installer and click Open
- Browse to the location where you want to save the customized .msi installer
- Create a unique name, so you know the difference between the custom installer and the original installer
- Click Save
Now, we need to uninstall from the computer you're on so we can re-install your unique version of VIPRE SafeSend!
Uninstall SafeSend
- In Windows, open Control Panel. Under Programs, select Uninstall a program
- Locate SafeSend and select Uninstall
Deploy SafeSend using Group Policy
Here we'll walk you through the process of deploying VIPRE SafeSend to your organization via Group Policy.
Create a Distribution Point
The first step in deploying an MSI through Group Policy Objects (GPO) is to create a distribution point on the publishing server.
- Log on to the server as an Administrator
- Create a shared network folder to house the MSI installer package
- Set the folder permissions to allow access to the distribution package
- Copy the SafeSend MSI to the shared folder
Create a Group Policy Object
The SafeSend .MSI is a per-machine package and should, therefore, be assigned per-machine. SafeSend will then be installed silently for all computers when the machines start.
- Navigate to Start > Programs > Administrative Tools > Group Policy Management Console
- Locate the domain/OU you wish to link the new GPO
- Right-click on your selected domain/OU and select Create a GPO in this domain, and Link it here…
- Name of the new policy, e.g. “SafeSend DLP Outlook Add-In”
- On the left side of the screen, select the GPO
- Under Scope > Security Filtering, add the wanted groups, users and computers
- Right-click on the new GPO and select Edit
- Expand Computer Configuration > Policies > Software Settings > Software installation
- Right-click Software Installation, and select New > Package
- In the Open dialog, enter the full UNC path of the shared package you want to assign
- Be sure to use the UNC path, not not the Browse button
- Click Open
- Click Assigned > OK. The package will be added to the right pane of the Group Policy window
- When the client computers start-up, the assigned package will be installed automatically
Congratulations! VIPRE SafeSend PC add-in has now been successfully deployed to the end-users in your organization.
Deploy SafeSend on Individual PCs
Warning
SafeSend cannot be installed from a network share drive. You must copy and run the installer locally. On each PC you want to install VIPRE SafeSend on, double-click on the installer package
- Accept the End-user License Agreement
- Click Install
Congratulations! VIPRE SafeSend has now been successfully deployed to the end-users in your organization.
Web Add-in
Have you ever mistakenly sent an email to the wrong person? Accidentally forwarded attachments with sensitive data? The VIPRE SafeSend Web Add-in is an Outlook add-in that works to prevent those types of mistakes within your organization by requesting manual confirmation from the user when sending emails to recipients outside of your organization.
If you're new to VIPRE SafeSend, this is the place to start. We're here to walk you through deployment with this guided setup. If you haven't seen our product overview and comparison chart though, please visit there first.
How SafeSend Works
When installed, SafeSend requires validation each time you send an email to an external recipient. You will need to confirm all external recipients of an email before it leaves the network. Upon hitting “Send” or “Send Secure,” the SafeSend pop-up window will appear. To confirm the recipients or any attached file, click on the checkbox beside each of the external recipients (and file if applicable) and hit the Send button.
What's Included
When you receive your SafeSendArchive-v.r.zip file, it will include the following files:
-
Get_Started_With_SafeSend
- Helpful information and links to help you get started
-
SafeSendPC_v.r.m.b.zip (SafeSend PC add-in)
-
Administrative Templates
- For use with Group Policy to manage settings when the SafeSend PC add-in has already been deployed
-
Admin Password
- Administrative credentials for local access to SafeSend settings
- Not applicable for Trial licenses
-
SafeSendSetup
- Installer package (.MSI) for the SafeSend PC/COM add-in
-
Administrative Templates
-
SafeSendWeb_v.r.m.b (SafeSend Web add-in)
- End-user License Agreement (EULA)
- Deployable files
- packagename.txt
- SafeSendWebPackagev.r.m.b.zip
-
3rd Party Libraries.txt
- Licenses for third-party libraries
For these instructions, you will need everything within the SafeSendWeb_v.r.m.b folder mentioned above.
When you are ready, move on to the next step below.
Install and Configure SafeSend Web Add-in
Install SafeSend Web Add-in
While SafeSend v4.6 will work with any .NET CORE 3.1 capable web server, we recom...
If you are new to SafeSend and setting it up for the first time, please stop here and navigate to our complete deployment guide. If you are already viewing this article from within the complete deployment guide, please disregard this message and continue below.
Prerequisites
Before you install the SafeSend web add-in, please verify that you have all of the required prerequisites listed here.
- Verify that your organization meets the System Requirements
- If your organization uses Microsoft Azure web server, ensure you have access to create a web app
- Certificate; This is a file you can create yourself or obtain through a third-party certificate authority; it is not provided to you by VIPRE
To generate a certificate signing request (CSR):
- Generate a Certificate Signing Request (CSR) using openssl with the following shell command:
openssl req -newkey rsa:2048 -keyout safesend.key -out safesend.csr - Enter a PEM passphrase. Once the certificate has been received from the third-party certificate authority (CA), you will need this passphrase in later steps
-
When prompted, provide the Country, State, Locality, Organization, Unit, and Common Name
- The Email Address, challenge password, and optional company name may be left blank
-
This will create a safesend.CSR and safesend.key file. Submit only the safesend.CSR file to the third-party CA of your choice
- You will need to wait for the certificate to be issued before proceeding with the remaining steps; this could take several business days
- If the generated certificate is returned as a PEM file, you will need to export the private key to a Pfx file so it can be uploaded to Azure
-
Run the following shell command (Note that this command assumes the file from the CA is named safesend.PEM; adjust as necessary)
openssl pkcs12 -export -out safesend.pfx -inkey safesend.key -in safesend.pem- Enter the PEM passphrase from Step 2 above
-
Enter an export password
- This can be different from the passphrase and will be used later when uploading the pfx file to Azure
- Enter the export password a second time to verify
Important
- SafeSend will work with any .NET CORE 8.0 capable web server
- Microsoft requires the site where the add-in is hosted to be SSL-secured
- Deploying the SafeSend web add-in can take up to 12 hours to propagate the network
- Any changes made to Settings.json require the website to be restarted to take effect; This should be done outside of normal operating hours to avoid potential service interruptions
- When deploying multiple instances of the SafeSend server, you'll need to provide a strong password with a minimum length of 16 characters using the following setting:
"ApiSecret": "<YOUR_API_SECRET>",
Graph API and Web Server Setup
Towards the beginning of this setup, there is some back-and-forth between the Graph API and Web Server Setup, so please ensure you read the instructions below carefully.
VIPRE Recommends
SafeSend web add-in will work with any .NET CORE 8.0 capable web server, and we include instructions for two specific web servers below, however we recommend Microsoft Azure due to it's ease of install and maintenance.
Step 1: Create Web App
The following instructions take place within Microsoft Azure.
- Navigate to portal.azure.com and log in with your Microsoft Azure account credentials
- On the top menu, hover your mouse over App Services and select Create Web App
- A new page called Create Web App will load
- Select the desired Resource Group from the drop-down menu
- Under Instance Details:
- Choose a web app name that reflects your use; For our purposes, we'll use SafeSend8, but you can use any name that you want
- Publish - defaults to Code; this can stay as-is
- Runtime stack - .NET 8.0 (LTS)
- Operating System - choose your preferred operating system to host SafeSend
- Region - Select your region
- Click Review + Create, then Create on the following page
Upon creation of the web app, you will be provided with a URL for your SafeSend site. Make note of this URL as you will need it in the next step.
Step 2: Graph API Setup
These instructions are for admins utilizing the SafeSend Web Add-in with Microsoft 365. These steps do not apply if you are using Microsoft Exchange Server.
Click here for Graph API Setup instructions
Web Add-in: Microsoft Graph API Setup for SafeSend
These instructions are for admins utilizing the SafeSend Web Add-in with Microsoft 365. These steps do not apply if you are using Microsoft Exchange Server.
- Sign in to Microsoft Azure Active Directory Admin Center with your administrator credentials
- Select App Registrations, then click New Registration
- On the Register an Application page, set the following values:
- Name: VIPRE SafeSend Graph API Resource
- Supported account types:
- If you're using within a single domain, select Accounts in this organizational directory only (Single Tenant)
- If the Microsoft Azure portal you're logging in to is not the same account that you're using to sign in to your Microsoft 365 account, select Accounts in any organizational directory (Multitenant)
- In the Redirect URI section, select Single-page application (SPA) from the drop-down menu, then set URI to your SafeSend site URL using the following format: 'https://<yoursafesendsiteurl>/login'
- Choose Register
- On the SafeSend page, copy and save the Application (client) ID and AppTenantID; you'll need these later
- Under the Manage section, select Authentication
- Under Implicit Grant and Hybrid Flows, check the box next to Access Tokens (used for implicit flows) and ID Tokens, and click Save
- Still, under the Manage section, select Certificates & Secrets, then Certificate
- Under Certificates, select Upload Certificate
- Select a certificate file (.cer extension) and enter a value for Description
- This is a file you can create yourself or obtain through a third-party certificate authority; it is not provided to you by VIPRE
- Click Add, then copy and save the Thumbprint value; you'll need this later for a setting called AppCertificateThumbprint
- Select a certificate file (.cer extension) and enter a value for Description
- Enter a value for Description, select an appropriate option for Expires, then click Add
- Still, under Manage, select Expose an API
- Choose the Set link that appears after Application ID URI
- In the Set App URI panel, change the default value by adding your host before the GUID listed
- Example: If the default value is api://05adb30e-50fa-4ae2-9cec-eab2cd6095b0, and your app is running on <yoursafesendhost>, the value should be api://<yoursafesendhost>/05adb30e-50fa-4ae2-9cec-eab2cd6095b0
- Click Save
- Select Add a Scope
- A panel will open; enter access_as_user as the Scope name
- Who can consent? should be set to Admins only
- Fill in the fields for configuring the admin consent prompt with values that are appropriate for the `access_as_user` scope
- This enables the Office client application to use your SafeSend add-in's web APIs with the same rights as the current user
- Examples:
- Admin consent display name**: Office can act as the user
- Admin consent description**: Enable Office to call the add-in's web APIs with the same rights as the current user
- Set State to Enabled
- Select Add Scope
- In the Authorized client applications section, identify the applications that you want to authorize to your SafeSend add-in's web application
- Each of the following IDs needs to be pre-authorized:
- d3590ed6-52b3-4102-aeff-aad2292ab01c (Microsoft Office)
- ea5a67f6-b6f3-4338-b240-c655ddc3cc8e (Microsoft Office)
- 57fb890c-0dab-4253-a5e0-7188c88b2bb4 (Office on the web)
- 08e18876-6177-487e-b8b5-cf950c1e598c (Office on the web)
- bc59ab01-8403-45c6-8796-ac3ef710b3e3 (Outlook on the web)
- Each of the following IDs needs to be pre-authorized:
- For each of the IDs above, take the following steps:
- Select Add a client application button
- In the panel that opens, set the Client ID to the respective GUID
- Check the box for api://<yoursafesendhost>/$App ID GUID$/access_as_user
- Select Add application
- Under Manage, select API Permissions, then Add a Permission
- On the panel that opens, choose Microsoft Graph then Delegated Permissions
- Using the Select Permissions search box, search for the following permissions
- Calendars.ReadWrite.Shared
- Files.ReadWrite
- Mail.ReadWrite.Shared
- offline_access
- openid
- profile
- User.Read
- Select the checkbox for each permission as it appears; after selecting the permissions, click Add Permissions at the bottom of the panel
- On the same page, choose Grant Admin Consent for [tenant name] button
- Select Yes to confirm
Important
After choosing Grant Admin Consent for [tenant name], you may see a banner message asking you to try again in a few minutes so that the consent prompt can be constructed. If you see that message, you can continue to the next step, however, it is important that you do not forget to come back to this step.
- Update the following settings via Azure portal configuration:
- Update AppID using the AppID from Step 5 above
- Update AppCertificateThumbprint using the certificate thumbprint from Step 9 above
- Ensure EmailProviderUrl is set to https://graph.microsoft.com
- Navigate to https://<yoursafesendhost>/manifest to download the manifest file
Step 3: Web Server Setup
Click here for Azure-specific instructions
- If you're not still logged in to http://portal.azure.com, please navigate back to it and login with your credentials
- Go to the web app you created above
- Click Go to resource
- On the left-side menu, under Settings, select Environment Variables
- Under App Settings, select +Add, enter the names and values below - do not click Deployment Slot Setting, leave that blank - then click Apply at the bottom
- Name = WEBSITE_RUN_FROM_PACKAGE; Value = 1
- Name = AppID (NOTE: The AppID value should have been obtained during the Graph API setup. If that has not been done, you should complete this now before proceeding.)
- Name = AppIdUri (NOTE: The AppIdUri value should have been obtained during the Graph API setup. If that has not been done, you should complete this now before proceeding.)
- Name = AppTenantId (NOTE: The AppTenantId value should have been obtained during the Graph API setup, called the Directory tenant ID. If that has not been done, you should complete this now before proceeding.)
- Name = AppCertificateThumbprint (NOTE: The AppCertificateThumbprint value should have been obtained during the Graph API setup. If that has not been done, you should complete this now before proceeding.)
- Name = Website_Load_Certificates (NOTE: The Website_Load_Certificates value should have been obtained during the Graph API setup. If that has not been done, you should complete this now before proceeding.)
- Name = LicenseKey; Value = license key obtained when you purchased SafeSend

- Click Apply at the bottom of the Environment Variables screen
- Still under Settings, select Configuration
- Set Always on to On
- Change SCM Basic Auth Publishing to On
- Change FTP Basic Auth Publishing Credentials to On
- Click Save at the top
Upload the Private Key Certificate
- On the left-side menu, under Settings, select Certificates
- Click the Bring your own certificates tab
- Choose Add certificate
- Select Upload certificate (.pfx)
- Browse to the directory where you saved the .pfx file and upload it here
- Enter your Certificate password
- Fill in the Certificate friendly name - this can be whatever you want
- Click Add
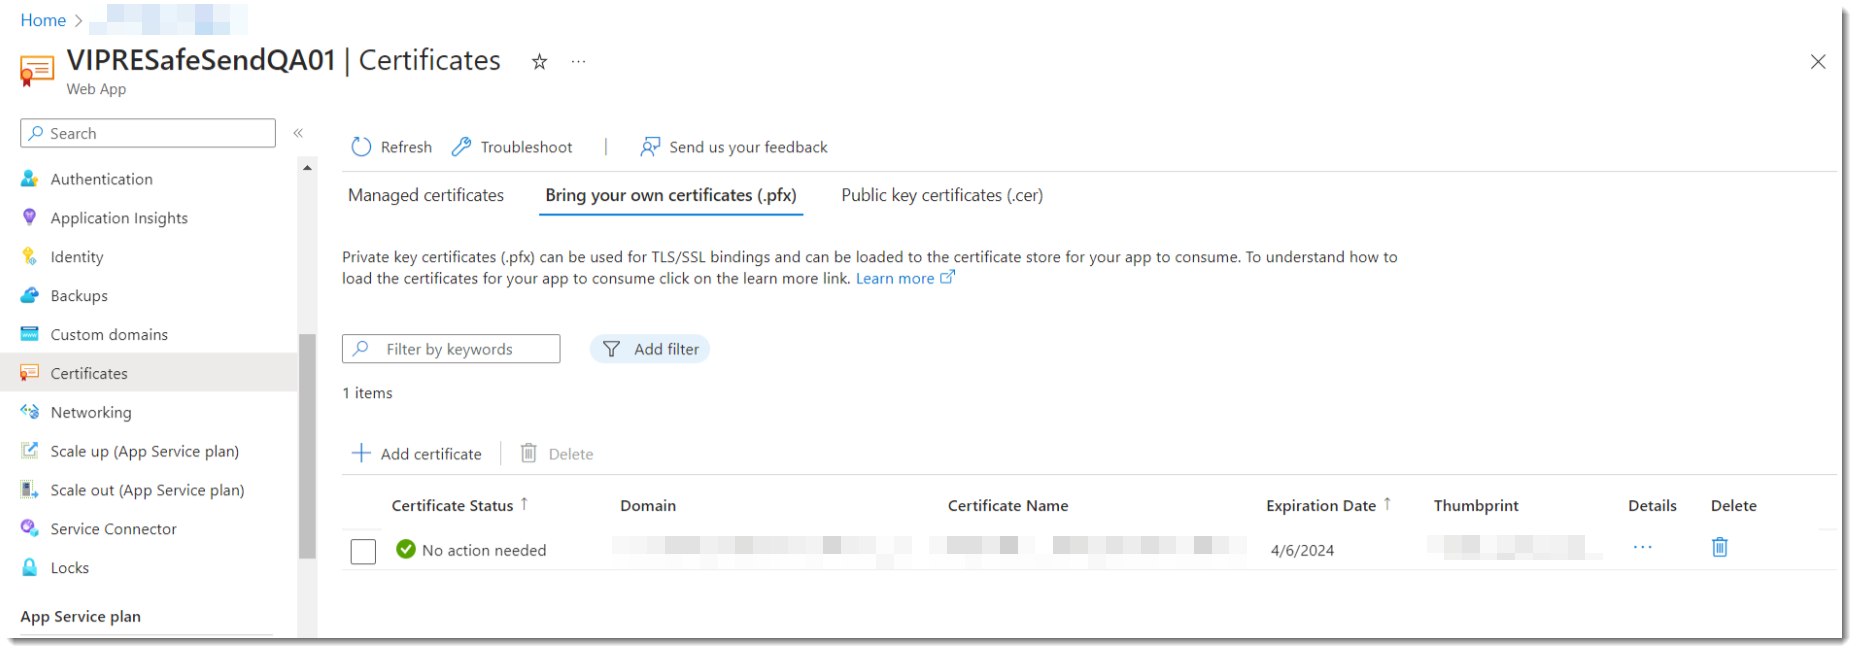
You'll need an FTP Client (like Filezilla) for the next part
- On the left-side menu, under Deployment, select Deployment Center
- Select FTPS Credentials at the top
- Copy the value in the FTPS endpoint field and paste it into the Host address field of your FTP Client
- Under Application scope, copy the value in the Username field to the Username field of your FTP Client
- Copy the value of the Password field to the Password field of your FTP Client
- On your FTP Client, click Connect
- After you're connected, under Remote site, create the following directories based on your operating system
- Windows based App Service = C:\home\Data\sitepackages
- Linux based App Service = /data/sitepackages
- Upload the SafeSendWebPackagev.r.m.b.zip and packagename.txt files found in SafeSendArchive-v.r.m.b.zip\SafeSendWeb_v.r.m.b.zip to the sitepackages folder
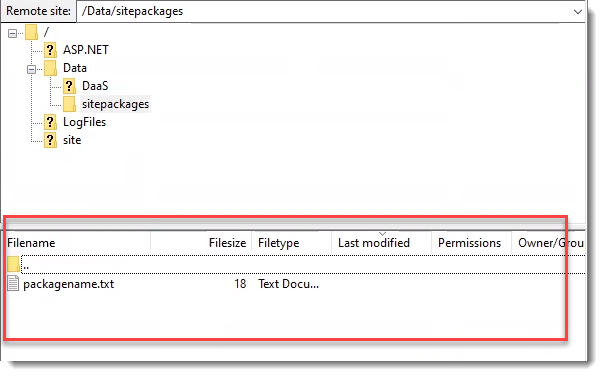
Optional: Go back to the browser screen that has Azure open
This section is optional and can be completed at anytime. Refer to the Web Add-in Settings Reference for the following section:
- Configure additional settings as desired:
- On the left-side menu, under Settings, select Environment Variables
- Under App Settings, select +Add
- Take the name of the setting from Web Add-in Settings Reference and add it to the Name field
- For example, to enable the client keyword domain list setting, you could copy ClientKeywordDomainList from Web Add-in Settings Reference into the Name field of Azure
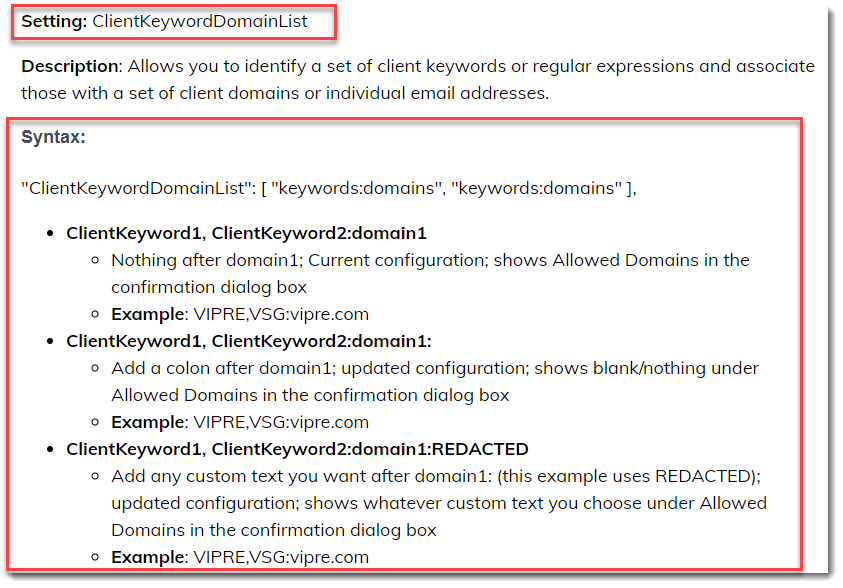
- Determine the appropriate values for each setting using the Web Add-in Settings Reference
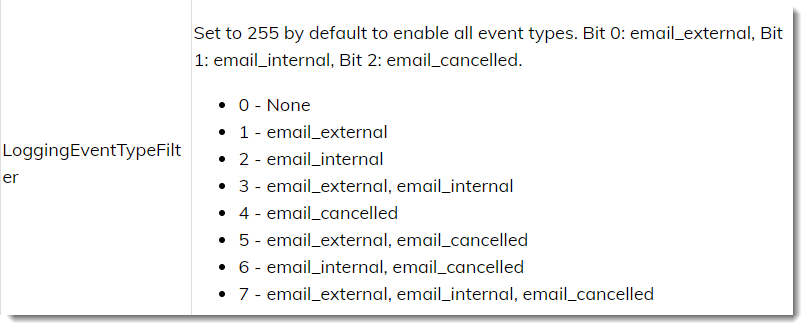
- Click OK then select Apply
- Click Continue to save changes
- On the left-side menu, select Overview, then select Restart at the top
- Azure will confirm you are sure you want to restart SafeSend - click Yes
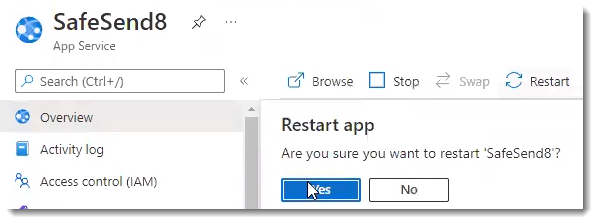
- In the top-right corner, you should see a notification showing the web app has been successfully restarted
These steps will complete the SafeSend deployment
- You'll see a URL somewhat close to the top-right portion of the screen labeled Default Domain; clicking that URL should open a browser window and take you immediately to the SafeSend website to verify your installation and license status
- Append /manifest to the URL to download the manifest.xml file; you will need this manifest or the URL to it when sideloading or deploying the add-in to users
If you see a 504.0 GatewayTimeout error in your browser, please refresh the browser window. This error can happen when Microsoft Azure takes too long to load and start up.
Click here for IIS-specific instructions
Please note if you are using IIS, you'll need to download and install the .NET Core Hosting Bundle found here.
Configure IIS
- After you have downloaded and extracted the SafeSend Web add-in .zip files, create a folder called SafeSend in the c:\ directory of the server hosting IIS
- Copy the contents from the extracted folder to your new c:\SafeSend
- Open Internet Information Services (IIS) Manager
- Right-click on Sites
- Select Add Website and complete the following properties:
- Site Name: SafeSend
- Physical Path: c:\SafeSend
- In the Binding section:
- Type: https
- Add the SSL certificate
-
IP address and port should be according to your needs
- Click OK
- Select Default Website, then click on Stop in the right panel
- In the left panel, click Application Pools
- Right-click SafeSend
- Select Basic Settings
- .NET CLR version: No Managed Code
- Click OK
Edit the settings.json file
- Open the folder called SafeSend that you created in the c:\ directory of the server hosting IIS
- Look for the file called settings.json and right-click on the file and open it with Notepad
- Adjust the following settings:
-
IsOffice365
- Default value is true
- If you are using Microsoft 365, IsOffice365 should be true
- If you are using an Exchange Server, IsOffice365 should be false and update the EmailProviderUrl below
-
EmailProviderURL
- If you are using Microsoft 365, the EmailProviderURL should already be correct
- The AppID and AppSecret values should have been obtained during the Graph API setup. If that has not been done, you should complete this now before proceeding.)
- If you are using an Exchange Server, you will need to update that setting as appropriate
- Set LicenseKey
- Set SafeDomains
- Set EnablePlatform to True if you will be using Web, PC, or Mac and False for the platforms you will not be using
- If you are using Microsoft 365, Web Add-in works for all 3 available platforms
- If you are using Exchange Server, Web Add-in does not work for Outlook for Mac or OWA in Safari
- For full details, the latest release notes
- If you intend to use both the PC add-in and the Web add-in, set the PC platform to False to avoid double prompts
-
IsOffice365
- Append /manifest to the URL to download the manifest.xml file; you will need this manifest or the URL to it when sideloading or deploying the add-in to users
Using SafeSend Web Add-in with a Different Tenant than the one you Registered the Application with
To use the SafeSend Web Add-in with a different tenant than the one you registered with, you will need access to a tenant administrator account to perform consent for all of your Microsoft 365 users.
- Browse to `https://login.microsoftonline.com/common/adminconsent?client_id={AppId}&state=12345`, where `{AppId}` is the application ID shown in your app registration
- Sign in with your administrator account, then review the permissions and click Accept
- The browser will attempt to redirect back to your app, which may not be running
- You might see a This Site cannot be Reached error after clicking Accept; this is okay as the consent was still recorded
When you are ready, move on to the next step below.
Add your Logo
SafeSend for Web - Add your Logo
...
You can customize the look and feel of the VIPRE SafeSend web add-in by uploading your organization's personalized logo. This optional step is a great way to integrate SafeSend with your organization seamlessly.
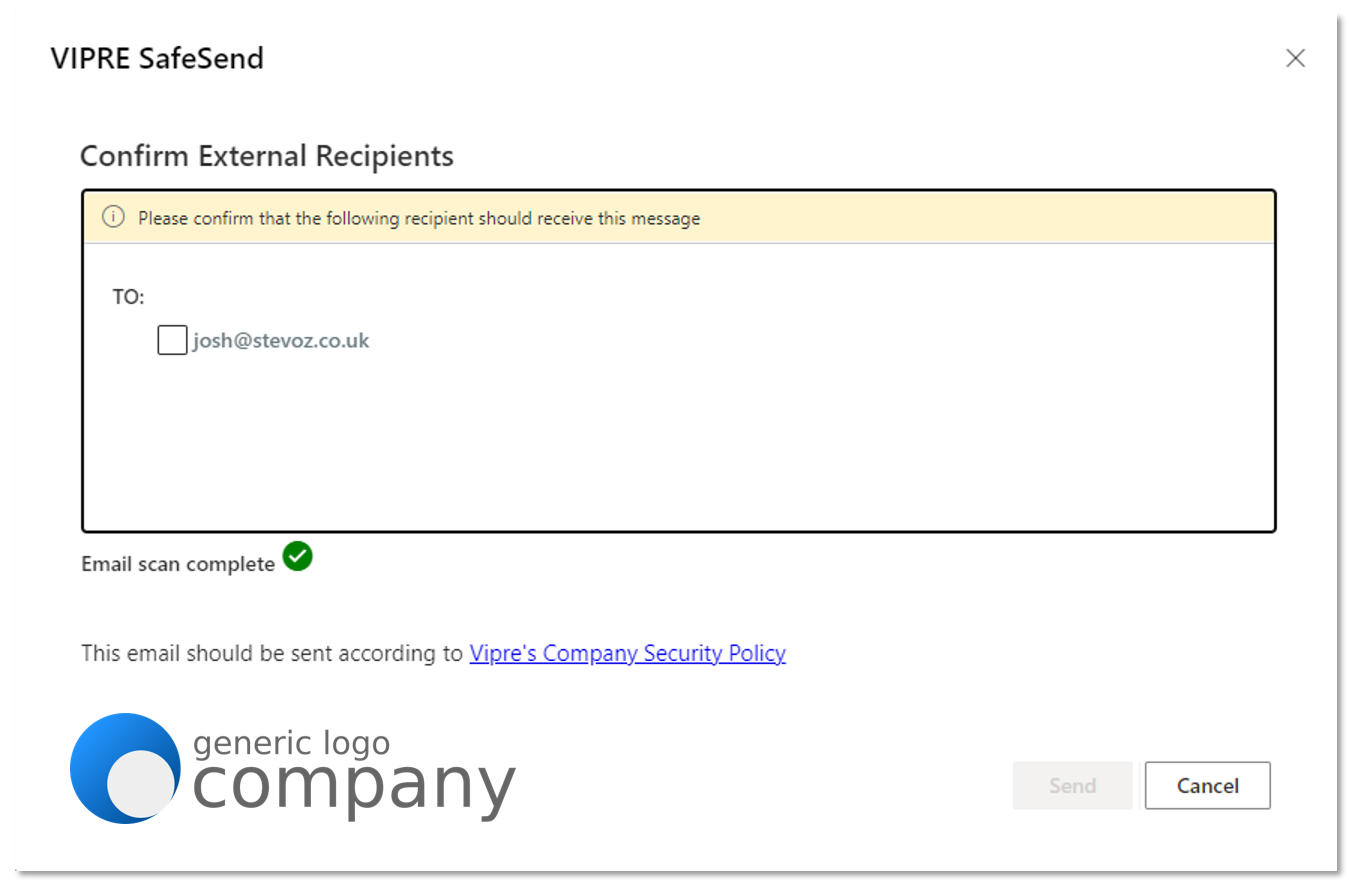
Image Requirements
Before uploading your logo, make sure it meets the following requirements:
- Image size must be no larger than 155x40
- Image type must be .png file type
- Images with transparent backgrounds are recommended so that your logo matches the rest of SafeSend.
Now that you have an image that meets the above requirements, let's upload it.
Add Logo
Change the following setting to change your logo in Azure or IIS:
| Setting | Description |
|---|---|
| LogoFilePath |
File path of .png file to use for confirmation logo. Overrides Logo setting if defined. This may be an absolute or relative path. The path must be accessible from within the context that the web addin is running and should be json escaped if it contains json characters. I.E. "C:\\logo.png"
"LogoFilePath": "logo.png", |
Click here for Azure instructions
When using the LogoFilePath setting, please note the path must be accessible from within the context of the Web Add-in.
- Upload your logo to your SafeSend site by completing the following:
- Copy your logo to a local copy of the SafeSend Web Add-in package directory and create a new .zip package
- Use the FTP client of your choosing to upload your logo to the SafeSend Web Add-in package directory on your SafeSend site
- In Azure, go to the SafeSend web app you previously created
- On the left-side menu, under Settings, click Configuration
- Select +New Application
- Add new setting LogoFilePath using the following syntax: "LogoFilePath": "logo.png", with logo.png as the image name and extension of the logo image you uploaded in Step 1
- Click OK
- Click Save
- Click Continue
Allow a few minutes after the service restarts for the changes to appear.
Click here for IIS instructions
When using the LogoFilePath setting, please note the path must be accessible from within the context of the Web Add-in.
- Open settings.json with administrative privileges using the text editor of your choosing
- Locate //"LogoFilePath": "",
- Remove the // at the beginning of the line and add the image name and extension of your logo image
- Example: "LogoFilePath": "logo.png",
- Save your changes and restart the SafeSend site
Allow a few minutes after the service restarts for the changes to appear.
Congratulations! Now, your logo is part of SafeSend.
When you are ready, move on to the next step below.
Deploy SafeSend Web Add-in
Deploy SafeSend Web Add-in
When using the SafeSend web add-in, there are two ways to deploy this to your org...
When using the SafeSend web add-in, there are two ways to deploy this to your organization:
- Microsoft 365
- Exchange 2019
Refer to the latest release notes for full system requirements.
Centralized Deployment via Microsoft 365 Admin Center
For full, up-to-date, details on deploying add-ins in Microsoft 365, visit https://docs.microsoft.com/en-us/microsoft-365/admin/manage/manage-deployment-of-add-ins?view=o365-worldwide.
Deployment via Exchange 2019
For full, up-to-date, details on deploying add-ins for Outlook in Exchange, visit https://docs.microsoft.com/en-us/exchange/clients-and-mobile-in-exchange-online/add-ins-for-outlook/add-ins-for-outlook
Congratulations! VIPRE's SafeSend web add-in has now been successfully deployed to the end-users in your organization.
Security Awareness Training for Edge
Before you get started, you should have received a Welcome email that contains important information you'll need to proceed with this guide. If you haven't received this email, please check your spam folder or contact Support.
There are several things that will need to be completed before you are able to deploy VIPRE Security Awareness Training.
What we need from you
Sometimes it can be confusing to try to figure out what you need to do to get started. Here we eliminate that confusion and lay it all out as simply as possible.
- Company Name
- Customer Contact Name
- Customer Email Address (both primary and admin)
- Product Selection
- Number of users/learners
- List of end-users in a CSV file
- Confirmation that all prerequisite action items have been completed
The majority of these items are obtained when you respond to the Onboarding/Account Setup email.
Action Items Checklist
On top of the required items above, we've put together a check-list of things you'll need to complete on your end to ensure VIPRE SAT and PhishProof works properly.
Info
The following information discusses white-listing via domain. If your organization prefers to white-list via IP address, please contact us for that information.
- Notify your IT department that we will be sending simulated phishing emails from outside of your network
- The following white-listing tasks must be completed in Intrusion Detection System/Firewall, Client-side Email Filters, and Server-side Email Filters to ensure emails are delivered successfully to the end-user:
- Domain name of the SMTP Relay used by the application: smtp.mailgun.org
- Location that hosts the landing pages in your web filtering software (if applicable): *phishproof.com
- Domains used when sending Phishproof email templates:
- accountsecurity.online
- amznbks.com
- bankameriica.com
- certifyjob.com
- clickweb.solutions
- faceboookfriendster.com
- filescanners.org
- formsmail.com
- funitgames.org
- googllesecurity.net
- ibsbanks.com
- mailsystems.online
- phishproof.com
- securityadmin.net
- securityalert.org
- securityawarenesstraining.com
- starrwood.net
- systemadsmin.org
- twitttersocialpage.com
- upssite.com
- uspostallservice.com
- wallgreenspharm.com
- web-access-alerting.com
- boxfilesshare.com
- docutransfers.com
- employee-rewards.net
- hr-rewardscenter.com
- hq-administrators.com
- itpatching-installs.com
- corp-addmin.com
- admin-tokenalert.com
- sso-server.com
- login-microsoft.com
- Adjust any other settings as needed to ensure the simulated phishing emails flow properly to your end-users
What VIPRE takes care of
Once we've received all of the above information from you, we'll get to work on the following:
- Configuration of VIPRE SAT (Security Awareness Training) with the provided company name and domain
- Sending a registration email
- Registration of users with the selected learning path
- Configuration of automatic reminders for all courses bi-weekly on predefined cadence
- e.g. Every two weeks, learners will receive automated reminders to complete their courses
System Requirements
Browsers
- Google Chrome 75+
- Mozilla Firefox 66+
- Microsoft Edge 89+
- Apple Safari 13.0.2+
Additional Requirements
- Required bandwidth per host machine of 4 Mbps download and .5 Mbps upload
- iPad access is supported only for HTML5-based courses in the latest version of iPadOS with Safari
- Operating System and browser zoom levels at 100%
- Screen resolution of 1024x768 or 1920x1080
- Ability to play .mp4 videos
Not Supported
VIPRE User Protection does not officially support training using the following:
- Thin Clients (Citrix / Virtual Desktops)
- VPN Connections
- Proxy Connections
- Internet Explorer Compatibility mode
PhishProof
Ensure your computers meet the following requirements:
Email Clients
- MS Outlook 2003+
- Hotmail
- Gmail
- Yahoo Mail
Browsers
- Chrome 71+
- Firefox 65+
- Internet Explorer 9+
- Safari 11.1.2+